Spring Boot 2.1.6+Spring Data Elasticsearch 3.1.9+ElasticsearchTemplate整合笔记
一直在网上没找到一篇完整的spring boot+spring data es的文章,很零碎,而且坑很多,正好目前的项目需要用到这个,所以把我整合的笔记分享给大家,有不足指出欢迎留言,好了废话少说,言归正传。
一、Docker安装ES,安装ik分词器,安装ES-Head
1、Docker 安装ES5.6和运行
$ docker pull elasticsearch:5.6.16
$ docker run --name elasticsearch5 -d -p 9200:9200 -p 9300:9300 -e ES_JAVA_OPTS="-Xms512m -Xmx512m" elasticsearch:5.6.16
测试ES:http://127.0.0.1:9200
# 成功返回:
{
"name": "BoXX4Ky",
"cluster_name": "elasticsearch",
"cluster_uuid": "arsPH8JsSJm3-VHH1muQUQ",
"version": {
"number": "5.6.16",
"build_hash": "3a740d1",
"build_date": "2019-03-13T15:33:36.565Z",
"build_snapshot": false,
"lucene_version": "6.6.1"
},
"tagline": "You Know, for Search"
}
2、拷贝配置文件到宿主主机
$ mkdir -p /Users/kevin/Work/docker-test/es
$ docker cp elasticsearch5:/usr/share/elasticsearch/config/elasticsearch.yml /Users/kevin/Work/docker-test/es/elasticsearch.yml
修改elasticsearch.yml,增加远程访问配置
$ vi /Users/kevin/Work/docker-test/es/elasticsearch.yml
# 增加以下内容:
http.cors.enabled: true
http.cors.allow-origin: "*"
http.port: 9200 #http端口
transport.tcp.port: 9300 #java端口
network.bind_host: 0.0.0.0 #可以访问es集群的ip  0.0.0.0表示不绑定
network.publish_host: 0.0.0.0 #es集群相互通信的ip  0.0.0.0默认本地网络搜索
3、停止和删除原来创建的容器
$ docker rm -f elasticsearch54、重新执行创建容器命令
$ docker run -di --name=elasticsearch5 -p 9200:9200 -p 9300:9300 -e ES_JAVA_OPTS="-Xms512m -Xmx512m" -v /Users/kevin/Work/docker-test/es/elasticsearch.yml:/usr/share/elasticsearch/config/elasticsearch.yml elasticsearch:5.6.165、安装ik分词器(在宿主主机下载ik,版本必须和es一致,否则有有问题,据官方说明,5.x以后不支持在线安装插件,参考:[https://www.elastic.co/guide/en/elasticsearch/reference/5.0/breaking_50_plugins.html#_site_plugins_removed],所以得下载到本地)
$ cd /Users/kevin/Work/docker-test/es
$ wget https://github.com/medcl/elasticsearch-analysis-ik/releases/download/v5.6.16/elasticsearch-analysis-ik-5.6.16.zip
$ unzip elasticsearch-analysis-ik-5.6.16.zip
$ mv elasticsearch ik
6、在宿主机中将ik文件夹拷贝到容器内 /usr/share/elasticsearch/plugins 目录下
$ docker cp ik elasticsearch5:/usr/share/elasticsearch/plugins/7、重新启动,以加载IK分词器
$ docker restart elasticsearch5测试ik分词是否生效,创建一个叫test1的索引
$ curl -X PUT http://localhost:9200/test1
成功返回:
{"acknowledged":true,"shards_acknowledged":true,"index":"test1"}
测试ik_smart分词器:
# ik_smart分词
$ curl -X POST \'http://127.0.0.1:9200/test1/_analyze?pretty=true' \-H 'Content-Type: application/json' \-d '{"text":"我们是软件工程师","tokenizer":"ik_smart"}'
成功返回:
{"tokens" : [{"token" : "我们","start_offset" : 0,"end_offset" : 2,"type" : "CN_WORD","position" : 0},{"token" : "是","start_offset" : 2,"end_offset" : 3,"type" : "CN_CHAR","position" : 1},{"token" : "软件","start_offset" : 3,"end_offset" : 5,"type" : "CN_WORD","position" : 2},{"token" : "工程师","start_offset" : 5,"end_offset" : 8,"type" : "CN_WORD","position" : 3}]
}
测试ik_max_word分词器:
$ curl -X POST \'http://127.0.0.1:9200/test1/_analyze?pretty=true' \-H 'Content-Type: application/json' \-d '{"text":"我们是软件工程师","tokenizer":"ik_max_word"}'
成功返回:
{"tokens" : [{"token" : "我们","start_offset" : 0,"end_offset" : 2,"type" : "CN_WORD","position" : 0},{"token" : "是","start_offset" : 2,"end_offset" : 3,"type" : "CN_CHAR","position" : 1},{"token" : "软件工程","start_offset" : 3,"end_offset" : 7,"type" : "CN_WORD","position" : 2},{"token" : "软件","start_offset" : 3,"end_offset" : 5,"type" : "CN_WORD","position" : 3},{"token" : "工程师","start_offset" : 5,"end_offset" : 8,"type" : "CN_WORD","position" : 4},{"token" : "工程","start_offset" : 5,"end_offset" : 7,"type" : "CN_WORD","position" : 5},{"token" : "师","start_offset" : 7,"end_offset" : 8,"type" : "CN_CHAR","position" : 6}]
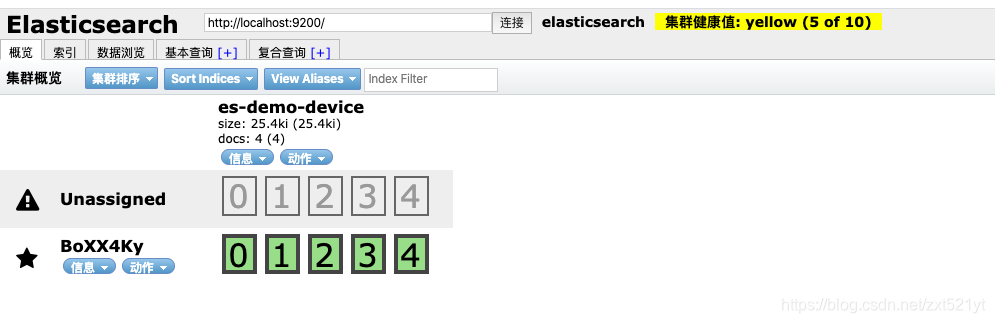
}8、Docker安装ES-Head和启动
$ docker pull mobz/elasticsearch-head:5
$ docker run --name es-head -d -p 9100:9100 mobz/elasticsearch-head:5
测试ES-Head:http://localhost:9100/

二、Spring Boot 2.1.6 集成Spring Data ElasticSearch 3.1.9
1、Pom.xml引入依赖包
org.projectlombok lombok 1.18.10 provided
org.springframework.data spring-data-elasticsearch 3.1.9.RELEASE
org.elasticsearch.client transport 6.2.4
2、修改application.yml,增加es配置
spring:application:name: es-demo data:elasticsearch:index-prefix: es-demo-dev #给索引加一个前缀好区分生产环境或者dev环境cluster-name: elasticsearch #访问http://localhost:9200返回的cluster_name值cluster-nodes: 127.0.0.1:9300 #9300是和es的通信端口3、创建索引mapping对象
/*** 存入es的数据结构* @author kevin**/
@Data
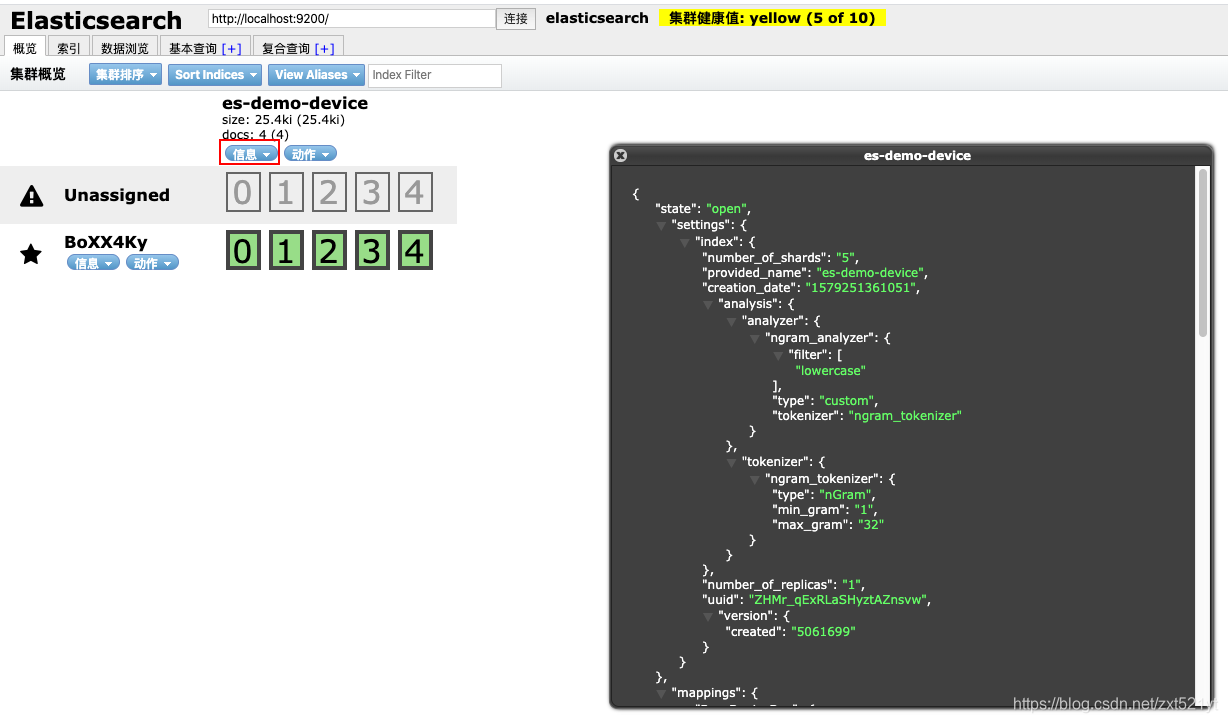
/*索引名叫device-statistic,但是我们配了前缀${spring.data.elasticsearch},*所以在创建索引的时候会加上前缀,也可以不加前缀,那就存入es的索引名就是这个.*es7以后废弃掉type了,但是我用的5.6,所以还可以使用type,这里的type名就是BaseDeviceDoc*es的分片数是5,每个分片有1个副本*refreshInterval = "-1"表示禁止索引自动实时刷新数据到磁盘,提高索引的写入速度,默认是1s*/
@Document(indexName = "device", type = "BaseDeviceDoc", shards = 5, replicas = 1, refreshInterval = "-1")
//索引的setting配置
@Setting(settingPath = "/es/document_index_setting.json")
//索引的mapping配置
@Mapping(mappingPath = "/es/document_index_mapping.json")
public class BaseDeviceDoc implements Serializable {//@Id注解表示对应索引里的主键ID@Idprivate String sn;private String name;private String owner;private String deviceType;private String mergeType;private Integer deployFlag; private Date updateTime;private Date createTime;private Long deployTimestamp;private String deviceDomain;private List tags;private List spaceIds;
} (1)对于上面的refreshInterval = "-1"的理解:-1并不代表es不会将数据写入磁盘,当一个文档被索引时,它会被添加到内存缓冲区并加到translog文件中。默认情况下,当translog的大小达到512mb时,或者在30分钟之后,会将数据持久存储在磁盘上。
(2)因为在mapping.json中指定了每个字段的分词器,所以上面的数据结构无需指定,如果没写mapping.json,则spring data会根据这个对象创建一套mapping,但这套mapping可能会跟你所想的会不一样,所以不建议用spring data默认生成的配置。
4、在resource目录下新建一个es目录,并创建document_index_setting.json和document_index_mapping.json,document_index_setting.json的内容如下:
{"index":{"number_of_shards":5,"number_of_replicas":1,"analysis":{"tokenizer":{"ngram_tokenizer":{"type":"nGram","min_gram":1,"max_gram":32}},"analyzer":{"ngram_analyzer":{"type":"custom","tokenizer":"ngram_tokenizer","filter": ["lowercase"]}}}}
}注:关于setting.json的格式请参考官方github文档:https://github.com/spring-projects/spring-data-elasticsearch/blob/master/src/test/resources/settings/test-settings.json 网上有很多格式都是带上"settings",这是错误的配置,会不起作用
上面我配了一个ngram分词器,用于对sn进行分词检索,min_gram=1,max_gram=32。(关于ngram原理请自己自行度娘)
document_index_mapping.json的内容如下:
{"properties": {"sn": {"type": "text","index": "analyzed","analyzer": "ngram_analyzer","search_analyzer": "ngram_analyzer","fielddata": true},"deviceType": {"type": "keyword"},"owner": {"type": "keyword"},"mergeType": {"type": "keyword"},"updateTime": {"type": "date"},"tags": {"type": "text","index": "analyzed","analyzer": "ik_max_word","search_analyzer": "ik_max_word"},"createTime": {"type": "date"},"deviceDomain": {"type": "keyword"},"name": {"type": "text","index": "analyzed","analyzer": "ik_max_word","search_analyzer": "ik_max_word","fielddata": true},"deployFlag": {"type": "long"},"deployTimestamp": {"type": "long"},"spaceIds": {"type": "text"}}
}同理,关于mapping.json的格式请参考官方github文档:https://github.com/spring-projects/spring-data-elasticsearch/blob/master/src/test/resources/mappings/test-mappings.json
5、单元测试(这里没用Spring Data的Repository,而是用ElasticsearchTemplate,原因是ElasticsearchTemplate提供的API更加灵活)
import com.alibaba.fastjson.JSONObject;
import com.google.common.collect.Lists;
import com.google.common.collect.Maps;
import com.sensoro.appsdata.statistics.entity.es.BaseDeviceDoc;
import lombok.extern.slf4j.Slf4j;
import org.apache.commons.lang3.StringUtils;
import org.elasticsearch.common.collect.MapBuilder;
import org.elasticsearch.index.query.Operator;
import org.elasticsearch.index.query.QueryBuilders;
import org.junit.Before;
import org.junit.Test;
import org.junit.runner.RunWith;
import org.springframework.beans.factory.annotation.Autowired;
import org.springframework.beans.factory.annotation.Value;
import org.springframework.boot.test.context.SpringBootTest;
import org.springframework.data.domain.Page;
import org.springframework.data.domain.PageRequest;
import org.springframework.data.domain.Pageable;
import org.springframework.data.domain.Sort;
import org.springframework.data.elasticsearch.annotations.Mapping;
import org.springframework.data.elasticsearch.annotations.Setting;
import org.springframework.data.elasticsearch.core.ElasticsearchTemplate;
import org.springframework.data.elasticsearch.core.mapping.ElasticsearchPersistentEntity;
import org.springframework.data.elasticsearch.core.query.IndexQuery;
import org.springframework.data.elasticsearch.core.query.IndexQueryBuilder;
import org.springframework.data.elasticsearch.core.query.NativeSearchQueryBuilder;
import org.springframework.data.elasticsearch.core.query.SearchQuery;
import org.springframework.test.context.junit4.SpringRunner;import java.util.*;@RunWith(SpringRunner.class)
@SpringBootTest
@Slf4j
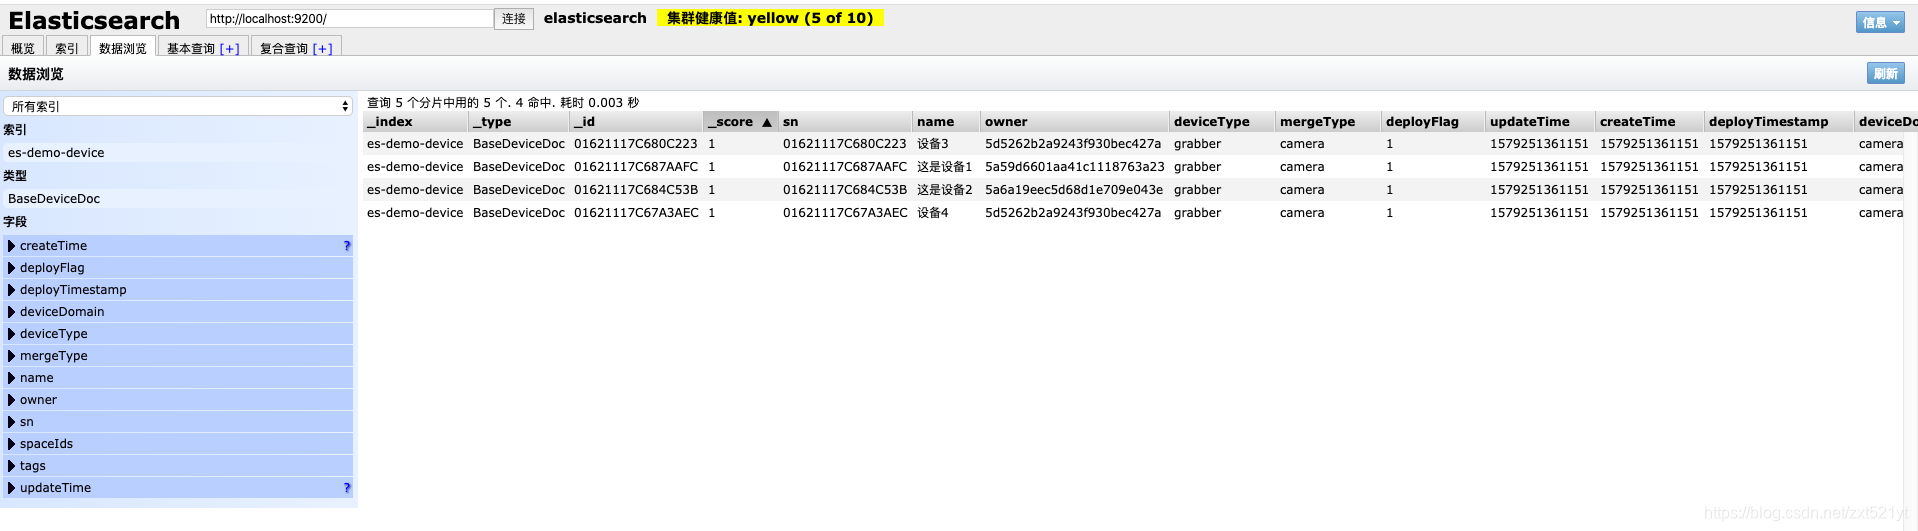
public class IndexTest {//索引前缀@Value("${spring.data.elasticsearch.index-prefix}")private String indexPrefix;@AutowiredElasticsearchTemplate elasticsearchTemplate;private String INDEX_NAME = null;private String INDEX_TYPE = null;@Beforepublic void setUp() {//通过调用elasticsearchTemplate.getPersistentEntityFor()方法获取上面对象定义的indexName后缀和typeINDEX_NAME = indexPrefix + "-" + elasticsearchTemplate.getPersistentEntityFor(BaseDeviceDoc.class).getIndexName();INDEX_TYPE = elasticsearchTemplate.getPersistentEntityFor(BaseDeviceDoc.class).getIndexType();}/*** 创建索引*/@Testpublic void testCreateIndex(){//先删除索引elasticsearchTemplate.deleteIndex(INDEX_NAME);//再创建索引elasticsearchTemplate.createIndex(INDEX_NAME, createIndexWithSettings(BaseDeviceDoc.class));//调用putMappingelasticsearchTemplate.putMapping(INDEX_NAME, INDEX_TYPE, getMapping(BaseDeviceDoc.class));System.out.println("=============testCreateIndex end===============");}/*** 批量插入*/@Testpublic void testBatchInsertIndex() {List list = Lists.newArrayList();BaseDeviceDoc device = new BaseDeviceDoc();device.setSn("01621117C687AAFC");device.setName("这是设备1");device.setDeployFlag(1);device.setDeployTimestamp(new Date().getTime());device.setDeviceDomain("camera_domain");device.setDeviceType("grabber");device.setMergeType("camera");device.setOwner("5a59d6601aa41c1118763a23");device.setTags(Lists.newArrayList("中华","人民共和国"));device.setUpdateTime(new Date());device.setCreateTime(new Date());BaseDeviceDoc device2 = new BaseDeviceDoc();device2.setSn("01621117C684C53B");device2.setName("这是设备2");device2.setDeployFlag(1);device2.setDeployTimestamp(new Date().getTime());device2.setDeviceDomain("camera_domain");device2.setDeviceType("grabber");device2.setMergeType("camera");device2.setOwner("5a6a19eec5d68d1e709e043e");device2.setTags(Lists.newArrayList("测试tag1","tag2"));device2.setUpdateTime(new Date());device2.setCreateTime(new Date());BaseDeviceDoc device3 = new BaseDeviceDoc();device3.setSn("01621117C680C223");device3.setName("设备3");device3.setDeployFlag(1);device3.setDeployTimestamp(new Date().getTime());device3.setDeviceDomain("camera_domain");device3.setDeviceType("grabber");device3.setMergeType("camera");device3.setOwner("5d5262b2a9243f930bec427a");device3.setTags(Lists.newArrayList("测试tag2","tag3"));device3.setUpdateTime(new Date());device3.setCreateTime(new Date());BaseDeviceDoc device4 = new BaseDeviceDoc();device4.setSn("01621117C67A3AEC");device4.setName("设备4");device4.setDeployFlag(1);device4.setDeployTimestamp(new Date().getTime());device4.setDeviceDomain("camera_domain");device4.setDeviceType("grabber");device4.setMergeType("camera");device4.setOwner("5d5262b2a9243f930bec427a");device4.setTags(Lists.newArrayList("报警"));device4.setUpdateTime(new Date());device4.setCreateTime(new Date());list.add(device);list.add(device2);list.add(device3);list.add(device4);batchInsertOrUpdateIndex(list);System.out.println("=============testBatchInsertIndex end===============");}/*** 分页搜索*/@Testpublic void testSearchByPage() {Sort sort = new Sort(Sort.Direction.DESC, "name");//以name降序排列Pageable pageable = PageRequest.of(0, 10, sort);//查看第0页,以每页10条划分List owners = Lists.newArrayList("5d5262b2a9243f930bec427a", "5a695886482c8e29ce7f9cab");String keyword = "23";SearchQuery searchQuery = new NativeSearchQueryBuilder().withIndices(INDEX_NAME).withTypes(INDEX_TYPE)//加上and表示不对输入的词进行分词,表示完全匹配,默认是or,即分词查询.withQuery(QueryBuilders.multiMatchQuery(keyword, "sn", "name", "tags").operator(Operator.AND)) // 自定义查询(这是不同的地方).withFilter(QueryBuilders.boolQuery().must(QueryBuilders.termsQuery("owner", owners)).must(QueryBuilders.termsQuery("deployFlag", "1"))).withPageable(pageable) // 自定义分页.build();Page sampleEntities = elasticsearchTemplate.queryForPage(searchQuery, BaseDeviceDoc.class);JSONObject jsonObject = new JSONObject();System.out.println("页数" + sampleEntities.getTotalPages());System.out.println("行数" + sampleEntities.getTotalElements());System.out.println("大小" + sampleEntities.getSize());System.out.println("当前第几页" + sampleEntities.getNumber());System.out.println("当前页的数量"+sampleEntities.getNumberOfElements());System.out.println("List: "+ jsonObject.toJSONString(sampleEntities.getContent()));}/*** 根据用户自定义的setting创建索引(重写elasticsearchTemplate.createIndexWithSettings(Class clazz))* @param clazz* @param * @return*/private String createIndexWithSettings(Class clazz) {if (clazz.isAnnotationPresent(Setting.class)) {String settingPath = clazz.getAnnotation(Setting.class).settingPath();if (!org.springframework.util.StringUtils.isEmpty(settingPath)) {String settings = elasticsearchTemplate.readFileFromClasspath(settingPath);if (!StringUtils.isEmpty(settings)) {return settings;}} else {log.info("settingPath in @Setting has to be defined. Using default instead.");}}JSONObject jsonObject = new JSONObject(getDefaultSettings(elasticsearchTemplate.getPersistentEntityFor(clazz)));return jsonObject.toJSONString();}/*** 获取默认的setting(重写elasticsearchTemplate.getDefaultSettings(ElasticsearchPersistentEntity persistentEntity))** @param persistentEntity* @param * @return*/private Map getDefaultSettings(ElasticsearchPersistentEntity persistentEntity) {if (persistentEntity.isUseServerConfiguration())return new HashMap();return new MapBuilder().put("index.number_of_shards", String.valueOf(persistentEntity.getShards())).put("index.number_of_replicas", String.valueOf(persistentEntity.getReplicas())).put("index.refresh_interval", persistentEntity.getRefreshInterval()).put("index.store.type", persistentEntity.getIndexStoreType()).map();}/*** 获取用户自定义的mapping(重写elasticsearchTemplate.getMapping(Class clazz))** @param clazz* @param * @return*/private String getMapping(Class clazz) {if (clazz.isAnnotationPresent(Mapping.class)) {String mappingPath = clazz.getAnnotation(Mapping.class).mappingPath();if (!StringUtils.isEmpty(mappingPath)) {String mappings = elasticsearchTemplate.readFileFromClasspath(mappingPath);if (!StringUtils.isEmpty(mappings)) {return mappings;}} else {log.info("mappingPath in @Mapping has to be defined. Building mappings using @Field");}}JSONObject jsonObject = new JSONObject(Maps.newHashMap());return jsonObject.toJSONString();}/*** 批量更新索引* @param list* @return*/private boolean batchInsertOrUpdateIndex(List list) {try {List queries = new ArrayList();for (BaseDeviceDoc t : list) {IndexQuery indexQuery = new IndexQueryBuilder().withIndexName(INDEX_NAME).withObject(t).build();queries.add(indexQuery);}elasticsearchTemplate.bulkIndex(queries);} catch (Exception e) {e.printStackTrace();return false;}return true;}}
测试结果:
# 单元测试结果
页数1
行数1
大小10
当前第几页0
当前页的数量1
List: [{"createTime":1579251361151,"deployFlag":1,"deployTimestamp":1579251361151,"deviceDomain":"camera_domain","deviceType":"grabber","mergeType":"camera","name":"设备3","owner":"5d5262b2a9243f930bec427a","sn":"01621117C680C223","tags":["测试tag2","tag3"],"updateTime":1579251361151}]
本文来自互联网用户投稿,文章观点仅代表作者本人,不代表本站立场,不承担相关法律责任。如若转载,请注明出处。 如若内容造成侵权/违法违规/事实不符,请点击【内容举报】进行投诉反馈!