RabbitMQ之如何保证消息的可靠性与Spring AMQP特性
RabbitMQ之如何保证消息的可靠性与Spring AMQP特性
- 主流消息中间件
- ActiveMQ
- RabbitMQ
- RocketMQ
- Kafka
- RabbitMQ相关术语
- Erlang
- AMQP协议
- Exchange
- RabbitMQ的安装
- Windows安装
- Linux安装
- 网页端管理工具
- 命令行工具的使用
- 状态查看
- 用户相关
- 应用启停
- 集群相关
- 镜像队列
- RabbitMQ的基本使用
- 添加依赖
- 配置RabbitMQ
- 消费者监听消息
- 生产者发送消息
- 执行测试
- 如何保证消息的可靠性
- 发送方
- 发送端确认机制
- 消息返回机制
- 消费方
- 消费端确认机制
- 重回队列
- 消费端限流机制
- RabbitMQ
- 消息过期机制
- 死信队列
- Spring AMQP特性
- 1.RabbitAdmin
- 配置RabbitMQ服务
- 简化配置RabbitMQ服务
- 2.RabbitTemplate发送消息
- 3.发送端确认、消息返回确认
- 4.消息监听容器
- 5.自定义消息监听容器
- 简单模式
- 高阶模式
- 6.MessageConverter消息转换
- 使用Jackson2JsonMessageConverter
- 使用ClassMapper
- 7.RabbitListener
主流消息中间件
ActiveMQ
概述
由 Apache出品,Java开发,支持JMS1.1协议和J2EE14规范。支持广泛的连接协议: OpenWire/STOMP/REST/XMPP/AMQP支持多种语音客户端,支持插件管理方便,便于配置集群代理
优点
基于AVA,跨平台运行可以用BC连接多种数据库有完善的界面、监控、安全机制自动重连和错误重试
缺点
社区活跃度不及 RabbitMO目前重心放到60产品 Apollo,对5的Bug维护较少不适合用于上千个队列的应用场景
RabbitMQ
概述
当前最主流的消息中间件高可靠性,支持发送确认,投递确认等特性高可用,支持镜像队列支持插件
优点
基于 Erlang,支持高并发支持多种平台,多种客户端,文档齐全可靠性高在互联网公司有较大规模的应用,社区活跃度高
缺点
Erlang语音较为小众,不利于二次开发代理架构下,中央节点增加了延迟,影响性能使用AMQP协议,使用起来有学习成本
RocketMQ
概述
阿里巴巴团队开发,经受双十一考验能够保证严格的消息顺序亿级消息堆积能力丰富的消息拉取模式
优点
基于Java,方便二次开发单机支持1万以上持久化队列内存与磁盘都有一份数据,保证性能+高可用开发度较活跃,版本更新很快
缺点
客户端种类不多,较成熟的是Java及C++没有Web管理界面,提供了一个CL(命令行界面)社区关注度及成熟度不如 RabbitMQ
Kafka
概述
LinkedIn开发的分布式的日志提交系统独特的分区特性,适用于大数据系统性能高效、可扩展良好可复制、可容错
优点
原生的分布式系统零拷贝技术,减少IO操作步骤,提高系统吞吐量快速持久化:可以在O(1)的系统开销下进行消息持久化支持数据批量发送和拉取
缺点
单机超过64个队列/分区时,性能明显劣化使用短轮询方式,实时性取决于轮询间隔时间消费失败不支持重试可靠性比较差
RabbitMQ相关术语
Erlang
Erlang语言由爱立信公司开发,是一门为交换机软件开发诞生的编程语言
特点
通用的面向并发的编程语言,适用于分布式系统基于虚拟机解释运行,跨平台部署进程间上下文切换效率远高于C语言有着和原生 Socket一样的延迟
RabbitMQ底层使用Erlang实现,因此具有高性能的特性
AMQP协议
AMQP(Advanced Message Queuing Protocol,高级消息队列协议)是一个进程间传递异步消息的网络协议。


Broker:接收和分发消息的应用, RabbitMQ就是 Message BrokerVirtual host:虚拟 Broker,将多个单元隔离开Connection: publisher/ consumer和 broker之间的TCP连接Channel: connection內部建立的逻辑连接,通常每个线程创建单独的 channelRouting Key:路由键,用来指示消息的路由转发相当于快递的地址Exchange:交换机,相当于快递的分拔中心Queue:消息队列,消息最终被送到这里等待 consumer取走Binding: exchange和 queue之间的虚拟连接用于 message的分发依据
Exchange
在AMQP协议或者是 RabbitMQ实现中,最核心的组件是Exchange,承担 RabbitMO的核心功能——路由转发
作用
Exchange是AMQP协议和RabbitMQ的核心组件Exchange的功能是根据绑定关系和路由键为消息提供路由将消息转发至相应的队列Exchange有4种类型:Direct/Topic/Fanout/Headers 其中Headers使用很少,以前三种为主
1.Direct Exchange
Direct Exchange(直接路由),Message中的Routing Key如果和Binding Key一致,Direct Exchange则将message发到对应的queue中
2.Fanout Exchange
Fanout Exchange(广播路由),每个发到Fanout Exchange的message都会分发到所有绑定的queue上去
3.Topit Exchange
Topit Exchange(话题路由),根据Routing Key及通配规则,Topic Exchange将消息分发到目标Queue中
全匹配:与Direct类似
Binding Key中的#:匹配任意个数的wordBinding Key中的*:匹配任意1个word
RabbitMQ的安装
Windows安装
安装Erlang OTP https://www.erlang.org/downloads
装RabbitMQ https://www.rabbitmq.com/
Linux安装
基于Docker安装
docker run -it --rm --name rabbitmq -p 5672:5672 -p 15672:15672 rabbitmq:3-management
网页端管理工具
RabbitMQ网页端管理工具也叫管理控制台、管控台管理控制台是RabbitMQ最常用的管理、配置工具管理控制台对于业务的开发、调试也非常有用
启用前端插件
启动应用: 进入bin目录执行 rabbitmq-plugins enable rabbitmq management浏览器打开:127.0.0.1:15672默认用户名: guest默认密码: guest
功能
概览:查看节点/集群状态连接:查看connection通道:查看channel交换机:查看、操作交换机状态队列:查看、操作队列状态管理:高级管理功能
命令行工具的使用
状态查看
查看状态:rabbitmqctl status查看绑定:rabbitmqctl list_bindings查看channel:rabbitmqctl list_channels查看connection:rabbitmqctl list_connections查看消费者:rabbitmqctl list_consumers查看交换机:rabbitmqctl list_exchanges查看队列:rabbitmqctl list_queues删除队列:rabbitmqctl delete_queue清空队列:rabbitmqctl purge_queue
用户相关
新建用户:rabbitmqctl add_user修改用户密码:rabbitmqctl change_password查看用户:rabbitmqctl list_users设置用户角色:rabbitmqctl rabbitmqctl set_user_tags
应用启停
启动应用:rabbitmqctl start_app关闭应用:rabbitmqctl stop_app,保留Erlang虚拟机(暂停)关闭应用:rabbitmqctl stop,并关闭Erlang虚拟机
集群相关
加入集群:rabbitmqctl join_cluster离开集群:rabbitmqctl reset
镜像队列
设置镜像队列:rabbitmqctl sync_queue取消镜像队列:rabbitmqctl cancel_sync_queue
RabbitMQ的基本使用
添加依赖
<dependency><groupId>org.springframework.boot</groupId><artifactId>spring-boot-starter-amqp</artifactId></dependency>
配置RabbitMQ
申明Exchange申明Queue申明交换机与队列绑定
public void initMq(Channel channel) throws IOException, TimeoutException, InterruptedException {log.info("-------MQ交换机,队列,绑定关系初始化开始---------");log.info("-------申明交换机开始---------");/*** 申明交换机* 交换机名称 路由模式 是否持久化 是否自动删除 特殊参数*/channel.exchangeDeclare("exchange.test", BuiltinExchangeType.DIRECT, true, false, null);log.info("-------申明队列开始---------");/*** 声明一个队列** 参数:* queue – 队列的名称* 持久 - 如果我们声明一个持久队列,则为真(该队列将在服务器重启后继续存在)* 独占 – 如果我们声明独占队列(仅限于此连接),则为 true* autoDelete – 如果我们声明一个自动删除队列,则为 true(服务器将在不再使用时将其删除)* 参数 - 队列的其他属性(构造参数*/channel.queueDeclare("queue.test", true, false, false, null);log.info("-------申明交换机与队列绑定关系开始---------");/*** 将队列绑定到交换** 参数:* queue – 队列的名称* exchange – 交易所的名称* routingKey – 用于绑定的路由key*/channel.queueBind("queue.test", "exchange.test", "key.test");}消费者监听消息
使用异步线程新开线程进行消息监听,需创建线程池,防止可能引发线程爆炸问题
配置线程池
ThredPoolTaskExcutor的处理流程
当池子大小小于corePoolSize,就新建线程,并处理请求当池子大小等于corePoolSize,把请求放入workQueue中,池子里的空闲线程就去workQueue中取任务并处理当workQueue放不下任务时,就新建线程入池,并处理请求,如果池子大小撑到了maximumPoolSize,就用RejectedExecutionHandler来做拒绝处理当池子的线程数大于corePoolSize时,多余的线程会等待keepAliveTime长时间,如果无请求可处理就自行销毁
@Configuration
@EnableAsync
public class AsyncTaskConfig implements AsyncConfigurer {@Override@Beanpublic Executor getAsyncExecutor() {ThreadPoolTaskExecutor threadPool = new ThreadPoolTaskExecutor();//设置核心线程数threadPool.setCorePoolSize(10);//设置最大线程数threadPool.setMaxPoolSize(100);//线程池所使用的缓冲队列threadPool.setQueueCapacity(10);//等待任务在关机时完成--表明等待所有线程执行完threadPool.setWaitForTasksToCompleteOnShutdown(true);// 等待时间 (默认为0,此时立即停止),并没等待xx秒后强制停止threadPool.setAwaitTerminationSeconds(60);//  线程名称前缀threadPool.setThreadNamePrefix("MQ-Async-");// 初始化线程threadPool.initialize();return threadPool;}@Overridepublic AsyncUncaughtExceptionHandler getAsyncUncaughtExceptionHandler() {return null;}
}
消息监听方法
private void startMessageMonitoring(Channel channel) throws IOException {log.info("-------消费者监听开始---------");/*** 使用服务器生成的 consumerTag 启动非本地、非排他的消费者。* 仅提供对basic.deliver和basic.cancel AMQP 方法的访问(这对于大多数情况来说已经足够了)。 查看带有Consumer参数的方法以访问所有应用程序回调。** 参数:* queue – 队列的名称* autoAck – 如果服务器应该考虑消息一旦发送就被确认,则为真; 如果服务器应该期待明确的确认,则为 false* DeliverCallback – 传递消息时的回调* cancelCallback – 消费者取消时的回调*/channel.basicConsume("queue.test", true, deliverCallback, cancelCallback);while (true) {}}DeliverCallback deliverCallback = (consumerTag, message) -> {log.info("-------消费者收到消息,开始处理---------");String messageBody = new String(message.getBody());log.info("收到消息:{}", messageBody);};CancelCallback cancelCallback = (consumerTag) -> {log.info("-------消费者取消时的回调---------");};监听调用配置
/*** 该类添加@Configuration注解* * 项目启动,异步方式从线程池获取一个线程执行MQ初始化与队列监听** @throws IOException* @throws TimeoutException* @throws InterruptedException*/@Async@Autowiredpublic void messageMonitoring() throws IOException, TimeoutException, InterruptedException {log.info("-------创建连接开始---------");ConnectionFactory connectionFactory = new ConnectionFactory();connectionFactory.setHost("IP");try (Connection connection = connectionFactory.newConnection();Channel channel = connection.createChannel()) {this.initMq(channel);this.startMessageMonitoring(channel);}}
生产者发送消息
public static void sendMsg(long number) throws IOException, TimeoutException {ConnectionFactory connectionFactory = new ConnectionFactory();connectionFactory.setHost("IP");try (Connection connection = connectionFactory.newConnection();Channel channel = connection.createChannel()) {log.info("生产者发送消息:{}", number);channel.basicPublish("exchange.test", "key.test", null, String.valueOf(number).getBytes());}}
public static void main(String[] args) throws IOException, InterruptedException, TimeoutException {for (int i = 0; i < 20; i++) {sendMsg(i);}}
执行测试
启动项目
INFO 14360 --- [ restartedMain] c.e.springboot.config.RabbitMQConfig : -------创建连接开始---------INFO 14360 --- [ restartedMain] c.e.springboot.config.RabbitMQConfig : -------MQ交换机,队列,绑定关系初始化开始---------INFO 14360 --- [ restartedMain] c.e.springboot.config.RabbitMQConfig : -------申明交换机开始---------INFO 14360 --- [ restartedMain] c.e.springboot.config.RabbitMQConfig : -------申明队列开始---------INFO 14360 --- [ restartedMain] c.e.springboot.config.RabbitMQConfig : -------申明交换机与队列绑定关系开始---------INFO 14360 --- [ restartedMain] c.e.springboot.config.RabbitMQConfig : -------消费者监听开始---------发送消息
[main] INFO com.example.springboot.config.RabbitMQConfig - 生产者发送消息:0[main] INFO com.example.springboot.config.RabbitMQConfig - 生产者发送消息:1[main] INFO com.example.springboot.config.RabbitMQConfig - 生产者发送消息:2[main] INFO com.example.springboot.config.RabbitMQConfig - 生产者发送消息:3[main] INFO com.example.springboot.config.RabbitMQConfig - 生产者发送消息:4
消息监听
INFO 14360 --- [pool-1-thread-4] c.e.springboot.config.RabbitMQConfig : -------消费者收到消息,开始处理---------INFO 14360 --- [pool-1-thread-4] c.e.springboot.config.RabbitMQConfig : 收到消息:0INFO 14360 --- [pool-1-thread-5] c.e.springboot.config.RabbitMQConfig : -------消费者收到消息,开始处理---------INFO 14360 --- [pool-1-thread-5] c.e.springboot.config.RabbitMQConfig : 收到消息:1INFO 14360 --- [pool-1-thread-6] c.e.springboot.config.RabbitMQConfig : -------消费者收到消息,开始处理---------INFO 14360 --- [pool-1-thread-6] c.e.springboot.config.RabbitMQConfig : 收到消息:2INFO 14360 --- [pool-1-thread-7] c.e.springboot.config.RabbitMQConfig : -------消费者收到消息,开始处理---------INFO 14360 --- [pool-1-thread-7] c.e.springboot.config.RabbitMQConfig : 收到消息:3INFO 14360 --- [pool-1-thread-8] c.e.springboot.config.RabbitMQConfig : -------消费者收到消息,开始处理---------INFO 14360 --- [pool-1-thread-8] c.e.springboot.config.RabbitMQConfig : 收到消息:4如何保证消息的可靠性
发送方
使用RabbitMQ发送端确认机制,确认消息成功发送到RabbitMQ并被处理使用RabbitMQ消息返回机制,若没发现目标队列,中间件会通知发送方
发送端确认机制
消息发送后,若中间件收到消息,会给发送端一个应答生产者接收应答,用来确认这条消息是否正常发送到中间件
三种确认机制
单条同步确认多条同步确认异步确认
###单条同步确认机制
配置channel,开启确认模式:channel.confirmSelect()每发送一条消息,调用channel.waitForConfirms()方法,等待确认
public static void sendMsg(long number) throws IOException, TimeoutException, InterruptedException {ConnectionFactory connectionFactory = new ConnectionFactory();connectionFactory.setHost("IP");try (Connection connection = connectionFactory.newConnection();Channel channel = connection.createChannel()) {channel.confirmSelect();log.info("生产者发送消息:{}", number);channel.basicPublish("exchange.test", "key.test", null, String.valueOf(number).getBytes());if (channel.waitForConfirms()){log.info("MQ confirm success");}else {log.info("MQ confirm failed");}}}
22:56:05.072 [main] INFO com.example.springboot.config.RabbitMQConfig - 生产者发送消息:0
22:56:05.151 [main] INFO com.example.springboot.config.RabbitMQConfig - MQ confirm success
22:56:05.714 [main] INFO com.example.springboot.config.RabbitMQConfig - 生产者发送消息:1
22:56:05.776 [main] INFO com.example.springboot.config.RabbitMQConfig - MQ confirm success
多条同步确认机制
配置channel,开启确认模式:channel.confirmSelect()发送多条消息后,调用channel.waitForConfirms()方法,等待确认
public static void sendMsg(long number) throws IOException, TimeoutException, InterruptedException {ConnectionFactory connectionFactory = new ConnectionFactory();connectionFactory.setHost("IP");try (Connection connection = connectionFactory.newConnection();Channel channel = connection.createChannel()) {channel.confirmSelect();log.info("生产者发送消息:{}", number);for (int i = 0; i < 5; i++) {channel.basicPublish("exchange.test", "key.test", null, String.valueOf(number).getBytes());}if (channel.waitForConfirms()){log.info("MQ confirm success");}else {log.info("MQ confirm failed");}}}
生产者发送消息
22:59:36.793 [main] INFO com.example.springboot.config.RabbitMQConfig - 生产者发送消息:0
22:59:36.893 [main] INFO com.example.springboot.config.RabbitMQConfig - MQ confirm success
消费者监听消息
INFO 2692 --- [ool-1-thread-12] c.e.springboot.config.RabbitMQConfig : -------消费者收到消息,开始处理---------INFO 2692 --- [ool-1-thread-12] c.e.springboot.config.RabbitMQConfig : 收到消息:0INFO 2692 --- [ool-1-thread-13] c.e.springboot.config.RabbitMQConfig : -------消费者收到消息,开始处理---------INFO 2692 --- [ool-1-thread-13] c.e.springboot.config.RabbitMQConfig : 收到消息:0INFO 2692 --- [ool-1-thread-13] c.e.springboot.config.RabbitMQConfig : -------消费者收到消息,开始处理---------INFO 2692 --- [ool-1-thread-13] c.e.springboot.config.RabbitMQConfig : 收到消息:0INFO 2692 --- [ool-1-thread-13] c.e.springboot.config.RabbitMQConfig : -------消费者收到消息,开始处理---------INFO 2692 --- [ool-1-thread-13] c.e.springboot.config.RabbitMQConfig : 收到消息:0INFO 2692 --- [ool-1-thread-13] c.e.springboot.config.RabbitMQConfig : -------消费者收到消息,开始处理---------INFO 2692 --- [ool-1-thread-13] c.e.springboot.config.RabbitMQConfig : 收到消息:0
异步同步确认机制
配置channel,开启确认模式:channel.confirmSelect()在channel上添加监听:addConfirmListener,发送消息后,会回调此方法,通知是否发送成功异步确认有可能是单条,也有可能是多条,取决MQ
public static void sendMsg(long number) throws IOException, TimeoutException, InterruptedException {ConnectionFactory connectionFactory = new ConnectionFactory();connectionFactory.setHost("IP");try (Connection connection = connectionFactory.newConnection();Channel channel = connection.createChannel()) {channel.confirmSelect();ConfirmListener confirmListener=new ConfirmListener() {/**** @param deliveryTag 发送消息的编号,第几条的编号* @param multiple 是否确认多条消息,TRUE:确认多条消息* @throws IOException*/@Overridepublic void handleAck(long deliveryTag, boolean multiple) throws IOException {log.info("handleAck,deliveryTag:{},multiple:{}",deliveryTag,multiple);}@Overridepublic void handleNack(long deliveryTag, boolean multiple) throws IOException {log.info("handleNack,deliveryTag:{},multiple:{}",deliveryTag,multiple);}};channel.addConfirmListener(confirmListener);log.info("生产者发送消息:{}", number);for (int i = 0; i < 5; i++) {channel.basicPublish("exchange.test", "key.test", null, String.valueOf(number).getBytes());}Thread.sleep(5000);}}
INFO 2692 --- [ool-1-thread-12] c.e.springboot.config.RabbitMQConfig : -------消费者收到消息,开始处理---------INFO 2692 --- [ool-1-thread-12] c.e.springboot.config.RabbitMQConfig : 收到消息:0INFO 2692 --- [ool-1-thread-13] c.e.springboot.config.RabbitMQConfig : -------消费者收到消息,开始处理---------INFO 2692 --- [ool-1-thread-13] c.e.springboot.config.RabbitMQConfig : 收到消息:0INFO 2692 --- [ool-1-thread-13] c.e.springboot.config.RabbitMQConfig : -------消费者收到消息,开始处理---------INFO 2692 --- [ool-1-thread-13] c.e.springboot.config.RabbitMQConfig : 收到消息:0INFO 2692 --- [ool-1-thread-13] c.e.springboot.config.RabbitMQConfig : -------消费者收到消息,开始处理---------INFO 2692 --- [ool-1-thread-13] c.e.springboot.config.RabbitMQConfig : 收到消息:0INFO 2692 --- [ool-1-thread-13] c.e.springboot.config.RabbitMQConfig : -------消费者收到消息,开始处理---------INFO 2692 --- [ool-1-thread-13] c.e.springboot.config.RabbitMQConfig : 收到消息:0
23:07:14.580 [main] INFO com.example.springboot.config.RabbitMQConfig - 生产者发送消息:0
23:07:14.657 [AMQP Connection ip:5672] INFO com.example.springboot.config.RabbitMQConfig - handleAck,deliveryTag:1,multiple:false
23:07:14.666 [AMQP Connection ip:5672] INFO com.example.springboot.config.RabbitMQConfig - handleAck,deliveryTag:5,multiple:true
消息返回机制
开启方法
在RabbitMQ基础配置中有一个关键配置项:MandatoryMandatory若为false,RabbitMQ将直接丢弃无法路由的消息Mandatory若为true,RabbitMQ才会处理无法路由的消息
public static void sendMsg(long number) throws IOException, TimeoutException, InterruptedException {ConnectionFactory connectionFactory = new ConnectionFactory();connectionFactory.setHost("IP");try (Connection connection = connectionFactory.newConnection();Channel channel = connection.createChannel()) {channel.confirmSelect();ConfirmListener confirmListener=new ConfirmListener() {/**** @param deliveryTag 发送消息的编号,第几条的编号* @param multiple 是否确认多条消息,TRUE:确认多条消息* @throws IOException*/@Overridepublic void handleAck(long deliveryTag, boolean multiple) throws IOException {log.info("handleAck,deliveryTag:{},multiple:{}",deliveryTag,multiple);}@Overridepublic void handleNack(long deliveryTag, boolean multiple) throws IOException {log.info("handleNack,deliveryTag:{},multiple:{}",deliveryTag,multiple);}};channel.addConfirmListener(confirmListener);//添加消息返回机制
//            channel.addReturnListener(new ReturnListener() {
//                @Override
//                public void handleReturn(int replyCode, String replyText, String exchange, String routingKey, AMQP.BasicProperties properties, byte[] body) throws IOException {
//                    log.info("handleReturn,replyCode:{},replyText:{},exchange:{},routingKey:{},properties:{},replyText:{}",replyCode,replyText,exchange,routingKey,properties,new String(body));
//                }
//            });channel.addReturnListener(new ReturnCallback() {@Overridepublic void handle(Return returnMessage) {log.info("handleReturn,replyCode:{},replyText:{},exchange:{},routingKey:{},properties:{},replyText:{}",returnMessage.getReplyCode(),returnMessage.getReplyText(),returnMessage.getExchange(),returnMessage.getRoutingKey(),returnMessage.getProperties(),new String(returnMessage.getBody()));}});log.info("生产者发送消息:{}", number);for (int i = 0; i < 5; i++) {// Mandatory:开启消息返回机制channel.basicPublish("exchange.test", "key.test222222", true,null, String.valueOf(number).getBytes());}Thread.sleep(5000);}}
23:31:29.263 [main] INFO com.example.springboot.config.RabbitMQConfig - 生产者发送消息:0
23:31:29.339 [AMQP Connection ip:5672] INFO com.example.springboot.config.RabbitMQConfig - handleReturn,replyCode:312,replyText:NO_ROUTE,exchange:exchange.test,routingKey:key.test222222,properties:#contentHeader<basic>(content-type=null, content-encoding=null, headers=null, delivery-mode=null, priority=null, correlation-id=null, reply-to=null, expiration=null, message-id=null, timestamp=null, type=null, user-id=null, app-id=null, cluster-id=null),replyText:0
23:31:29.339 [AMQP Connection ip:5672] INFO com.example.springboot.config.RabbitMQConfig - handleAck,deliveryTag:1,multiple:false
23:31:29.346 [AMQP Connection ip:5672] INFO com.example.springboot.config.RabbitMQConfig - handleReturn,replyCode:312,replyText:NO_ROUTE,exchange:exchange.test,routingKey:key.test222222,properties:#contentHeader<basic>(content-type=null, content-encoding=null, headers=null, delivery-mode=null, priority=null, correlation-id=null, reply-to=null, expiration=null, message-id=null, timestamp=null, type=null, user-id=null, app-id=null, cluster-id=null),replyText:0
23:31:29.346 [AMQP Connection ip:5672] INFO com.example.springboot.config.RabbitMQConfig - handleAck,deliveryTag:2,multiple:false
23:31:29.346 [AMQP Connection ip:5672] INFO com.example.springboot.config.RabbitMQConfig - handleReturn,replyCode:312,replyText:NO_ROUTE,exchange:exchange.test,routingKey:key.test222222,properties:#contentHeader<basic>(content-type=null, content-encoding=null, headers=null, delivery-mode=null, priority=null, correlation-id=null, reply-to=null, expiration=null, message-id=null, timestamp=null, type=null, user-id=null, app-id=null, cluster-id=null),replyText:0
23:31:29.346 [AMQP Connection ip:5672] INFO com.example.springboot.config.RabbitMQConfig - handleAck,deliveryTag:3,multiple:false
23:31:29.347 [AMQP Connection ip:5672] INFO com.example.springboot.config.RabbitMQConfig - handleReturn,replyCode:312,replyText:NO_ROUTE,exchange:exchange.test,routingKey:key.test222222,properties:#contentHeader<basic>(content-type=null, content-encoding=null, headers=null, delivery-mode=null, priority=null, correlation-id=null, reply-to=null, expiration=null, message-id=null, timestamp=null, type=null, user-id=null, app-id=null, cluster-id=null),replyText:0
23:31:29.347 [AMQP Connection ip:5672] INFO com.example.springboot.config.RabbitMQConfig - handleAck,deliveryTag:4,multiple:false
23:31:29.347 [AMQP Connection ip:5672] INFO com.example.springboot.config.RabbitMQConfig - handleReturn,replyCode:312,replyText:NO_ROUTE,exchange:exchange.test,routingKey:key.test222222,properties:#contentHeader<basic>(content-type=null, content-encoding=null, headers=null, delivery-mode=null, priority=null, correlation-id=null, reply-to=null, expiration=null, message-id=null, timestamp=null, type=null, user-id=null, app-id=null, cluster-id=null),replyText:0
23:31:29.347 [AMQP Connection ip:5672] INFO com.example.springboot.config.RabbitMQConfig - handleAck,deliveryTag:5,multiple:false
消费方
需要使用RabbitMQ消费端确认机制,确认消息没有发生处理异常需要使用RabbitMQ消费端限流机制,限制消息推送速度,保障接收端服务稳定
消费端确认机制
消费端ACK类型
自动ACK:消费端收到消息后,会自动签收消息手动ACK:消费端收到消息后,不会自动签收消息,需要在业务代码中显式签收消息
手动ACK类型
单条手动ACK:multiple=false多条手动ACK:multiple=true推荐使用单条ACK
private void startMessageMonitoring(Channel channel) throws IOException {log.info("-------消费者监听开始---------");/*** 使用服务器生成的 consumerTag 启动非本地、非排他的消费者。* 仅提供对basic.deliver和basic.cancel AMQP 方法的访问(这对于大多数情况来说已经足够了)。 查看带有Consumer参数的方法以访问所有应用程序回调。** 参数:* queue – 队列的名称* autoAck – 如果服务器应该考虑消息一旦发送就被确认,则为真; 如果服务器应该期待明确的确认,则为 false* DeliverCallback – 传递消息时的回调* cancelCallback – 消费者取消时的回调*///autoAck :true --> false,手动签收channel.basicConsume("queue.test", false, new DeliverCallback() {@Overridepublic void handle(String consumerTag, Delivery message) throws IOException {log.info("-------消费者收到消息,开始处理---------");String messageBody = new String(message.getBody());log.info("收到消息:{}", messageBody);// 手动签收消息log.info("手动签收DeliveryTa:{}",message.getEnvelope().getDeliveryTag());channel.basicAck(message.getEnvelope().getDeliveryTag(), false);// 每5条消息签收一次//if (message.getEnvelope().getDeliveryTag() % 5==0){// channel.basicAck(message.getEnvelope().getDeliveryTag(), true);//}}}, cancelCallback);while (true) {}}DeliverCallback deliverCallback = (consumerTag, message) -> {log.info("-------消费者收到消息,开始处理---------");String messageBody = new String(message.getBody());log.info("收到消息:{}", messageBody);};CancelCallback cancelCallback = (consumerTag) -> {log.info("-------消费者取消时的回调---------");};23:58:58.213 [main] INFO com.example.springboot.config.RabbitMQConfig - 生产者发送消息:0
23:58:58.285 [AMQP Connection ip:5672] INFO com.example.springboot.config.RabbitMQConfig - handleAck,deliveryTag:1,multiple:false
23:58:58.292 [AMQP Connection ip:5672] INFO com.example.springboot.config.RabbitMQConfig - handleAck,deliveryTag:5,multiple:true
INFO 3272 --- [pool-1-thread-4] c.e.springboot.config.RabbitMQConfig : -------消费者收到消息,开始处理---------INFO 3272 --- [pool-1-thread-4] c.e.springboot.config.RabbitMQConfig : 收到消息:0INFO 3272 --- [pool-1-thread-4] c.e.springboot.config.RabbitMQConfig : 手动签收DeliveryTa:1INFO 3272 --- [pool-1-thread-5] c.e.springboot.config.RabbitMQConfig : -------消费者收到消息,开始处理---------INFO 3272 --- [pool-1-thread-5] c.e.springboot.config.RabbitMQConfig : 收到消息:0INFO 3272 --- [pool-1-thread-5] c.e.springboot.config.RabbitMQConfig : 手动签收DeliveryTa:2INFO 3272 --- [pool-1-thread-5] c.e.springboot.config.RabbitMQConfig : -------消费者收到消息,开始处理---------INFO 3272 --- [pool-1-thread-5] c.e.springboot.config.RabbitMQConfig : 收到消息:0INFO 3272 --- [pool-1-thread-5] c.e.springboot.config.RabbitMQConfig : 手动签收DeliveryTa:3INFO 3272 --- [pool-1-thread-5] c.e.springboot.config.RabbitMQConfig : -------消费者收到消息,开始处理---------INFO 3272 --- [pool-1-thread-5] c.e.springboot.config.RabbitMQConfig : 收到消息:0INFO 3272 --- [pool-1-thread-5] c.e.springboot.config.RabbitMQConfig : 手动签收DeliveryTa:4INFO 3272 --- [pool-1-thread-5] c.e.springboot.config.RabbitMQConfig : -------消费者收到消息,开始处理---------INFO 3272 --- [pool-1-thread-5] c.e.springboot.config.RabbitMQConfig : 收到消息:0INFO 3272 --- [pool-1-thread-5] c.e.springboot.config.RabbitMQConfig : 手动签收DeliveryTa:5
重回队列
若设置了重回队列,消息被NACK之后,会返回队列未尾,等待进一步被处理一般不建议开启重回队列,因为第一次处理异常的消息,再次处理,基本上也是异常
//autoAck :true --> false,手动签收channel.basicConsume("queue.test", false, new DeliverCallback() {@Overridepublic void handle(String consumerTag, Delivery message) throws IOException {log.info("-------消费者收到消息,开始处理---------");String messageBody = new String(message.getBody());log.info("收到消息:{}", messageBody);// 手动签收消息 multiple:false:签收单条,true:签收多条//log.info("手动签收DeliveryTa:{}",message.getEnvelope().getDeliveryTag());//channel.basicAck(message.getEnvelope().getDeliveryTag(), false);// 每5条消息签收一次//if (message.getEnvelope().getDeliveryTag() % 5==0){// channel.basicAck(message.getEnvelope().getDeliveryTag(), true);//}//手动拒收,重回队列log.info("手动拒收,重回队列,拒收DeliveryTa:{}",message.getEnvelope().getDeliveryTag());channel.basicNack(message.getEnvelope().getDeliveryTag(), false,true);}}, cancelCallback); INFO 11212 --- [ool-1-thread-18] c.e.springboot.config.RabbitMQConfig : 手动拒收,重回队列,拒收DeliveryTa:1365INFO 11212 --- [ool-1-thread-18] c.e.springboot.config.RabbitMQConfig : -------消费者收到消息,开始处理---------INFO 11212 --- [ool-1-thread-18] c.e.springboot.config.RabbitMQConfig : 收到消息:0INFO 11212 --- [ool-1-thread-18] c.e.springboot.config.RabbitMQConfig : 手动拒收,重回队列,拒收DeliveryTa:1366INFO 11212 --- [ool-1-thread-18] c.e.springboot.config.RabbitMQConfig : -------消费者收到消息,开始处理---------INFO 11212 --- [ool-1-thread-18] c.e.springboot.config.RabbitMQConfig : 收到消息:0INFO 11212 --- [ool-1-thread-18] c.e.springboot.config.RabbitMQConfig : 手动拒收,重回队列,拒收DeliveryTa:1367INFO 11212 --- [ool-1-thread-18] c.e.springboot.config.RabbitMQConfig : -------消费者收到消息,开始处理---------INFO 11212 --- [ool-1-thread-18] c.e.springboot.config.RabbitMQConfig : 收到消息:0INFO 11212 --- [ool-1-thread-18] c.e.springboot.config.RabbitMQConfig : 手动拒收,重回队列,拒收DeliveryTa:1368INFO 11212 --- [ool-1-thread-18] c.e.springboot.config.RabbitMQConfig : -------消费者收到消息,开始处理---------INFO 11212 --- [ool-1-thread-18] c.e.springboot.config.RabbitMQConfig : 收到消息:0INFO 11212 --- [ool-1-thread-18] c.e.springboot.config.RabbitMQConfig : 手动拒收,重回队列,拒收DeliveryTa:1369
消费端限流机制
RabbitMQ之QOS
QoS是服务质量保证功能保证了在一定数目的消息未被确认前,不消费新的消息QoS功能的前提是不使用自动确认
QoS原理
QoS原理是当消费端有一定数量的消息未被ACK确认时RabbitMQ不给消费端推送新的消息RabbitMQ使用QoS机制实现了消费端限流
消费端限流机制参数设置
ρrefetch Count:针对一个消费端最多推送多少未确认消息global:true 针对整个消费端限流 false:针对当前 channelprefetch size:0(单个消息大小限制,一般为0)prefetch Size与 globa两项, RabbitmQ暂时未实现
不使用限流
消息生产者一次性发送多条消息消息监听者线程每隔1s执行一次签收消费者启动服务,一下全部接收发送的消息
private void startMessageMonitoring(Channel channel) throws IOException {log.info("-------消费者监听开始---------");//autoAck :true --> false,手动签收channel.basicConsume("queue.test", false, new DeliverCallback() {@Overridepublic void handle(String consumerTag, Delivery message) throws IOException {log.info("-------消费者收到消息,开始处理---------");String messageBody = new String(message.getBody());log.info("收到消息:{}", messageBody);// 每隔一秒签收一次try {Thread.sleep(1000);} catch (InterruptedException e) {e.printStackTrace();}// 手动签收消息log.info("手动签收DeliveryTa:{}",message.getEnvelope().getDeliveryTag());channel.basicAck(message.getEnvelope().getDeliveryTag(), false);}}, cancelCallback);while (true) {}}DeliverCallback deliverCallback = (consumerTag, message) -> {log.info("-------消费者收到消息,开始处理---------");String messageBody = new String(message.getBody());log.info("收到消息:{}", messageBody);};CancelCallback cancelCallback = (consumerTag) -> {log.info("-------消费者取消时的回调---------");};


使用限流
设置prefetchCount值
private void startMessageMonitoring(Channel channel) throws IOException {log.info("-------消费者监听开始---------");// 针对一个消费端最多推送多少未确认消息channel.basicQos(2);//autoAck :true --> false,手动签收channel.basicConsume("queue.test", false, new DeliverCallback() {@Overridepublic void handle(String consumerTag, Delivery message) throws IOException {log.info("-------消费者收到消息,开始处理---------");String messageBody = new String(message.getBody());log.info("收到消息:{}", messageBody);// 每隔一秒签收一次try {Thread.sleep(1000);} catch (InterruptedException e) {e.printStackTrace();}// 手动签收消息log.info("手动签收DeliveryTa:{}",message.getEnvelope().getDeliveryTag());channel.basicAck(message.getEnvelope().getDeliveryTag(), false);}, cancelCallback);while (true) {}}DeliverCallback deliverCallback = (consumerTag, message) -> {log.info("-------消费者收到消息,开始处理---------");String messageBody = new String(message.getBody());log.info("收到消息:{}", messageBody);};CancelCallback cancelCallback = (consumerTag) -> {log.info("-------消费者取消时的回调---------");};


RabbitMQ
大量堆积的消息会给RabbitMQ产生很大的压力,需要使用RabbitMQ消息过期机制,防止消息大量积压
过期后会直接被丢弃,无法对系统运行异常发出警报,需要使用RabbitMQ死信队列,收集过期消息,以供分析
消息过期机制
RabbitMQ之过期时间TTL
Rabbitmo的过期时间称为TTL( Time to live),生存时间RabbitMQ的过期时间分为消息T和队列TTL消息TTL设置了单条消息的过期时间队列TTL设置了队列中所有消息的过期时间
消息过期时间
public static void sendMsg(long number) throws IOException, TimeoutException, InterruptedException {ConnectionFactory connectionFactory = new ConnectionFactory();connectionFactory.setHost("IP");try (Connection connection = connectionFactory.newConnection();Channel channel = connection.createChannel()) {channel.confirmSelect();ConfirmListener confirmListener = new ConfirmListener() {/**** @param deliveryTag 发送消息的编号,第几条的编号* @param multiple 是否确认多条消息,TRUE:确认多条消息* @throws IOException*/@Overridepublic void handleAck(long deliveryTag, boolean multiple) throws IOException {log.info("handleAck,deliveryTag:{},multiple:{}", deliveryTag, multiple);}@Overridepublic void handleNack(long deliveryTag, boolean multiple) throws IOException {log.info("handleNack,deliveryTag:{},multiple:{}", deliveryTag, multiple);}};channel.addConfirmListener(confirmListener);//添加消息返回机制channel.addReturnListener(new ReturnCallback() {@Overridepublic void handle(Return returnMessage) {log.info("handleReturn,replyCode:{},replyText:{},exchange:{},routingKey:{},properties:{},replyText:{}", returnMessage.getReplyCode(), returnMessage.getReplyText(), returnMessage.getExchange(), returnMessage.getRoutingKey(), returnMessage.getProperties(), new String(returnMessage.getBody()));}});// Mandatory:开启消息返回机制for (int i = 0; i < 30; i++) {log.info("生产者发送消息:{}", i);//消息5秒后过期AMQP.BasicProperties basicProperties = new AMQP.BasicProperties().builder().expiration("10000").build();channel.basicPublish("exchange.test", "key.test", true, basicProperties, String.valueOf(i).getBytes());}}}
生产者发送10条消息

10秒时间到了自动删除

队列消息过期时间
申明队列时设置队列消息过期时间
public void initMq(Channel channel) throws IOException, TimeoutException, InterruptedException {log.info("-------MQ交换机,队列,绑定关系初始化开始---------");log.info("-------申明交换机开始---------");channel.exchangeDeclare("exchange.test", BuiltinExchangeType.DIRECT, true, false, null);log.info("-------申明队列开始---------");//设置队列过期时间HashMap<String, Object> map = new HashMap<>();map.put("x-message-ttl",10000);channel.queueDeclare("queue.test", true, false, false, map);log.info("-------申明交换机与队列绑定关系开始---------");channel.queueBind("queue.test", "exchange.test", "key.test");}

10秒后,队列消息全部删除

死信队列
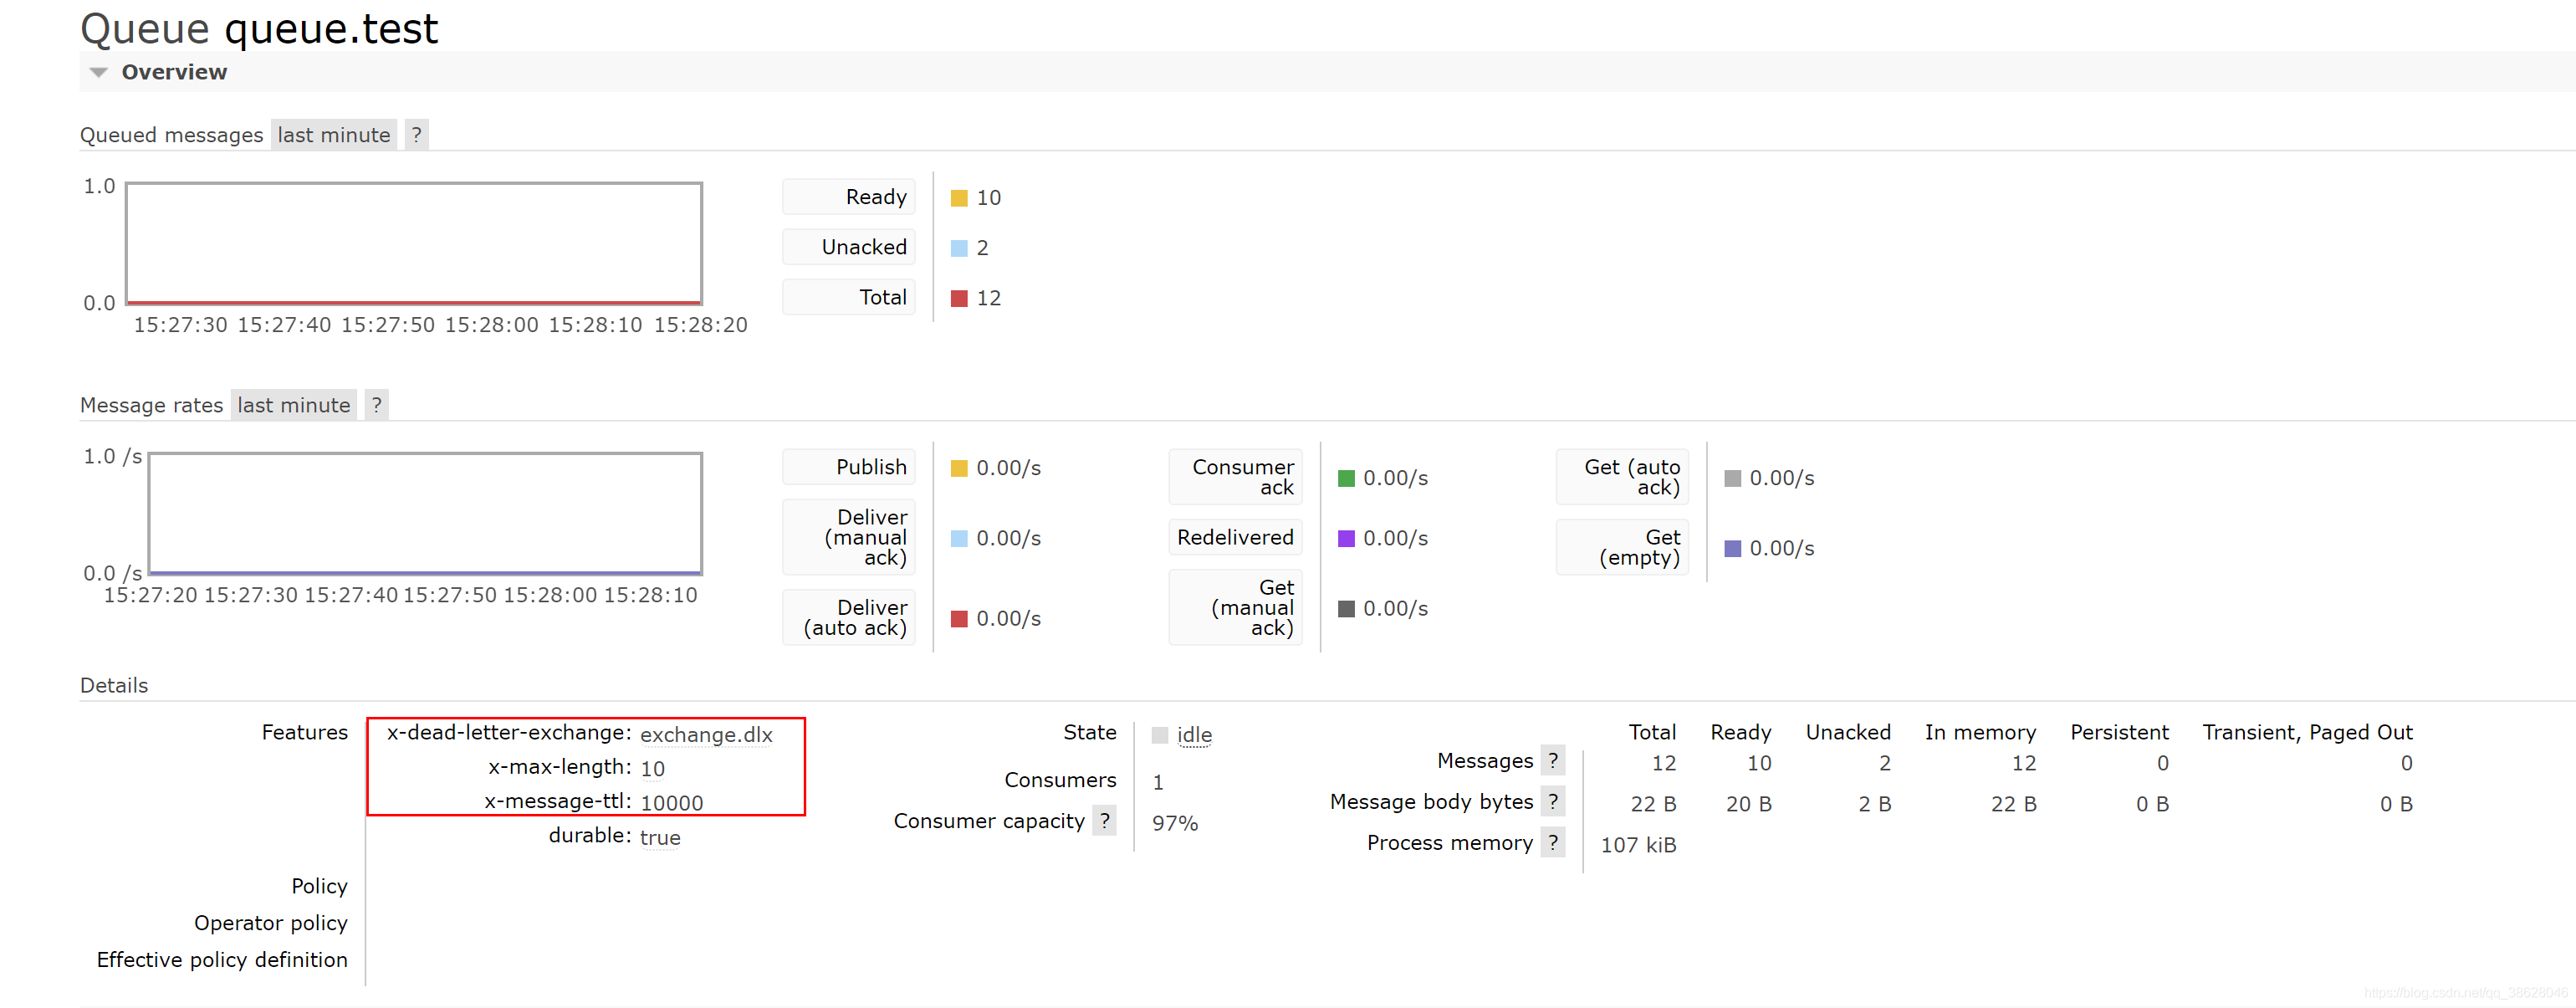
死信队列:队列被配置了DLX属性(Dead- Letter- Exchange)当一个消息变成死信( dead message)后,能重新被发布到另一个 Exchange,这个 Exchange也是一个普通交换机死信被死信交换机路由后,一般进入一个固定队列
变成死信
消息被拒绝( reject/nack)并且 requeue= false肖息过期(TTL到期)队列达到最大长度
设置死信队列
设置转发、接收死信的交换机和队列Exchange: dlx.exchangeQueue: dIx.queueRoutingKey:#在需要设置死信的队列加入参数x-dead-letter-exchange=dlx.exchange
public void initMq(Channel channel) throws IOException, TimeoutException, InterruptedException {log.info("-------MQ交换机,队列,绑定关系初始化开始---------");log.info("-------申明交换机开始---------");channel.exchangeDeclare("exchange.test", BuiltinExchangeType.DIRECT, true, false, null);log.info("-------申明队列开始---------");/*** 若队列存在,修改参数后,需删除队列,否则报错*/HashMap<String, Object> map = new HashMap<>();//设置队列过期时间map.put("x-message-ttl", 10000);//设置消息过期进入的交换机map.put("x-dead-letter-exchange", "exchange.dlx");//设置队列的最大长度map.put("x-max-length", 10);channel.queueDeclare("queue.test", true, false, false, map);log.info("-------申明交换机与队列绑定关系开始---------");channel.queueBind("queue.test", "exchange.test", "key.test");/*申明死信交换机*/channel.exchangeDeclare("exchange.dlx", BuiltinExchangeType.TOPIC, true, false, null);/** 申明死信队列*/channel.queueDeclare("queue.dlx", true, false, false, null);/** 申明死信队列与死信交换机绑定*/channel.queueBind("queue.dlx", "exchange.dlx", "#");}

Spring AMQP特性
异步消息监听容器
原始实现:自己实现线程池、回调方法,并注册回调方法Spring boot:自动实现可配置的线程池,并自动注册回调方法,只需实现回调方法
原生提供Rabbit template,方便收发消息
相比 basicPublish,功能更加强大,能自动实现消息转换等功能
原生提供 Rabbitadmin,方便队列、交换机声明
声明式提供队列、交换机、绑定关系的注册方法甚至不需要显式的注册代码
Spring boot Config原生支持 RabbitMQ
充分发挥 Spring boots约定大于配置的特性可以隐式建立 Connection、 Channel
1.RabbitAdmin
RabbitAdmin类用来管理RabbitMQ
CachingConnectionFactory connectionFactory = new CachingConnectionFactory();
RabbitAdmin rabbitAdmin = new RabbitAdmin(connectionFactory);
RebbitAdmin功能
declareExchange:创建交换机deleteExchange:删除交换机declareQueue:创建队列deleteQueue:删除队列purgeQueue:清空队列declareBinding:新建绑定关系removeBinding:删除绑定关系getQueueProperties: 查询队列属性
配置RabbitMQ服务
@Configuration
public class RabbitConfig {@Autowiredpublic void initRabbit() {/** 创建连接*/CachingConnectionFactory connectionFactory = new CachingConnectionFactory();connectionFactory.setHost("ip");connectionFactory.setPort(5672);connectionFactory.setPassword("guest");connectionFactory.setUsername("guest");RabbitAdmin rabbitAdmin = new RabbitAdmin(connectionFactory);/** 申明交换机*/Exchange exchange = new DirectExchange("exchange.test");rabbitAdmin.declareExchange(exchange);/** 申明队列*/Queue queue = new Queue("queue.test");rabbitAdmin.declareQueue(queue);/** 申明绑定关系*/Binding binding = new Binding("queue.test",Binding.DestinationType.QUEUE,"exchange.test","key.test",null);rabbitAdmin.declareBinding(binding);}
}
简化配置RabbitMQ服务
@Configuration
public class RabbitConfig {@Beanpublic Exchange exchange1() {return new DirectExchange("exchange.test");}@Beanpublic Queue queue1() {return new Queue("queue.test");}@Beanpublic Binding binding1() {return new Binding("queue.test",Binding.DestinationType.QUEUE,"exchange.test","key.test",null);}@Beanpublic ConnectionFactory connectionFactory() {CachingConnectionFactory connectionFactory = new CachingConnectionFactory();connectionFactory.setHost("127.0.0.1");connectionFactory.setPort(5672);connectionFactory.setPassword("guest");connectionFactory.setUsername("guest");// 申明式配置后,需手动调用一次,即使用时才会初始化,如调用连接方法触发交换机队列等的初始化connectionFactory.createConnection();return connectionFactory;}@Beanpublic RabbitAdmin rabbitAdmin(ConnectionFactory connectionFactory) {RabbitAdmin rabbitAdmin = new RabbitAdmin(connectionFactory);// 初始化交换机 队列等rabbitAdmin.setAutoStartup(true);return rabbitAdmin;}
}
2.RabbitTemplate发送消息
使用RabbitTemplate发送消息Rabbittemplate提供了丰富的功能,方便消息收发Rabbittemplate可以显式传入配置也可以隐式声明配置
声明RabbitTemplate Bean
@Configuration
public class RabbitConfig {@Beanpublic ConnectionFactory connectionFactory() {CachingConnectionFactory connectionFactory = new CachingConnectionFactory();connectionFactory.setHost("127.0.0.1");connectionFactory.setPort(5672);connectionFactory.setPassword("guest");connectionFactory.setUsername("guest");// 申明式配置后,需手动调用一次,即使用时才会初始化,如调用连接方法触发交换机队列等的初始化connectionFactory.createConnection();return connectionFactory;}@BeanRabbitTemplate rabbitTemplate(ConnectionFactory connectionFactory) {return new RabbitTemplate(connectionFactory);}
}
使用send方法发送消息
@Slf4j
@Component
public class SendMsg {@Resourceprivate RabbitTemplate rabbitTemplate;public void send(String msg) {log.info("send方法发送消息:{}",msg);MessageProperties messageProperties = new MessageProperties();messageProperties.setExpiration("1000");Message message = new Message(msg.getBytes(), messageProperties);rabbitTemplate.send("exchange.test", "queue.test", message);}
}
使用convertAndSend方法发送消息
@Slf4j
@Component
public class SendMsg {@Resourceprivate RabbitTemplate rabbitTemplate;public void convertAndSend(String msg) {log.info("convertAndSend方法发送消息:{}",msg);rabbitTemplate.convertAndSend("exchange.test", "queue.test", msg);}
}
执行测试
@Testpublic void test() {sendMsg.send("hello world");sendMsg.convertAndSend("hello world");}
INFO 13840 --- [ main] com.example.springboot.config.SendMsg : send方法发送消息:hello worldINFO 13840 --- [ main] com.example.springboot.config.SendMsg : convertAndSend方法发送消息:hello world

3.发送端确认、消息返回确认
RabbitTemplate设置发送端确认、消息返回方法
@BeanRabbitTemplate rabbitTemplate(ConnectionFactory connectionFactory) {RabbitTemplate rabbitTemplate = new RabbitTemplate(connectionFactory);//开启消息返回机制rabbitTemplate.setMandatory(true);//消息确认rabbitTemplate.setConfirmCallback(new RabbitTemplate.ConfirmCallback() {@Overridepublic void confirm(CorrelationData correlationData, boolean ack, String cause) {log.info("correlationData:{}, ack:{}, cause{}", correlationData, ack, cause);}});// 消息返回rabbitTemplate.setReturnCallback(new RabbitTemplate.ReturnCallback() {@Overridepublic void returnedMessage(Message message, int replyCode, String replyText, String exchange, String routingKey) {log.info("message:{}, replyCode:{}, replyText:{}, exchange:{}, routingKey{}", message, replyCode, replyText, exchange, routingKey);}});return rabbitTemplate;}
此时再次发送消息,发现发送端确认、消息返回方法均未执行
查看源码发现,发现publisherConfirms属性,在创建连接时应该被设置TRUE
public void determineConfirmsReturnsCapability(ConnectionFactory connectionFactory) {this.publisherConfirms = connectionFactory.isPublisherConfirms();this.confirmsOrReturnsCapable =this.publisherConfirms || connectionFactory.isPublisherReturns();}
修改ConnectionFactory
@Beanpublic ConnectionFactory connectionFactory() {CachingConnectionFactory connectionFactory = new CachingConnectionFactory();connectionFactory.setHost("IP ");connectionFactory.setPort(5672);connectionFactory.setPassword("guest");connectionFactory.setUsername("guest");// 申明式配置后,手动调用一次,否则使用时才会初始化,,如调用连接方法触发交换机队列等的初始化connectionFactory.createConnection();connectionFactory.setPublisherConfirmType(CachingConnectionFactory.ConfirmType.SIMPLE);connectionFactory.setPublisherReturns(true);return connectionFactory;}
创建服务,调用发送消息(使用springBootTest回调不生效)
@RestController
public class TestController {@Autowiredprivate SendMsg sendMsg;@GetMapping("/test")public String test(){sendMsg.send("hello world");sendMsg.convertAndSend("hello world");return "send success";}
}
INFO 14576 --- [nio-8888-exec-1] com.example.springboot.config.SendMsg : send方法发送消息:hello worldINFO 14576 --- [nio-8888-exec-1] com.example.springboot.config.SendMsg : convertAndSend方法发送消息:hello worldINFO 14576 --- [nectionFactory2] c.e.springboot.config.RabbitConfig : correlationData:null, ack:true, causenullINFO 14576 --- [nectionFactory1] c.e.springboot.config.RabbitConfig : correlationData:null, ack:true, causenull
CachingConnectionFactory.ConfirmType.SIMPLE方式无法确定那条消息被确认
修改ConnectionFactory
connectionFactory.setPublisherConfirmType(CachingConnectionFactory.ConfirmType.CORRELATED);
发送消息时携带CorrelationData
public void convertAndSend(String msg) {log.info("convertAndSend方法发送消息:{}",msg);CorrelationData correlationData = new CorrelationData();correlationData.setId("123456");rabbitTemplate.convertAndSend("exchange.test", "key.test", msg,correlationData);}
INFO 14576 --- [nio-8888-exec-1] com.example.springboot.config.SendMsg : send方法发送消息:hello worldINFO 14576 --- [nio-8888-exec-1] com.example.springboot.config.SendMsg : convertAndSend方法发送消息:hello worldINFO 14576 --- [nectionFactory1] c.e.springboot.config.RabbitConfig : correlationData:null, ack:true, causenullINFO 14576 --- [nectionFactory1] c.e.springboot.config.RabbitConfig : correlationData:CorrelationData [id=123456], ack:true, causenull
4.消息监听容器
SimpleMessageListenerContainer是一个简单消息监听容器
特点
设置同时监听多个队列、自动启动、自动配置RabbitMQ设置消费者数量(最大数量、最小数量、批量消费)设置消息确认模式、是否重回队列、异常捕获设置是否独占、其他消费者属性等设置具体的监听器、消息转换器等支持动态设置,运行中修改监听器配置
使用监听容器
 @Beanpublic SimpleMessageListenerContainer messageListenerContainer(@Autowired ConnectionFactory connectionFactory) {SimpleMessageListenerContainer messageListenerContainer = new SimpleMessageListenerContainer(connectionFactory);// 监听的队列messageListenerContainer.setQueueNames("queue.test");// 同时并发的消费线程messageListenerContainer.setConcurrentConsumers(2);// 最大并发的消费线程messageListenerContainer.setMaxConcurrentConsumers(5);// 消息确认方式//messageListenerContainer.setAcknowledgeMode(AcknowledgeMode.AUTO);//手动确认messageListenerContainer.setAcknowledgeMode(AcknowledgeMode.MANUAL);/*-------------------消息监听方式一-----------------------------*/
/*      // 消息监听messageListenerContainer.setMessageListener(new MessageListener() {@Overridepublic void onMessage(Message message) {log.info("消息监听,message:{}", message.toString());}});*//*-------------------消息监听方式二-----------------------------*/messageListenerContainer.setMessageListener(new ChannelAwareMessageListener() {@Overridepublic void onMessage(Message message, Channel channel) throws Exception {log.info("消息监听,message:{}", message.toString());log.info("消息Ack,DeliveryTag:{}", message.getMessageProperties().getDeliveryTag());channel.basicAck(message.getMessageProperties().getDeliveryTag(), false);}});// 消费端限流messageListenerContainer.setPrefetchCount(2);return messageListenerContainer;}
发送消息,启动监听
INFO 2544 --- [enerContainer-2] c.e.springboot.config.RabbitConfig : 消息监听,message:(Body:'hello world' MessageProperties [headers={spring_listener_return_correlation=85d4df83-af4b-426c-aed9-094d9272c9e9, spring_returned_message_correlation=123456}, contentType=text/plain, contentEncoding=UTF-8, contentLength=0, receivedDeliveryMode=PERSISTENT, priority=0, redelivered=false, receivedExchange=exchange.test, receivedRoutingKey=key.test, deliveryTag=5, consumerTag=amq.ctag-vZcoVv0Jx3Vgm07hQ8iDFA, consumerQueue=queue.test])INFO 2544 --- [enerContainer-2] c.e.springboot.config.RabbitConfig : 消息Ack,DeliveryTag:5
5.自定义消息监听容器
利用MessageListenerAdapter消息监听适配器可以实现自定义消息监听
简单模式
定义一个handleMessage方法,消息监听的就是该方法,也是业务处理回调,方法名一定是handleMessage
@Slf4j
@Component
public class MsgService {public void handleMessage(byte[] body){String msg = new String(body);log.info("消息监听,执行handleMessage(),msg:{}",msg);}
}
@Autowiredprivate MsgService msgService;@Beanpublic SimpleMessageListenerContainer messageListenerContainer(@Autowired ConnectionFactory connectionFactory) {SimpleMessageListenerContainer messageListenerContainer = new SimpleMessageListenerContainer(connectionFactory);// 监听的队列messageListenerContainer.setQueueNames("queue.test");// 同时并发的消费线程messageListenerContainer.setConcurrentConsumers(2);// 最大并发的消费线程messageListenerContainer.setMaxConcurrentConsumers(5);messageListenerContainer.setAcknowledgeMode(AcknowledgeMode.MANUAL);// 消费端限流messageListenerContainer.setPrefetchCount(2);MessageListenerAdapter messageListenerAdapter = new MessageListenerAdapter();messageListenerAdapter.setDelegate(msgService);messageListenerContainer.setMessageListener(messageListenerAdapter);return messageListenerContainer;}
执行测试
INFO 14272 --- [nio-8888-exec-1] com.example.springboot.config.SendMsg : send方法发送消息:hello worldINFO 14272 --- [nio-8888-exec-1] com.example.springboot.config.SendMsg : convertAndSend方法发送消息:hello worldINFO 14272 --- [enerContainer-2] c.example.springboot.config.MsgService : 消息监听,执行handleMessage(),msg:hello world
方法名为什么一定是:handleMessage?
MessageListenerAdapter类,看onMessage()方法中getListenerMethodName()
@Overridepublic void onMessage(Message message, Channel channel) throws Exception { // NOSONAR// Check whether the delegate is a MessageListener impl itself.// In that case, the adapter will simply act as a pass-through.Object delegateListener = getDelegate();if (delegateListener != this) {if (delegateListener instanceof ChannelAwareMessageListener) {((ChannelAwareMessageListener) delegateListener).onMessage(message, channel);return;}else if (delegateListener instanceof MessageListener) {((MessageListener) delegateListener).onMessage(message);return;}}// Regular case: find a handler method reflectively.Object convertedMessage = extractMessage(message);String methodName = getListenerMethodName(message, convertedMessage);if (methodName == null) {throw new AmqpIllegalStateException("No default listener method specified: "+ "Either specify a non-null value for the 'defaultListenerMethod' property or "+ "override the 'getListenerMethodName' method.");}// Invoke the handler method with appropriate arguments.Object[] listenerArguments = buildListenerArguments(convertedMessage, channel, message);Object result = invokeListenerMethod(methodName, listenerArguments, message);if (result != null) {handleResult(new InvocationResult(result, null, null, null, null), message, channel);}else {logger.trace("No result object given - no result to handle");}}
getListenerMethodName()返回this.defaultListenerMethod
protected String getListenerMethodName(Message originalMessage, Object extractedMessage) {if (this.queueOrTagToMethodName.size() > 0) {MessageProperties props = originalMessage.getMessageProperties();String methodName = this.queueOrTagToMethodName.get(props.getConsumerQueue());if (methodName == null) {methodName = this.queueOrTagToMethodName.get(props.getConsumerTag());}if (methodName != null) {return methodName;}}return getDefaultListenerMethod();}
protected String getDefaultListenerMethod() {return this.defaultListenerMethod;}
默认方法名:handleMessage
public static final String ORIGINAL_DEFAULT_LISTENER_METHOD = "handleMessage";private Object delegate;private String defaultListenerMethod = ORIGINAL_DEFAULT_LISTENER_METHOD;高阶模式
自定义“队列名一方法名”映射关系
消息监听,回调业务处理类
@Slf4j
@Component
public class MsgService {public void test1(byte[] body){String msg = new String(body);log.info("消息监听,执行handleMessage(),msg:{}",msg);}
}
    @Autowiredprivate MsgService msgService;@Beanpublic SimpleMessageListenerContainer messageListenerContainer(@Autowired ConnectionFactory connectionFactory) {SimpleMessageListenerContainer messageListenerContainer = new SimpleMessageListenerContainer(connectionFactory);// 监听的队列messageListenerContainer.setQueueNames("queue.test");// 同时并发的消费线程messageListenerContainer.setConcurrentConsumers(2);// 最大并发的消费线程messageListenerContainer.setMaxConcurrentConsumers(5);messageListenerContainer.setAcknowledgeMode(AcknowledgeMode.MANUAL);// 消费端限流messageListenerContainer.setPrefetchCount(2);MessageListenerAdapter messageListenerAdapter = new MessageListenerAdapter();messageListenerAdapter.setDelegate(msgService);// 自定义“队列名一方法名”映射关系HashMap<String, String> map = new HashMap<>();map.put("queue.test","test1");
//        map.put("queue.test2","test2");messageListenerAdapter.setQueueOrTagToMethodName(map);messageListenerContainer.setMessageListener(messageListenerAdapter);return messageListenerContainer;}
执行测试
INFO 7100 --- [nio-8888-exec-1] com.example.springboot.config.SendMsg : send方法发送消息:hello worldINFO 7100 --- [nio-8888-exec-1] com.example.springboot.config.SendMsg : convertAndSend方法发送消息:hello worldINFO 7100 --- [enerContainer-2] c.example.springboot.config.MsgService : 消息监听,执行handleMessage(),msg:hello world
核心this.queueOrTagToMethodName.size() > 0
protected String getListenerMethodName(Message originalMessage, Object extractedMessage) {if (this.queueOrTagToMethodName.size() > 0) {MessageProperties props = originalMessage.getMessageProperties();String methodName = this.queueOrTagToMethodName.get(props.getConsumerQueue());if (methodName == null) {methodName = this.queueOrTagToMethodName.get(props.getConsumerTag());}if (methodName != null) {return methodName;}}return getDefaultListenerMethod();}
6.MessageConverter消息转换
MessageConverter用来在收发消息时自动转换消息Jackson2JsonMessageConverter是最常用的MessageConverter用来转换Json格式消息,配合ClassMapper可以直接转换为POJO对象
使用Jackson2JsonMessageConverter
Jackson2JsonMessageConverter messageConverter = new Jackson2JsonMessageConverter();
messageListenerAdapter.setMessageConverter(new Jackson2JsonMessageConverter());
messageListenerAdapter.setMessageConverter(messageConverter);
消息监听回调方法接收参数是一个LinkedHashMap
public void test1(Map<String,Object> map){log.info("消息监听,执行handleMessage(),msg:{}",map);}
使用ClassMapper
  @Autowiredprivate MsgService msgService;@Beanpublic SimpleMessageListenerContainer messageListenerContainer(@Autowired ConnectionFactory connectionFactory) {SimpleMessageListenerContainer messageListenerContainer = new SimpleMessageListenerContainer(connectionFactory);// 监听的队列messageListenerContainer.setQueueNames("queue.test");// 同时并发的消费线程messageListenerContainer.setConcurrentConsumers(2);// 最大并发的消费线程messageListenerContainer.setMaxConcurrentConsumers(5);// 消费端限流messageListenerContainer.setPrefetchCount(2);MessageListenerAdapter messageListenerAdapter = new MessageListenerAdapter();messageListenerAdapter.setDelegate(msgService);Jackson2JsonMessageConverter messageConverter = new Jackson2JsonMessageConverter();messageConverter.setClassMapper(new ClassMapper() {@Overridepublic void fromClass(Class<?> clazz, MessageProperties properties) {}@Overridepublic Class<?> toClass(MessageProperties properties) {return UserDTO.class;}});messageListenerAdapter.setMessageConverter(messageConverter);HashMap<String, String> map = new HashMap<>();map.put("queue.test", "test1");
//        map.put("queue.test2","test2");messageListenerAdapter.setQueueOrTagToMethodName(map);messageListenerContainer.setMessageListener(messageListenerAdapter);return messageListenerContainer;}
发送消息时将POJO对象转JSON再转字节对象再发送,否则有坑.
@Autowired
ObjectMapper objectMapper = new ObjectMapper();public void convertAndSend(String msg) throws JsonProcessingException {log.info("convertAndSend方法发送消息:{}", userDTO);CorrelationData correlationData = new CorrelationData();correlationData.setId("123456");String writeValueAsString = objectMapper.writeValueAsString(userDTO);rabbitTemplate.convertAndSend("exchange.test", "key.test", writeValueAsString.getBytes(), correlationData);}
INFO 10636 --- [nio-8888-exec-1] com.example.springboot.config.SendMsg : send方法发送消息:UserDTO(id=1, name=MQ)INFO 10636 --- [nio-8888-exec-1] com.example.springboot.config.SendMsg : convertAndSend方法发送消息:UserDTO(id=1, name=MQ)INFO 10636 --- [enerContainer-2] c.example.springboot.config.MsgService : 消息监听,执行handleMessage(),msg:UserDTO(id=1, name=MQ)INFO 10636 --- [enerContainer-1] c.example.springboot.config.MsgService : 消息监听,执行handleMessage(),msg:UserDTO(id=1, name=MQ)
7.RabbitListener
RabbitListener是SpringBoot中消息监听的最终方案,使用注解声明,对业务代码无侵入,也可以在SpringBoot配置文件中进行配置
@RabbitListener注解的使用
@RabbitListener是一个组合注解,可以嵌套以下注解@Exchange:自动声明Exchange@Queue:自动声明队列@QueueBinding:自动声明绑定关系
申明RabbitListenerContainerFactory的bean
@Beanpublic RabbitListenerContainerFactory rabbitListenerContainerFactory(ConnectionFactory connectionFactory){SimpleRabbitListenerContainerFactory factory = new SimpleRabbitListenerContainerFactory();factory.setConnectionFactory(connectionFactory);return factory;}
作用在类上
@Slf4j
@Component
@RabbitListener(containerFactory = "rabbitListenerContainerFactory", queues = "queue.test")
public class MsgService {@RabbitHandler(isDefault = true)public void test1(@Payload Message message) {log.info("消息监听,执行handleMessage(),msg:{}", new String(message.getBody()));}
}
作用在方法上
@RabbitListener(containerFactory = "rabbitListenerContainerFactory", queues = "queue.test")public void test1(@Payload Message message) {log.info("消息监听,执行handleMessage(),msg:{}", new String(message.getBody()));}
自动申明交换机、队列、绑定关系、参数属性
@Slf4j
@Configuration
public class RabbitConfig {@Beanpublic ConnectionFactory connectionFactory() {CachingConnectionFactory connectionFactory = new CachingConnectionFactory();connectionFactory.setHost("ip");connectionFactory.setPort(5672);connectionFactory.setPassword("guest");connectionFactory.setUsername("guest");connectionFactory.setPublisherConfirmType(CachingConnectionFactory.ConfirmType.CORRELATED);connectionFactory.setPublisherReturns(true);// 申明式配置后,手动调用一次,否则使用时才会初始化,,如调用连接方法触发交换机队列等的初始化connectionFactory.createConnection();return connectionFactory;}@Beanpublic RabbitAdmin rabbitAdmin(ConnectionFactory connectionFactory) {return new RabbitAdmin(connectionFactory);}@BeanRabbitTemplate rabbitTemplate(ConnectionFactory connectionFactory) {RabbitTemplate rabbitTemplate = new RabbitTemplate(connectionFactory);//开启消息返回机制rabbitTemplate.setMandatory(true);// 消息返回rabbitTemplate.setReturnCallback(new RabbitTemplate.ReturnCallback() {@Overridepublic void returnedMessage(Message message, int replyCode, String replyText, String exchange, String routingKey) {log.info("message:{}, replyCode:{}, replyText:{}, exchange:{}, routingKey{}", message, replyCode, replyText, exchange, routingKey);}});//消息确认rabbitTemplate.setConfirmCallback(new RabbitTemplate.ConfirmCallback() {@Overridepublic void confirm(CorrelationData correlationData, boolean ack, String cause) {log.info("correlationData:{}, ack:{}, cause{}", correlationData, ack, cause);}});return rabbitTemplate;}@Beanpublic RabbitListenerContainerFactory rabbitListenerContainerFactory(ConnectionFactory connectionFactory){SimpleRabbitListenerContainerFactory factory = new SimpleRabbitListenerContainerFactory();factory.setConnectionFactory(connectionFactory);return factory;}
}
@Slf4j
@Component
public class MsgService {@RabbitListener(containerFactory = "rabbitListenerContainerFactory", admin = "rabbitAdmin",bindings = {@QueueBinding(value = @Queue(name = "queue.test",arguments = {@Argument(name = "x-message-ttl", value = "1000", type = "java.lang.Integer"),@Argument(name = "x-dead-letter-exchange", value = "exchange.dlx"),}),exchange = @Exchange(name = "exchange.test", type = ExchangeTypes.FANOUT),key = "key.test"),@QueueBinding(value = @Queue(name = "exchange.dlx"),exchange = @Exchange(name = "exchange.dlx", type = ExchangeTypes.DIRECT),key = "key.dlx"),})public void test1(@Payload Message message) {log.info("消息监听,执行handleMessage(),msg:{}", new String(message.getBody()));}
}
删除已存在交换机与队列,重启项目
INFO 11692 --- [nio-8888-exec-1] com.example.springboot.config.SendMsg : send方法发送消息:UserDTO(id=1, name=MQ)INFO 11692 --- [nio-8888-exec-1] com.example.springboot.config.SendMsg : convertAndSend方法发送消息:UserDTO(id=1, name=MQ)INFO 11692 --- [nectionFactory1] c.e.springboot.config.RabbitConfig : correlationData:null, ack:true, causenullINFO 11692 --- [ntContainer#0-1] c.example.springboot.config.MsgService : 消息监听,执行handleMessage(),msg:{"id":1,"name":"MQ"}INFO 11692 --- [ntContainer#0-1] c.example.springboot.config.MsgService : 消息监听,执行handleMessage(),msg:{"id":1,"name":"MQ"}INFO 11692 --- [nectionFactory1] c.e.springboot.config.RabbitConfig : correlationData:CorrelationData [id=123456], ack:true, causenull
注释/删除创建的RabbitConfig配置类,在application.properties配置MQ信息,SpringBoot约定大于配置,会自动进行RabbitConfig配置类相关设置
spring.rabbitmq.addresses=ip
spring.rabbitmq.username=guest
spring.rabbitmq.password=guest
spring.rabbitmq.port=6379# 开启发送确认
spring.rabbitmq.publisher-confirm-type=correlated
# 开启发送失败退回
spring.rabbitmq.publisher-returns=true
# 手动签收
spring.rabbitmq.listener.simple.acknowledge-mode=manual
添加消息确认与回退监听
@Configuration
@Slf4j
public class MqConfig {/*** 开启confirm和return机制的回调处理** @return RabbitTemplate*/@BeanRabbitTemplate rabbitTemplate(ConnectionFactory connectionFactory) {RabbitTemplate rabbitTemplate = new RabbitTemplate(connectionFactory);//开启消息返回机制rabbitTemplate.setMandatory(true);// 消息返回rabbitTemplate.setReturnCallback(new RabbitTemplate.ReturnCallback() {@Overridepublic void returnedMessage(Message message, int replyCode, String replyText, String exchange, String routingKey) {log.info("message:{}, replyCode:{}, replyText:{}, exchange:{}, routingKey{}", message, replyCode, replyText, exchange, routingKey);}});//消息确认rabbitTemplate.setConfirmCallback(new RabbitTemplate.ConfirmCallback() {@Overridepublic void confirm(CorrelationData correlationData, boolean ack, String cause) {log.info("correlationData:{}, ack:{}, cause{}", correlationData, ack, cause);}});return rabbitTemplate;}
}注释admin = "rabbitAdmin",spring创建的bean不叫rabbitAdmin整个名字
containerFactory = "rabbitListenerContainerFactory"可注释可不注释,实则会创建该Bean可直接引用或不引用
@Slf4j
@Component
public class MsgService {@RabbitListener(//containerFactory = "rabbitListenerContainerFactory", admin = "rabbitAdmin",bindings = {@QueueBinding(value = @Queue(name = "queue.test",arguments = {@Argument(name = "x-message-ttl", value = "1000", type = "java.lang.Integer"),@Argument(name = "x-dead-letter-exchange", value = "exchange.dlx"),}),exchange = @Exchange(name = "exchange.test", type = ExchangeTypes.FANOUT),key = "key.test"),@QueueBinding(value = @Queue(name = "exchange.dlx"),exchange = @Exchange(name = "exchange.dlx", type = ExchangeTypes.DIRECT),key = "key.dlx"),})public void test1(@Payload Message message, Channel channel) throws IOException {log.info("消息监听,执行handleMessage(),msg:{}", new String(message.getBody()));log.info("准备执行签收,签收消息Id:{}",message.getMessageProperties().getDeliveryTag());channel.basicAck(message.getMessageProperties().getDeliveryTag(), false);}
}
删除已存在交换机与队列,重启项目
INFO 14028 --- [nio-8888-exec-1] com.example.springboot.config.SendMsg : send方法发送消息:UserDTO(id=1, name=MQ)INFO 14028 --- [nio-8888-exec-1] com.example.springboot.config.SendMsg : convertAndSend方法发送消息:UserDTO(id=1, name=MQ)INFO 14028 --- [ntContainer#0-1] c.example.springboot.config.MsgService : 消息监听,执行handleMessage(),msg:{"id":1,"name":"MQ"}INFO 14028 --- [ntContainer#0-1] c.example.springboot.config.MsgService : 准备执行签收,签收消息Id:1INFO 14028 --- [ntContainer#0-1] c.example.springboot.config.MsgService : 消息监听,执行handleMessage(),msg:{"id":1,"name":"MQ"}INFO 14028 --- [ntContainer#0-1] c.example.springboot.config.MsgService : 准备执行签收,签收消息Id:2
本文来自互联网用户投稿,文章观点仅代表作者本人,不代表本站立场,不承担相关法律责任。如若转载,请注明出处。 如若内容造成侵权/违法违规/事实不符,请点击【内容举报】进行投诉反馈!