IOS学习实例之三---QQ列表
今天跟着极客学院的视频做了QQ列表。
在这个例子中,学习到了一些新的知识点。如:二级控制器等
样例图片:
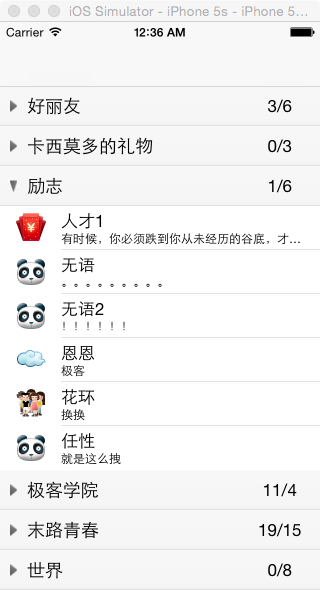
列表可以展开,点击好友可以跳到另一个页面
本实例没有使用xib或者storyboard。而是采用纯代码的方式添加view,进行界面布局,背景调整。
实现步骤如下:
1. 模型搭建
1)本例采用MVC的结构,首先添加三个文件夹,然后将其拖入项目,copy成为group。
就是黄色文件夹。
2)添加GroupModel.h和.m文件,实现组的模型
3)添加Friends.h和.m文件,实现好友模型
2. 实现UITableView
1) 设置二级控制器和主window
- (BOOL)application:(UIApplication *)application didFinishLaunchingWithOptions:(NSDictionary *)launchOptions {// Override point for customization after application launch.self.window = [[UIWindow alloc] initWithFrame:[UIScreen mainScreen].bounds];self.window.backgroundColor = [UIColor whiteColor];ListTableViewController *listVC = [[ListTableViewController alloc] init];//二级控制器UINavigationController *navCtrl = [[UINavigationController alloc] initWithRootViewController:listVC];self.window.rootViewController = navCtrl;//set it is a main window[self.window makeKeyAndVisible];return YES;
}
通过懒加载的方式绑定数据到ListTableViewController
3) 设置section数目,设置section内行数
4)创建Cell,并绑定数据到cell上,需要使用标示符
3. 自定义头视图
1)创建HeaderView.h和.m文件,继承自UITableViewHeaderFooterView
2)在实现文件中创建并初始化header
+ (instancetype)headerView:(UITableView *)tableView{static NSString *identifier = @"header";HeaderView *header = [tableView dequeueReusableCellWithIdentifier:identifier];if(!header){header = [[HeaderView alloc] initWithReuseIdentifier:identifier];}return header;
}- (instancetype)initWithReuseIdentifier:(NSString *)reuseIdentifier{if (self = [super init]) {UIButton *button = [UIButton buttonWithType:UIButtonTypeCustom];[button setBackgroundImage:[UIImage imageNamed:@"header_bg"] forState:UIControlStateNormal];[button setBackgroundImage:[UIImage imageNamed:@"header_bg_highlighted"] forState:UIControlStateHighlighted];[button setImage:[UIImage imageNamed:@"arrow"] forState:UIControlStateNormal];[button setTitleColor:[UIColor blackColor] forState:UIControlStateNormal];button.contentEdgeInsets = UIEdgeInsetsMake(0, 10, 0, 0);button.contentHorizontalAlignment = UIControlContentHorizontalAlignmentLeft;button.titleEdgeInsets = UIEdgeInsetsMake(0, 10, 0, 0);[button addTarget:self action:@selector(buttonAction) forControlEvents:UIControlEventTouchUpInside];button.imageView.clipsToBounds = NO;_arrowBtn = button;[self addSubview:_arrowBtn];//create label, display current people numberUILabel *labelRight = [[UILabel alloc] init];labelRight.textAlignment = NSTextAlignmentCenter;_label = labelRight;[self addSubview:_label];}return self;
}
2)设置header按钮上显示的值
- (void)setGroupModel:(GroupModel *)groupModel{_groupModel = groupModel;[_arrowBtn setTitle:_groupModel.name forState:UIControlStateNormal];_label.text = [NSString stringWithFormat:@"%@/%lu", _groupModel.online, (unsigned long)_groupModel.friends.count];}3)设置header上button和label的frame
//layout:set the frame value of button and frame
- (void)layoutSubviews{[super layoutSubviews];_arrowBtn.frame = self.bounds;_label.frame = CGRectMake(self.frame.size.width - 70, 0, 60, self.frame.size.height);
}
4)在ListViewTableController.m中绑定header
- (UIView *)tableView:(UITableView *)tableView viewForHeaderInSection:(NSInteger)section{HeaderView *header = [HeaderView headerView:tableView];header.delegate = self;header.groupModel = self.dataArray[section];return header;}5)在HeaderView中实现点击
#import
#import "GroupModel.h"// for the click
@protocol HeaderViewDelegate @optional
- (void)clickView;@end@interface HeaderView : UITableViewHeaderFooterView@property (nonatomic, assign) id delegate;
@property (nonatomic, strong) GroupModel *groupModel;+ (instancetype)headerView:(UITableView *)tableView;@end
- (void)buttonAction{self.groupModel.isOpen = !self.groupModel.isOpen;if ([self.delegate respondsToSelector:@selector(clickView)]) {[self.delegate clickView];}
}在ListTableViewController中
- (void)clickView{[self.tableView reloadData];
}
4. 实现好友点击
- (void)tableView:(UITableView *)tableView didSelectRowAtIndexPath:(NSIndexPath *)indexPath{ViewController *viewCtrl = [[ViewController alloc] init];viewCtrl.view.backgroundColor = [UIColor grayColor];[self.navigationController pushViewController:viewCtrl animated:NO];}5. 去除底线
- (void)clipExtraCellLine:(UITableView *)tableView{UIView *view = [[UIView alloc] init];view.backgroundColor = [UIColor clearColor];[self.tableView setTableFooterView:view];
}
6. 设置按钮点击后翻转
- (void)didMoveToSuperview{_arrowBtn.imageView.transform = self.groupModel.isOpen ?CGAffineTransformMakeRotation(M_PI_2) :CGAffineTransformMakeRotation(0);
}
本文来自互联网用户投稿,文章观点仅代表作者本人,不代表本站立场,不承担相关法律责任。如若转载,请注明出处。 如若内容造成侵权/违法违规/事实不符,请点击【内容举报】进行投诉反馈!