RK3568 android11.0 LCD多屏配置
RK3568支持三屏显示,显示屏DTS配置划分为三部分:LCD参数配置,LCD引脚配置,VP通道配置
- LCD参数配置根据单屏显示参数移植即可
- LCD引脚配置,包括RST, PWR, PWM
注:若不同通道的屏,使用相同的引脚,只需要在其中一个屏中控制;若同时配置的话,则会uboot启动失败.
常用调试命令:
adb root
adb remount
adb shell
#getprop | grep hw //查看屏配置
#cat /d/dri/0/summary //查看vop绑定情况
adb shell settings get system screen_brightness //获取当前亮度值
adb shell settings put system screen_brightness 150 //更改亮度值(亮度值在0—255之间)
一. LCD参数配置
1. lvds显示配置
&lvds_panel {status = "okay";compatible = "simple-panel";backlight = <&backlight4>; //背光enable-delay-ms = <20>;prepare-delay-ms = <20>;unprepare-delay-ms = <20>;disable-delay-ms = <20>;bus-format = <MEDIA_BUS_FMT_RGB666_1X7X3_SPWG>; //MEDIA_BUS_FMT_RGB666_1X7X3_JEIDAwidth-mm = <217>;height-mm = <136>;display-timings {native-mode = <&timing2>;timing2: timing2 {clock-frequency = <45000000>;hactive = <1024>;vactive = <600>;hback-porch = <160>;hfront-porch = <160>;vback-porch = <23>;vfront-porch = <12>;hsync-len = <20>;vsync-len = <3>;hsync-active = <0>;vsync-active = <0>;de-active = <0>;pixelclk-active = <0>;};};ports {#address-cells = <1>;#size-cells = <0>;port@0 {reg = <0>;dual-lvds-even-pixels;panel_in_lvds: endpoint {remote-endpoint = <&lvds_out_panel>;};};};
};&lvds {status = "okay";ports {port@1 {reg = <1>;lvds_out_panel: endpoint {remote-endpoint = <&panel_in_lvds>;};};};
};&video_phy0 {status = "okay";
};
2. dsi0显示配置
&dsi0 {status = "okay";rockchip,lane-rate = <480>;dsi0_panel: panel@0 {status = "okay";compatible = "simple-panel-dsi";reg = <0>;reset-delay-ms = <60>;enable-delay-ms = <60>;prepare-delay-ms = <60>;unprepare-delay-ms = <60>;disable-delay-ms = <60>;dsi,flags = <(MIPI_DSI_MODE_VIDEO | MIPI_DSI_MODE_VIDEO_BURST |MIPI_DSI_MODE_LPM | MIPI_DSI_MODE_EOT_PACKET)>;dsi,format = <MIPI_DSI_FMT_RGB888>;dsi,lanes  = <4>;panel-init-sequence = [05 78 01 1105 78 01 29];panel-exit-sequence = [05 00 01 2805 78 01 10];disp_timings0: display-timings {native-mode = <&dsi0_timing0>;dsi0_timing0: timing0 {clock-frequency = <51000000>;hactive = <1024>;vactive = <600>;hback-porch = <160>;hfront-porch = <136>;vback-porch = <16>;vfront-porch = <16>;hsync-len = <4>;vsync-len = <2>;hsync-active = <0>;vsync-active = <0>;de-active = <0>;pixelclk-active = <1>;};};ports {#address-cells = <1>;#size-cells = <0>;port@0 {reg = <0>;panel_in_dsi: endpoint {remote-endpoint = <&dsi_out_panel>;};};};};ports {#address-cells = <1>;#size-cells = <0>;port@1 {reg = <1>;dsi_out_panel: endpoint {remote-endpoint = <&panel_in_dsi>;};};};
};&mipi_dphy0 {status = "disabled"; //这个节点一定要disabled掉,不然会进不去系统;//I've been in trouble here before
};
3. dsi1显示配置
&dsi1 {status = "okay";//rockchip,lane-rate = <;dsi1_panel: panel@0 {status = "okay";compatible = "simple-panel-dsi";reg = <0>;backlight = <&backlight5>;reset-delay-ms = <60>;enable-delay-ms = <60>;prepare-delay-ms = <60>;unprepare-delay-ms = <60>;disable-delay-ms = <60>;dsi,flags = <(MIPI_DSI_MODE_VIDEO | MIPI_DSI_MODE_VIDEO_BURST |MIPI_DSI_MODE_LPM | MIPI_DSI_MODE_EOT_PACKET)>;dsi,format = <MIPI_DSI_FMT_RGB888>;dsi,lanes  = <4>;panel-init-sequence = [05 78 01 1105 78 01 29];panel-exit-sequence = [05 00 01 2805 78 01 10];disp_timings1: display-timings {native-mode = <&dsi1_timing0>;dsi1_timing0: timing0 {clock-frequency = <35000000>;hactive = <1024>;vactive = <600>;hback-porch = <160>;hfront-porch = <136>;vback-porch = <16>;vfront-porch = <16>;hsync-len = <4>;vsync-len = <2>;hsync-active = <0>;vsync-active = <0>;de-active = <0>;pixelclk-active = <1>;};};ports {#address-cells = <1>;#size-cells = <0>;port@0 {reg = <0>;panel_in_dsi1: endpoint {remote-endpoint = <&dsi1_out_panel>;};};};};ports {#address-cells = <1>;#size-cells = <0>;port@1 {reg = <1>;dsi1_out_panel: endpoint {remote-endpoint = <&panel_in_dsi1>;};};};
};&mipi_dphy1 {status = "okay";
};
4. edp显示配置
&edp_panel {status = "okay";compatible = "simple-panel";//backlight = <&backlight5>;prepare-delay-ms = <20>;enable-delay-ms = <20>;disable-delay-ms = <20>;unprepare-delay-ms = <20>;display-timings {native-mode = <&timing1>;timing0: timing0 {//EDP 13.3clock-frequency = <150000000>;hactive = <1920>;vactive = <1080>;hfront-porch = <12>;hsync-len = <16>;hback-porch = <48>;vfront-porch = <8>;vsync-len = <4>;vback-porch = <8>;hsync-active = <0>;vsync-active = <0>;de-active = <0>;pixelclk-active = <0>;};timing1: timing1 {// EDP 15.6   LP156WF6clock-frequency = <138000000>;hactive = <1920>;vactive = <1080>;hfront-porch = <48>;hsync-len = <32>;hback-porch = <80>;vfront-porch = <3>;vsync-len = <5>;vback-porch = <23>;hsync-active = <0>;vsync-active = <0>;de-active = <0>;pixelclk-active = <0>;};};ports {panel_in_edp: endpoint {remote-endpoint = <&edp_out_panel>;};};
};&edp {hpd-gpios = <&gpio0 RK_PC2 GPIO_ACTIVE_HIGH>;status = "okay";force-hpd;ports {port@1 {reg = <1>;edp_out_panel: endpoint {remote-endpoint = <&panel_in_edp>;};};};
};&edp_phy {status = "okay";
};
二. VP通道配置
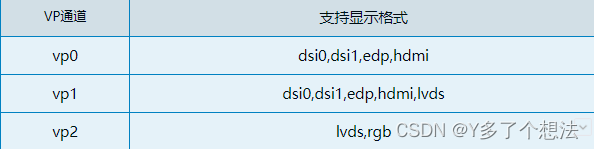
RK3568支持VP0~2,每个VP通道只能配置单一显示屏,并且每个通道支持显示屏格式不一致。
1. 常用参数
VP0 : dsi0_in_vp0、dsi1_in_vp0、edp_in_vp0、hdmi_in_vp0
VP1 : dsi0_in_vp1、dsi1_in_vp1、edp_in_vp1、hdmi_in_vp1、lvds_in_vp1
VP2 : lvds_in_vp2、rgb_in_vp2
2. vp通道绑定
- dsi0 + vp0
&dsi0_in_vp0 {status = "okay";
};&dsi0_in_vp1 {status = "disabled";
};&route_dsi0 {status = "okay";connect = <&vp0_out_dsi0>;
};
- dsi1+vp0
&dsi1_in_vp0 {status = "okay";
};&dsi1_in_vp1 {status = "disabled";
};&route_dsi1 {status = "okay";connect = <&vp0_out_dsi1>;
};
- edp+vp1
&edp_in_vp0 {status = "disabled";
};&edp_in_vp1 {status = "okay";
};&route_edp {status = "okay";connect = <&vp1_out_edp>;
};
- lvds+vp2
&lvds_in_vp1 {status = "disabled";
};&lvds_in_vp2 {status = "okay";
};&route_lvds {status = "okay";connect = <&vp2_out_lvds>;
};
三. LCD引脚配置
1. RST/PWR GPIO配置
注:不论PWM,RST,PWR中任一引脚,都不能重复配置在已经使能的通道下,否则会导致uboot启动失败。
// MIPI DSI0
&dsi0_panel {power-supply = <&vcc3v3_lcd_n>;reset-gpios = <&gpio4 RK_PD2 GPIO_ACTIVE_LOW>; // 屏reset脚gpio口pinctrl-names = "default";pinctrl-0 = <&lcd_rst_gpio>;backlight = <&backlight4>;
};// MIPI DSI1
&dsi1_panel {power-supply = <&vcc3v3_lcd_n>;reset-gpios = <&gpio4 RK_PD2 GPIO_ACTIVE_LOW>;pinctrl-names = "default";pinctrl-0 = <&lcd_rst_gpio>;backlight = <&backlight5>;
};// LVDS
&lvds_panel {power-supply = <&vcc3v3_lcd_n>;reset-gpios = <&gpio4 RK_PD2 GPIO_ACTIVE_LOW>;pinctrl-names = "default";pinctrl-0 = <&lcd_rst_gpio>;backlight = <&backlight4>;
};// EDP
&edp_panel {power-supply = <&vcc3v3_lcd_n>;backlight = <&backlight5>;
};// POWER GPIO
&vcc3v3_lcd_n {gpio = <&gpio0 RK_PC7 GPIO_ACTIVE_HIGH>; //屏PWR_EN脚gpio口enable-active-high;
};&pinctrl {lcd1 {lcd_rst_gpio: lcd1-rst-gpio {rockchip,pins = <4 RK_PD2 RK_FUNC_GPIO &pcfg_pull_none>; //up,down};};
};
2. PWM配置
dts中同时使能PWM4,PWM5,根据原理图在对应的LCD中直接引用即可。
/ {backlight4: backlight4 {compatible = "pwm-backlight";pwms = <&pwm4 0 25000 0>;brightness-levels = <0  20  20  21  21  22  22  2323  24  24  25  25  26  26  2727  28  28  29  29  30  30  3131  32  32  33  33  34  34  3535  36  36  37  37  38  38  3940  41  42  43  44  45  46  4748  49  50  51  52  53  54  5556  57  58  59  60  61  62  6364  65  66  67  68  69  70  7172  73  74  75  76  77  78  7980  81  82  83  84  85  86  8788  89  90  91  92  93  94  9596  97  98  99 100 101 102 103104 105 106 107 108 109 110 111112 113 114 115 116 117 118 119120 121 122 123 124 125 126 127128 129 130 131 132 133 134 135136 137 138 139 140 141 142 143144 145 146 147 148 149 150 151152 153 154 155 156 157 158 159160 161 162 163 164 165 166 167168 169 170 171 172 173 174 175176 177 178 179 180 181 182 183184 185 186 187 188 189 190 191192 193 194 195 196 197 198 199200 201 202 203 204 205 206 207208 209 210 211 212 213 214 215216 217 218 219 220 221 222 223224 225 226 227 228 229 230 231232 233 234 235 236 237 238 239240 241 242 243 244 245 246 247248 249 250 251 252 253 254 255>;default-brightness-level = <200>;};backlight5: backlight5 {compatible = "pwm-backlight";pwms = <&pwm5 0 25000 0>;brightness-levels = <0  20  20  21  21  22  22  2323  24  24  25  25  26  26  2727  28  28  29  29  30  30  3131  32  32  33  33  34  34  3535  36  36  37  37  38  38  3940  41  42  43  44  45  46  4748  49  50  51  52  53  54  5556  57  58  59  60  61  62  6364  65  66  67  68  69  70  7172  73  74  75  76  77  78  7980  81  82  83  84  85  86  8788  89  90  91  92  93  94  9596  97  98  99 100 101 102 103104 105 106 107 108 109 110 111112 113 114 115 116 117 118 119120 121 122 123 124 125 126 127128 129 130 131 132 133 134 135136 137 138 139 140 141 142 143144 145 146 147 148 149 150 151152 153 154 155 156 157 158 159160 161 162 163 164 165 166 167168 169 170 171 172 173 174 175176 177 178 179 180 181 182 183184 185 186 187 188 189 190 191192 193 194 195 196 197 198 199200 201 202 203 204 205 206 207208 209 210 211 212 213 214 215216 217 218 219 220 221 222 223224 225 226 227 228 229 230 231232 233 234 235 236 237 238 239240 241 242 243 244 245 246 247248 249 250 251 252 253 254 255>;default-brightness-level = <200>;enable-gpios = <&gpio0 RK_PC6 GPIO_ACTIVE_HIGH>; // 屏背光使能脚gpio口pinctrl-names = "default";pinctrl-0 = <&edp_bl_en>;};
};&pwm4 {status = "okay";
};&pwm5 {status = "okay";
};&pinctrl {backlight {edp_bl_en: edp-bl-en {rockchip,pins = <0 RK_PC6 RK_FUNC_GPIO &pcfg_pull_none>;};};
}
可根据实际需求来打开或关闭不需要的屏幕节点,一定要匹配VP通道对应所支持的屏幕类型,避免复用。
本文来自互联网用户投稿,文章观点仅代表作者本人,不代表本站立场,不承担相关法律责任。如若转载,请注明出处。 如若内容造成侵权/违法违规/事实不符,请点击【内容举报】进行投诉反馈!