Openvino量化模型推理 Fp32 Fp16 int8
我忘记我是哪个版本的openvino了,这里记录一下我将模型从onnx转换到Openvino的Ir模型以及最后的int8,Openvino比Tensorrt的泛化性要高,Tensorrt的量化是模型放到不同的机子上面都需要重新量化一次但是Openvino没有这个缺点。
我的OpenVino采用的是源码编译的这里采用的是python代码,之后可能会写一份C++代码放上去,先上才艺
一.将模型转换成onnx模型
这里我采用的是pytorch模型文件转成onnx
模型结构包括参数保存
import torch
import torch.nn
import os
import sysdef export(model_path):net = torch.load(model_path,map_location=torch.device('cpu'),)net.eval()#这里需要指定你输入和输出的名字方便后面推理input_names = ['input']output_names = ['output']#这里需要确定模型的输入x = torch.randn(1, 3, 224, 224)torch.onnx.export(net,x,os.path.join(os.path.split(model_path)[0],'best.onnx',),input_names=input_names,output_names=output_names,verbose=False,opset_version=12,)if __name__ == "__main__":model_path = '/home/yuesang/Pythonproject/MobileNetV3/runs/train/exp1/best.pt'export(model_path)
模型采用字典保存
import os
import torch
from swin_transformer import *
from collections import OrderedDictDROP_PATH_RATE = 0.5
EMBED_DIM = 192
DEPTHS = [2, 2, 18, 2]
NUM_HEADS = [6, 12, 24, 48]
WINDOW_SIZE = 7model_path = ''checkpoint = torch.load(model_path,map_location='cpu',
)
model = SwinTransformer(img_size=224,patch_size=4,in_chans=3,num_classes=0,embed_dim=EMBED_DIM,depths=DEPTHS,num_heads=NUM_HEADS,window_size=WINDOW_SIZE,mlp_ratio=4,qkv_bias=True,qk_scale=None,drop_rate=0.0,drop_path_rate=DROP_PATH_RATE,ape=False,patch_norm=True,
)new_state_dict = OrderedDict()
for k, v in checkpoint['model'].items():if k != 'head.weight':new_state_dict[k] = velse:print(k, v.shape)
model.load_state_dict(new_state_dict, strict=False)model.eval()input_names = ['input']
output_names = ['output']
x = torch.randn(1, 3, 224, 224)torch.onnx.export(model,x,os.path.join(os.path.split(model_path)[0],'best.onnx',),input_names=input_names,output_names=output_names,verbose=False,opset_version=12,
)
总结来说就是把字典导入到模型的结构里面然后在进行onnx的转换这部分可以自己网上找找教程听多的
二.模型从onnx模型转ir模型

这里如果你是用python直接pip的话可以直接进入conda的环境去使用她,如果你是源码编译OpenVino的话可能要进入那个目录下载一下,这里我个人觉得如果你只是用来测试的话Python其实就很够用了。
python mo_onnx.py --input_model <输入模型路经> --output_dir <输出模型路经>(如果需要量化到FP16的话需要额外指定参数 --compress_to_fp16)
首先先将你的模型转换到Ir格式,这里放一下mo的参数你们可以有道翻译一下我个人英语不太好这里就不解释了
mo -h #可以查看mo的参数
#或者是进入到mo.py所在的文件夹然后
python mo.py -h
之后测试一下转换完的模型推理速度
进入Openvino这个文件夹
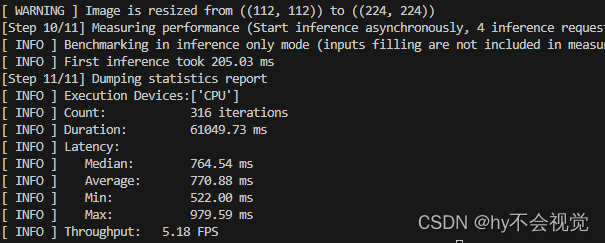
然后查看一下你模型量化的结果(FP32)
python ./benchmark_app.py -m <量化后的xml文件> -d CPU -api async -i <选择图片路径> -b 1其中 -d指定的是你的设备 -api指定的是你的推理模式(同步还是异步推理)
看一下FP32模型的速度

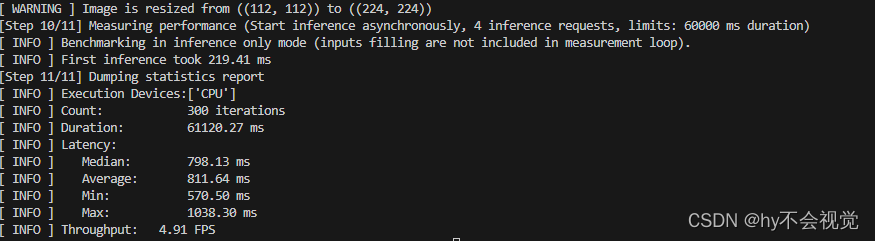
FP16
ONNX模型推理速度
三,Int8量化
在转换之前,我们需要准备一下数据(在量化过程中会使用到)。对于自己的数据集首先转换成openvino支持的数据格式,这里使用imagenet数据集格式,对于分类任务需要annotation.txt文件以及labels.txt共两个文件。
├── dataset:: 存放数据集的根目录
│     ├── 1:
│     ├── 2:
│     ├── 3:
│     ├── 4:
│     └── .... :
这里给一个生成annotation.txt和labels.txt脚本(霹雳趴拉导师那边抄的)
import os
import globimage_dir = "/your_dataset_dir"
assert os.path.exists(image_dir), "image dir does not exist..."img_list = glob.glob(os.path.join(image_dir, "*", "*.jpg"))
assert len(img_list) > 0, "No images(.jpg) were found in image dir..."classes_info = os.listdir(image_dir)
classes_info.sort()
classes_dict = {}# create label file
with open("my_labels.txt", "w") as lw:# 注意,没有背景时,index要从0开始for index, c in enumerate(classes_info, start=0):txt = "{}:{}".format(index, c)if index != len(classes_info):txt += "\n"lw.write(txt)classes_dict.update({c: str(index)})
print("create my_labels.txt successful...")# create annotation file
with open("my_annotation.txt", "w") as aw:for img in img_list:img_classes = classes_dict[img.split("/")[-2]]txt = "{} {}".format(img, img_classes)if index != len(img_list):txt += "\n"aw.write(txt)
print("create my_annotation.txt successful...")
3.1 模型测试
首先先测试FP32和FP16的模型精度,先准备一份yaml文件
models:- name: mobileNetV3Fp32launchers:#下面指定运行的框架 dlsdk就是openvino, 也可以是tensorflow或者其他框架#model/weights是要测试的模型文件名#adapter是告诉accuracy checker模型的输出是目标分类还是目标识别或者其他的输出- framework: openvinomodel: /home/yuesang/Pythonproject/MobileNetV3/runs/train/exp1/bestfp16.xmlweights: /home/yuesang/Pythonproject/MobileNetV3/runs/train/exp1/bestfp16.binadapter: classificationdatasets:#下面这部分是有关数据集的路径,数据集的格式(imagenet,VOC或者其他)以及标注文件的名字- name: Flowerdata_source: /mnt/hdd-4t/data/hanyue/mobileNet/flowerannotation_conversion:converter: imagenetannotation_file: "/home/yuesang/Pythonproject/MobileNetV3/onnxinference/int8inference/my_annotation.txt"#预处理告诉ac_checker工具在把数据集图片送进模型前要做那些预处理,比如缩放,剪切或者调整RGB/BGR顺序之类reader: opencv_imread # default settingpreprocessing:- type: resizesize: 256aspect_ratio_scale: greater- type: cropsize: 224- type: bgr_to_rgb # bgr format in opencv- type: normalization# you may specify precomputed statistics manually or use precomputed values, such as ImageNet as wellmean: (123.675, 116.28, 103.53)std: (58.395, 57.12, 57.375)#这里定义统计准确度用的算法,这里要看2种准确度,一个是top1的,还一个是top5的metrics:- name: accuracy @ top1type: accuracytop_k: 1
model:存放你的xml的路径,在精度测试中可以先不用放weight,这个model也可以是你的onnx文件
adapter:选择你的网络类型我这里是分类网络,openvino还支持目标检测网络具体可以看看config下面的配置
datasource:下面存放的是你的数据集的根路径(这里有个坑就是这个文件夹下面存放的图片路径要和你上面生成的annotion.txt对应起来包括你的类别还有路径,相当于就是你把你数据集所有的图片全部放在这个路径下面,验证的时候由annotion.txt里面的东西验证)
convert:我直接写imagenet没有什么影响
preprocessing:里面的是写的是你预处理操作(记得颜色通道的转换不然的话精确度一直和训练的时候验证都是错的)这里有的预处理很傻逼我官网也没有找到如果有人找到的话欢迎评论区和我说一声哈哈哈哈哈
metrics:定义的是评价指标这里是分类网络所以我采用的是accuary这里的top1表示,评分排名前1中能正确分出的概率。
accuracy_check -c 你的yaml文件 -s ./ -td CPU可以得到正确率了,之后int8量化也需要用到这个进行评估。
3.2.yaml文件以及json文件的准备
这里int8有两种量化方式一种是全int8量化还有一种是混精度量化首先先准备一下model.yaml文件
这里的yaml文件和刚刚那个yaml文件大差不差
models:- name: mobileNetV3launchers:- framework: dlsdkdevice: CPUadapter: classification#定义数据集datasets:- name: classification_dataset#定义数据集路径data_source: /mnt/hdd-4t/data/hanyue/mobileNet/flower#定义annotation路径annotation_conversion:converter: imagenetannotation_file: /home/yuesang/Pythonproject/MobileNetV3/onnxinference/int8inference/my_annotation.txtreader: opencv_imread # default setting#这里需要提前定义预处理preprocessing:- type: resizesize: 256aspect_ratio_scale: greater- type: cropsize: 224- type: bgr_to_rgb # bgr format in opencv- type: normalization# you may specify precomputed statistics manually or use precomputed values, such as ImageNet as wellmean: (123.675, 116.28, 103.53)std: (58.395, 57.12, 57.375)metrics:- name: accuracy @ top1type: accuracytop_k: 1
然后就是json文件的编写
3.2.1 DefaultQuantization
这个应该是openvino中的全int8的量化
{"model": {"model_name": "MobileNetV3", "model": "/home/yuesang/Pythonproject/MobileNetV3/runs/train/exp1/bestfp16.xml", "weights": "/home/yuesang/Pythonproject/MobileNetV3/runs/train/exp1/bestfp16.bin" },"engine": {"config": "/home/yuesang/Pythonproject/MobileNetV3/onnxinference/int8inference/defualtQuantization/model.yaml"},"compression": {"target_device": "CPU", "algorithms": [{"name": "DefaultQuantization", "params": {"preset": "performance",                      "stat_subset_size": 300  }}]}
}
model:里面定义的是你最开始量化后的xml和bin的路径以及指定你的设备
engine:就是你刚刚写好的yaml文件了
target_device:就是你要量化的设备
algorithms --
name:这里指定的是你的量化方式
preset:我也不知道什么意思
stat_subset_size: 好像是采取多少张数据集的意思
3.2.2 AccuracyAwareQuantization
先放一下json文件
{"model": {"model_name": "MobileNetV3", "model": "/home/yuesang/Pythonproject/MobileNetV3/runs/train/exp1/bestfp16.xml", "weights": "/home/yuesang/Pythonproject/MobileNetV3/runs/train/exp1/bestfp16.bin" },"engine": {"config": "/home/yuesang/Pythonproject/MobileNetV3/onnxinference/int8inference/AccuracyAwareQuantization/model.yaml"},"compression": {"target_device": "CPU", "algorithms": [{"name": "AccuracyAwareQuantization", "params": {"preset": "performance",                      "stat_subset_size": 300  ,"maximal_drop": 0.1 }}]}
}
想比于DefaultQuantization就是name里面那个不一样以及多了一个maximal_drop,这个参数的意义是运行你的模型下降多少指标
准确度的测试脚本可以用我3.1讲到的那个部分来测试只要把模型替换掉就OK了
但是Openvino的量化好像只支撑分类网络和目标检测,后续找个时间写一下有关Pytorch自带的QAT的量化方法
本文来自互联网用户投稿,文章观点仅代表作者本人,不代表本站立场,不承担相关法律责任。如若转载,请注明出处。 如若内容造成侵权/违法违规/事实不符,请点击【内容举报】进行投诉反馈!