黑马程序员JavaWeb开发教程(P67-P115)
黑马程序员JavaWeb开发教程(P67-P115)
- 1. 请求
- 1.1 Postman
- 1.2 简单参数
- 1.2.1 原始方式
- 1.2.2 SpringBoot形参
- 1.2.3 @RequestParam
- 1.3 实体参数
- 1.3.1 简单实体对象
- 1.3.2 复杂实体对象
- 1.4 数组集合参数
- 1.4.1 数组参数
- 1.4.2 集合参数
- 1.5 日期参数
- 1.6 Json参数
- 1.6.1 发送请求
- 1.6.2 接受请求
- 1.7 路径参数
- 2 响应
- 3 分层解耦
- 3.1 三层架构
- 3.2 分层解耦(IOC-DI引入)
- 3.3 IOC&DI-入门
- 3.4 IOC&DI-IOC详解
- 3.5 IOC&DI-DI详解
- 4 MySQL


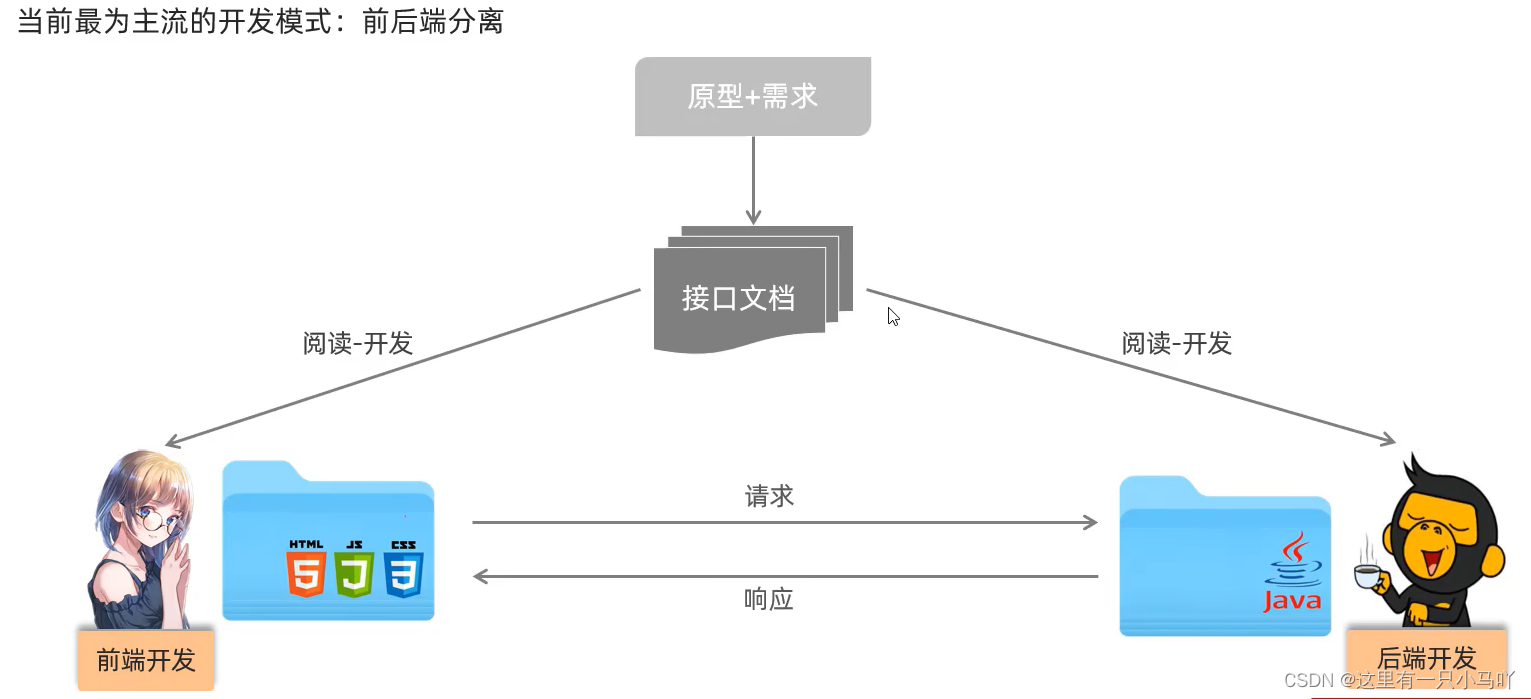
请求响应:
- 请求(HttpServletRequest) :获取请求数据
- 响应(HttpServletResponse) :设置响应数据
- BS架构: Browser/Server, 浏览器/服务器架构模式。客户端只需要浏览器,应用程序的逻辑和数据都存储在服务端。
- CS架构: Client/Server, 客户端/服务器架构模式。
1. 请求
介绍请求参数的接受及封装
1.1 Postman
Postman是一款功能强大的网页调试与发送网页HTTP请求的Chrome插件。
作用:常用于进行接口测试(超链接点击进入官网下载即可)
正常Free注册登录到下面的这个界面:

输入下面网址:运行你上面写的代码 你就不用打开浏览器接受了!
http://localhost:8080/hello
这个软件会收到响应回来的数据——Hello World
1.2 简单参数
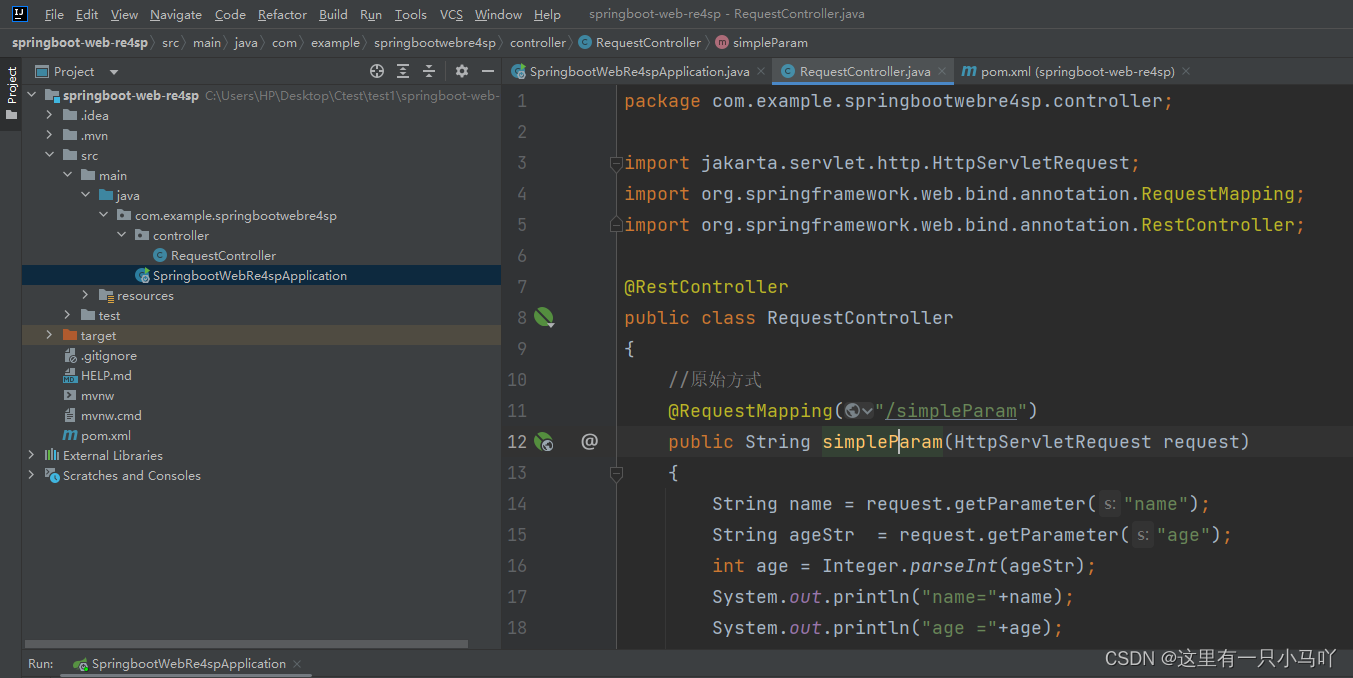
1.2.1 原始方式
案例测试:

**原始方式:**在原始的web程序中,获取请求参数,需要通过HttpServletRequest对象手动获取。
package com.example.springbootwebre4sp.controller;import jakarta.servlet.http.HttpServletRequest;
import org.springframework.web.bind.annotation.RequestMapping;
import org.springframework.web.bind.annotation.RestController;@RestController
public class RequestController
{//原始方式@RequestMapping("/simpleParam")public String simpleParam(HttpServletRequest request){String name = request.getParameter("name");String ageStr  = request.getParameter("age");int age = Integer.parseInt(ageStr);System.out.println("name="+name);System.out.println("age ="+age);return "OK";}
}
目录的层级关系如下:
响应结果:

注意网址输入是下面这个:
http://localhost:8080/simpleParam?name=Tom&age=18
浏览器传递了name与age的参数后,服务器接受成功 and返回OK在浏览器中。

1.2.2 SpringBoot形参
观察上面的步骤:发现原始方式过于繁琐,我还要手动类型转换,那么在SpringBoot中,如何简化上面的代码呢?
前端传递了参数后,我只需要在Controller中建立对应的形参就可以接受到了。

package com.example.springbootwebre4sp.controller;import jakarta.servlet.http.HttpServletRequest;
import org.springframework.web.bind.annotation.RequestMapping;
import org.springframework.web.bind.annotation.RestController;@RestController
public class RequestController
{//原始方式@RequestMapping("/simpleParam")public String simpleParam(String name,int age){System.out.println("name="+name);System.out.println("age ="+age);return "OK";}
}
那么上面是GET的请求方式,下面我们演示POST的请求方式


1.2.3 @RequestParam

@RequestParam中的required属性默认为true,代表该请求参数必须传递,如果不传递将报错。如果该参数是可选的,可以将required属性设置为false。
1.3 实体参数
1.3.1 简单实体对象
- 简单实体对象:请求参数名与形参对象属性名相同,定义POJO接收即可

但是我要是传递10个20个参数呢?????
Java 是怎么解决的呢?建立类!参数都是成员变量!!!!


User
package com.example.springbootwebre4sp.pojo;public class User {private String name;public  Integer age;public User() {}public User(String name, Integer age) {this.name = name;this.age = age;}public String getName() {return name;}public void setName(String name) {this.name = name;}public Integer getAge() {return age;}public void setAge(Integer age) {this.age = age;}@Overridepublic String toString() {return "User{" +"name='" + name + '\'' +", age=" + age +'}';}
}
RequestController
package com.example.springbootwebre4sp.controller;import com.example.springbootwebre4sp.pojo.User;
import jakarta.servlet.http.HttpServletRequest;
import org.springframework.web.bind.annotation.RequestMapping;
import org.springframework.web.bind.annotation.RestController;@RestController
public class RequestController
{//原始方式@RequestMapping("/simpleParam")public String simpleParam(String name,int age){System.out.println("name="+name);System.out.println("age ="+age);return "OK";}@RequestMapping("/simplePojo")public String simplePojo(User user){System.out.println(user);return "OK";}
}
1.3.2 复杂实体对象

1.4 数组集合参数
1.4.1 数组参数
请求参数名与形参数组名称相同且请求参数为多个,定义数组类型形参即可接收参数


package com.example.springbootwebre4sp.controller;import com.example.springbootwebre4sp.pojo.User;
import jakarta.servlet.http.HttpServletRequest;
import org.springframework.web.bind.annotation.RequestMapping;
import org.springframework.web.bind.annotation.RestController;import java.util.Arrays;@RestController
public class RequestController
{//原始方式@RequestMapping("/arrayParam")public String arrayParam(String[] hobby){System.out.println(Arrays.toString(hobby));return "OK";}
}
这是数组的!
1.4.2 集合参数
package com.example.springbootwebre4sp.controller;import org.springframework.web.bind.annotation.RequestMapping;
import org.springframework.web.bind.annotation.RequestParam;
import org.springframework.web.bind.annotation.RestController;import java.util.List;@RestController
public class RequestController
{//原始方式@RequestMapping("/listParam")public String listParam(@RequestParam List<String> hobby){System.out.println(hobby);return "OK";}
}
数组集合参数
- 数组:请求参数名与形参中数组变量名相同,可以直接使用数组封装
- 集合:请求参数名与形参中集合变量名相同,通过@RequestParam绑定参数关系
1.5 日期参数
入职时间、生日等时间类型的表单——可以封装到LocalDateTime中来
但是前端传来的时间类型多种多样,如2020年12月12日10时10分10秒、2020/12/12 10:10:10等等。
所以我要申明日期格式

http://localhost:8080/dataParam?updateTime=2020-12-12 10:10:10
import org.springframework.web.bind.annotation.RestController;import java.time.LocalDateTime;
import java.util.List;@RestController
public class RequestController
{//原始方式@RequestMapping("/dataParam")public String dataParam(@DateTimeFormat(pattern = "yyyy-MM-dd HH:mm:ss") LocalDateTime updateTime){System.out.println(updateTime);return "OK";}
}

2020-12-12T10:10:10
1.6 Json参数
1.6.1 发送请求
http://localhost:8080/jsonParam
{"name":"ITCAST","age":16,"address":{"province":"北京","city":"北京"}
}

1.6.2 接受请求
JSON参数: JSON数据键名与形参对象属性名相同,定义POJ0类型形参即可接收参数,需要使用@RequestBody标识

User
package com.example.springbootwebre4sp.pojo;public class User {private String name;private  Integer age;private Address address;public User() {}public User(String name, Integer age, Address address) {this.name = name;this.age = age;this.address = address;}public String getName() {return name;}public void setName(String name) {this.name = name;}public Integer getAge() {return age;}public void setAge(Integer age) {this.age = age;}public Address getAddress() {return address;}public void setAddress(Address address) {this.address = address;}@Overridepublic String toString() {return "User{" +"name='" + name + '\'' +", age=" + age +", address=" + address +'}';}
}
Address
package com.example.springbootwebre4sp.pojo;public class Address {private String province;private String city;public Address() {}public Address(String province, String city) {this.province = province;this.city = city;}public String getProvince() {return province;}public void setProvince(String province) {this.province = province;}public String getCity() {return city;}public void setCity(String city) {this.city = city;}@Overridepublic String toString() {return "Address{" +"province='" + province + '\'' +", city='" + city + '\'' +'}';}
}
package com.example.springbootwebre4sp.controller;import com.example.springbootwebre4sp.pojo.User;
import org.springframework.web.bind.annotation.RequestBody;
import org.springframework.web.bind.annotation.RequestMapping;
import org.springframework.web.bind.annotation.RestController;@RestController
public class RequestController
{//原始方式@RequestMapping("/jsonParam")public String jsonParam(@RequestBody User user){System.out.println(user);return "OK";}
}
1.7 路径参数
- 路径参数:通过请求URL直接传递参数,使用{…}来标识该路径参数,需要使用
@PathVariable获取路径参数

统一资源定位符(Uniform Resource Locator)”简称为URL。实际上,我们在使用互联网的过程中,其中有许多东西都是只会用,而不知道它到底是啥名字,看见了也不理解它是做什么的,比如今天我将和大家说的URL,实际上就是我们在互联网生活中非常常见的一个东西。URL是web页的地址,这种地址会在浏览器顶部附近的Location或者URL框内显示出来。鼠标指针移至某个超链接上方时, URL也会在屏幕的底部显示出来。
百度百科的解释:URL是统一资源定位符,对可以从互联网上得到的资源的位置和访问方法的一种简洁的表示,是互联网上标准资源的地址。互联网上的每个文件都有一个唯一的URL,它包含的信息指出文件的位置以及浏览器应该怎处理它。
Q:那我们能把@RequestMapping("/path/1")吗?
A:不能,因为如果这样,路径就死了,识别不了/path/2。
so!
package com.example.springbootwebre4sp.controller;import org.springframework.web.bind.annotation.PathVariable;
import org.springframework.web.bind.annotation.RequestMapping;
import org.springframework.web.bind.annotation.RestController;@RestController
public class RequestController
{//原始方式@RequestMapping("/path/{id}")public String pathParam(@PathVariable Integer id){System.out.println(id);return "OK";}
}

可以结合!!!
package com.example.springbootwebre4sp.controller;import org.springframework.web.bind.annotation.PathVariable;
import org.springframework.web.bind.annotation.RequestMapping;
import org.springframework.web.bind.annotation.RequestParam;
import org.springframework.web.bind.annotation.RestController;@RestController
public class RequestController
{//原始方式@RequestMapping("/path/{id}")public String pathParam(@PathVariable Integer id, @RequestParam String name,Integer age){System.out.println(id+name+age);return "OK";}
}
2 响应

@ResponseBody
- 类型:方法注解、类注解
- 位置:Controller方法上/类上
- 作用:将方法返回值直接响应,如果返回值类型是实体对象/集合,将会转换为JSON格式响应
为什么我们之前有返回的OK显示再客户端呢?是因为:
- 说明:
@RestController = @Controller + @ResponseBody; - 返回值作为响应数据——转JSON
package com.example.springbootwebre4sp.controller;import com.example.springbootwebre4sp.pojo.Address;
import org.springframework.web.bind.annotation.RequestMapping;
import org.springframework.web.bind.annotation.RestController;import java.util.ArrayList;
import java.util.List;@RestController
public class ResponseController {@RequestMapping("/hello")public String hello(){System.out.println("Hello World~");return "Hello World~";}@RequestMapping("/getAddress")public Address getAddress(){Address addr = new Address();addr.setProvince("辽宁");addr.setCity("铁岭");return  addr;}@RequestMapping("/listAddr")public List<Address> listAddr(){List<Address> list  = new ArrayList<>();Address addr = new Address();addr.setProvince("广东") ;addr.setCity("深圳");Address addr2 = new Address() ;addr2.setProvince ("陕西") ;addr2.setCity("西安") ;list.add (addr) ;list.add (addr2) ;return list;}}


但是!这个不具有通用性,我写一个结构, 前端就需要一个新的代码接受,太麻烦!不便管理!
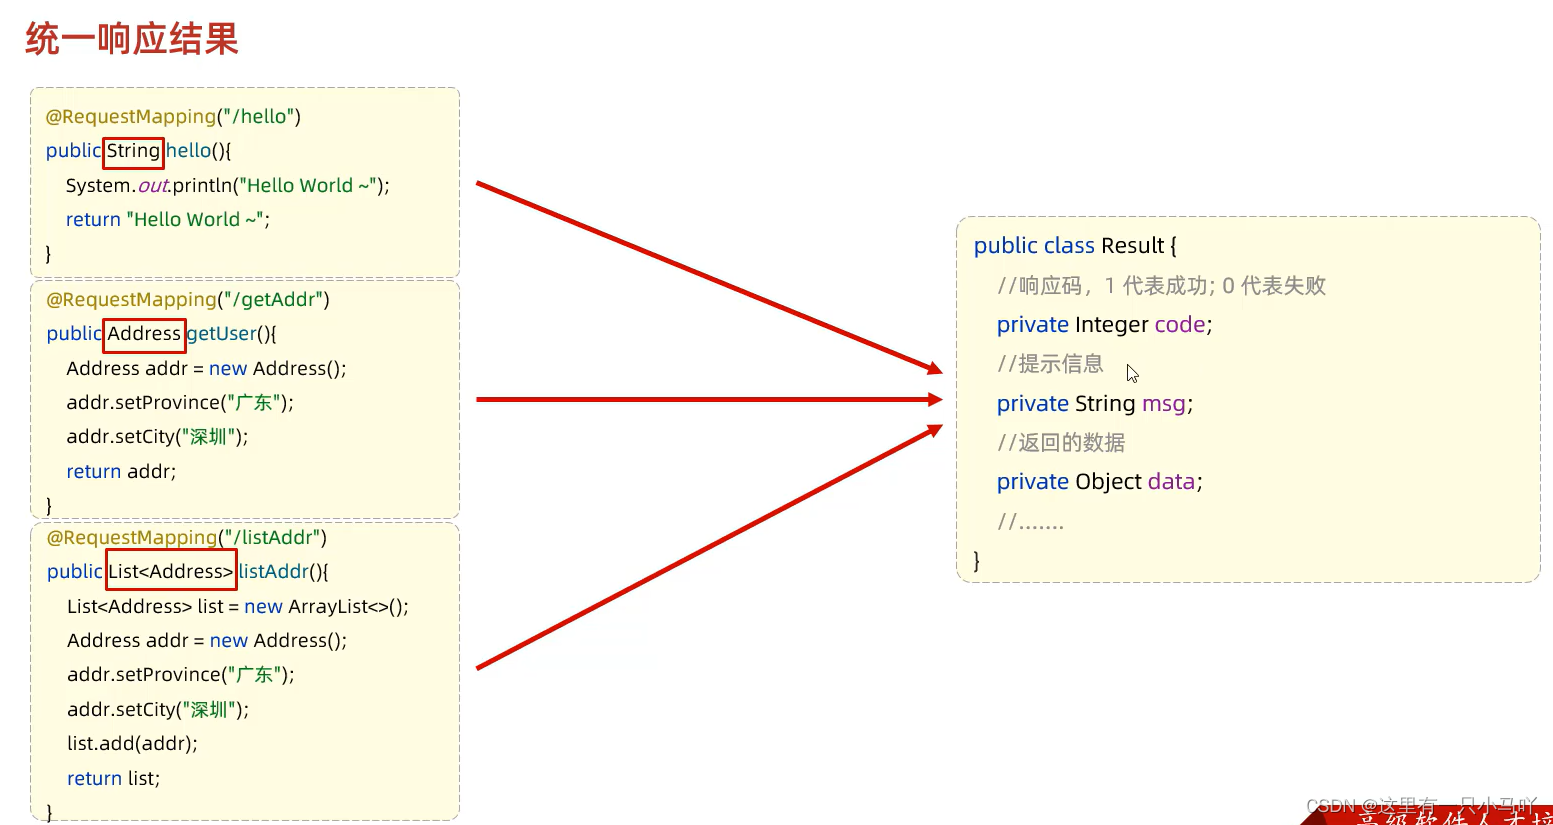
Result
package com.example.springbootwebre4sp.pojo;public class Result {private Integer code ;//1 成功,0失败private String msg; //提示信息private Object data; // 数据datepublic Result() {}public Result(Integer code, String msg, Object data) {this.code = code;this.msg = msg;this.data = data;}/*** 获取* @return code*/public Integer getCode() {return code;}/*** 设置* @param code*/public void setCode(Integer code) {this.code = code;}/*** 获取* @return msg*/public String getMsg() {return msg;}/*** 设置* @param msg*/public void setMsg(String msg) {this.msg = msg;}/*** 获取* @return data*/public Object getData() {return data;}/*** 设置* @param data*/public void setData(Object data) {this.data = data;}public String toString() {return "Result{code = " + code + ", msg = " + msg + ", data = " + data + "}";}public static Result success (Object data) {return new Result( 1,"sucess", data) ;}public static Result ssucces() {return new Result(1,"sucess",null) ;}public static Result error (String msg) {return new Result( 0,msg,null) ;}}package com.example.springbootwebre4sp.controller;import com.example.springbootwebre4sp.pojo.Address;
import com.example.springbootwebre4sp.pojo.Result;
import org.springframework.web.bind.annotation.RequestMapping;
import org.springframework.web.bind.annotation.RestController;import java.util.ArrayList;
import java.util.List;@RestController
public class ResponseController {@RequestMapping("/hello")public Result hello(){System.out.println("Hello World~");//return new Result(1,"success","Hello World~");return Result.success("Hello World~");}@RequestMapping("/getAddress")public Result getAddress(){Address addr = new Address();addr.setProvince("辽宁");addr.setCity("铁岭");return Result.success(addr);}@RequestMapping("/listAddr")public Result listAddr(){List<Address> list = new ArrayList<>();Address addr = new Address();addr.setProvince("广东") ;addr.setCity("深圳");Address addr2 = new Address() ;addr2.setProvince ("陕西") ;addr2.setCity("西安") ;list.add (addr) ;list.add (addr2) ;return Result.success(list);}}


案例分析!

- 在pom.xml文件中引入dom4j的依赖,用于解析XML文件
- 引入资料中提供的解析XML的工具类XMLParserUtils、对应的实体类Emp、XML文件emp.xml
- 引入资料中提供的静态页面文件,放在resources下的static目录下
- 编写Controller程序,处理请求,响应数据
- 在pom.xml文件中引入dom4j的依赖,用于解析XML文件
<dependency><groupId>org.dom4jgroupId><artifactId>dom4jartifactId><version>2.1.3version>dependency>

2. 引入资料中提供的解析XML的工具类XMLParserUtils、对应的实体类Emp、XML文件emp.xml
XmlParserUtils
package com.example.springbootwebre4sp.utils;import org.dom4j.Document;
import org.dom4j.Element;
import org.dom4j.io.SAXReader;
import java.io.File;
import java.lang.reflect.Constructor;
import java.lang.reflect.Field;
import java.util.ArrayList;
import java.util.List;public class XmlParserUtils {public static <T> List<T> parse(String file , Class<T> targetClass)  {ArrayList<T> list = new ArrayList<T>(); //封装解析出来的数据try {//1.获取一个解析器对象SAXReader saxReader = new SAXReader();//2.利用解析器把xml文件加载到内存中,并返回一个文档对象Document document = saxReader.read(new File(file));//3.获取到根标签Element rootElement = document.getRootElement();//4.通过根标签来获取 user 标签List<Element> elements = rootElement.elements("emp");//5.遍历集合,得到每一个 user 标签for (Element element : elements) {//获取 name 属性String name = element.element("name").getText();//获取 age 属性String age = element.element("age").getText();//获取 image 属性String image = element.element("image").getText();//获取 gender 属性String gender = element.element("gender").getText();//获取 job 属性String job = element.element("job").getText();//组装数据Constructor<T> constructor = targetClass.getDeclaredConstructor(String.class, Integer.class, String.class, String.class, String.class);constructor.setAccessible(true);T object = constructor.newInstance(name, Integer.parseInt(age), image, gender, job);list.add(object);}} catch (Exception e) {e.printStackTrace();}return list;}}
Emp
package com.example.springbootwebre4sp.pojo;public class Emp {private String name;private Integer age;private String image;private String gender;private String job;public Emp() {}public Emp(String name, Integer age, String image, String gender, String job) {this.name = name;this.age = age;this.image = image;this.gender = gender;this.job = job;}public String getName() {return name;}public void setName(String name) {this.name = name;}public Integer getAge() {return age;}public void setAge(Integer age) {this.age = age;}public String getImage() {return image;}public void setImage(String image) {this.image = image;}public String getGender() {return gender;}public void setGender(String gender) {this.gender = gender;}public String getJob() {return job;}public void setJob(String job) {this.job = job;}@Overridepublic String toString() {return "Emp{" +"name='" + name + '\'' +", age=" + age +", image='" + image + '\'' +", gender='" + gender + '\'' +", job='" + job + '\'' +'}';}
}
emp.xml
<emps><emp><name>金毛狮王name><age>55age><image>https://web-framework.oss-cn-hangzhou.aliyuncs.com/web/1.jpgimage><gender>1gender><job>1job>emp><emp><name>白眉鹰王name><age>65age><image>https://web-framework.oss-cn-hangzhou.aliyuncs.com/web/2.jpgimage><gender>1gender><job>1job>emp><emp><name>青翼蝠王name><age>45age><image>https://web-framework.oss-cn-hangzhou.aliyuncs.com/web/3.jpgimage><gender>1gender><job>2job>emp><emp><name>紫衫龙王name><age>38age><image>https://web-framework.oss-cn-hangzhou.aliyuncs.com/web/4.jpgimage><gender>2gender><job>3job>emp>
emps>-
添加前端界面——相关资料源码笔记等关注微信公众号:黑马程序员,回复关键词:领取资源02
-
EmpController
package com.example.springbootwebre4sp.controller;import com.example.springbootwebre4sp.pojo.Emp;
import com.example.springbootwebre4sp.pojo.Result;
import com.example.springbootwebre4sp.utils.XmlParserUtils;
import org.springframework.web.bind.annotation.RequestMapping;
import org.springframework.web.bind.annotation.RestController;import java.util.List;@RestController
public class EmpController {@RequestMapping("/listEmp")public Result list(){//1. 加载并解析emp.xmlString file = this.getClass().getClassLoader().getResource("emp.xml").getFile();System.out.println(file);List<Emp> empList = XmlParserUtils.parse(file, Emp.class);//2. 对数据进行转换处理 - gender, jobempList.stream().forEach(emp -> {//处理 gender 1: 男, 2: 女String gender = emp.getGender();if("1".equals(gender)){emp.setGender("男");}else if("2".equals(gender)){emp.setGender("女");}//处理job - 1: 讲师, 2: 班主任 , 3: 就业指导String job = emp.getJob();if("1".equals(job)){emp.setJob("讲师");}else if("2".equals(job)){emp.setJob("班主任");}else if("3".equals(job)){emp.setJob("就业指导");}});//3. 响应数据return Result.success(empList);}}
3 分层解耦
我们发现我们上面编写的程序有点问题,我们所有的代码都写在了Controller中,这个逻辑简单,当时当代码复杂时就非常难以维护。——分层解耦来了!!!!
3.1 三层架构

单一原则!!!


修改代码!下面是目录:

EmpController
package com.example.springbootwebre4sp.controller;import com.example.springbootwebre4sp.dao.impl.EmpDaoA;
import com.example.springbootwebre4sp.pojo.Emp;
import com.example.springbootwebre4sp.pojo.Result;
import com.example.springbootwebre4sp.service.EmpService;
import com.example.springbootwebre4sp.service.impl.EmpServiceA;
import com.example.springbootwebre4sp.utils.XmlParserUtils;
import org.springframework.web.bind.annotation.RequestMapping;
import org.springframework.web.bind.annotation.RestController;import java.util.List;@RestController
public class EmpController {private EmpService empService = new EmpServiceA();@RequestMapping("/listEmp")public Result list(){List<Emp> empList = empService.listEmp();//3. 响应数据return Result.success(empList);}}
package com.example.springbootwebre4sp.dao.impl;import com.example.springbootwebre4sp.dao.EmpDao;
import com.example.springbootwebre4sp.pojo.Emp;
import com.example.springbootwebre4sp.utils.XmlParserUtils;import java.util.List;public class EmpDaoA implements EmpDao {@Overridepublic List<Emp> listEmp() {String file = this.getClass().getClassLoader().getResource("emp.xml").getFile();System.out.println(file);List<Emp> empList = XmlParserUtils.parse(file, Emp.class);return empList;}
}
package com.example.springbootwebre4sp.dao;import com.example.springbootwebre4sp.pojo.Emp;import java.util.List;public interface EmpDao {//获取列表数据public List<Emp> listEmp();}
package com.example.springbootwebre4sp.service.impl;import com.example.springbootwebre4sp.dao.EmpDao;
import com.example.springbootwebre4sp.dao.impl.EmpDaoA;
import com.example.springbootwebre4sp.pojo.Emp;
import com.example.springbootwebre4sp.service.EmpService;import java.util.List;public class EmpServiceA implements EmpService {private EmpDao empDao = new EmpDaoA();@Overridepublic List<Emp> listEmp() {List<Emp> empList = empDao.listEmp();empList.stream().forEach(emp -> {//处理 gender 1: 男, 2: 女String gender = emp.getGender();if("1".equals(gender)){emp.setGender("男");}else if("2".equals(gender)){emp.setGender("女");}//处理job - 1: 讲师, 2: 班主任 , 3: 就业指导String job = emp.getJob();if("1".equals(job)){emp.setJob("讲师");}else if("2".equals(job)){emp.setJob("班主任");}else if("3".equals(job)){emp.setJob("就业指导");}});return empList;}
}
package com.example.springbootwebre4sp.service;import com.example.springbootwebre4sp.pojo.Emp;import java.util.List;public interface EmpService {//获取员工列表数据public List<Emp> listEmp();}3.2 分层解耦(IOC-DI引入)
- 内聚:软件中各个功能模块内部的功能联系。
- 耦合:衡量软件中各个层/模块之间的依赖、关联的程度。
- 软件设计原则:高内聚低耦合。

耦合!


3.3 IOC&DI-入门


控制反转:@Component //将当前类交给IOC容器管理,成为IOC容器中的bean
依赖注入:@Autowired //运行时,IOC容器会提供该类型的bean对象,并赋值给该变量
3.4 IOC&DI-IOC详解
Bean的声明
要把某个对象交给IOC容器管理,需要在对应的类上加上如下注解之一:
| 注解 | 说明 | 位置 |
|---|---|---|
| @Component | 声明bean的基础注解 | 不属于以下三类时,用此注解 |
| @Controller | @Component的衍生注解 | 标注在控制器类上 |
| @Service | @Component的衍生注解 | 标注在业务类上 |
| @Repository | @Component的衍生注解 | 标注在数据访问类上(由于与mybatis整合,用的少) |
推荐:下面的三类分别标注Controller,Service,DAO三层的bean对象
工具类常常想要利用容器,我用Component
注意事项
- 声明bean的时候, 可以通过value属性指定bean的名字, 如果没有指定,默认为类名首字母小写。
- 使用以 上四个注解都可以声明bean,但是在springboot集成web开发中,声明控制器bean只能用@Controller
Bean组件扫描
- 前面声明bean的四大注解,要想生效,还需要被组件扫描注解@ComponentScan扫描。
- @ComponentScan注 解虽然没有显式配置,但是实际上已经包含在了启动类声明注解@SpringBootApplication 中,默认扫描的范围是启动类所在包及其子包。
3.5 IOC&DI-DI详解
@Autowired——依赖注入

- 通过以下几种方 案来解决:
- @Primary

- @Qualifier

- @Resource

4 MySQL
请大家关注我下面两个博客笔记,这也是黑马视频出品的,
黑马程序员 MySQL数据库入门到精通——基础篇(1)
黑马程序员 MySQL数据库入门到精通——基础篇(2)
- 以上笔记是MySQL(基础篇——进阶篇——运维篇)中的基础篇
- 该两篇笔记与该视频讲解的MySQL相似,而且更为细致,建议大家跳过该视频 的MySQL部分,去刷一下黑马程序员 MySQL数据库入门到精通,从mysql安装到mysql高级、mysql优化全囊括
- 后续我也会记录进阶篇与运维篇的笔记
- 都已经学到这了,大家不要放弃吖!!!大家共同进步!!!!!
本文来自互联网用户投稿,文章观点仅代表作者本人,不代表本站立场,不承担相关法律责任。如若转载,请注明出处。 如若内容造成侵权/违法违规/事实不符,请点击【内容举报】进行投诉反馈!