linux chef rpm,Chef简介及在Linux下的安装
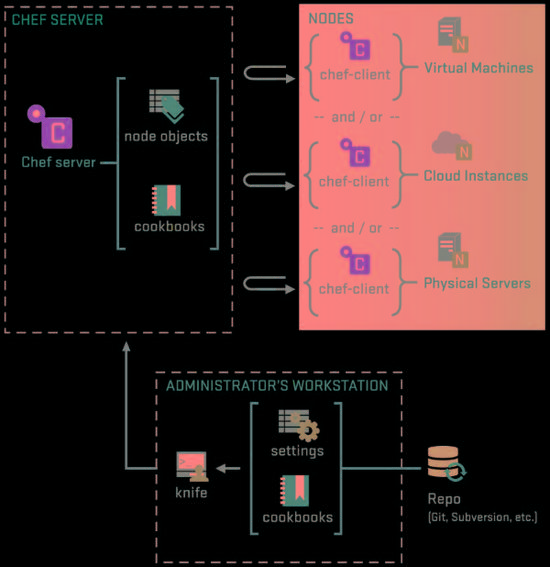
Chef有三个重要的概念:(如上图所示)
它们的合作关系大致是这样的, Workstation把资源或者说是一些要被运行的命令上传到Chef-Server上, Nodes自动通过Chef-Server拿到属于自己的执行任务到本地执行,这样可达到一个将军指挥千军万马的效果:smirk:。
Chef Server
存放所有通过Workstation上传的资源,和用户等公共数据(用PostgreSQL)。 可以干脆叫它为资源服务器,大家都可以与它通讯(用RabbitMQ ), 本身提供一个在线管理工具叫 chef-server-webui (用Nginx,包括它的rest-api)。
Chef Server只能安装在linux系统上。
Workstation
简单理解为管理员操作机,通过安装的工具knife远程操作Chef-Server上的资源,或者注册Nodes等
这个可以安装在任意系统上,包括windows
Nodes
一些客户端的机子,它们是内部装有一个工具叫做Chef-Client,这东西会自动到Chef-Server上获取自己的要执行命令清单
可以安装在任意系统上,包括windows
Chef安装
安装环境为3台Ubuntu13的虚拟机(应该看出来为什么是3台了吧)和Chef11。
注意 ,在开始之前先把所有机器的时间更新一下, sudo ntpdate ntp.ubuntu.com ,不然无法通过登录认证:worried:。
Chef提供两个安装包,一个是Server,一个是Client,其中Client包括Chef-Client和Workstation用到的knife, 也就是说Nodes和Workstation上的安装都是这个包。
下载Chef
Chef-11的安装特别简单,官方下载(传送门: http://www.getchef.com/chef/install/ ),里面包括Server和Client的下载, 注意Server在第二个选项卡里,选择相应的操作系统和版本就会出现下载链接。
安装命令:
//ChefServer安装//在第一台虚拟机上运行dpkg-i chef-server_11.1.1-1_amd64.deb//Chef-Client安装//在第二台和第三台虚拟机上运行,也就是Workstation和Nodedpkg-i chef_11.12.8-2_amd64.deb
运行和配置Chef
怎么让这三个东西一起工作起来呢,其实也很简单,只是开始有些概念上的东西比较模糊导致无从下手。
让Chef-Server跑起来
在第一台Ubuntu虚拟机上进行。
执行完上面的安装过程以后,运行一个配置初始化命令 sudo chef-server-ctl reconfigure ,然后所有服务就会自动运行了, 所生成的配置文件,包括前面提到的 postgresql , rabbitmq 等,放在 /etc/chef-server/chef-server-running.json
如果你需要自定义其中的某些配置 ,需要创建文件 /etc/chef-server/chef-server.rb ,一个基于ruby语法的配置文件
官方参考: http://docs.opscode.com/open_source/config_rb_chef_server.html
所有配置说明和实例: http://docs.opscode.com/config_rb_chef_server_optional_settings.html
修改完成后通过 sudo chef-server-ctl reconfigure 命令重新生成配置文件,并自动重启有变化的服务。
现在可以通过这台机器的ip访问 chef-server-webui ,用户名: admin ,密码: p@ssw0rd1 。
远程REST API请参考: http://docs.opscode.com/open_source/api_chef_server.html
运行Chef Workstation
在第二台Ubuntu虚拟机上进行。
克隆Workstation的目录结构:chef-repo
方法: git clone git://github.com/opscode/chef-repo.git ,当然你要安装git
sudo apt-get update && sudo apt-get install git ;
生成认证文件:
在 chef-repo 目录下创建一个目录 .chef 来存储workstation与server的交互认证和一些server的配置信息。
主要有三个文件: knife.rb , validator.pem USER.pem ,通过命令 knife configure --initial 生成!
在chef-server机器的 /etc/chef-server 目录下找到 chef-validator.pem 和 admin.pem 两个私钥拷贝到刚才创建的 .chef 目录下, 然后在 chef-repo 目录下执行 knife configure --initial ,请参考以下交互信息:
admin1@localhost:~/chef-repo$ knife configure--initial
WARNING:Noknife configuration file foundWhereshould I put the config file?[/home/admin1/.chef/knife.rb]/home/admin1/chef-repo/.chef/knife.rbPleaseenter the chef server URL:[https://localhost:443]https://ubuntu:443Pleaseenter a nameforthe new user:[admin1]chefuser5Pleaseenter the existing admin name:[admin]Pleaseenter the location of the existing admin's private key: [/etc/chef-server/admin.pem] /home/admin1/chef-repo/.chef/admin.pem
Please enter the validation clientname: [chef-validator]
Please enter the location of the validation key: [/etc/chef-server/chef-validator.pem] /home/admin1/chef-repo/.chef/chef-validator.pem
Please enter the path to a chef repository (or leave blank): /home/admin1/chef-repo/cookbooks
Creating initial API user...
Please enter a password for the new user:
Created user[chefuser5]
Configuration file written to /home/admin1/chef-repo/.chef/knife.rb
没什么问题的话就成功了,通过命令 knife client list 来测试是否安装成功:v:!
启动一个Chef Node
在第二台Ubuntu虚拟机也就是Workstation上进行,并假设第三台虚拟机的IP为 192.168.0.3 。
通过Workstation注册这台Node,命令:(在chef-repo目录下)
knife bootstrap 192.168.0.3 -x username -P password --sudo
其中 username 和 password 是虚拟机 192.168.0.3 上 SSH 登录的用户名及密码。
参考交互信息:
admin1@localhost:~/chef-repo$ knife bootstrap192.168.0.3-x admin1-P111111--sudoConnectingto192.168.0.3192.168.0.3knife sudo password:Enteryour password:192.168.0.3192.168.0.3StartingfirstChefClientrun...192.168.0.3[2014-06-13T10:14:07+08:00]WARN:192.168.0.3****************************************192.168.0.3SSL validation of HTTPS requests is disabled.HTTPS connections are still192.168.0.3encrypted,but chef is not able to detect forged replies or maninthe middle192.168.0.3attacks.192.168.0.3192.168.0.3Tofix this issue add an entry like this to your configuration file:192.168.0.3192.168.0.3```
192.168.0.3 # Verify all HTTPS connections (recommended)
192.168.0.3 ssl_verify_mode :verify_peer
192.168.0.3
192.168.0.3 # OR, Verify only connections to chef-server
192.168.0.3 verify_api_cert true
192.168.0.3 ```192.168.0.3192.168.0.3Tocheck your SSL configuration,or troubleshoot errors,you can use the192.168.0.3`knife ssl check`command like so:192.168.0.3192.168.0.3```
192.168.0.3 knife ssl check -c /etc/chef/client.rb
192.168.0.3 ```192.168.0.3192.168.0.3****************************************192.168.0.3192.168.0.3StartingChefClient,version11.12.8192.168.0.3resolving cookbooksforrun list:[]192.168.0.3SynchronizingCookbooks:192.168.0.3CompilingCookbooks...192.168.0.3[2014-06-13T10:15:13+08:00]WARN:Nodelocalhost has an empty run list.192.168.0.3Converging0resources192.168.0.3192.168.0.3Runninghandlers:192.168.0.3Runninghandlers complete192.168.0.3192.168.0.3ChefClientfinished,0/0resources updatedin66.508732206seconds
其它参考

本文来自互联网用户投稿,文章观点仅代表作者本人,不代表本站立场,不承担相关法律责任。如若转载,请注明出处。 如若内容造成侵权/违法违规/事实不符,请点击【内容举报】进行投诉反馈!