Vue源码剖析
前言
Vue源码地址:https://github.com/vuejs/vue
最近发现一个神器,可以在线用vscode查看github源码,非常方便,只需在github后面加一个1s
例:https://github1s.com/vuejs/vue
1、目录解析
解析目录有助于我们对Vue整个项目有个大致的了解,并能深入学习Vue架构思想
Vue源码文件注释:
├─ .circleci                   // 包含CircleCI持续集成/持续部署工具的配置文件
├─ .github                   // 项目相关的说明文档,上面的说明文档就在此文件夹
├─ benchmarks                 // 基准,性能测试文件
├─ dist                       // 打包文件
├─ examples                   // 部分示例,用Vue写的一些小demo
├─ flow                       // flow,静态类型检查类型声明文件
├─ packages                   // 包含服务端渲染和模板编译器两种不同的NPM包
├─ scripts                   // 存放npm脚本配置文件,结合webpack、rollup进行编译
│   ├─ alias.js              // 模块导入所有源代码和测试中使用的别名
│   ├─ config.js             // 包含在'dist/`中找到的所有文件的生成配置
│   ├─ build.js               // 对 config.js 中所有的rollup配置进行构建
├─ src                        // 主要源码所在位置,核心内容
│   ├─ compiler               // 解析模版相关
│       ├─ codegen            // 把AST转换为Render函数
│       ├─ directives         // 通用生成Render函数之前需要处理的指令
│       ├─ parser              // 解析模版成AST
│   ├─ core                    // Vue核心代码
│       ├─ components          // 组件相关属性,主要是Keep-Alive
│       ├─ global-api          // Vue全局API,如Vue.use,Vue.extend,Vue.mixin等
│       ├─ instance            // 实例化相关内容,生命周期、事件等
│       ├─ observer            // 响应式核心目录,双向数据绑定相关文件
│       ├─ util                // 工具方法
│       └─ vdom                // 虚拟DOM,创建(creation)和打补丁(patching) 的代码
│   ├─ platforms               // 跨平台文件夹(web、native、weex)
│       ├─ web                 // web端
│           ├─ compiler        // web端编译相关代码,用来编译模版成render函数basic.js
│           ├─ runtime         // web端运行时相关代码,用于创建Vue实例等
│           ├─ server          // 服务端渲染
│           └─ util            // 相关工具类
│       └─ weex                // weex相关
│   ├─ server                  // 服务端渲染(ssr)
│   ├─ sfc                     // 转换单文件组件(*.vue)
│   └─ shared                  // 全局共享的方法和常量
├─ test                        // test 测试用例
├─ types                       // TypeScript类型声明文件
├─ node_modules               // npm包存放目录
|-- .babelrc.js               // babel配置
|-- .editorconfig             // 文本编码样式配置文件
|-- .eslintignore             // eslint校验忽略文件
|-- .eslintrc.js              // eslint配置文件
|-- .flowconfig               // flow配置文件
|-- .gitignore               // Git提交忽略文件配置
|-- BACKERS.md               // 赞助者信息文件
|-- LICENSE                 // 项目开源协议
|-- package.json             // 依赖
|-- README.md               // 说明文件
|-- yarn.lock               // yarn版本锁定文件
2、找寻Vue核心代码入口
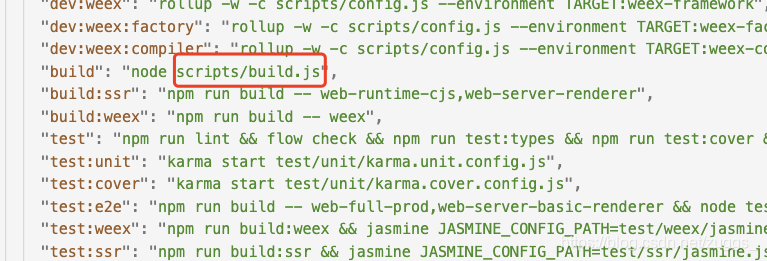
1、查看package.json文件
通过package.json可以清晰看到项目启动、打包、及依赖信息,可以找到scripts/build.js打包文件
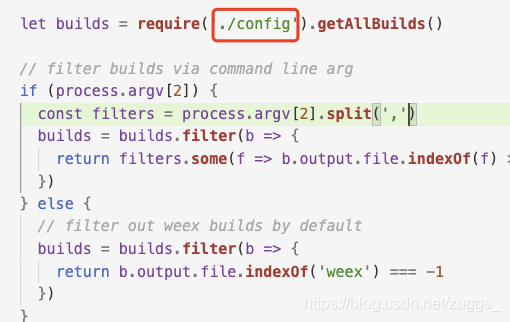
2、查看打包文件scripts/build.js
找到打包项config.js文件
3、查看打包配置文件
找到入口文件web/entry-runtime-with-compiler.js
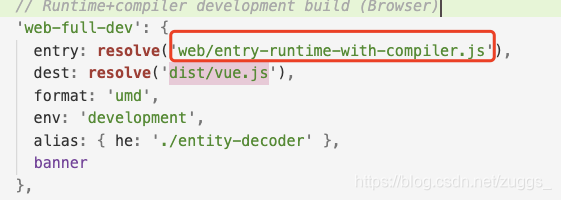
这个web是一个alias(别名),所有别名都在alia.js文件里这里是src/platforms/web/entry-runtime-with-compiler.js

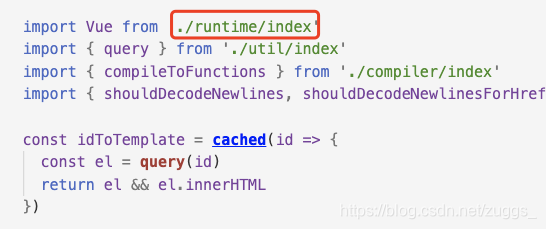
4、查看入口文件、找出最终文件
entry-runtime-with-compiler.js --> runtime/index --> core/index --> core/instance/index
5、最终文件src/core/instance/index
很简单,一共20多行代码的主文件。。
3、Vue不同模块剖析
可以看见主入口有几个函数很重要,也是vue源码重中之重,Vue生命周期有助于我们理解源码,下面是从官网扒的一张生命周期图

3.1 initMixin
关键代码:
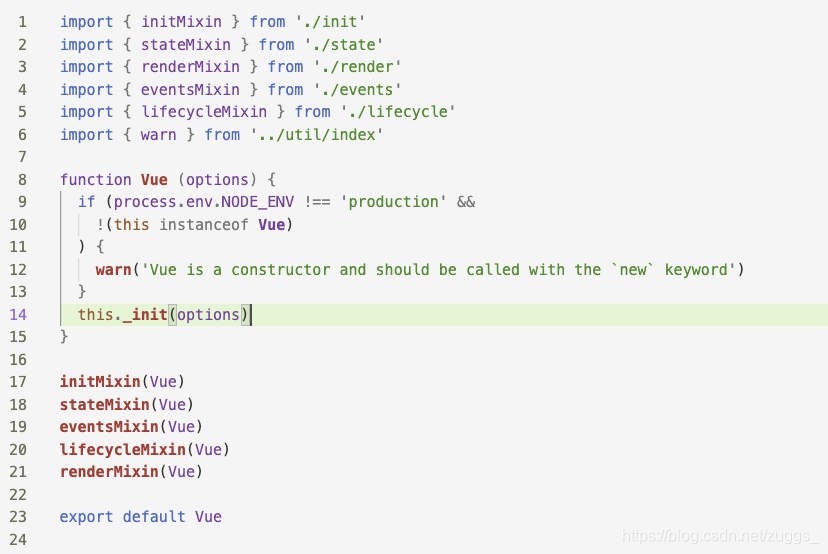
export function initMixin (Vue: Class) {Vue.prototype._init = function (options?: Object) {const vm: Component = this// a uidvm._uid = uid++let startTag, endTag...if (process.env.NODE_ENV !== 'production') {initProxy(vm)} else {vm._renderProxy = vm}// expose real selfvm._self = vminitLifecycle(vm)initEvents(vm)initRender(vm)callHook(vm, 'beforeCreate')initInjections(vm) // resolve injections before data/propsinitState(vm)initProvide(vm) // resolve provide after data/propscallHook(vm, 'created')...}
}
根据关键代码的执行函数和生命周期图示中不难猜出是用来初始化Vue的,包括注册事件跟生命周期
initProxy核心代码
initProxy就是用来初始化Proxy的
initProxy = function initProxy (vm) {if (hasProxy) {// determine which proxy handler to useconst options = vm.$optionsconst handlers = options.render && options.render._withStripped? getHandler: hasHandlervm._renderProxy = new Proxy(vm, handlers)} else {vm._renderProxy = vm}
}
判断当前Proxy是否可用,如果可用则初始化_renderProxy
getHandler方法主要是针对读取代理对象的某个属性时进行的操作。当访问的属性不是string类型或者属性值在被代理的对象上不存在,则抛出错误提示,否则就返回该属性值。
const getHandler = {get (target, key) {if (typeof key === 'string' && !(key in target)) {if (key in target.$data) warnReservedPrefix(target, key)else warnNonPresent(target, key)}return target[key]}
}
hasHandler方法的应用场景在于查看vm实例是否拥有某个属性—比如调用for in循环遍历vm实例属性时,会触发hasHandler方法。
const hasHandler = {has (target, key) {const has = key in targetconst isAllowed = allowedGlobals(key) ||(typeof key === 'string' && key.charAt(0) === '_' && !(key in target.$data))if (!has && !isAllowed) {if (key in target.$data) warnReservedPrefix(target, key)else warnNonPresent(target, key)}return has || !isAllowed}
}
initLifecycle关键代码
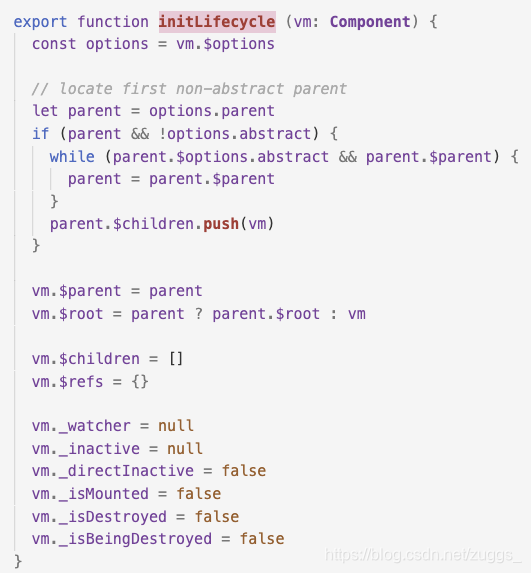
代码很简单,就是初始化一些生命周期的相关属性,一级对parent,children等属性进行赋值,下面是一些介绍
| 名称 | 说明 |
|---|---|
| $parent | 指定已创建的实例之父实例,在两者之间建立父子关系。子实例可以用 this.parent 访问父实例,子实例被推入父实例的parent访问父实例,子实例被推入父实例的children 数组中。 |
| $root | 当前组件树的根 Vue 实例。如果当前实例没有父实例,此实例将会是其自己。 |
| $children | 当前实例的直接子组件。需要注意 $children 并不保证顺序,也不是响应式的。 |
| $refs | 一个对象,持有已注册过 ref 的所有子组件。 |
| _watcher | 组件实例相应的 watcher 实例对象。 |
| _inactive | 表示keep-alive中组件状态,如被激活,该值为false,反之为true。 |
| _directInactive | 也是表示keep-alive中组件状态的属性。 |
| _isMounted | 当前实例是否完成挂载(对应生命周期图示中的mounted)。 |
| _isDestroyed | 当前实例是否已经被销毁(对应生命周期图示中的destroyed)。 |
| _isBeingDestroyed | 当前实例是否正在被销毁,还没有销毁完成(介于生命周期图示中deforeDestroy和destroyed之间)。 |
initEvents相关代码
初始化事件:
// 初始化事件
export function initEvents (vm: Component) {// 初始化_events事件队列vm._events = Object.create(null)// 初始化判断是否有生命周期钩子函数vm._hasHookEvent = false// 初始化父组件事件 const listeners = vm.$options._parentListeners// 如果有父组件事件if (listeners) {// 组件初始化事件监听器 更新组件事件updateComponentListeners(vm, listeners)}
}
更新组件事件:
// 更新组件事件 在initEvents中会调用 在updateChildComponent中会调用
export function updateComponentListeners (vm: Component, //虚拟dom 实例listeners: Object,  //新的事件队列oldListeners: ?Object //旧事件队列
) {target = vm// 为listeners增加事件 为oldListeners删除事件updateListeners(listeners, oldListeners || {}, add, remove, createOnceHandler, vm)target = undefined
}
add,remove,createOnceHandler函数,用来执行updateListeners的方法参数
let target: any
// target.$on的代理 添加事件  用来updateListeners:todo
function add (event, //事件名fn //函数) {target.$on(event, fn)
}
// target.$off 解绑事件  用来updateListeners:todo
function remove (event, // 事件名fn // 函数) {target.$off(event, fn)
}
// 返回一个直接调用函数的方法,调用完就删除事件,用来updateListeners:todo
function createOnceHandler (event,  // 事件名fn //函数) {// 获取targetconst _target = target// 返回onceHandlerreturn function onceHandler () {// 执行fnconst res = fn.apply(null, arguments)// 如果res不为空if (res !== null) {// 解绑事件_target.$off(event, onceHandler)}}
}
更新事件监听器:updateListeners
// 更新事件监听器
export function updateListeners (on: Object, // 新增事件oldOn: Object, // 旧事件add: Function, // 添加函数remove: Function, // 移除函数vm: Component // 实例对象
) {// 定义一些辅助变量let name, def, cur, old, event// 遍历新的监听器对象for (name in on) {// 为def和cur赋值为新的事件对象def = cur = on[name]// 为old赋值为旧的事件对象old = oldOn[name]// 标准化事件对象并赋值给event。// normalizeEvent函数主要用于将传入的带有特殊前缀的事件修饰符分解为具有特定值的事件对象event = normalizeEvent(name)// 下面代码是weex框架专用,处理cur变量和格式化好的事件对象的参数属性/* istanbul ignore if */if (__WEEX__ && isPlainObject(def)) {cur = def.handlerevent.params = def.params}// 如果新事件不存在,在非生产环境中提供报错信息,否则不执行任何操作if (isUndef(cur)) {process.env.NODE_ENV !== 'production' && warn(`Invalid handler for event "${event.name}": got ` + String(cur),vm)// 当旧事件不存在时} else if (isUndef(old)) {// 如果新事件对象cur的fns属性不存在if (isUndef(cur.fns)) {// 创建函数调用器并重新复制给cur和on[name]cur = on[name] = createFnInvoker(cur)}// 添加新的事件处理器add(event.name, cur, event.once, event.capture, event.passive, event.params)// 如果新旧事件不完全相等} else if (cur !== old) {// 用新事件处理函数覆盖旧事件对象的fns属性old.fns = cur// 将事件对象重新复制给onon[name] = old}}// 遍历旧事件监听器for (name in oldOn) {// 如果新事件对象不存在if (isUndef(on[name])) {// 标准化事件对象event = normalizeEvent(name)// 移除事件处理器remove(event.name, oldOn[name], event.capture)}}
}
initRender核心代码
获取父节点vnode和执行环境
vm._vnode = null // the root of the child tree
vm._staticTrees = null // v-once cached trees
const options = vm.$options
const parentVnode = vm.$vnode = options._parentVnode // the placeholder node in parent tree
const renderContext = parentVnode && parentVnode.context
组件之slot插槽,处理组件的slot标签
vm.$slots = resolveSlots(options._renderChildren, renderContext)
vm.$scopedSlots = emptyObject
...
vm._c = (a, b, c, d) => createElement(vm, a, b, c, d, false);
vm.$createElement = (a, b, c, d) => createElement(vm, a, b, c, d, true);
...找到createElement(主要),解析用户写的模板html,从而成为浏览器可以识别的格式。
export function createElement (context: Component, // 上下文tag: any, // 标签data: any, // 数据对象children: any, // 自己点normalizationType: any,alwaysNormalize: boolean
): VNode | Array {if (Array.isArray(data) || isPrimitive(data)) {normalizationType = childrenchildren = datadata = undefined}if (isTrue(alwaysNormalize)) {normalizationType = ALWAYS_NORMALIZE}return _createElement(context, tag, data, children, normalizationType)
}
callhook代码
顾名思义是钩子,是在每个生命周期执行的钩子函数
export function callHook (vm: Component, hook: string) {// #7573 disable dep collection when invoking lifecycle hookspushTarget()const handlers = vm.$options[hook]const info = `${hook} hook`if (handlers) {for (let i = 0, j = handlers.length; i < j; i++) {invokeWithErrorHandling(handlers[i], vm, null, vm, info)}}if (vm._hasHookEvent) {vm.$emit('hook:' + hook)}popTarget()
}
initInjections、initProvider核心功能及代码
provide/inject作用是给祖先提供一个provider,provider的属性可供所有后代通过inject注入并使用
官网实例:
// 父级组件提供 'foo'
var Provider = {provide: {foo: 'bar'},// ...
}// 子组件注入 'foo'
var Child = {inject: ['foo'],created () {console.log(this.foo) // => "bar"}// ...
}
代码:

首先看initInjections该方法在data/props之前被调用,主要作用树初始化vue实例的inject
const result = resolveInject(vm.$options.inject, vm)首先是一个队inject的处理方法resolveInject
export function resolveInject (inject: any, vm: Component): ?Object {if (inject) {// 建立一个存储结果的空对象const result = Object.create(null)// 兼容解析inject(Reflect是ES6方法)const keys = hasSymbol? Reflect.ownKeys(inject): Object.keys(inject)for (let i = 0; i < keys.length; i++) {const key = keys[i]// #6574 in case the inject object is observed...if (key === '__ob__') continueconst provideKey = inject[key].fromlet source = vmwhile (source) {if (source._provided && hasOwn(source._provided, provideKey)) {result[key] = source._provided[provideKey]break}source = source.$parent}if (!source) {if ('default' in inject[key]) {const provideDefault = inject[key].defaultresult[key] = typeof provideDefault === 'function'? provideDefault.call(vm): provideDefault} else if (process.env.NODE_ENV !== 'production') {warn(`Injection "${key}" not found`, vm)}}}return result}
}
这段代码主要就是对inject属性中的各个key进行遍历,然后沿着父组件链一直向上查找provide中和inject对应的属性,直到查找到根组件或者找到为止,然后返回结果。
我们接着回到initInjections方法
可以看到从provide中找到了inject的值之后,接下来就是对result的一些处理,比如在非生产环境会将result里的值定义成相应式的
if (result) {toggleObserving(false)Object.keys(result).forEach(key => {/* istanbul ignore else */if (process.env.NODE_ENV !== 'production') {defineReactive(vm, key, result[key], () => {warn(`Avoid mutating an injected value directly since the changes will be ` +`overwritten whenever the provided component re-renders. ` +`injection being mutated: "${key}"`,vm)})} else {defineReactive(vm, key, result[key])}})toggleObserving(true)
}
接下来看下initProvider
可以看到就是将$options上的provider赋值到当前实例上
export function initProvide (vm: Component) {const provide = vm.$options.provideif (provide) {vm._provided = typeof provide === 'function'? provide.call(vm): provide}
}
最后看下initState
export function initState (vm: Component) {vm._watchers = []const opts = vm.$optionsif (opts.props) initProps(vm, opts.props)if (opts.methods) initMethods(vm, opts.methods)if (opts.data) {initData(vm)} else {observe(vm._data = {}, true /* asRootData */)}if (opts.computed) initComputed(vm, opts.computed)if (opts.watch && opts.watch !== nativeWatch) {initWatch(vm, opts.watch)}
}
这里对props,methods,data,computed,watch分别进行了处理
initProps
- 全局挂载_props,
- 对props的值,进行全局配置
- 添加响应式
- 添加代理
function initProps (vm: Component, propsOptions: Object) {const propsData = vm.$options.propsData || {}const props = vm._props = {}  // 挂载_props...const keys = vm.$options._propKeys = []if (!isRoot) {toggleObserving(false)}for (const key in propsOptions) {keys.push(key)// 对prop的值的计算validateProp详细去看// 先采用propsData没有则取默认值const value = validateProp(key, propsOptions, propsData, vm) ....defineReactive(props, key, value) // 添加响应式if (!(key in vm)) {proxy(vm, `_props`, key) // 代理,通过this直接访问}}
}
initMethods
- 添加代理
- 绑定作用域
function initMethods (vm: Component, methods: Object) {const props = vm.$options.propsfor (const key in methods) {vm[key] = typeof methods[key] !== 'function' ? noop : bind(methods[key], vm)  // 挂载是vm实例上}
}
initData
- 全局挂载_data
- 对data进行处理,判断是否是函数还是对象
- 添加代理
- 添加响应式
let data = vm.$options.datadata = vm._data = typeof data === 'function'? getData(data, vm) // 函数执行后在赋值: data || {}const keys = Object.keys(data)while (i--) {const key = keys[i].... proxy(vm, `_data`, key) //代理}observe(data, true) // 添加响应式initComputed
- 添加_computedWatchers
- 生成Watcher
- 添加代理 {lazy:true} 不会立即查值
- 在get的时候,通过控制dirty控制
 const watchers = vm._computedWatchers = Object.create(null) // 创建watchersfor (const key in computed) {const userDef = computed[key]const getter = typeof userDef === 'function' ? userDef : userDef.get....if (!isSSR) {watchers[key] = new Watcher(  // 实例Watchervm,getter || noop,noop,computedWatcherOptions // {lazy:true} )}if (!(key in vm)) {defineComputed(vm, key, userDef) // 代理vm} ....}// defineComputed
export function defineComputed (target: any,key: string,userDef: Object | Function
) {const shouldCache = !isServerRendering()sharedPropertyDefinition.get = shouldCache? createComputedGetter(key): createGetterInvoker(userDef)sharedPropertyDefinition.set = noop...Object.defineProperty(target, key, sharedPropertyDefinition) //代理
}
// createComputedGetter
function createComputedGetter (key) {return function computedGetter () {const watcher = this._computedWatchers && this._computedWatchers[key] // 通过key拿到watcherif (watcher) {if (watcher.dirty) {watcher.evaluate() // 计算}if (Dep.target) {watcher.depend() // Sub搜集Watcher}return watcher.value}}
}
initWatch
- 解析watch的参数
- 设置options.user = true在执行run的时候 会返回oldval
function initWatch (vm: Component, watch: Object) {for (const key in watch) {             // {a:handlerChange(old,newV){}}const handler = watch[key]if (Array.isArray(handler)) {for (let i = 0; i < handler.length; i++) {createWatcher(vm, key, handler[i]) }} else {createWatcher(vm, key, handler)}}
}
function createWatcher (vm: Component,expOrFn: string | Function,handler: any,options?: Object
) {if (isPlainObject(handler)) {options = handlerhandler = handler.handler}if (typeof handler === 'string') {handler = vm[handler]}return vm.$watch(expOrFn, handler, options)  // 这里使用$watch
}...Vue.prototype.$watch = function (expOrFn: string | Function,cb: any,options?: Object): Function {const vm: Component = thisif (isPlainObject(cb)) {return createWatcher(vm, expOrFn, cb, options) // 对cb进行递归}options = options || {}options.user = true  // 设置user为trueconst watcher = new Watcher(vm, expOrFn, cb, options)  //实例if (options.immediate) {cb.call(vm, watcher.value)}return function unwatchFn () {watcher.teardown()  // 移除sub}}
initMixin主要在原型上添加_init方法,初始化Proxy、生命周期、事件、渲染、调用beforeCreate钩子、初始化注入函数、State、Provider、调用created钩子
3.2 stateMixin
核心代码
export function stateMixin (Vue: Class) {const dataDef = {}dataDef.get = function () { return this._data }const propsDef = {}propsDef.get = function () { return this._props }if (process.env.NODE_ENV !== 'production') { // 不是生产环境,设置setdataDef.set = function () {warn('Avoid replacing instance root $data. ' +'Use nested data properties instead.',this)}propsDef.set = function () {warn(`$props is readonly.`, this)}}// $data 和 $props是只读属性Object.defineProperty(Vue.prototype, '$data', dataDef)Object.defineProperty(Vue.prototype, '$props', propsDef)Vue.prototype.$set = setVue.prototype.$delete = delVue.prototype.$watch = function (expOrFn: string | Function,cb: any,options?: Object): Function {...} 代码很简单,简而言之
- 在Vue.prototype上定义$data、$props
- 定义了三个方法$set、$delete、$watch
3.3 eventsMixin
核心代码
export function eventsMixin (Vue: Class) {const hookRE = /^hook:/Vue.prototype.$on = function (event: string | Array, fn: Function): Component {}Vue.prototype.$once = function (event: string, fn: Function): Component {}Vue.prototype.$off = function (event?: string | Array, fn?: Function): Component {}Vue.prototype.$emit = function (event: string): Component {}
}
eventsMixin主要在原型上加了$on,$once,$off,$emit方法,了解vue的同学都知道这些都和自定义事件相关
代码很简单,感兴趣的可以去看下
简单介绍一下这些作用
- $emit触发自定义事件
- $once监听自定义事件(只触发一次)
- $on监听自定义事件
- $off移除自定义事件
3.4 lifecycleMixin
核心代码
export function lifecycleMixin (Vue: Class) {Vue.prototype._update = function (vnode: VNode, hydrating?: boolean) {}Vue.prototype.$forceUpdate = function () {}Vue.prototype.$destroy = function () {}
}
lifecycleMixin主要在原型上加了_update,$forceUpdate,$destroy方法
- _update方法挂载在vue原型上,首次渲染或数据改变驱动视图的变化,会调用_update,初始化渲染会调用_patch
- $forceUpdate: 迫使Vue实例重新渲染,包括其下的子组件
- $destory: 完全销毁一个实例, 触发生命周期beforeDestroy和destroyed
3.5 renderMixin
核心代码
export function renderMixin (Vue: Class) {// install runtime convenience helpersinstallRenderHelpers(Vue.prototype)Vue.prototype.$nextTick = function (fn: Function) {return nextTick(fn, this)}Vue.prototype._render = function (): VNode {}
}
export function installRenderHelpers (target: any) {target._o = markOncetarget._n = toNumbertarget._s = toStringtarget._l = renderListtarget._t = renderSlottarget._q = looseEqualtarget._i = looseIndexOftarget._m = renderStatictarget._f = resolveFiltertarget._k = checkKeyCodestarget._b = bindObjectPropstarget._v = createTextVNodetarget._e = createEmptyVNodetarget._u = resolveScopedSlotstarget._g = bindObjectListenerstarget._d = bindDynamicKeystarget._p = prependModifier
}
可以看到renderMixin也是往原型上挂在了各种方法,用于构造render函数
并且又在原型上加了两个实例方法$nextTick和_render
- _render,渲染函数
- $nextTick,dom更新回调函数
本文来自互联网用户投稿,文章观点仅代表作者本人,不代表本站立场,不承担相关法律责任。如若转载,请注明出处。 如若内容造成侵权/违法违规/事实不符,请点击【内容举报】进行投诉反馈!