Shiro框架总结
Shiro框架总结
一、Shrio框架
1、Shiro介绍
(1)RBAC
Shiro是一款基于资源的访问控制框架即RBAC(Resource-Based Access Control),其将安全认证等相关功能全部提取出来抽象成了一个框架,使用Shiro能够轻松方便的完成认证、授权、加密等功能的开发。
(2)角色(roles)与权限(Permission)
角色与权限是Shiro认证授权的核心概念。在用户登录时,Shiro对用户进行认证,并授予其相应的角色,而角色也有其对应的权限,根据角色所具有的权限从而可管理用户可访问的资源。
2、Shiro架构分析
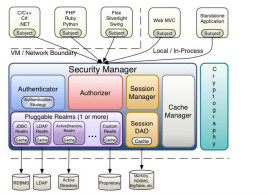
(1)Subject与Security Manager
Shiro中最核心的两大组件是Subject与Security Manager。其中,Subject是主体,其不仅可以代表用户,也可以是一段代码、一台计算机等,因此可将其理解为系统的参与者,Securtiy Manager中包含了Shiro所有的实现细节,且SecurityManager是唯一暴露给用户的功能组件。一般在使用时,先过的Subject,通过Subject再调用Security Manager中的功能。
因此,对于用户来说可将Subject理解为一个用户界面,Security Manager理解为一个服务器,通过用户界面使用服务器中的功能;而对于Shiro来说,Subject是一个抽象的用户。这样不仅方便了用户的调用,也起到数据安全的作用。
(2)Realm
Realm相当于安全框架与数据源之间的桥梁,也可以在Realm中定义自己的一些认证与授权的规则与细节,一般的角色与权限都保存在数据库中,因此都需要自己去实现;Shiro中也有定义好的realm,可以直接使用。因此,可以将Realm可以理解为DataSource
(3)Session Manager
Shrio中有自己的一套会话管理机制,并不依赖于Web容器,因此Shiro不仅可以用在web项目,也可用于java项目中。
(4)Authenticator
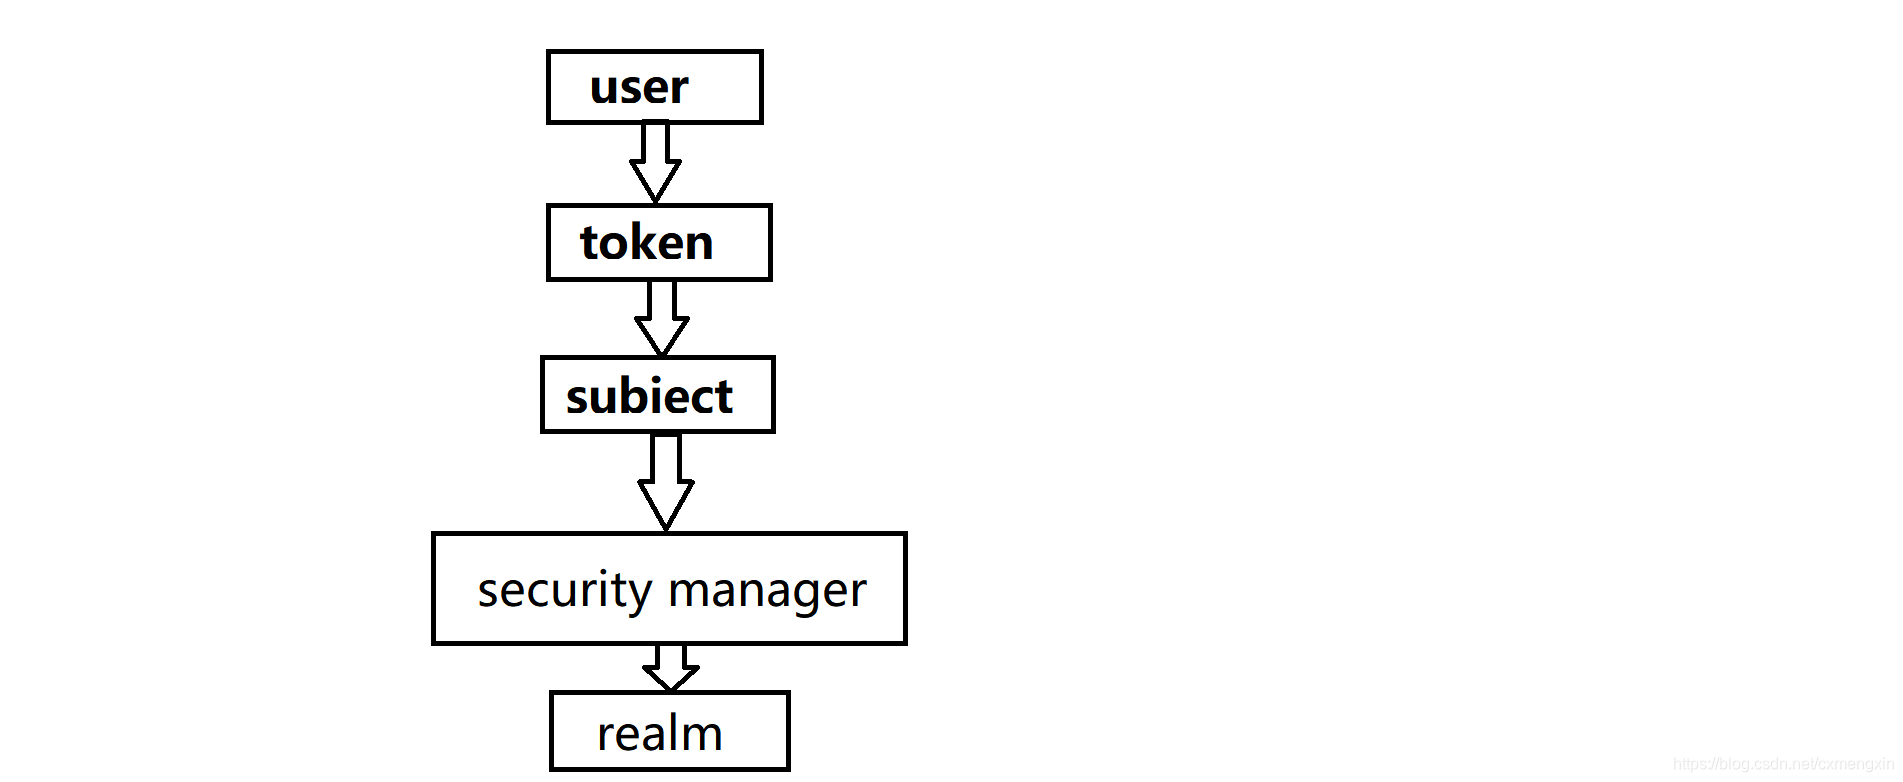
Authenticator即认证器,其通过token可对subject的身份验证,可在Realm中自定义验证规则。其简易的认证流程如下
(5)Authorizer
Authorizer为授权器,在subject认证通过后,可对subject进行授权,在访问功能时需要通过授权器判断Subject是否有此功能的操作权限。Authorizer也可在realm中自定义规则。
(6)SessionDao
sessionDAO即会话管理DAO,是对session会话管理操作的一套接口,比如要将session存储到数据库,可以使用jdbc将会话存储到数据库。
(7)crypography
crypography即密码管理,Shiro提供了一套加密/解密的组件,方便开发。提供了常用的散列函数,可将一个Object散列为一串无意义的字符串,比如Base64与MD5等加密算法。其中,Base64算法可逆,MD5算法不可逆。
(8)CacheManager
CacheManager为缓存管理。
二、Shiro与java整合
1、依赖
<dependency><groupId>org.apache.shirogroupId><artifactId>shiro-coreartifactId><version>1.4.0version>dependency><dependency><groupId>commons-logginggroupId><artifactId>commons-loggingartifactId><version>1.2version>
dependency>
2、ini文件
ini文件一般放在resources文件下,一般的默认文件名为shiro.ini;也可自定义,后面的代码需要相应的调整
[users]
zhangsan=123456,admin,custom
lisi=123456,custom
[roles]
admin=select,update,insert,delete
custom=select,insert
注:1、[users]表示用户,其中的键值对表示用户名和密码,密码后为用户所具有的角色
2、[roles]表示角色,其键值对表示角色与其对应的权限
3、java代码
public class Shiro {public void shiro(String pass){//定义SecurityManagerFactoryIniSecurityManagerFactory factory=new IniSecurityManagerFactory("classpath:shiro.ini");SecurityManager instance = factory.getInstance();//通过factory获取subjectSecurityUtils.setSecurityManager(instance);Subject subject = SecurityUtils.getSubject();//定义token并登录UsernamePasswordToken token=new UsernamePasswordToken("zhangsan",pass);subject.login(token);System.out.println("成功");}
}
注:1、若ini文件名为
shiro.ini,则IniSecurityManagerFactory factory=new IniSecurityManagerFactory("classpath:shiro.ini")的参数可缺省,若ini文件名为自定义的则,需要在参数中写入对应的文件名。 2、IniSecurityManagerFactory类似与Spring中的ClassPathXmlApplicationContext,可以根据文件名获取subject
三、Shiro与JDBC整合
1、依赖
<dependency><groupId>org.apache.shirogroupId><artifactId>shiro-coreartifactId><version>1.4.0version>dependency><dependency><groupId>commons-logginggroupId><artifactId>commons-loggingartifactId><version>1.2version>dependency><dependency><groupId>org.springframeworkgroupId><artifactId>spring-jdbcartifactId><version>4.3.6.RELEASEversion>dependency><dependency><groupId>mysqlgroupId><artifactId>mysql-connector-javaartifactId><version>5.1.47version>
dependency>
2、shiro.ini
[main]
dr=org.springframework.jdbc.datasource.DriverManagerDataSource
dr.url=jdbc:mysql://localhost:3306/shiro?characterEncoding=utf-8
dr.username=***
dr.password=***
dr.driverClassName=com.mysql.jdbc.Driverjr=org.apache.shiro.realm.jdbc.JdbcRealm
jr.dataSource=$dr
jr.authenticationQuery=select password from user where userName=?securityManager.realm=$jr
注:1、之前说了,shiro要实现验证与授权,就需要
SecurityManager与Realm,因此无论Shiro与什么整合,都需要配这两个东西 2、
org.apache.shiro.realm.jdbc.JdbcRealm为Shiro定义好的Realm,可以直接使用 3、
jr.authenticationQuery=select password from user where userName=?在这里写动态sql
3、java代码
public class Shiro3 {public void shiro(String pass){IniSecurityManagerFactory factory=new IniSecurityManagerFactory("classpath:shiro3.ini");SecurityManager instance = factory.getInstance();SecurityUtils.setSecurityManager(instance);Subject subject = SecurityUtils.getSubject();UsernamePasswordToken token=new UsernamePasswordToken("zhangsan",pass);subject.login(token);System.out.println("成功");}
}
与jdbc整合后,便可访问自己的数据库了,java代码上与之前的无异,但是token中的用户名和密码必须在数据库中存在。
四、角色与权限的数据库设计
1、需求分析
Shiro的授权是校验通常是与数据库进行交互,从数据库中拿到用户的相关信息,在Realm中进行校验与授权
首先需要一个User表,实现校验需要一个Role表,实现授权需要Permission表;其中一个用户可以有多个角色,一个角色也可以有多个用户,因此User与Role是多对多的关系,因此需要一个User_Role的中间表;一个角色可以有多个权限,一个权限也可以有多个角色,因此Role与Permission也是多对对的关系,因此也需要一个Role_Permission中间表。
2、表关系
综上,要实现校验与授权共需要5张表,表与表间的关系如下图:
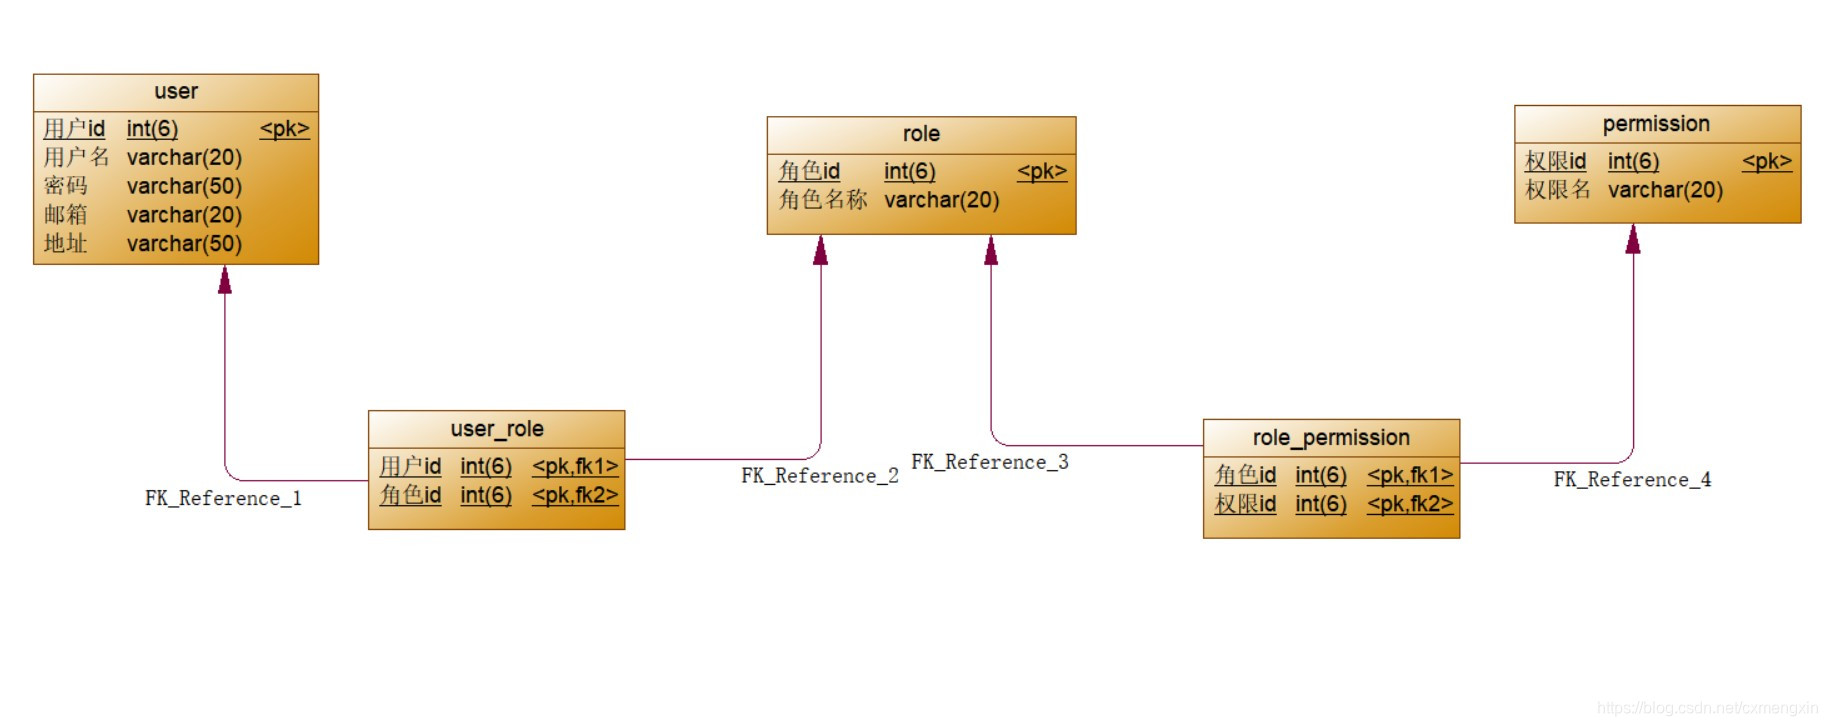
3、SQL语句
注:以下sql语句为MyBatis中Mapping.xml文件中的语句
-
登录:
select * from user where userName=#{name} and password=#{pass} -
赋予角色:User、Role、User_Role表三表联查
SELECT r.roleName FROM USER u,role r,user_role ur WHERE u.userId=ur.userId AND r.roleId=ur.roleId AND u.userName=#{name}- 授权:User、Role、User_Role、Permisson、Role_Permission表五表联查
SELECT DISTINCT p.permissionName FROM USER u,role r,permission p,user_role ur,role_permission rp WHERE u.userId=ur.userId AND r.roleId=ur.roleId AND r.roleId=rp.roleId AND p.permissionId=rp.permissionId AND u.userName=#{name}
五、Shiro与SSM整合
1、依赖(只包含Shiro的依赖)
<dependency><groupId>org.apache.shirogroupId><artifactId>shiro-webartifactId><version>1.3.2version>dependency><dependency><groupId>org.apache.shirogroupId><artifactId>shiro-springartifactId><version>1.3.2version>dependency>
2、web.xml文件
<web-app><filter><filter-name>shiroFilterfilter-name><filter-class>org.springframework.web.filter.DelegatingFilterProxyfilter-class><init-param><param-name>targetFilterLifecycleparam-name><param-value>trueparam-value>init-param>filter><listener><listener-class>org.springframework.web.context.ContextLoaderListenerlistener-class>listener><context-param><param-name>contextConfigLocationparam-name><param-value>classpath:spring-*.xmlparam-value>context-param><filter-mapping><filter-name>shiroFilterfilter-name><url-pattern>/*url-pattern>filter-mapping>
<servlet><servlet-name>servletservlet-name><servlet-class>org.springframework.web.servlet.DispatcherServletservlet-class><init-param><param-name>contextConfigLocationparam-name><param-value>classpath:spring-mvc.xmlparam-value>init-param>servlet><servlet-mapping><servlet-name>servletservlet-name><url-pattern>/url-pattern>servlet-mapping>
<filter><filter-name>encodingfilter-name><filter-class>org.springframework.web.filter.CharacterEncodingFilterfilter-class><init-param><param-name>encodingparam-name><param-value>utf-8param-value>init-param><init-param><param-name>forceEncodingparam-name><param-value>trueparam-value>init-param>filter><filter-mapping><filter-name>encodingfilter-name><url-pattern>/*url-pattern>filter-mapping>
web-app>
3、spring-shiro.xml
<beans xmlns="http://www.springframework.org/schema/beans"xmlns:xsi="http://www.w3.org/2001/XMLSchema-instance"xsi:schemaLocation="http://www.springframework.org/schema/beans http://www.springframework.org/schema/beans/spring-beans.xsd">
<bean id="shiroFilter" class="org.apache.shiro.spring.web.ShiroFilterFactoryBean"><property name="securityManager" ref="securityManager" >property><property name="loginUrl" value="/login.jsp" /><property name="successUrl" value="/main.jsp" /><property name="unauthorizedUrl" value="/error.jsp" /><property name="filterChainDefinitions"><value>/login.jsp=anon/index.jsp=anon/select.jsp=authc,roles[manager]/delete.jsp=authc,roles[custom]/update.jsp=authc,roles[manager]/insert.jsp=authc,roles[custom]value>property>bean>
<bean id="securityManager" class="org.apache.shiro.web.mgt.DefaultWebSecurityManager"><property name="realm" ref="mr" />bean>
<bean id="mr" class="com.qf.shiro.MyRealm">bean><bean class="org.apache.shiro.spring.LifecycleBeanPostProcessor" id="LifecycleBeanPostProcessor" />
beans>
注:1、shiroFilter过滤器接收到前端发来的请求后,交由Spring进行管理
2、在securityManager中可定义权限关键字,用于给资源授权,常用的关键字如下:
anon:无需认证即可访问,一般可用于无需登录的页面或游客访问页面
authc:需要认证后方可能访问,但不需要特定的角色或权限
roles:需要被服务某个角色后方可访问,前提是认证后
perms:需要被服务某个权限方可访问,前提是认证后 3、roles/perms[boss,admin]表示同时具有boss角色与admin角色/权限方可访问,实现“或”的关系:
roles[boss] roles[admin] 4、LifecycleBeanPostProcessor实际上可有可无
4、自定义Realm
public class MyRealm extends AuthorizingRealm {@Autowiredprivate UserService userService;@Autowiredprivate RoleService roleService;@Autowiredprivate PermissionService permissionService;//授权@Overrideprotected AuthorizationInfo doGetAuthorizationInfo(PrincipalCollection principals) {SimpleAuthorizationInfo info=new SimpleAuthorizationInfo();User user = (User) getAvailablePrincipal(principals);//授予角色List<String> roleNames = roleService.getRoleNames(user.getUserName()); if (roleNames!=null&&roleNames.size()!=0){info.addRoles(roleNames);}//授予权限List<String> permissionNames = permissionService.getPermissionNames(user.getUserName());if (permissionNames!=null&&permissionNames.size()!=0){info.addStringPermissions(permissionNames);}return info;}//校验@Overrideprotected AuthenticationInfo doGetAuthenticationInfo(AuthenticationToken token) throws AuthenticationException {UsernamePasswordToken usernamePasswordToken = (UsernamePasswordToken) token;String username = usernamePasswordToken.getUsername();String password = new String(usernamePasswordToken.getPassword());//登录User user = userService.login(username, password);if (user!=null){return new SimpleAuthenticationInfo(user,password,getName());}return null;}
}
PermissionService(其余略)
@Service
public class PermissionServiceImpl implements PermissionService {@Autowiredprivate PermissionDao permissionDao;@Overridepublic List<String> getPermissionNames(String userName) {List<String> permissionNames=new ArrayList<>();List<Permission> permissions = permissionDao.getPermissions(userName);if (permissions!=null&&permissions.size()!=0){for (Permission p :permissions) {permissionNames.add(p.getPermissionName());}}return permissionNames;}
}
5、Controller
@Controller
@RequestMapping("user")
public class UserController {@Autowiredprivate UserService userService;@RequestMapping(value = "login",method = RequestMethod.POST)public String login(String userName, String password, Model model){//Spring接管后的Shiro直接获得SubjectSubject subject = SecurityUtils.getSubject();UsernamePasswordToken token=new UsernamePasswordToken(userName,password);try {//校验,若校验不过直接抛异常subject.login(token);//判断是否通过校验if (subject.isAuthenticated()) {//判断是否具有manager角色if (subject.hasRole("manager")){//检查是否具有select权限,不通过直接抛异常subject.checkPermission("select");return "select";//判断是否具有custom角色}else if (subject.hasRole("custom")){//检查是否具有delete权限,不通过直接抛异常subject.checkPermission("delete");return "delete";}}//校验不同过的异常}catch (UnknownAccountException e){e.printStackTrace();return "login";//没有权限的异常}catch (UnauthorizedException e){e.printStackTrace();return "index";}return null;}
}
注:一般的登录不这么写,只需要一个subject.login(token)即可,在登录时只需要校验,不需要授权,若校验不过会直接抛异常,在catch中可以多接收一些异常,将粒度缩小,可以判断具体的错误原因,但用户的可操作性与安全性是一对矛盾,这样不利于系统安全,因此可用一个粗粒度的异常代替所有原因,从而提高系统的安全性
@RequestMapping("test")public String test(){Subject subject = SecurityUtils.getSubject();//判断是否通过验证if (subject.isAuthenticated()){//判断是否具有admin权限if (subject.hasRole("admin")){//判断是否delete权限subject.checkPermission("delete");return "/delete.jsp";}}else{return "/login.jsp";}}
注:若用控制器在后端进行授权操作,需要先判断是否通过校验,再判断是否有角色,再判断是否有权限
6、Shiro的JSTL
Shiro也是有JSTL标签的,常用的标签如下
(1)首先在jsp页面引入Shiro的标签
<%@ taglib prefix="shiro" uri="http://shiro.apache.org/tags"%>
(2)常用标签
1.shiro:authenticated (表示已认证通过,但不包括remember me登录的)
<shiro:authenticated><label>用户身份验证已通过 label>
shiro:authenticated>
说明:只有已通过用户认证,但不是通过记住我(remember me)浏览才会看到标签内的内容
2.shiro:guest (表示是游客身份,没有登录)
<shiro:guest><label>您当前是游客,label><a href="/login.jsp" >请登录a>
shiro:guest>
说明:只有是没有登录过,以游客的身份浏览才会看到标签内的内容
3.shiro:hasAnyRoles(表示拥有这些角色中其中一个)
<shiro:hasAnyRoles name="admin,user"><label>这是拥有admin或者是user角色的用户label>
shiro:hasAnyRoles>
说明:只有成功登录后,且具有admin或者user角色的用户才会看到标签内的内容;name属性中可以填写多个角色名称,以逗号(,)分隔
4.shiro:hasPermission(表示拥有某一权限)
<shiro:hasPermission name="admin:add"><label>这个用户拥有admin:add的权限label>
shiro:hasPermission>
说明:只有成功登录后,且具有admin:add权限的用户才可以看到标签内的内容,name属性中只能填写一个权限的名称
5.shiro:hashRole (表示拥有某一角色)
<shiro:hasRole name="admin"><label>这个用户拥有的角色是adminlabel>
shiro:hasRole>
说明:只有成功登录后,且具有admin角色的用户才可以看到标签内的内容,name属性中只能填写一个角色的名称
6.shiro:lacksPermission (表示不拥有某一角色)
<shiro:lacksPermission name="admin:delete"><label>这个用户不拥有admin:delete的权限label>
shiro:lacksPermission>
说明:只有成功登录后,且不具有admin:delete权限的用户才可以看到标签内的内容,name属性中只能填写一个权限的名称
7.shiro:lacksRole (表示不拥有某一角色)
<shiro:lacksRole name="admin"><label>这个用户不拥有admin的角色label>
shiro:lacksRole>
说明:只有成功登录后,且不具有admin角色的用户才可以看到标签内的内容,name属性中只能填写一个角色的名称
8.shiro:notAuthenticated (表示没有通过验证)
<shiro:notAuthenticated><label>用户身份验证没有通过(包括通过记住我(remember me)登录的) label>
shiro:notAuthenticated>
说明:只有没有通过验证的才可以看到标签内的内容,包括通过记住我(remember me)登录的
9.shiro:principal (表示用户的身份)
取值取的是你登录的时候,在Realm 实现类中的new SimpleAuthenticationInfo(第一个参数,…) 放的第一个参数:
....
return new SimpleAuthenticationInfo(user,user.getPswd(), getName());
1)如果第一个放的是username或者是一个值 ,那么就可以直接用。
<shiro: principal/>
2)如果第一个参数放的是对象,比如放User 对象。那么如果要取其中某一个值,可以通过property属性来指定。
<shiro:principal property="username"/>
10.shiro:user (表示已登录)
<shiro:user><label>欢迎[<shiro:principal/>],label><a href="/logout.jsp">退出a>
shiro:user>
说明:只有已经登录(包含通过记住我(remember me)登录的)的用户才可以看到标签内的内容;一般和标签shiro:principal一起用,来做显示用户的名称
注意:
shiro的jsp标签可以嵌套使用,可以根据业务的具体场景进行使用。例如一个按钮需要排除不是admin或user角色的用户才可以显示,可以像如下这样实现:
<shiro:lacksRole name="admin"><shiro:lacksRole name="user"> <label>这个用户不拥有admin或user的角色label>shiro:lacksRole>
shiro:lacksRole>
版权声明:本文为CSDN博主「逸致hjm」的原创文章,遵循CC 4.0 BY-SA版权协议,转载请附上原文出处链接及本声明。
原文链接:https://blog.csdn.net/yaodieteng1510/article/details/79992247
注:以上有关Shrio的JSTL标签的内容来自CSDN逸致hjm博主的《shiro学习–jsp标签》文章,原文链接如上
六、SpringBoot整合Shiro
SpringBoot框架是在SSM框架的基础上进一步整合,因此SpirngBoot整合Shiro于SSM基本无差,甚至还更简便了(yyds),只需要将SSM中的spring-shiro.xml抽取成Config类即可
1、依赖(只包含Shiro的依赖)
<dependency><groupId>org.apache.shirogroupId><artifactId>shiro-webartifactId><version>1.3.2version>dependency><dependency><groupId>org.apache.shirogroupId><artifactId>shiro-springartifactId><version>1.3.2version>dependency><dependency><groupId>com.github.theborakompanionigroupId><artifactId>thymeleaf-extras-shiroartifactId><version>2.0.0version>dependency>
若在SpringBoot环境下使用JSP作为前端页面,需要有引入如下三个依赖
<dependency><groupId>org.apache.shirogroupId><artifactId>shiro-webartifactId><version>1.3.2version>dependency><dependency><groupId>org.apache.shirogroupId><artifactId>shiro-springartifactId><version>1.3.2version>dependency>
2、Config配置类
@Configuration
public class ShiroCongif {//Spring接管shiroFilter过滤器@Bean(name = "shiroFilterFactoryBean")public ShiroFilterFactoryBean shiroFilterFactoryBean(@Qualifier("securityManager")DefaultWebSecurityManager securityManager){ShiroFilterFactoryBean bean=new ShiroFilterFactoryBean();bean.setSecurityManager(securityManager);//在SpringBoot中可通过map配置资源权限Map<String,String> filters=new LinkedHashMap<>();filters.put("/index.jsp","anon");filters.put("/toLogin","anon");filters.put("/login.jsp","anon");filters.put("/main.jsp","authc");filters.put("/person/delete","roles[admin]");filters.put("/person/delete","roles[boss]");bean.setFilterChainDefinitionMap(filters);bean.setLoginUrl("/person/toLogin");bean.setUnauthorizedUrl("/error.jsp");return bean;}//配置securityManager节点@Bean(name = "securityManager")public DefaultWebSecurityManager defaultWebSecurityManager(@Qualifier("realm")MyRealm myRealm){DefaultWebSecurityManager securityManager=new DefaultWebSecurityManager();securityManager.setRealm(myRealm);return securityManager;}//配置Realm节点@Bean(name = "realm")public MyRealm realm(){return new MyRealm();}//配置thymeleaf节点@Beanpublic ShiroDialect shiroDialect(){return new ShiroDialect();}
}
3、自定义Realm
public class MyRealm extends AuthorizingRealm {@Autowiredprivate UserService userService;@Autowiredprivate RoleService roleService;@Autowiredprivate PermissionService permissionService;//授权@Overrideprotected AuthorizationInfo doGetAuthorizationInfo(PrincipalCollection principals) {SimpleAuthorizationInfo info=new SimpleAuthorizationInfo();User user = (User) getAvailablePrincipal(principals);//授予角色List<String> roleNames = roleService.getRoleNames(user.getUserName()); if (roleNames!=null&&roleNames.size()!=0){info.addRoles(roleNames);}//授予权限List<String> permissionNames = permissionService.getPermissionNames(user.getUserName());if (permissionNames!=null&&permissionNames.size()!=0){info.addStringPermissions(permissionNames);}return info;}//校验@Overrideprotected AuthenticationInfo doGetAuthenticationInfo(AuthenticationToken token) throws AuthenticationException {UsernamePasswordToken usernamePasswordToken = (UsernamePasswordToken) token;String username = usernamePasswordToken.getUsername();String password = new String(usernamePasswordToken.getPassword());//登录User user = userService.login(username, password);if (user!=null){return new SimpleAuthenticationInfo(user,password,getName());}return null;}
}
SpringBoot的Realm与SSM的Realm基本无差
4、Shiro的thymeleaf标签
(1)首先在html标签中引入Shiro的thymeleaf标签
<html xmlns:shiro="http://www.pollix.at/thymeleaf/shiro">
(2)常用标签
DOCTYPE html>
<html xmlns="http://www.w3.org/1999/xhtml" xmlns:th="http://www.thymeleaf.org"xmlns:sec="http://www.thymeleaf.org/thymeleaf-extras-springsecurity3"xmlns:shiro="http://www.pollix.at/thymeleaf/shiro">
<head>
<meta charset="UTF-8" />
<title>Insert title heretitle>
head>
<body>  <h3>indexh3> <p shiro:guest="">Please <a href="login.html">logina>p><p shiro:user="">Welcome back John! Not John? Click <a href="login.html">herea> to login.p><p shiro:authenticated="">Hello, <span shiro:principal="">span>, how are you today?p> <a shiro:authenticated="" href="updateAccount.html">Update your contact informationa><p>Hello, <shiro:principal/>, how are you today?p><p shiro:notAuthenticated="">Please <a href="login.html">logina> in order to update your credit card information.p><a shiro:hasRole="admin" href="admin.html">Administer the systema><p shiro:lacksRole="developer">Sorry, you are not allowed to developer the system.p><p shiro:hasAllRoles="developer, admin">You are a developer and a admin.p><p shiro:hasAnyRoles="admin, vip, developer">You are a admin, vip, or developer.p><a shiro:hasPermission="userInfo:add" href="createUser.html">添加用户a><p shiro:lacksPermission="userInfo:del">Sorry, you are not allowed to delete user accounts.p><p shiro:hasAllPermissions="userInfo:view, userInfo:add">You can see or add users.p><p shiro:hasAnyPermissions="userInfo:view, userInfo:del">You can see or delete users.p>body>
html>
注:以上有关shiro的thymeleaf标签转载自CSDN的DENG8623048博主的《shiro在thymeleaf中的常用标签》文章,原文链接如下:https://blog.csdn.net/DENG8623048/article/details/88682892
5、注销
通过subject.logout()可进行注销
@RequestMapping("logout")public void logout(){Subject subject = SecurityUtils.getSubject();if (subject.isAuthenticated()){subject.logout();}}
七、加密
1、Base64
(1)加密:
import org.apache.shiro.codec.Base64;byte[] encode = Base64.encode(pass.getBytes());
(2)解密:
import org.apache.shiro.codec.Base64;byte[] decode = Base64.decode(pass);
注:1、Base64属于可逆散列算法
2、Base64加密后的字符串的长度会收到原字符串长度的影响,即原字符串的长度越长加密后便越长,反之同理;因此安全性不是很高,但可逆
2、MD5
(1)加密
import org.apache.shiro.crypto.hash.Md5Hash;String password = new Md5Hash(pass,salft,10).toString();
注:1、MD5属于不可逆散列算法
2、MD5加密后无论原字符串的长度是多少,加密后长度都一样;因此其安全性相较于可逆的散列算法来说相对高一些,但仍可通过常见的被加密值推测出原值
(2)加盐
这里有一个典故:传说中的菜谱里加盐的量从来不量化,都是加适量盐,而具体加多少全凭经验,因此加盐的意思是只有内部人员才能看懂的私房话。
import org.apache.shiro.crypto.hash.Md5Hash;String password = new Md5Hash(pass,salft,10).toString();
注:加盐需要用到MD5Hash的构造器,其中第一参数为被加密的字符串,第二个参数为
“盐”,即一个内部人员才能看懂的字符串,第三个参数为“加盐”的次数,即循环次数,通常是加在被加密字符串的前面
八、Shiro整合总结
Shiro最核心的东西为shiroFilter、securityManager、Realm因此,这三个东西是必配的
首先在web.xml中定义shiroFilter,并将其交由Spring管理
自定义Realm类,并将其交由securityManager中管理
其他的功能视情况而定进行配置
s());
(2)解密:```java
import org.apache.shiro.codec.Base64;byte[] decode = Base64.decode(pass);
注:1、Base64属于可逆散列算法
2、Base64加密后的字符串的长度会收到原字符串长度的影响,即原字符串的长度越长加密后便越长,反之同理;因此安全性不是很高,但可逆
2、MD5
(1)加密
import org.apache.shiro.crypto.hash.Md5Hash;String password = new Md5Hash(pass,salft,10).toString();
注:1、MD5属于不可逆散列算法
2、MD5加密后无论原字符串的长度是多少,加密后长度都一样;因此其安全性相较于可逆的散列算法来说相对高一些,但仍可通过常见的被加密值推测出原值
(2)加盐
这里有一个典故:传说中的菜谱里加盐的量从来不量化,都是加适量盐,而具体加多少全凭经验,因此加盐的意思是只有内部人员才能看懂的私房话。
import org.apache.shiro.crypto.hash.Md5Hash;String password = new Md5Hash(pass,salft,10).toString();
注:加盐需要用到MD5Hash的构造器,其中第一参数为被加密的字符串,第二个参数为
“盐”,即一个内部人员才能看懂的字符串,第三个参数为“加盐”的次数,即循环次数,通常是加在被加密字符串的前面
八、Shiro整合总结
Shiro最核心的东西为shiroFilter、securityManager、Realm因此,这三个东西是必配的
首先在web.xml中定义shiroFilter,并将其交由Spring管理
自定义Realm类,并将其交由securityManager中管理
其他的功能视情况而定进行配置
本文来自互联网用户投稿,文章观点仅代表作者本人,不代表本站立场,不承担相关法律责任。如若转载,请注明出处。 如若内容造成侵权/违法违规/事实不符,请点击【内容举报】进行投诉反馈!