Linux 中conda 安R
安装Miniconda,这里用的是清华镜像源:Index of /anaconda/miniconda/ | 清华大学开源软件镜像站 | Tsinghua Open Source Mirror https://mirrors.tuna.tsinghua.edu.cn/anaconda/miniconda/
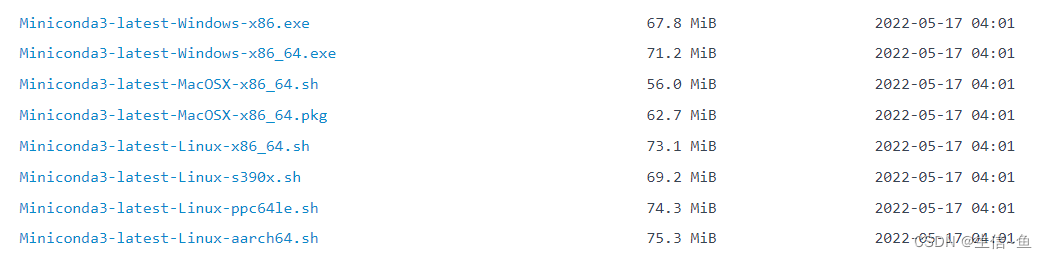
按时间排序,选择最新的Linux-x86_64.sh,右击复制链接。
在用户目录下下载。
wget https://mirrors.tuna.tsinghua.edu.cn/anaconda/miniconda/Miniconda3-latest-Linux-x86_64.sh等待。下载完成后用bash安装。
bash Anaconda3-2020.07-MacOSX-x86_64.sh安装时需要一些同意。按需要进行yes。
Please, press ENTER to continue
>>>
······
--More--
······
Do you accept the license terms? [yes|no]
[no] >>>
Please answer 'yes' or 'no':'
>>> yes 下一步为安装位置确认,位置默认为用户目录下的anaconda3文件夹。
Anaconda3 will now be installed into this location:
/home/test/anaconda3- Press ENTER to confirm the location- Press CTRL-C to abort the installation- Or specify a different location below[/home/test/anaconda3] >>>
一般选择默认路径,如想更改在后面输入自己想添加到的路径位置即可。如:/home/data/conda3 ,直接
下一步为是否init。init能够帮助你解决环境变量的问题。所以依旧yes。
Do you wish the installer to initialize Anaconda3
by running conda init? [yes|no]
[no] >>> yesIf you'd prefer that conda's base environment not be activated on startup, set the auto_activate_base parameter to false: conda config --set auto_activate_base falseThank you for installing Anaconda3!
安装完毕之后,重连服务器或者运行
. ~/.bashrc,之后会出现,(base) [test@VM-0-7-centos ~]$。
前面的(base)表明你已经激活anaconda3的base环境,使用conda config --set auto_activate_base false可以阻止该环境的自动激活。
按照清华镜像的 anaconda help 配置镜像地址。
在用户目录下新建.condarc文件。
cd ~
vim .condarc
输入以下内容。
channels:- defaults
show_channel_urls: true
channel_alias: https://mirrors.tuna.tsinghua.edu.cn/anaconda
default_channels:- https://mirrors.tuna.tsinghua.edu.cn/anaconda/pkgs/main- https://mirrors.tuna.tsinghua.edu.cn/anaconda/pkgs/free- https://mirrors.tuna.tsinghua.edu.cn/anaconda/pkgs/r- https://mirrors.tuna.tsinghua.edu.cn/anaconda/pkgs/pro- https://mirrors.tuna.tsinghua.edu.cn/anaconda/pkgs/msys2
custom_channels:conda-forge: https://mirrors.tuna.tsinghua.edu.cn/anaconda/cloudmsys2: https://mirrors.tuna.tsinghua.edu.cn/anaconda/cloudbioconda: https://mirrors.tuna.tsinghua.edu.cn/anaconda/cloudmenpo: https://mirrors.tuna.tsinghua.edu.cn/anaconda/cloudpytorch: https://mirrors.tuna.tsinghua.edu.cn/anaconda/cloudsimpleitk: https://mirrors.tuna.tsinghua.edu.cn/anaconda/cloud
保存。
<:>
此时查看config内容,可以看到默认channel(镜像)已经改变。
conda config --show之后也可以再添加一些其他想要的镜像源,比如直接在conda里面输入如下代码即可:
conda config --add channels https://mirrors.tuna.tsinghua.edu.cn/anaconda/cloud/bioconda/
conda config --add channels https://mirrors.tuna.tsinghua.edu.cn/anaconda/cloud/conda-forge/
conda config --set show_channel_urls yes
像删除已添加的镜像源,可以:
conda config --remove channels 源名称或链接 显示添加的源通道
显示添加的源通道
conda config --show-sources
安装R环境
新建一个环境Renv,环境是为了避免版本及依赖冲突。
conda create --name Renv提示中出现。
## Package Plan ##environment location: /home/test/anaconda3/envs/RenvProceed ([y]/n)? yenvironment location表明了环境的存储位置。按y同意。
安装结束后,激活该环境。
(base) [test@VM-0-7-centos etc]$ conda activate Renv
(Renv) [test@VM-0-7-centos etc]$此时前缀更改为(Renv)。
安装R。
#查看镜像中是否有R4.0版本
conda search R该命令表示从conda-forge拉取4.0版本的r-base进行安装,也可以选择3.6等其他版本。
conda install -c conda-forge r-base=4.0可以看到依赖的库有点多。大致看一下。
The following packages will be downloaded:package | build---------------------------|-----------------gcc_impl_linux-64-7.5.0 | hdb87b24_16 38.4 MB conda-forgegcc_linux-64-7.5.0 | hf34d7eb_28 23 KB conda-forgegfortran_impl_linux-64-7.5.0| h1104b78_16 9.0 MB conda-forgegfortran_linux-64-7.5.0 | ha781d05_28 22 KB conda-forgelibgcc-ng-9.3.0 | h24d8f2e_16 7.8 MB conda-forgelibgfortran-ng-7.5.0 | hdf63c60_16 1.3 MB conda-forgelz4-c-1.9.2 | he1b5a44_3 203 KB conda-forgemake-4.3 | h516909a_0 505 KB conda-forgencurses-6.2 | he1b5a44_1 993 KB conda-forgeopenssl-1.1.1h | h516909a_0 2.1 MB conda-forgepip-20.2.3 | py_0 1.1 MB conda-forgepixman-0.38.0 | h516909a_1003 594 KB conda-forgepthread-stubs-0.4 | h14c3975_1001 5 KB conda-forgepython-3.8.5 |h1103e12_8_cpython 22.0 MB conda-forgepython_abi-3.8 | 1_cp38 4 KB conda-forger-base-4.0.2 | he766273_1 23.6 MB conda-forgezlib-1.2.11 | h516909a_1009 106 KB conda-forgezstd-1.4.5 | h6597ccf_2 712 KB conda-forge------------------------------------------------------------Total: 230.0 MB可以看到,环境在安装python和r-base的同时,也会安装gcc gfortran openssl make zlib等常用系统库。所以Anaconda解决系统依赖的办法很直接,系统没有,就自己装一个。
按y同意。
安装好之后,输入R试一下。
(Renv) [test@VM-0-7-centos ~]$ RR version 4.0.2 (2020-06-22) -- "Taking Off Again"
Copyright (C) 2020 The R Foundation for Statistical Computing
Platform: x86_64-conda_cos6-linux-gnu (64-bit)看一下library的位置。
> .libPaths()
[1] "/home/test/anaconda3/envs/Renv/lib/R/library"退出看看R在哪。
(Renv) [test@VM-0-7-centos ~]$ which R
~/anaconda3/envs/Renv/bin/RR在Renv的bin文件夹中,当Renv被激活时,直接输入R进入,而当环境没有被激活时,可以直接绝对路径使用R。
给R也配置一下镜像CRAN和Bioconductor
先来到R安装的位置。
(Renv) [test@VM-0-7-centos ~]$ cd /home/test/anaconda3/envs/Renv/lib/R/
(Renv) [test@VM-0-7-centos R]$ ls
bin COPYING doc etc include lib library modules share SVN-REVISION可以看出这里和正常安装R的安装目录结构差不多。
进入etc文件夹后,新建一个Rprofile.site文件(该文件为R启动初期必须执行的文件)。
cd etc
vim Rprofile.site
输入以下内容,此处也可以提供非内置包的安装位置。
options("repos" = c(CRAN="https://mirrors.tuna.tsinghua.edu.cn/CRAN/"))
options(BioC_mirror="https://mirrors.tuna.tsinghua.edu.cn/bioconductor")
保存。
<:>
进入R,看一下配置成功与否。
> options()$reposCRAN
"https://mirrors.tuna.tsinghua.edu.cn/CRAN/"
这之后我们就可以愉快的安装包了。
install.packages('Seurat')2 shell界面双R版本的切换 ,如果你conda有两个R版本,想来会切换怎么做?
比如:
#R3.6 /usr/bin/R R包有上面4个地方
#R4.0 /home/scR2021/miniconda3/bin/R
可以添加缩写以示区分:在/home/scR2021路径下搜索.bashrc文件,然后进入编辑,复制下面两句话添加到文件里面
alias R3='/usr/bin/R'
alias R4='/home/scR2021/miniconda3/bin/R'
保存退出,在conda中输入
scR2021@iZ0jlac7d4cxlrxfyzxkgoZ:~$ source ~/.bashrc
scR2021@iZ0jlac7d4cxlrxfyzxkgoZ:~$ R3
#R version 3.6.3 (2020-02-29)
scR2021@iZ0jlac7d4cxlrxfyzxkgoZ:~$ R4
#R version 4.0.3 (2020-10-10)
shell界面里面双R版本及包的安装路径配置完毕!!!根据需求调用不同的R版本。
参考:
2020-021 Anaconda装R - 知乎 (zhihu.com)
Rstudio Server 不同R版本配置和切换 - 腾讯云开发者社区-腾讯云 (tencent.com)
本文来自互联网用户投稿,文章观点仅代表作者本人,不代表本站立场,不承担相关法律责任。如若转载,请注明出处。 如若内容造成侵权/违法违规/事实不符,请点击【内容举报】进行投诉反馈!