15-SpringBoot自动配置-切换内置web服务器
15-SpringBoot自动配置-切换内置web服务器
切换内置web服务器
SpringBoot的Web环境中默认使用tomcat作为内置服务器,其实SpringBoot提供了4种内置服务器供我们选择,我们可以很方便的切换。
演示案例
1.我们首先还是使用上一篇的项目,启动看看 Tomcat 作为内置 web 服务启动
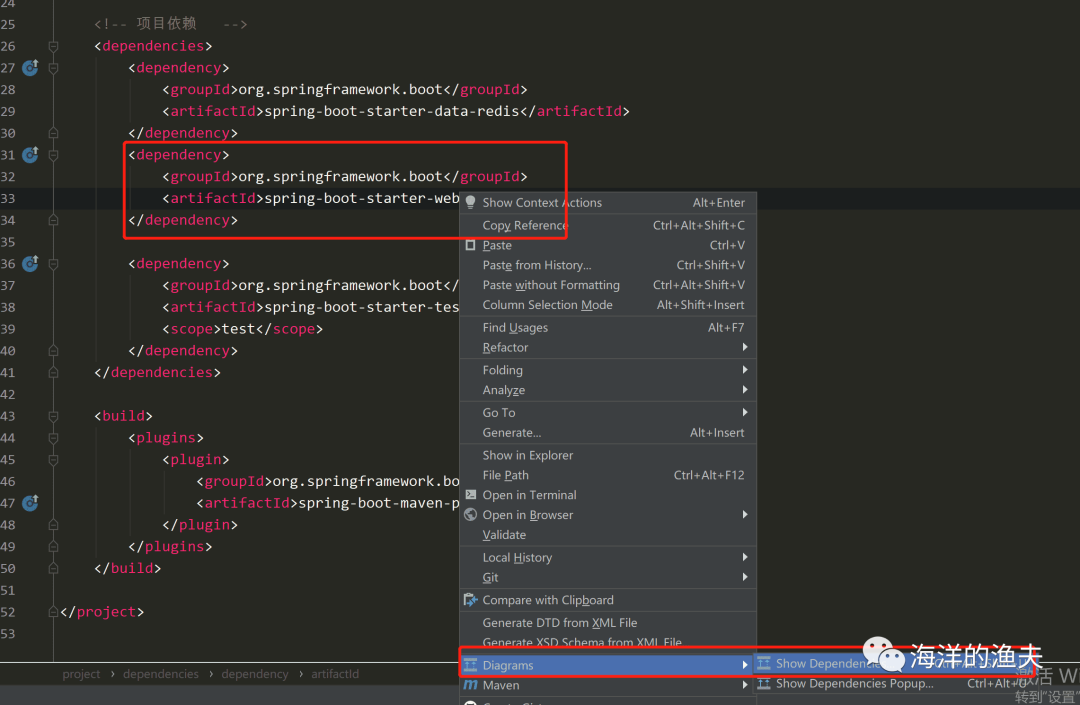
首先要确认一下项目的 pom.xml 是否有 web 启动依赖:
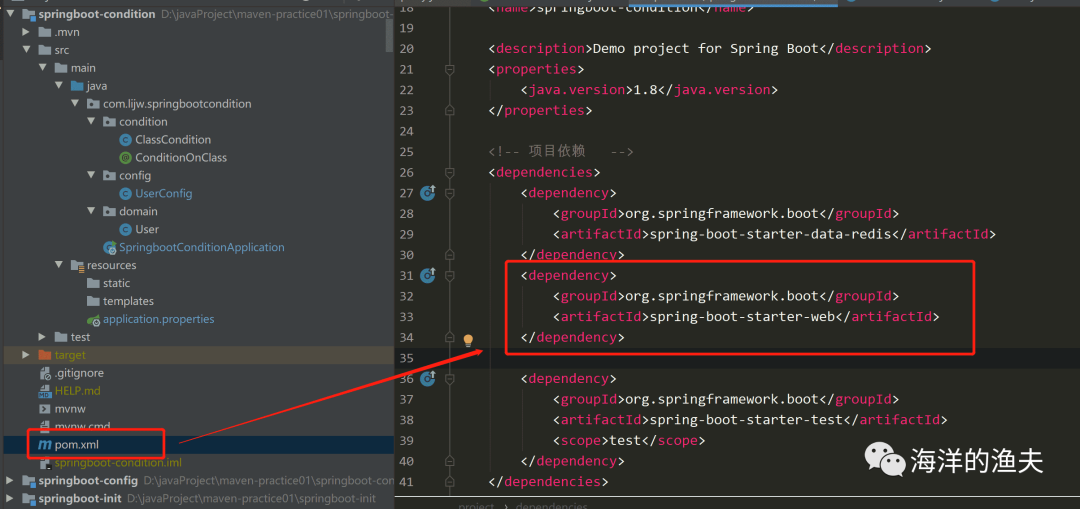
org.springframework.boot spring-boot-starter-web
2.确认了存在依赖之后,我们在从源码查看内置的web服务器
我们首先打开外部库,依然是找到 autoconfigure 的包:
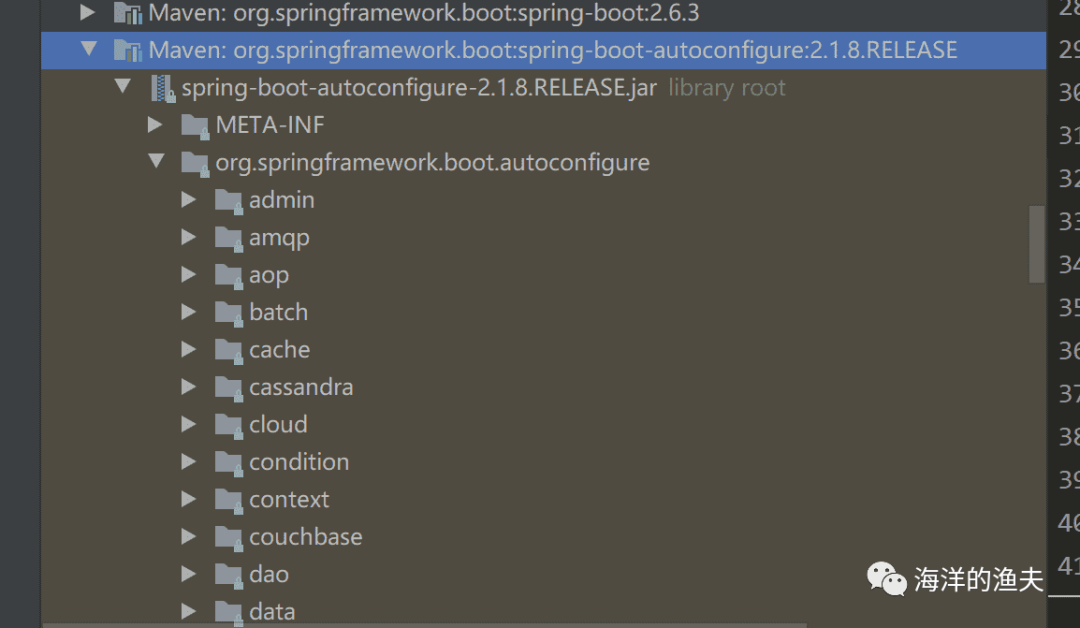
再找到 web 包,如下:
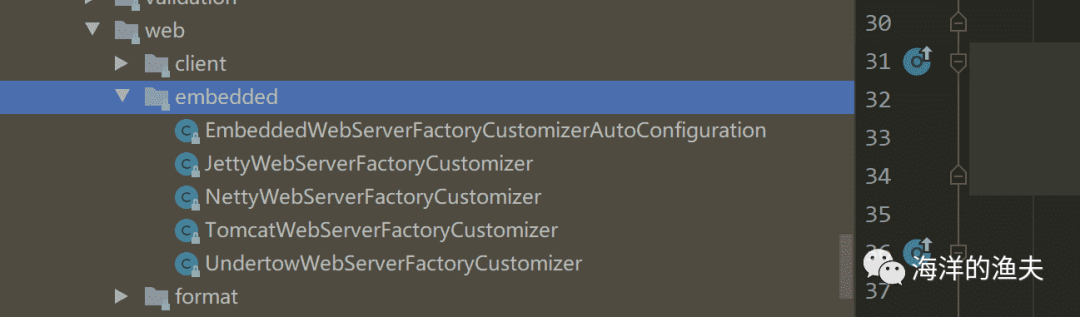
可以看到内置了几种web服务器。
/** Copyright 2012-2019 the original author or authors.** Licensed under the Apache License, Version 2.0 (the "License");* you may not use this file except in compliance with the License.* You may obtain a copy of the License at** https://www.apache.org/licenses/LICENSE-2.0** Unless required by applicable law or agreed to in writing, software* distributed under the License is distributed on an "AS IS" BASIS,* WITHOUT WARRANTIES OR CONDITIONS OF ANY KIND, either express or implied.* See the License for the specific language governing permissions and* limitations under the License.*/package org.springframework.boot.autoconfigure.web.embedded;import io.undertow.Undertow;
import org.apache.catalina.startup.Tomcat;
import org.apache.coyote.UpgradeProtocol;
import org.eclipse.jetty.server.Server;
import org.eclipse.jetty.util.Loader;
import org.eclipse.jetty.webapp.WebAppContext;
import org.xnio.SslClientAuthMode;
import reactor.netty.http.server.HttpServer;import org.springframework.boot.autoconfigure.EnableAutoConfiguration;
import org.springframework.boot.autoconfigure.condition.ConditionalOnClass;
import org.springframework.boot.autoconfigure.condition.ConditionalOnWebApplication;
import org.springframework.boot.autoconfigure.web.ServerProperties;
import org.springframework.boot.context.properties.EnableConfigurationProperties;
import org.springframework.context.annotation.Bean;
import org.springframework.context.annotation.Configuration;
import org.springframework.core.env.Environment;/*** {@link EnableAutoConfiguration Auto-configuration} for embedded servlet and reactive* web servers customizations.** @author Phillip Webb* @since 2.0.0*/
@Configuration
@ConditionalOnWebApplication
@EnableConfigurationProperties(ServerProperties.class)
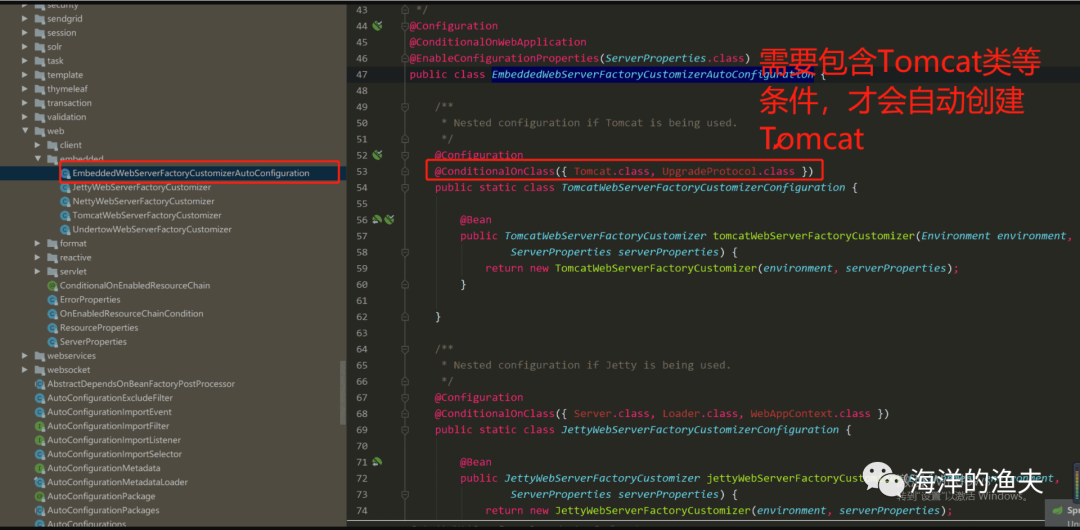
public class EmbeddedWebServerFactoryCustomizerAutoConfiguration {/*** Nested configuration if Tomcat is being used.*/@Configuration@ConditionalOnClass({ Tomcat.class, UpgradeProtocol.class }) // 只有配置了这些类的依赖,才会自动加载public static class TomcatWebServerFactoryCustomizerConfiguration {@Beanpublic TomcatWebServerFactoryCustomizer tomcatWebServerFactoryCustomizer(Environment environment,ServerProperties serverProperties) {return new TomcatWebServerFactoryCustomizer(environment, serverProperties);}}/*** Nested configuration if Jetty is being used.*/@Configuration@ConditionalOnClass({ Server.class, Loader.class, WebAppContext.class })public static class JettyWebServerFactoryCustomizerConfiguration {@Beanpublic JettyWebServerFactoryCustomizer jettyWebServerFactoryCustomizer(Environment environment,ServerProperties serverProperties) {return new JettyWebServerFactoryCustomizer(environment, serverProperties);}}/*** Nested configuration if Undertow is being used.*/@Configuration@ConditionalOnClass({ Undertow.class, SslClientAuthMode.class })public static class UndertowWebServerFactoryCustomizerConfiguration {@Beanpublic UndertowWebServerFactoryCustomizer undertowWebServerFactoryCustomizer(Environment environment,ServerProperties serverProperties) {return new UndertowWebServerFactoryCustomizer(environment, serverProperties);}}/*** Nested configuration if Netty is being used.*/@Configuration@ConditionalOnClass(HttpServer.class)public static class NettyWebServerFactoryCustomizerConfiguration {@Beanpublic NettyWebServerFactoryCustomizer nettyWebServerFactoryCustomizer(Environment environment,ServerProperties serverProperties) {return new NettyWebServerFactoryCustomizer(environment, serverProperties);}}}也就是说,我们只要改变类的依赖,那么就应该可以切换内置的web服务器了。
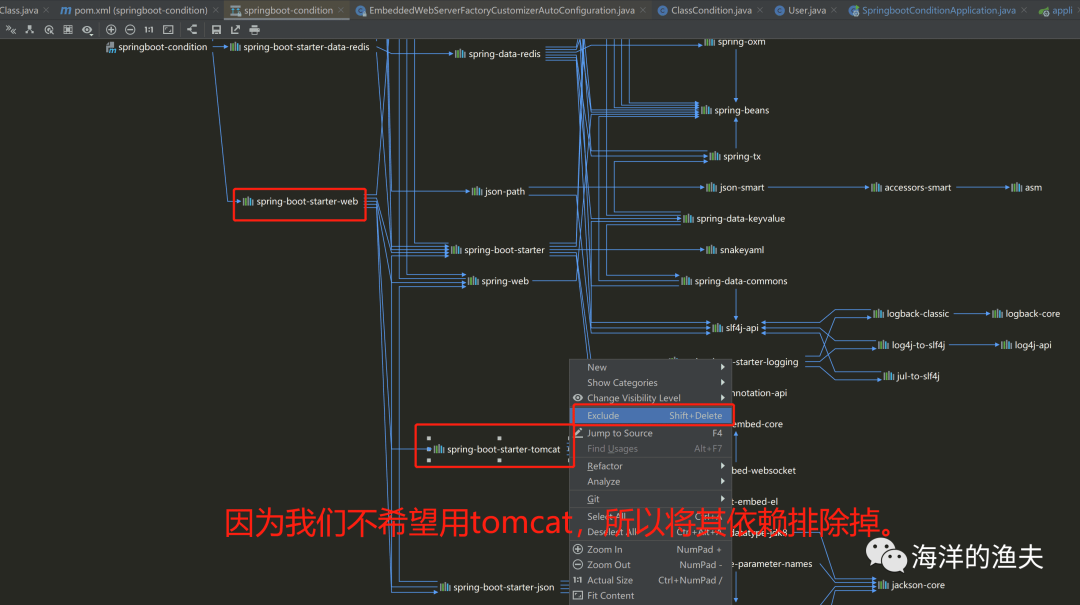
3.查看 spring-boot-starter-web 启动依赖的内部继承关系
4.排除 tomcat 的依赖
设置了排除之后,我们回头看看 pom.xml 里面的配置如下:
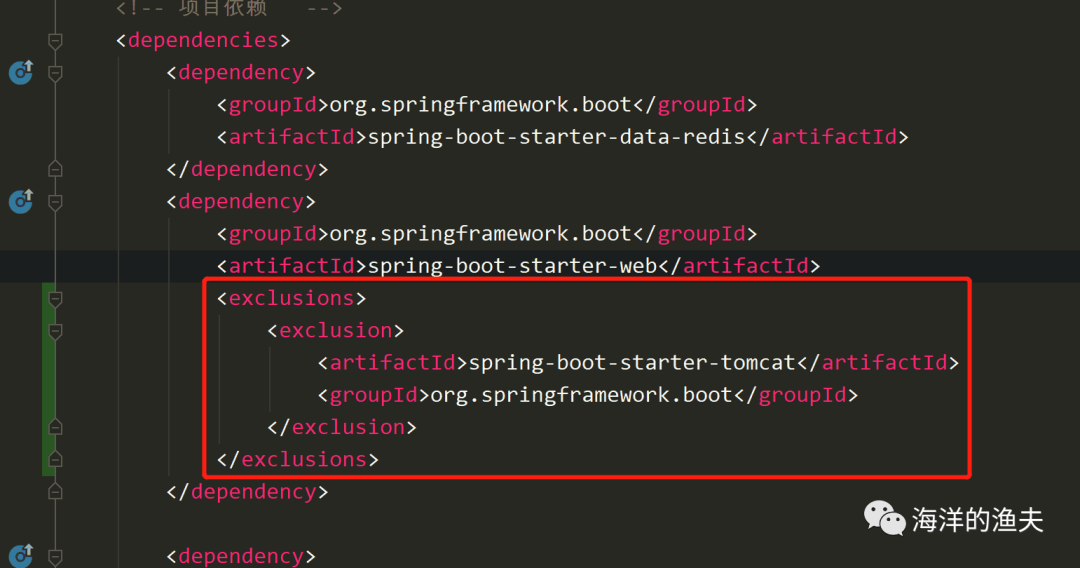
org.springframework.boot spring-boot-starter-web spring-boot-starter-tomcat org.springframework.boot 可以看到已经排除了依赖。
5.增加 jetty 依赖,使用 jetty 启动web服务
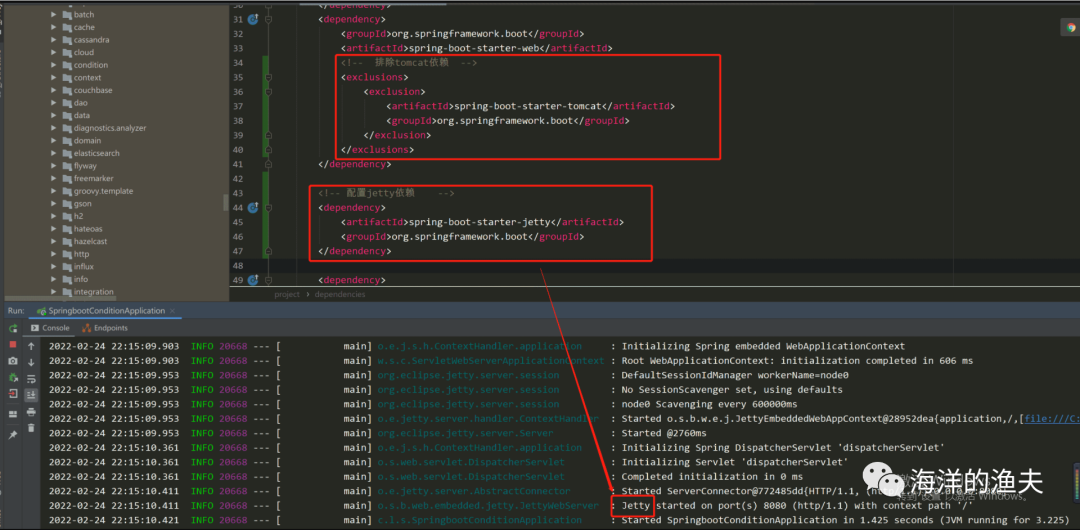
org.springframework.boot spring-boot-starter-web spring-boot-starter-tomcat org.springframework.boot spring-boot-starter-jetty org.springframework.boot
本文来自互联网用户投稿,文章观点仅代表作者本人,不代表本站立场,不承担相关法律责任。如若转载,请注明出处。 如若内容造成侵权/违法违规/事实不符,请点击【内容举报】进行投诉反馈!