若依框架:前端登录组件与图像验证码
在上一篇《若依框架:前端项目结构与初始页面渲染流程》中,我们探讨了与“vue.config.js文件配置、.env模式和环境变量配置、vue-router全局导航守卫配置、vue-router路由配置简介”相关的内容,书接上回,我们继续探讨若依前端项目的初始页面组件Login.vue的初始渲染逻辑,以及图像验证码实现逻辑、用户登录逻辑的解析。
目录
登录组件初始渲染逻辑
图像验证码逻辑
前端实现逻辑
后端验证码图像生成逻辑
@Resource注解
AjaxResult统一响应结果封装
HttpStatus响应状态码封装
@ConfigurationProperties注解
Redis缓存工具
springframework提供的FastByteArrayOutputStream类
前端Cookie信息读取和存储逻辑
用户登录逻辑
Vuex:全局状态值的异步更新操作
Axios:二次封装与拦截器配置
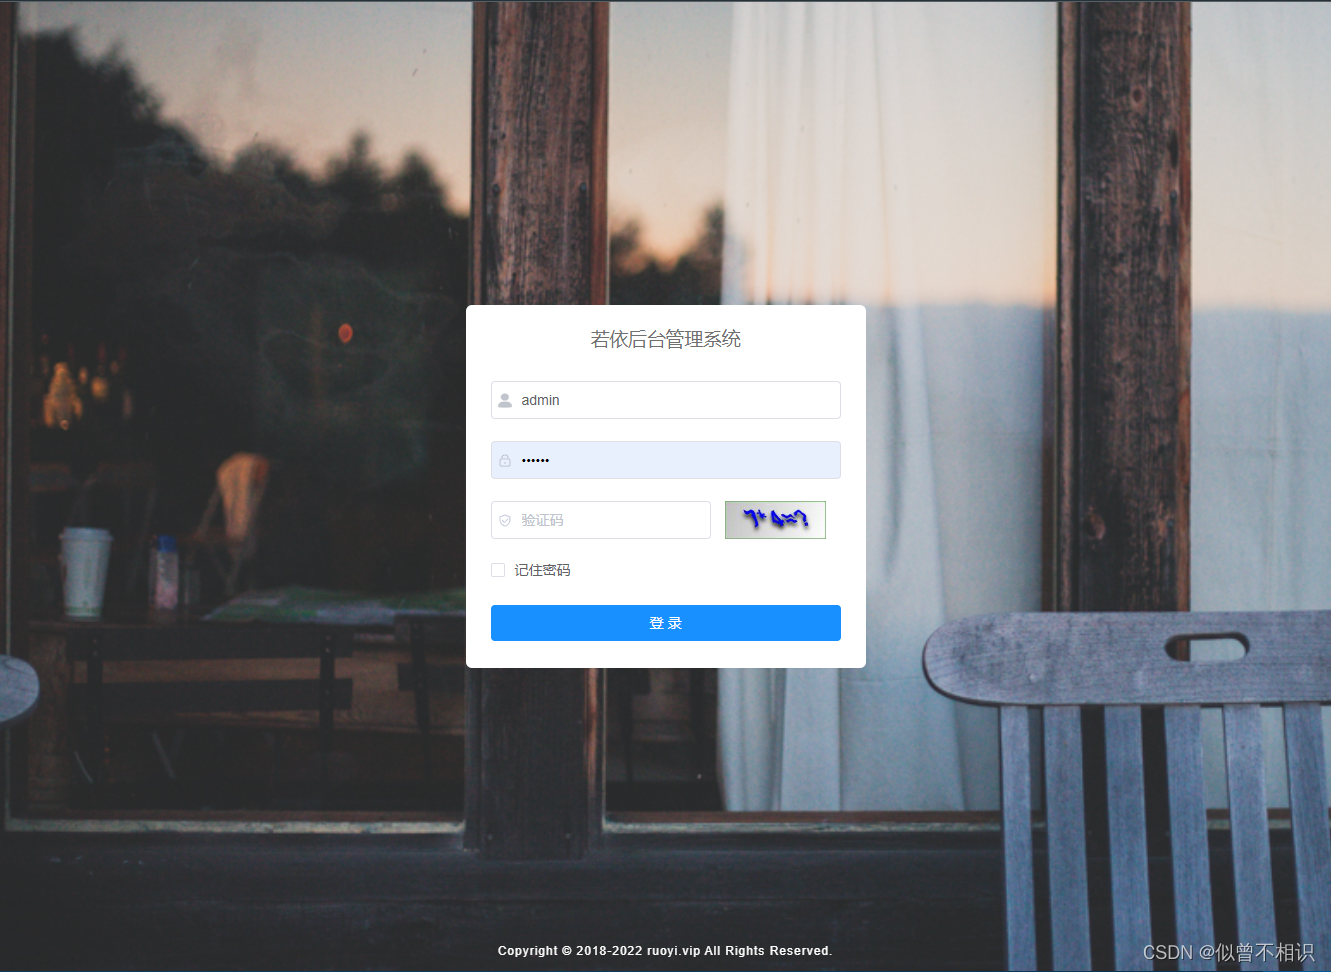
登录组件初始渲染逻辑
登录组件为Login.vue,借助Element-UI的表单组件el-form实现页面布局。初始渲染时,在组件的created生命周期阶段, 主要做了两件事情:
①调用后端接口http://localhost/dev-api/captchaImage,获取以Base64字符串形式表示的验证码图像,以及其它参数;
②借助js-cookie第三方依赖库从本地Cookie中获取已经缓存过的用户登录信息。
有关具体的业务处理逻辑,将在后面部分进行介绍。
此外,对应单击“登录”按钮,实现用户登录验证功能,Login.vue组件也为按钮注册了点击事件,并提供了handleLogin()回调函数,用于执行用户登录验证、登录成功后的用户信息缓存(缓存至Cookie和Vuex中),以及路由切换至“/index”主页页面的处理逻辑。
图像验证码逻辑
前端实现逻辑

图像验证码的前端逻辑实现,主要是:Login.vue组件在created()生命周期阶段,调用后端接口http://localhost/dev-api/captchaImage,获取包含了Base64字符串形式的图片序列,然后将其转换为Base64形式的图片链接,将其设置到标签的src属性(codeUrl)上。具体代码实现被封装在Login.vue组件的getCode()方法中。
/*** 获取验证码*/getCode() {getCodeImg().then(res => {console.log(res);this.captchaEnabled = res.captchaEnabled === undefined ? true : res.captchaEnabled;if (this.captchaEnabled) {this.codeUrl = "data:image/gif;base64," + res.img;this.loginForm.uuid = res.uuid;}});},调用后端接口时,返回的基本信息如下,
{"msg": "操作成功","img": "Base64字符串形式的image图片资源","code": 200,"captchaEnabled": true,"uuid": "0f8c9fab3ce8485e9779ef9515852c74"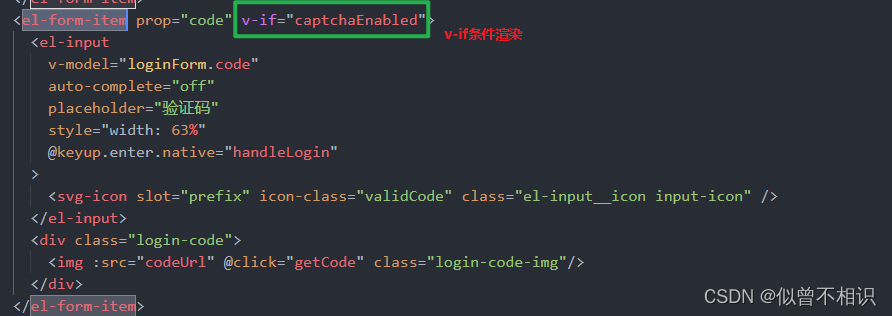
}其中:①captchaEnabled字段表示后端接口是否可以返回一个验证码图像,如果为false,则无法返回,对应的Login.vue组件就不会显示验证码这一项;反之为true时,则后端接口会返回一个Base64字符串形式的验证码图像。这个逻辑是基于Vue的v-if条件渲染实现的。
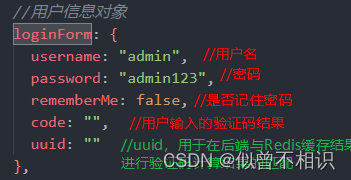
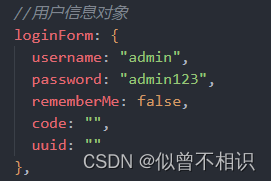
②uuid字段,对应的是后端存储在Redis缓存中的图像验证码表达式的正确计算结果,当用户点击登录时,会在loginForm属性中随着用户名、密码、是否记住密码、用户输入的验证码值一起被提交给后端接口,凭借这个uuid,后端接口在进行用户登录验证时,可以与Redis中存储的正确计算结果进行对比,以此判断用户登录信息是否有误。
后端验证码图像生成逻辑
图像验证码的前端处理逻辑其实比较简单,仅仅涉及后端接口请求,与Base64字符串形式的图像资源的处理与标签的src属性动态值的绑定操作。
至于后端部分,处理逻辑则较为复杂。
/*** 生成验证码*/@GetMapping("/captchaImage")public AjaxResult getCode(HttpServletResponse response) throws IOException{AjaxResult ajax = AjaxResult.success();//AjaxResult-统一返回结果的封装-[返回成功的消息]boolean captchaEnabled = configService.selectCaptchaEnabled();ajax.put("captchaEnabled", captchaEnabled);//根据返回的布尔值判断是否允许使用图片验证码if (!captchaEnabled){//不允许-直接返回ajax响应结果return ajax; //msg:操作成功,code:200,data:null}// 保存验证码信息String uuid = IdUtils.simpleUUID();//生成uuid-[简化的UUID,去掉了横线]String verifyKey = CacheConstants.CAPTCHA_CODE_KEY + uuid; // 'captcha_codes'+uuidString capStr = null, code = null;BufferedImage image = null;// 生成验证码String captchaType = RuoYiConfig.getCaptchaType(); //mathif ("math".equals(captchaType)){//创建一个表达式 x operator y = ? @ resultString capText = captchaProducerMath.createText();capStr = capText.substring(0, capText.lastIndexOf("@")); //获取表达式 x operator y = ?code = capText.substring(capText.lastIndexOf("@") + 1); //获取结果 resultimage = captchaProducerMath.createImage(capStr); // 创建一个BufferedImage对象}else if ("char".equals(captchaType)){capStr = code = captchaProducer.createText();image = captchaProducer.createImage(capStr);}//将表达式的结果result存入redis缓存中,并设置过期时间-[以分钟为单位]redisCache.setCacheObject(verifyKey, code, Constants.CAPTCHA_EXPIRATION, TimeUnit.MINUTES);// 转换流信息写出-【java.io.ByteArrayOutputStream类的替代品,OutputStream的直接子类,由 org.springframework.util包提供】FastByteArrayOutputStream os = new FastByteArrayOutputStream();try{ImageIO.write(image, "jpg", os); //将图片数据写入FastByteArrayOutputStream对象中}catch (IOException e){return AjaxResult.error(e.getMessage());}ajax.put("uuid", uuid);ajax.put("img", Base64.encode(os.toByteArray())); //图片转化为Base64编码return ajax; //返回对象}首先,这个处理前端http://localhost/dev-api/captchaImage请求的后端接口被放在ruoyi-admin模块下的controller/common/CaptchaController控制器中;其次,该接口对应的类成员方法如上,每一句代码的含义已通过注释进行标注;最后,该接口中涉及到了如下几个知识点:
①@Resource自动装配注解;
②AjaxResult统一响应结果封装;
③@ConfigurationProperties注解读取application.yml的配置属性信息;
④Redis缓存工具类com.ruoyi.common.core.redis.RedisCache;
⑤springframework提供的FastByteArrayOutputStream,作为java.io.ByteArrayOutputStream字节数组流的替代类使用;
⑥HttpStatus响应状态码封装。
以下对上述6点内容进行逐一介绍。
@Resource注解
@Resource在Spring/SpringBoot框架中,可用于实现类的成员属性的自动装配,该注解源码如下,主要包含7个属性,其中最重要的两个参数是:name 和 type 。
package javax.annotation;import java.lang.annotation.*;
import static java.lang.annotation.ElementType.*;
import static java.lang.annotation.RetentionPolicy.*;/*** 此注解用于标识应用程序所需要的资源.,可以用于修饰组件类、以及类的字段、方法。当注解被应用到字段或者方法上,组件初始化时,container容器就会注入一个资源对象对应的的实例;当注解被应用到class类上,就声明了一个应用程序将在运行时查找的资源。** @since Common Annotations 1.0*/
@Target({TYPE, FIELD, METHOD})
@Retention(RUNTIME)
public @interface Resource {/*** 资源的JNDI名称*/String name() default "";/*** 引用所指向的资源的名称 */String lookup() default "";/*** 资源对应的Java数据类型,默认是Object类型*/Class type() default java.lang.Object.class;/*** The two possible authentication types for a resource.*/enum AuthenticationType {CONTAINER,APPLICATION}/*** 使用资源时的验证类型,枚举类型enum AuthenticationType {CONTAINER,APPLICATION}*/AuthenticationType authenticationType() default AuthenticationType.CONTAINER;/*** 用于判断当前资源是否可以在不同的Bean实例中被共享*/boolean shareable() default true;String mappedName() default "";/*** 资源的描述信息*/String description() default "";
}
同时,由于@Resources注解是jdk原生提供的,因此该注解可以应用在任何Java后端框架中。关于Spring中@Autowired和@Resource的区别,可以查看参看博客。
AjaxResult统一响应结果封装
若依框架后端部分,对于接口响应结果进行了统一地封装,对应com.ruoyi.common.core.domain.AjaxResult实体类,该类作为HashMap
/*** 操作消息提醒* * @author ruoyi*/
public class AjaxResult extends HashMap
{private static final long serialVersionUID = 1L;/** 状态码 */public static final String CODE_TAG = "code";/** 返回内容 */public static final String MSG_TAG = "msg";/** 数据对象 */public static final String DATA_TAG = "data";/*** 初始化一个新创建的 AjaxResult 对象,使其表示一个空消息。*/public AjaxResult(){}/*** 初始化一个新创建的 AjaxResult 对象* * @param code 状态码* @param msg 返回内容*/public AjaxResult(int code, String msg){super.put(CODE_TAG, code);super.put(MSG_TAG, msg);}/*** 初始化一个新创建的 AjaxResult 对象* * @param code 状态码* @param msg 返回内容* @param data 数据对象*/public AjaxResult(int code, String msg, Object data){super.put(CODE_TAG, code);super.put(MSG_TAG, msg);if (StringUtils.isNotNull(data)){super.put(DATA_TAG, data);}}/*** 返回成功消息* * @return 成功消息*/public static AjaxResult success(){return AjaxResult.success("操作成功");}/*** 返回成功数据* * @return 成功消息*/public static AjaxResult success(Object data){return AjaxResult.success("操作成功", data);}/*** 返回成功消息* * @param msg 返回内容* @return 成功消息*/public static AjaxResult success(String msg){return AjaxResult.success(msg, null);}/*** 返回成功消息* * @param msg 返回内容* @param data 数据对象* @return 成功消息*/public static AjaxResult success(String msg, Object data){return new AjaxResult(HttpStatus.SUCCESS, msg, data);}/*** 返回警告消息** @param msg 返回内容* @return 警告消息*/public static AjaxResult warn(String msg){return AjaxResult.warn(msg, null);}/*** 返回警告消息** @param msg 返回内容* @param data 数据对象* @return 警告消息*/public static AjaxResult warn(String msg, Object data){return new AjaxResult(HttpStatus.WARN, msg, data);}/*** 返回错误消息* * @return 错误消息*/public static AjaxResult error(){return AjaxResult.error("操作失败");}/*** 返回错误消息* * @param msg 返回内容* @return 错误消息*/public static AjaxResult error(String msg){return AjaxResult.error(msg, null);}/*** 返回错误消息* * @param msg 返回内容* @param data 数据对象* @return 错误消息*/public static AjaxResult error(String msg, Object data){return new AjaxResult(HttpStatus.ERROR, msg, data);}/*** 返回错误消息* * @param code 状态码* @param msg 返回内容* @return 错误消息*/public static AjaxResult error(int code, String msg){return new AjaxResult(code, msg, null);}/*** 方便链式调用** @param key 键* @param value 值* @return 数据对象*/@Overridepublic AjaxResult put(String key, Object value){super.put(key, value);return this;}
}
HttpStatus响应状态码封装
在查看AjaxResult类的源码时,我们发现若依框架其实内部对接口响应时的状态码也进行了封装,对应于com.ruoyi.common.constant.HttpStatus类,源码如下,
/*** 返回状态码* * @author ruoyi*/
public class HttpStatus
{/*** 操作成功*/public static final int SUCCESS = 200;/*** 对象创建成功*/public static final int CREATED = 201;/*** 请求已经被接受*/public static final int ACCEPTED = 202;/*** 操作已经执行成功,但是没有返回数据*/public static final int NO_CONTENT = 204;/*** 资源已被移除*/public static final int MOVED_PERM = 301;/*** 重定向*/public static final int SEE_OTHER = 303;/*** 资源没有被修改*/public static final int NOT_MODIFIED = 304;/*** 参数列表错误(缺少,格式不匹配)*/public static final int BAD_REQUEST = 400;/*** 未授权*/public static final int UNAUTHORIZED = 401;/*** 访问受限,授权过期*/public static final int FORBIDDEN = 403;/*** 资源,服务未找到*/public static final int NOT_FOUND = 404;/*** 不允许的http方法*/public static final int BAD_METHOD = 405;/*** 资源冲突,或者资源被锁*/public static final int CONFLICT = 409;/*** 不支持的数据,媒体类型*/public static final int UNSUPPORTED_TYPE = 415;/*** 系统内部错误*/public static final int ERROR = 500;/*** 接口未实现*/public static final int NOT_IMPLEMENTED = 501;/*** 系统警告消息*/public static final int WARN = 601;
}
既然若依框架内部对接口响应时的状态码进行了封装,那么在前端项目中,对于axios必定也进行了对应的响应拦截器的配置,这部分内容在后边部分进行介绍。
@ConfigurationProperties注解
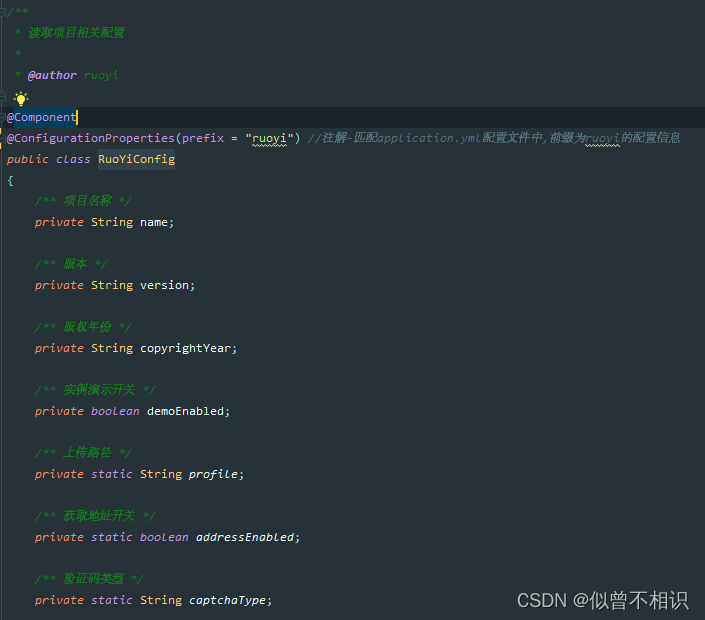
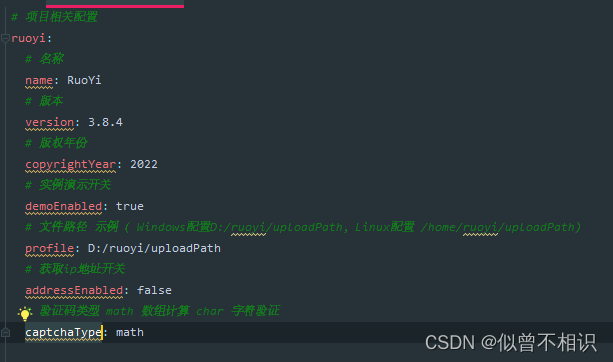
@ConfigurationProperties注解,可以用于读取application.yml的配置属性信息,并将其转换为Class类的属性、或者直接转换为Class实体类的属性值使用。
①可以配合@Bean注解使用,用于在某个配置类中完成Bean实例的自动装配;
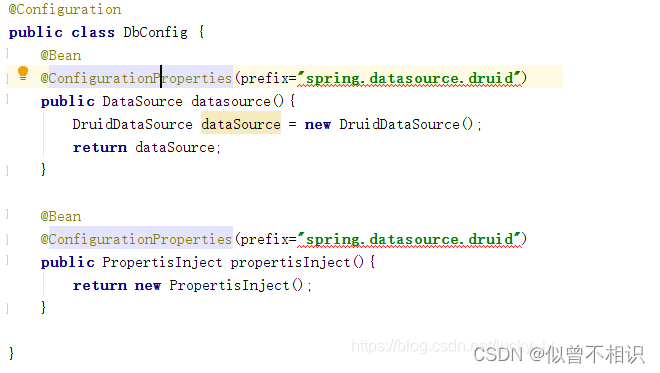
②将属性转换成bean对象,配合@component注解使用。例如:若依后端项目中com.ruoyi.common.config.RuoYiConfig类就是通过@component+ @ConfigurationProperties注解,基于application.yml配置文件中的属性信息,自动完成RuoYiConfig实体类的属性注入的。
Redis缓存工具
SpringBoot如何整合Redis呢?这有赖于Spring Data子项目:Spring Data Redis成员的支持。如下依赖项在ruoyi-common模块中被引入。
org.springframework.boot spring-boot-starter-data-redis 并且,若依框架为了方便Redis的缓存操作,也封装了内部工具类com.ruoyi.common.core.redis.RedisCache,提供了设置、删除、查询缓存列表等的基本方法,并通过@Component注解交由Spring容器进行管理。
package com.ruoyi.common.core.redis;import java.util.Collection;
import java.util.Iterator;
import java.util.List;
import java.util.Map;
import java.util.Set;
import java.util.concurrent.TimeUnit;
import org.springframework.beans.factory.annotation.Autowired;
import org.springframework.data.redis.core.BoundSetOperations;
import org.springframework.data.redis.core.HashOperations;
import org.springframework.data.redis.core.RedisTemplate;
import org.springframework.data.redis.core.ValueOperations;
import org.springframework.stereotype.Component;/*** spring redis 工具类** @author ruoyi**/
@SuppressWarnings(value = { "unchecked", "rawtypes" })
@Component
public class RedisCache
{@Autowiredpublic RedisTemplate redisTemplate;/*** 缓存基本的对象,Integer、String、实体类等** @param key 缓存的键值* @param value 缓存的值*/public void setCacheObject(final String key, final T value){redisTemplate.opsForValue().set(key, value);}/*** 缓存基本的对象,Integer、String、实体类等** @param key 缓存的键值* @param value 缓存的值* @param timeout 时间* @param timeUnit 时间颗粒度*/public void setCacheObject(final String key, final T value, final Integer timeout, final TimeUnit timeUnit){redisTemplate.opsForValue().set(key, value, timeout, timeUnit);}/*** 设置有效时间** @param key Redis键* @param timeout 超时时间* @return true=设置成功;false=设置失败*/public boolean expire(final String key, final long timeout){return expire(key, timeout, TimeUnit.SECONDS);}/*** 设置有效时间** @param key Redis键* @param timeout 超时时间* @param unit 时间单位* @return true=设置成功;false=设置失败*/public boolean expire(final String key, final long timeout, final TimeUnit unit){return redisTemplate.expire(key, timeout, unit);}/*** 获取有效时间** @param key Redis键* @return 有效时间*/public long getExpire(final String key){return redisTemplate.getExpire(key);}/*** 判断 key是否存在** @param key 键* @return true 存在 false不存在*/public Boolean hasKey(String key){return redisTemplate.hasKey(key);}/*** 获得缓存的基本对象。** @param key 缓存键值* @return 缓存键值对应的数据*/public T getCacheObject(final String key){ValueOperations operation = redisTemplate.opsForValue();return operation.get(key);}/*** 删除单个对象** @param key*/public boolean deleteObject(final String key){return redisTemplate.delete(key);}/*** 删除集合对象** @param collection 多个对象* @return*/public boolean deleteObject(final Collection collection){return redisTemplate.delete(collection) > 0;}/*** 缓存List数据** @param key 缓存的键值* @param dataList 待缓存的List数据* @return 缓存的对象*/public long setCacheList(final String key, final List dataList){Long count = redisTemplate.opsForList().rightPushAll(key, dataList);return count == null ? 0 : count;}/*** 获得缓存的list对象** @param key 缓存的键值* @return 缓存键值对应的数据*/public List getCacheList(final String key){return redisTemplate.opsForList().range(key, 0, -1);}/*** 缓存Set** @param key 缓存键值* @param dataSet 缓存的数据* @return 缓存数据的对象*/public BoundSetOperations setCacheSet(final String key, final Set dataSet){BoundSetOperations setOperation = redisTemplate.boundSetOps(key);Iterator it = dataSet.iterator();while (it.hasNext()){setOperation.add(it.next());}return setOperation;}/*** 获得缓存的set** @param key* @return*/public Set getCacheSet(final String key){return redisTemplate.opsForSet().members(key);}/*** 缓存Map** @param key* @param dataMap*/public void setCacheMap(final String key, final Map dataMap){if (dataMap != null) {redisTemplate.opsForHash().putAll(key, dataMap);}}/*** 获得缓存的Map** @param key* @return*/public Map getCacheMap(final String key){return redisTemplate.opsForHash().entries(key);}/*** 往Hash中存入数据** @param key Redis键* @param hKey Hash键* @param value 值*/public void setCacheMapValue(final String key, final String hKey, final T value){redisTemplate.opsForHash().put(key, hKey, value);}/*** 获取Hash中的数据** @param key Redis键* @param hKey Hash键* @return Hash中的对象*/public T getCacheMapValue(final String key, final String hKey){HashOperations opsForHash = redisTemplate.opsForHash();return opsForHash.get(key, hKey);}/*** 获取多个Hash中的数据** @param key Redis键* @param hKeys Hash键集合* @return Hash对象集合*/public List getMultiCacheMapValue(final String key, final Collection springframework提供的FastByteArrayOutputStream类
在后端接口返回Image二进制图像资源时,是以二进制流的形式返回的。jdk原生API提供了java.io.ByteArrayOutputStream字节数组流,可以实现bye数组数据的传输。而springframework通过继承OutputStream父类,内置定义并提供了FastByteArrayOutputStream类,相比原生API,性能更优。
提及此处,我们可以尝试基于此类,编写自己的验证码图形接口。后端接口示例代码如下,
package com.xwd.controller;import com.xwd.common.AjaxResult;
import com.xwd.common.Base64;
import org.springframework.stereotype.Controller;
import org.springframework.util.FastByteArrayOutputStream;
import org.springframework.web.bind.annotation.GetMapping;
import org.springframework.web.bind.annotation.RequestMapping;
import org.springframework.web.bind.annotation.ResponseBody;import javax.imageio.ImageIO;
import java.awt.*;
import java.awt.image.BufferedImage;
import java.nio.Buffer;/*** @className ImageController* @description: com.xwd.controller* @auther: xiwd* @date: 2023-01-01 - 01 - 01 - 00:16* @version: 1.0* @jdk: 1.8*/
@Controller(value = "com.xwd.controller.ImageController")
@RequestMapping(value = "/image")
public class ImageController {//properties//methods@ResponseBody@RequestMapping(value = "/verify")public AjaxResult getVerifyImage(){AjaxResult ajaxResult = AjaxResult.success();//创建图片BufferedImage image = new BufferedImage(200,50, BufferedImage.TYPE_INT_RGB);Graphics graphics = image.getGraphics();//获取画笔graphics.setColor(Color.PINK);graphics.fillRect(0,0,200,300);//设置字体样式Font font = new Font("gothic",Font.PLAIN,14);graphics.setFont(font);//设置字体颜色graphics.setColor(Color.BLUE);//写入文字graphics.drawString("Hello",(200-14*5)/2,25);//获取流数据FastByteArrayOutputStream outputStream = new FastByteArrayOutputStream();try{ImageIO.write(image,"jpg",outputStream);}catch (Exception e){return AjaxResult.error(e.getMessage());}//数据流转base64编码ajaxResult.put("image", Base64.encode(outputStream.toByteArray()));return ajaxResult;}}
相应结果如下,其中,image字段对应的就是FastByteArrayOutputStream实例转换过来的Base64编码字符串。

我们通过前端代码,将其展示到html页面中,
PS:此处为了展示效果,直接硬编码将Base64编码的字符串设置到img标签的src属性,最终显示结果如下图所示,这证明我们的思路是正确的。
Document


前端Cookie信息读取和存储逻辑
以上内容是对图像验证码的前后端实现逻辑的剖析,接下来我们探讨一下初始渲染时,Login登录组件的created生命周期阶段, 做的另一件事情:借助js-cookie第三方依赖库从本地Cookie中获取已经缓存过的用户登录信息。
这里js-cookie第三方依赖主要是提供了面向原生Cookie的增删改查API接口,具体的逻辑代码则被封装在Login.vue组件的getCookie()方法中,源码如下,
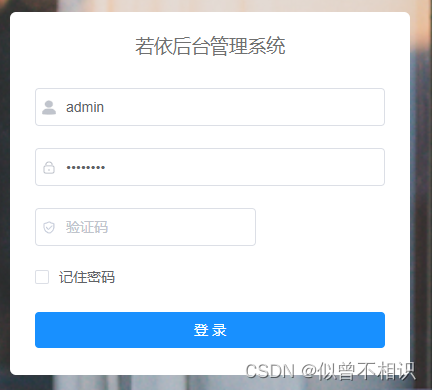
/*** 从Cookie中读取信息*/getCookie() {//从Cookie中获取值const username = Cookies.get("username"); // undefinedconst password = Cookies.get("password"); // undefinedconst rememberMe = Cookies.get('rememberMe') // undefinedthis.loginForm = {username: username === undefined ? this.loginForm.username : username,password: password === undefined ? this.loginForm.password : decrypt(password),//密码解密rememberMe: rememberMe === undefined ? false : Boolean(rememberMe)};},此处所实现的功能主要是:在Login登录组件初始化时,尝试从Cookie中获取被缓存的用户信息,并基于Vue表单组件的响应式特性将其填充到el-form表单组件的对应位置处。正因为这个逻辑,我们才可以看到登录组件显示了默认的用户名、密码信息。
当然,js-Cookie工具库在之后的用户登录逻辑中也有涉及到。
用户登录逻辑
前面分析了一大堆,现在终于来到用户的表单登录逻辑了,对应的代码被写在“登录”按钮的点击回调函数中,源码如下,其中也包含了我自己写的一些代码注释内容,
handleLogin() {//表单验证-Element-ui的$refs.loginForm.validate()接口this.$refs.loginForm.validate(valid => {if (valid) {this.loading = true; // 切换为显示登陆中//是否记住密码if (this.loginForm.rememberMe) {//记住密码-设置到Cookie中-[过期时间为30天]Cookies.set("username", this.loginForm.username, { expires: 30 });Cookies.set("password", encrypt(this.loginForm.password), { expires: 30 }); //密码加密Cookies.set('rememberMe', this.loginForm.rememberMe, { expires: 30 });} else {//不记住密码-将上一次设置到Cookie中的值移除Cookies.remove("username");Cookies.remove("password");Cookies.remove('rememberMe');}//提交用户信息到Vuex中this.$store.dispatch("Login", this.loginForm).then(() => {//路由跳转this.$router.push({ path: this.redirect || "/" }).catch(()=>{});}).catch(() => {//登陆失败时-取消loading显示,并尝试重新获取验证码图片资源this.loading = false;if (this.captchaEnabled) {this.getCode();}});}});}至于表单验证规则,Element-UI的el-form表单组件是可配置的,配置信息如下,主要是面向用户名、密码、验证码的非空判定。
//表单验证规则配置loginRules: {username: [{ required: true, trigger: "blur", message: "请输入您的账号" }],password: [{ required: true, trigger: "blur", message: "请输入您的密码" }],code: [{ required: true, trigger: "change", message: "请输入验证码" }]},注意到:在用户登录逻辑中,涉及到了this.$store.dispatch("Login", this.loginForm)——Vuex全局状态管理、this.$router.push({ path: this.redirect || "/" })路由跳转相关的内容。
以下,我们将继续探讨此处针对全局状态管理的处理逻辑。
Vuex:全局状态值的异步更新操作
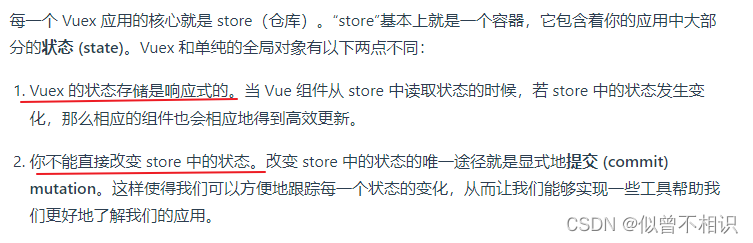
Vuex为Vue前端应用提供了全局变量共享的能力,以及同步/异步更新这些全局变量的接口。同时,应当认识到:Vuex的store仓库中存储的状态值是响应式的,这意味着状态值的更新会引起组件中的更新。面向同步/异步的状态值提交,Vuex提供了mutation的commit提交、actions的dispatch提交接口。
在Login组件的handleLogin()方法中,通过this.$store.dispatch()接口异步触发了store仓库中的Login方法,在异步执行流程中,对SET_TOKEN的值进行了同步更新,具体处理逻辑源码如下,
// 登录Login({ commit }, userInfo) {const username = userInfo.username.trim()const password = userInfo.passwordconst code = userInfo.codeconst uuid = userInfo.uuidreturn new Promise((resolve, reject) => {//调用登录接口login(username, password, code, uuid).then(res => {console.log(res);//将token设置到Cookie中setToken(res.token)//存储token到Vuex中commit('SET_TOKEN', res.token)//修改Promise对象的状态resolve()}).catch(error => {reject(error)})})},实质上,这里只是调用了一个login用户登录接口,然后根据接口响应结果,返回一个Promise对象,以便进行后续处理。登录接口定义如下,
// 登录方法
export function login(username, password, code, uuid) {const data = {username,password,code,uuid}return request({url: '/login',headers: {isToken: false},method: 'post',data: data})
}
Axios:二次封装与拦截器配置
再次注意到,上述login()方法调用接口时,是通过调用request()方法实现的,该方法其实是对Axios第三方依赖库的二次封装。
二次封装有什么好处呢?就在于它可以对Axios对象进行自定义化的配置,例如:请求拦截器、响应拦截器,在HTTP请求发出之前、收到后端响应结果之后,做一些过滤拦截处理操作,实现一些权限控制等操作。
还记得之前我们提到过的后端自定义的HTTP响应状态码吗?通过Axios二次封装,自定义响应拦截器,就可以实现针对不同的状态码的统一处理。
若依前端框架中对Axios的二次封装脚本request.js文件源码如下,
import axios from 'axios'
import { Notification, MessageBox, Message, Loading } from 'element-ui'
import store from '@/store'
import { getToken } from '@/utils/auth'
import errorCode from '@/utils/errorCode'
import { tansParams, blobValidate } from "@/utils/ruoyi";
import cache from '@/plugins/cache'
import { saveAs } from 'file-saver'let downloadLoadingInstance;
// 是否显示重新登录
export let isRelogin = { show: false };axios.defaults.headers['Content-Type'] = 'application/json;charset=utf-8'
// 创建axios实例
const service = axios.create({// axios中请求配置有baseURL选项,表示请求URL公共部分baseURL: process.env.VUE_APP_BASE_API,// 超时timeout: 10000
})// request拦截器
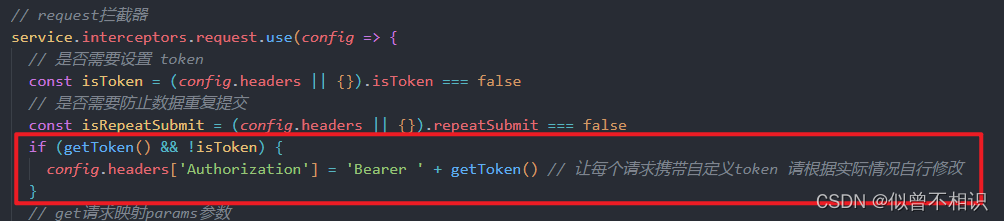
service.interceptors.request.use(config => {// 是否需要设置 tokenconst isToken = (config.headers || {}).isToken === false// 是否需要防止数据重复提交const isRepeatSubmit = (config.headers || {}).repeatSubmit === falseif (getToken() && !isToken) {config.headers['Authorization'] = 'Bearer ' + getToken() // 让每个请求携带自定义token 请根据实际情况自行修改}// get请求映射params参数if (config.method === 'get' && config.params) {let url = config.url + '?' + tansParams(config.params);url = url.slice(0, -1);config.params = {};config.url = url;}if (!isRepeatSubmit && (config.method === 'post' || config.method === 'put')) {const requestObj = {url: config.url,data: typeof config.data === 'object' ? JSON.stringify(config.data) : config.data,time: new Date().getTime()}const sessionObj = cache.session.getJSON('sessionObj')if (sessionObj === undefined || sessionObj === null || sessionObj === '') {cache.session.setJSON('sessionObj', requestObj)} else {const s_url = sessionObj.url; // 请求地址const s_data = sessionObj.data; // 请求数据const s_time = sessionObj.time; // 请求时间const interval = 1000; // 间隔时间(ms),小于此时间视为重复提交if (s_data === requestObj.data && requestObj.time - s_time < interval && s_url === requestObj.url) {const message = '数据正在处理,请勿重复提交';console.warn(`[${s_url}]: ` + message)return Promise.reject(new Error(message))} else {cache.session.setJSON('sessionObj', requestObj)}}}return config
}, error => {console.log(error)Promise.reject(error)
})// 响应拦截器-拦截器设置
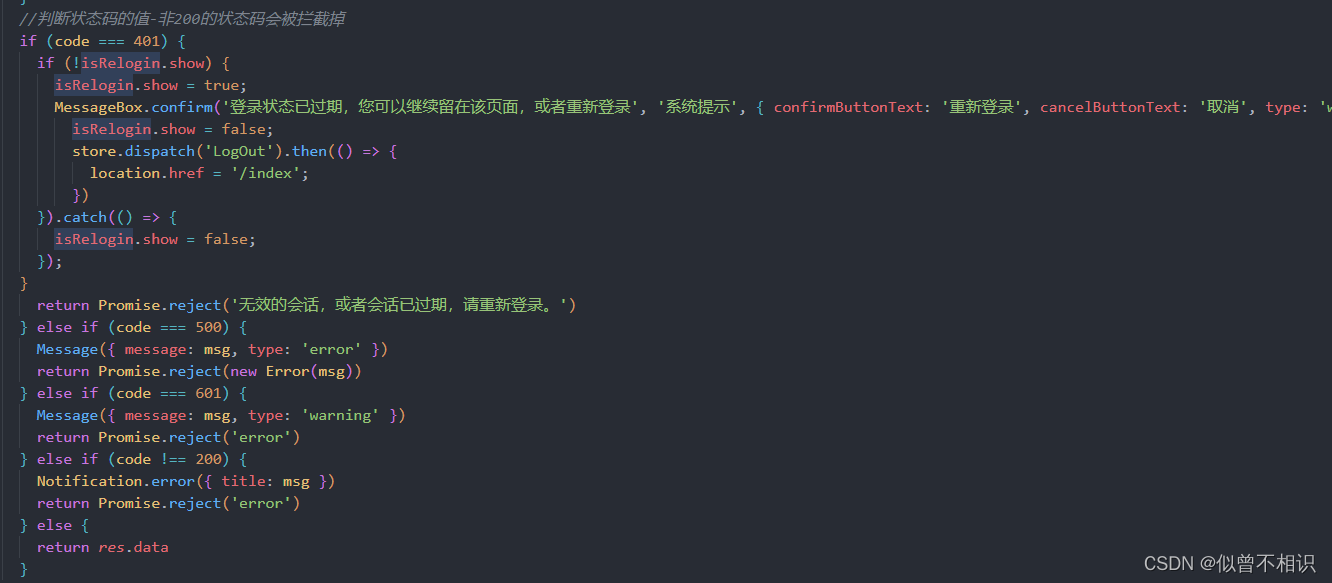
service.interceptors.response.use(res => {// 未设置状态码则默认成功状态const code = res.data.code || 200;// 获取错误信息const msg = errorCode[code] || res.data.msg || errorCode['default']// 二进制数据则直接返回if(res.request.responseType === 'blob' || res.request.responseType === 'arraybuffer'){return res.data}//判断状态码的值-非200的状态码会被拦截掉if (code === 401) {if (!isRelogin.show) {isRelogin.show = true;MessageBox.confirm('登录状态已过期,您可以继续留在该页面,或者重新登录', '系统提示', { confirmButtonText: '重新登录', cancelButtonText: '取消', type: 'warning' }).then(() => {isRelogin.show = false;store.dispatch('LogOut').then(() => {location.href = '/index';})}).catch(() => {isRelogin.show = false;});}return Promise.reject('无效的会话,或者会话已过期,请重新登录。')} else if (code === 500) {Message({ message: msg, type: 'error' })return Promise.reject(new Error(msg))} else if (code === 601) {Message({ message: msg, type: 'warning' })return Promise.reject('error')} else if (code !== 200) {Notification.error({ title: msg })return Promise.reject('error')} else {return res.data}},error => {console.log('err' + error)let { message } = error;if (message == "Network Error") {message = "后端接口连接异常";} else if (message.includes("timeout")) {message = "系统接口请求超时";} else if (message.includes("Request failed with status code")) {message = "系统接口" + message.substr(message.length - 3) + "异常";}Message({ message: message, type: 'error', duration: 5 * 1000 })return Promise.reject(error)}
)export default service
本篇内容涉及的知识点细节比较多,导致在最后介绍Vuex全局状态管理和Axios二次封装相关的内容介绍的比较粗略,之后会继续对这部分内容进行细化探讨。当然若有介绍不到位或者出错的地方,还请道友们海涵,我亦静候指正。
本文来自互联网用户投稿,文章观点仅代表作者本人,不代表本站立场,不承担相关法律责任。如若转载,请注明出处。 如若内容造成侵权/违法违规/事实不符,请点击【内容举报】进行投诉反馈!