HarmonyOS之页面开发
软件下载地址:https://developer.harmonyos.com/cn/develop/deveco-studio#download
当前使用版本号:deveco-studio-2.1.0.303
1、使用XML方式开发页面
使用DependentLayout布局,通过Text和Button组件来实现
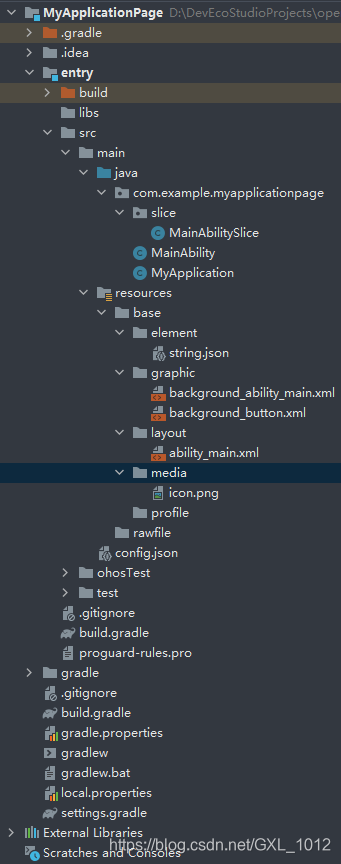
1.1、创建项目
过程与HarmonyOS之Hello World一样,目录结构如下:
1.2、页面布局
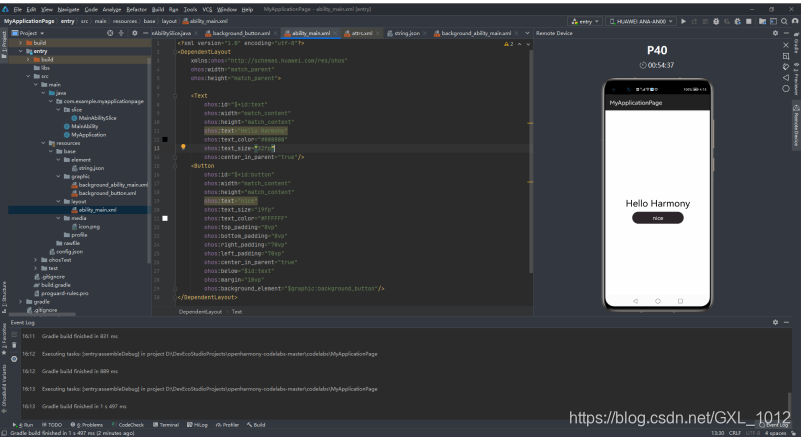
resource/base/graphic/ability_main.xml的代码如下:
<DependentLayoutxmlns:ohos="http://schemas.huawei.com/res/ohos"ohos:width="match_parent"ohos:height="match_parent"><Textohos:id="$+id:text"ohos:width="match_content"ohos:height="match_content"ohos:text="Hello Harmony"ohos:text_color="#000000"ohos:text_size="32fp"ohos:center_in_parent="true"/><Buttonohos:id="$+id:button"ohos:width="match_content"ohos:height="match_content"ohos:text="nice"ohos:text_size="19fp"ohos:text_color="#FFFFFF"ohos:top_padding="8vp"ohos:bottom_padding="8vp"ohos:right_padding="70vp"ohos:left_padding="70vp"ohos:center_in_parent="true"ohos:below="$id:text"ohos:margin="10vp"/>
DependentLayout>
1.3、设置按钮样式
在resource/base/graphic文件夹下创建名为background_button.xml的文件,代码如下:
<shapexmlns:ohos="http://schemas.huawei.com/res/ohos"ohos:shape="rectangle"><cornersohos:radius="100"/><solidohos:color="#FF2D2529"/>
shape>
1.4、引用文件
引用background_button.xml文件,修改resource/base/layout/ability_main.xml文件,代码如下:
<DependentLayoutxmlns:ohos="http://schemas.huawei.com/res/ohos"ohos:width="match_parent"ohos:height="match_parent"><Textohos:id="$+id:text"ohos:width="match_content"ohos:height="match_content"ohos:text="Hello Harmony"ohos:text_color="#000000"ohos:text_size="32fp"ohos:center_in_parent="true"/><Buttonohos:id="$+id:button"ohos:width="match_content"ohos:height="match_content"ohos:text="nice"ohos:text_size="19fp"ohos:text_color="#FFFFFF"ohos:top_padding="8vp"ohos:bottom_padding="8vp"ohos:right_padding="70vp"ohos:left_padding="70vp"ohos:center_in_parent="true"ohos:below="$id:text"ohos:margin="10vp"ohos:background_element="$graphic:background_button"/>
DependentLayout>
1.5、在Java中加载XML布局
在src/main/java/com/example/myapplicationpage/slice/MainAbilitySlice.java文件中加载XML布局,无需改动,代码如下:
package com.example.myapplicationpage.slice;import com.example.myapplicationpage.ResourceTable;
import ohos.aafwk.ability.AbilitySlice;
import ohos.aafwk.content.Intent;public class MainAbilitySlice extends AbilitySlice {@Overridepublic void onStart(Intent intent) {super.onStart(intent);//加载XML布局super.setUIContent(ResourceTable.Layout_ability_main);}@Overridepublic void onActive() {super.onActive();}@Overridepublic void onForeground(Intent intent) {super.onForeground(intent);}
}
1.6、运行项目
在虚拟机上运行效果,如下:
2、使用Java方式开发页面
新建src/main/java/com/example/myapplicationpage/slice/SecondAbilitySlice.java文件代码如下:
package com.example.myapplicationpage.slice;import ohos.aafwk.ability.AbilitySlice;
import ohos.aafwk.content.Intent;
import ohos.agp.colors.RgbColor;
import ohos.agp.components.DependentLayout;
import ohos.agp.components.Text;
import ohos.agp.components.element.ShapeElement;
import ohos.agp.utils.Color;
import ohos.agp.components.DependentLayout.LayoutConfig;public class SecondAbilitySlice extends AbilitySlice {@Overridepublic void onStart(Intent intent) {super.onStart(intent);// 声明布局DependentLayout myLayout = new DependentLayout(this);// 设置布局宽高myLayout.setWidth(LayoutConfig.MATCH_PARENT);myLayout.setHeight(LayoutConfig.MATCH_PARENT);// 设置布局背景为白色ShapeElement background = new ShapeElement();background.setRgbColor(new RgbColor(255, 255, 255));myLayout.setBackground(background);// 创建一个文本Text text = new Text(this);text.setText("你好 鸿蒙");text.setWidth(LayoutConfig.MATCH_PARENT);text.setTextSize(100);text.setTextColor(Color.BLACK);// 设置文本的布局DependentLayout.LayoutConfig textConfig = new DependentLayout.LayoutConfig(LayoutConfig.MATCH_CONTENT, LayoutConfig.MATCH_CONTENT);textConfig.addRule(LayoutConfig.CENTER_IN_PARENT);text.setLayoutConfig(textConfig);myLayout.addComponent(text);super.setUIContent(myLayout);}
}
3、实现页面跳转
3.1、代码实现
修改src/main/java/com/example/myapplicationpage/slice/MainAbilitySlice.java文件,代码如下:
package com.example.myapplicationpage.slice;import com.example.myapplicationpage.ResourceTable;
import ohos.aafwk.ability.AbilitySlice;
import ohos.aafwk.content.Intent;
import ohos.agp.components.Button;public class MainAbilitySlice extends AbilitySlice {@Overridepublic void onStart(Intent intent) {super.onStart(intent);super.setUIContent(ResourceTable.Layout_ability_main);Button button = (Button) findComponentById(ResourceTable.Id_button);// 点击按钮跳转至第二个页面button.setClickedListener(listener -> present(new SecondAbilitySlice(), new Intent()));}@Overridepublic void onActive() {super.onActive();}@Overridepublic void onForeground(Intent intent) {super.onForeground(intent);}
}
3.2、运行项目
在虚拟机中运行项目,效果如下:
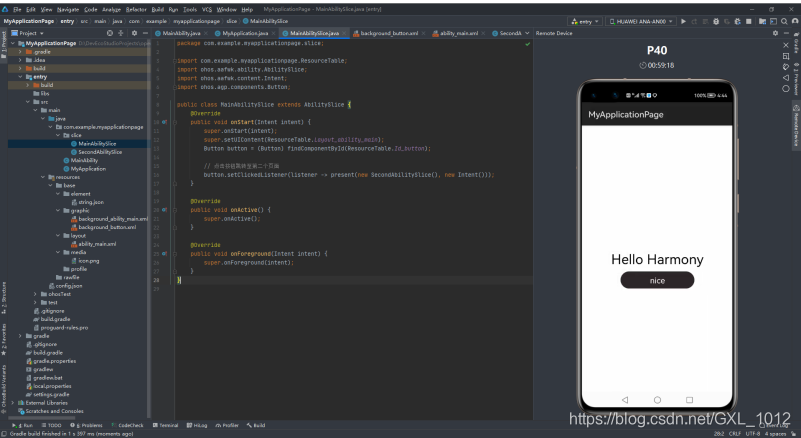
点击按钮跳转页面(反应有点慢,请淡定等待)

本文来自互联网用户投稿,文章观点仅代表作者本人,不代表本站立场,不承担相关法律责任。如若转载,请注明出处。 如若内容造成侵权/违法违规/事实不符,请点击【内容举报】进行投诉反馈!