Laya3.x版本,2D使用自定义shader
前言
2D下shader的应用和重要性不容忽视,是提高游戏质量和用户体验的重要手段之一。
- 提高游戏的视觉效果:使用shader可以实现各种视觉效果,让游戏更加炫酷、生动、真实。
- 提高游戏的表现力:使用shader可以实现各种动画效果,让游戏中的角色、场景更加有表现力。
- 提高游戏的品质:使用shader可以让游戏更加细腻、精美,提高游戏的品质和用户体验。
简述
Laya框架的运行逻辑可以分为三层:
用户逻辑层:这个层面是游戏开发者自己编写的代码,主要包含游戏逻辑,输入处理,动画等。这个层面一般是基于Laya的Timer循环更新的。
框架逻辑层:这个层面由Laya框架自身处理,主要负责决定每个显示对象的渲染方式,是否需要重绘等。这个层面会根据用户逻辑层设置的各种属性值来确定。
CPU到GPU渲染层:这个层面也由Laya框架处理,主要负责将框架逻辑层决定的渲染信息提交给GPU。每一次调用WebGL的接口可以视为一次着色器调用请求。
所以总的来说,Laya框架的运行过程是:
用户逻辑层在Timer循环中更新游戏逻辑、输入等,并设置显示对象的属性。
框架逻辑层根据用户设置的属性,决定显示对象的渲染方式和是否重绘。
CPU到GPU渲染层将框架逻辑层决定的渲染信息提交给GPU,触发WebGL的接口调用完成渲染。
Laya3.x版本引擎不支持2D自定义Shader,需要对引擎进行一下微调.
这三层的协同工作,才能完成Laya框架的完整渲染和更新流程。理解这三层的职责和关系,对学习和使用Laya框架有很大帮助。
引擎微调
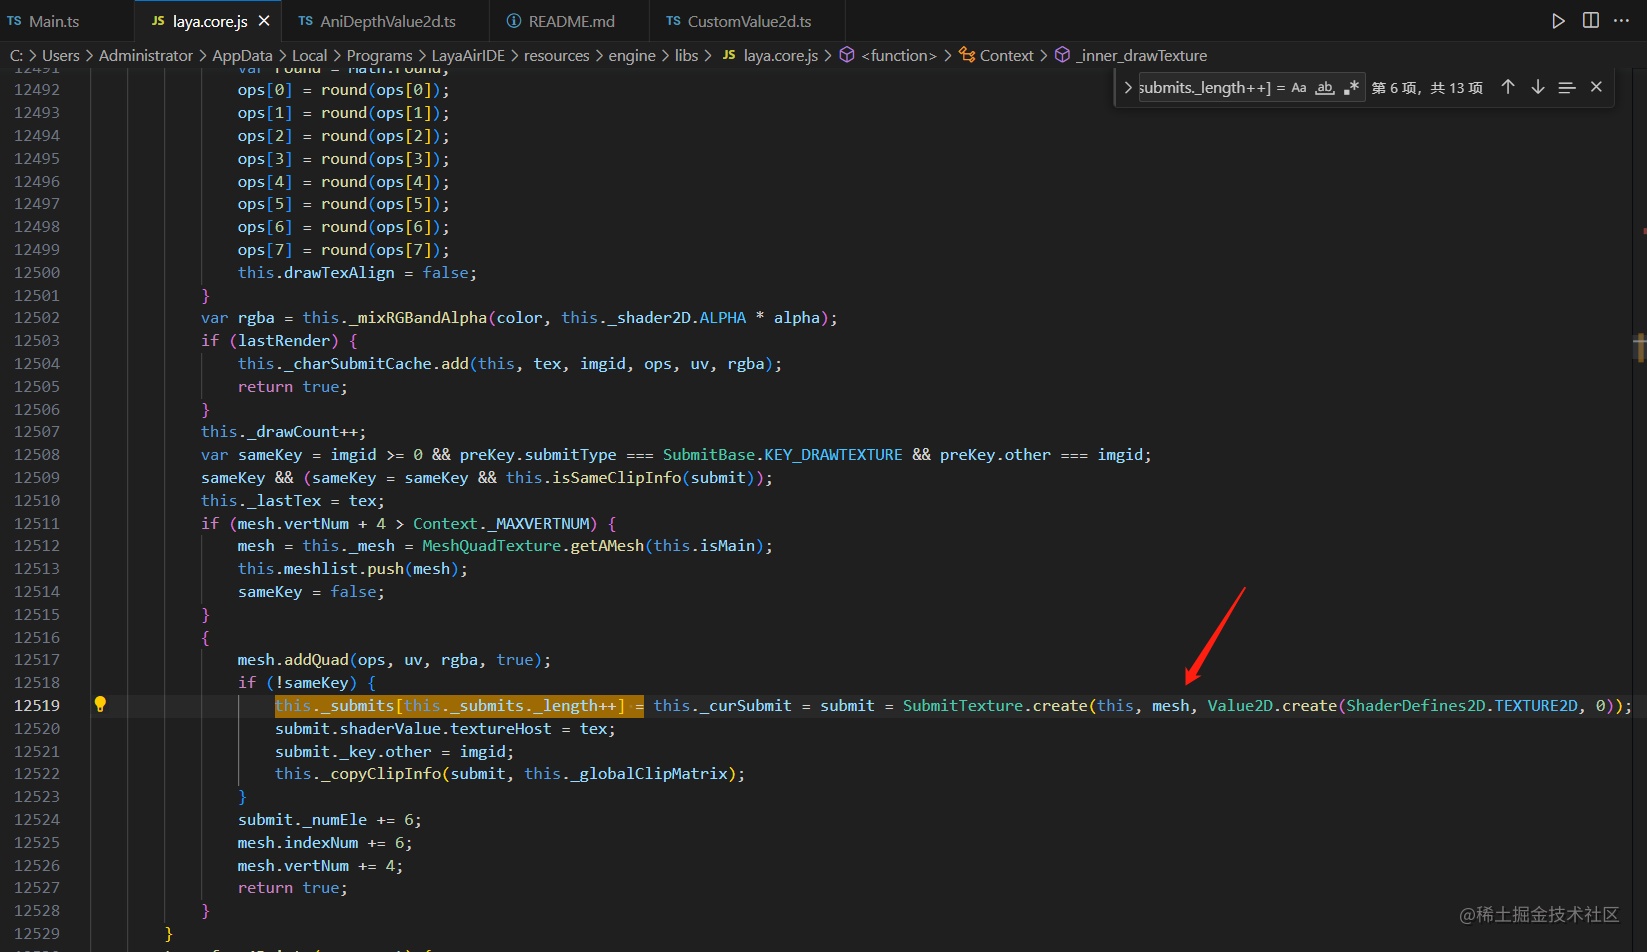
默认情况下Context对象在绘制纹理时创建的Value2D默认是TextureSV对象。需要修改Context._inner_drawTexture函数来告诉Laya遇到哪个Image对象要使用自定义Shader
_inner_drawTexture(tex: Texture, imgid: number, x: number, y: number, width: number, height: number, m: Matrix, uv: ArrayLike, alpha: number, lastRender: boolean): boolean {//省略部分代码..//修改之前:this._submits[this._submits._length++] = this._curSubmit = submit = SubmitTexture.create(this, mesh, Value2D.create(ShaderDefines2D.TEXTURE2D, 0));//修改之后:this._submits[this._submits._length++] = this._curSubmit = submit = SubmitTexture.create(this, mesh, Shader2X['customDefines2D'].indexOf(imgid) != -1 ? Value2D.create(ShaderDefines2D.TEXTURE2D, imgid) : Value2D.create(ShaderDefines2D.TEXTURE2D, 0));// 原行替换即可,不要加注释什么的,否则会影响map准确性
}
自定义Value2D
Value2D 类是 LayaAir 图形渲染系统中着色器处理的核心类,它主要用于封装 WebGL 渲染相关的数据,以便在着色器程序中使用。这些数据包括顶点、纹理、颜色等信息。Value2D 的实例会根据不同的需求传递给 GPU,用于控制图形渲染。
在 LayaAir 的绘制系统中,有许多继承自 Value2D 的子类,如 TextureSV、PrimitiveSV 等。这些子类用于处理不同类型的图形渲染任务,例如纹理渲染、基本图形渲染等。
总之,Value2D 是 LayaAir 游戏引擎中一个关键的基础类,用于处理图形渲染的各种参数和数据。它是高效渲染和实现各种图形效果的基础。
/*** 自定义2D的shader的Value2d扩展*/export default class CustomValue2d extends Laya.TextureSV{public u_colorMatrix: any[];public strength: number = 0;public blurInfo: any[] = null;public colorMat: Float32Array = null;public colorAlpha: Float32Array = null;private value2dProxy = null;private _textureHost: Laya.Texture = null;// 自定义的ShaderDefines2Dpublic static CustomId = 0x4000public static applyCustomId(): number{let currentId = this.CustomId;Laya.Shader2X['customDefines2D'].push(currentId);this.CustomId++;return currentId;}constructor(subID:number=0){super(subID);     this._attribLocation = ['posuv', 0, 'attribColor', 1, 'attribFlags', 2];// 重写,增加代理绑定Object.defineProperty(this, 'textureHost', {get() {return this._textureHost;},set(newValue: number) {this._textureHost = newValue;this.value2dProxy = Laya.Shader2X['value2dMap'][this._textureHost.id];},enumerable: true,configurable: true,});}public clear():void{super.clear();}public setValue(value: Laya.Shader2D):void{super.setValue(value);}public upload():void{//渲染之前可用更新自定义的变量super.upload();}/*** 以下为 代理参数传递,根据使用情况自己定义*/public get texture_depth(): WebGLTexture {return this.value2dProxy.texture_depth;}public get dimensions(): number[] {return this.value2dProxy.dimensions;}public get mapDimensions(): number[] {return this.value2dProxy.mapDimensions;}public get scale(): number {return this.value2dProxy.scale;}public get offset(): number[] {return this.value2dProxy.offset;}public get focus(): number {return this.value2dProxy.focus;}public get enlarge(): number {return this.value2dProxy.enlarge;}
}
完成自定义
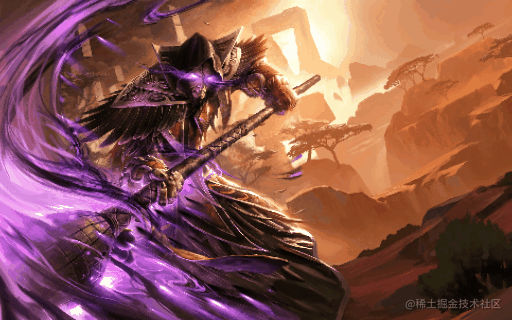
public use2dShader() {let shaderImage: Laya.Image = new Laya.Image();let texture = Laya.loader.getRes("bg/anibg2.jpg");// 深度图let texture_depth = Laya.loader.getRes("bg/anibgdepth2.jpg");// 申请idlet id = CustomValue2d.applyCustomId();texture.bitmap["_id"] = id;shaderImage.source = texture;shaderImage.zOrder = 999;shaderImage.width = Laya.stage.width;shaderImage.height = Laya.stage.height;// 创建深度动效let aniDepthValue2d = new AniDepthValue2d(texture.id);aniDepthValue2d.texture_host_depth = texture_depth;aniDepthValue2d.dimensions = [texture.width, texture.height, texture_depth.width, texture_depth.height];aniDepthValue2d.mapDimensions = [texture.width, texture.height];Laya.Value2D._initone(Laya.ShaderDefines2D.TEXTURE2D | id, CustomValue2d);let attribLocation = ['posuv', 0, 'attribColor', 1, 'attribFlags', 2];let shader = new Laya.Shader2X(Depth2dVS, Depth2dFS, Laya.ShaderDefines2D.TEXTURE2D | Laya.ShaderDefines2D.GAMMASPACE | id, null, attribLocation);Laya.stage.addChild(shaderImage);}
这段代码是一个使用自定义着色器的函数:
- 创建一个Laya.Image对象,用于显示着色器渲染后的图像,同时通过Laya.loader加载两张贴图,一张是背景贴图,另一张是深度图。
- 通过CustomValue2d类的applyCustomId()方法,申请一个自定义的ID。
- 将背景贴图的ID设置为申请的自定义ID,并将其作为Laya.Image对象的source属性。
- 创建一个AniDepthValue2d对象,用于处理深度图动效参数管理。
- 初始化自定义Value2D对象,使用上一步申请的自定义ID和CustomValue2d类。
- 创建一个Laya.Shader2X对象,将顶点着色器和片段着色器设为Depth2dVS和Depth2dFS,并设置ShaderDefines2D.TEXTURE2D、ShaderDefines2D.GAMMASPACE和上一步申请的自定义ID等属性。
- 将Laya.Image对象添加到舞台中,显示渲染后的图像。
总之,这段代码的作用是使用自定义的着色器对背景贴图进行渲染,并将渲染后的结果显示在舞台上。其中,AniDepthValue2d对象用于处理深度图动效,CustomValue2d类用于处理自定义Value2D对象的申请和初始化。这段代码展示了如何使用LayaAir引擎中的自定义着色器功能,可以用于实现更加丰富和高效的图形渲染效果。
其中AniDepthValue2d,是我们根据实际使用的shader的参数和实现效果,构建的一个数据管理集合,例子中时一个2D的深度动效shader,提供给大家学习.
export default class AniDepthValue2d {private _texture_depth: WebGLTexture = null;private _texture_host_depth: Laya.Texture = null;private _dimensions: number[] = [0, 0, 0, 0];private _mapDimensions: number[] = [1, 5112];private _scale: number = .0215;private _offset: number[] = [ 0.1, 0.1, 0.1];private _focus: number = .5;private _enlarge: number = 1.06;public animateType: number = 1;public animateDuration: number = 3;public easeFactor: number = .2;public animateScale = {x: 1,y: .95,z: 0.95,px: 0.9,py: .925,pz: .925}public pointZ = {x: 0,y: 0}public pointB = {x: 0,y: 0}public constructor(texture_id: number) {// 绑定数据(Laya.Shader2X as any)['value2dMap'][texture_id] = this;Laya.timer.frameLoop(1, this, this.update);}private update() {if (this.animateType == 0) {return;}if (this.animateType == 1) {// 投影let time = Date.now() / 1e3 / this.animateDuration;let s = this.animateScale.px;let l = this.animateScale.py;let u = this.animateScale.pz;this.offset = [Math.sin(2 * Math.PI * (time + s)) * this.animateScale.x,Math.sin(2 * Math.PI * (time + l)) * this.animateScale.y,.5 * (1 + Math.sin(2 * Math.PI * (time + u))) * this.animateScale.z];}}public get texture_depth(): WebGLTexture {return this._texture_depth;}public set texture_host_depth(texture: Laya.Texture) {this._texture_depth = (texture as any)["_getSource"]();this._texture_host_depth = texture;}public get dimensions(): number[] {return this._dimensions;}public set dimensions(value: number[]) {this._dimensions = value;}public get mapDimensions(): number[] {return this._mapDimensions;}public set mapDimensions(value: number[]) {this._mapDimensions = value;}public get scale(): number {return this._scale;}public set scale(value: number) {this._scale = value;}public get offset(): number[] {return this._offset; }public set offset(value: number[]) {this._offset = value;}public get focus(): number {return this._focus;}public set focus(value: number) {this._focus = value;}public get enlarge(): number {return this._enlarge;}public destroy() {Laya.timer.clear(this, this.update);this._texture_depth = null;if (this._texture_host_depth) {this._texture_host_depth.disposeBitmap();}this._texture_host_depth = null;}}
update()这段代码的作用是根据动画类型和参数,计算出当前的偏移量,用于更新动画效果。在animateType为1时,该方法使用正弦函数计算出x、y、z方向上的偏移量,并将其存储在offset属性中。这个偏移量可以用于在渲染过程中对对象进行移动、旋转等变换操作。
附上着色器:
顶点
/*texture和fillrect使用的。
*/
attribute vec4 posuv;
attribute vec4 attribColor;
attribute vec4 attribFlags;
uniform vec4 clipMatDir;
uniform vec2 clipMatPos;
varying vec2 cliped;
uniform vec2 size;
uniform vec2 clipOff;
varying vec4 v_texcoordAlpha;
varying vec4 v_color;
varying float v_useTex;
void main() {vec4 pos = vec4(posuv.xy,0.,1.);vec4 pos1  =vec4((pos.x/size.x-0.5)*2.0,(0.5-pos.y/size.y)*2.0,0.,1.0);gl_Position=pos1;v_texcoordAlpha.xy = posuv.zw;v_color = attribColor/255.0;v_color.xyz*=v_color.w;v_useTex = attribFlags.r/255.0;float clipw = length(clipMatDir.xy);float cliph = length(clipMatDir.zw);vec2 clpos = clipMatPos.xy;vec2 clippos = pos.xy - clpos;	if(clipw>20000. && cliph>20000.)cliped = vec2(0.5,0.5);else {cliped=vec2( dot(clippos,clipMatDir.xy)/clipw/clipw, dot(clippos,clipMatDir.zw)/cliph/cliph);}
}
片段着色器:
/*texture和fillrect使用的。
*/
#if defined(GL_FRAGMENT_PRECISION_HIGH)
precision highp float;
#else
precision mediump float;
#endif
vec3 linearToGamma(in vec3 value)
{return vec3(mix(pow(value.rgb, vec3(0.41666)) * 1.055 - vec3(0.055), value.rgb * 12.92, vec3(lessThanEqual(value.rgb, vec3(0.0031308)))));}
vec4 linearToGamma(in vec4 value)
{return vec4(linearToGamma(value.rgb), value.a);
}
vec3 gammaToLinear(in vec3 value)
{return pow(value, vec3(2.2));
}
vec4 gammaToLinear(in vec4 value)
{return vec4(gammaToLinear(value.rgb), value.a);
}
varying vec4 v_texcoordAlpha;
varying vec4 v_color;
varying float v_useTex;
uniform sampler2D texture;
uniform sampler2D texture_depth;
varying vec2 cliped;uniform vec4 dimensions;
uniform vec2 mapDimensions;
uniform float scale;
uniform vec3 offset;
uniform float focus;
uniform float enlarge;
float aspect = dimensions.x / dimensions.y;vec4 sampleTexture(sampler2D texture, vec2 uv)
{vec4 color = texture2D(texture, uv);return color;
}// mono version of perspective shader
vec3 perspective(
sampler2D texture,
sampler2D texture_depth,
vec2 uv,
float horizontal_parallax, // 0 - no parallax
float vertical_parallax,   // same
float perspective_factor,  // 0 - no perspective
float h_convergence,       // 0.0 - near, 0.5 - center, 1.0 - far
float v_convergence        // same
) {const float sensitivity = 15.0; // aligns animation with the previous version where it was multiplied by 15horizontal_parallax *= sensitivity;vertical_parallax *= sensitivity;vec3 ray_origin = vec3(uv.x - 0.5, uv.y - 0.5, +1.0);vec3 ray_direction = vec3(uv.x - 0.5, uv.y - 0.5, -1.0);ray_direction.xy *= perspective_factor;ray_origin.xy /= 1.0 + perspective_factor;ray_direction.x += horizontal_parallax;ray_direction.y += vertical_parallax;ray_origin.x -= h_convergence * horizontal_parallax;ray_origin.y -= v_convergence * vertical_parallax;const int step_count = 45; // affects quality and processing timeconst float hit_threshold = 0.01;ray_direction /= float(step_count);for (int i = 0; i < step_count; i++) {ray_origin += ray_direction;vec2 vFlipUV = (ray_origin.xy + 0.5);float scene_z = texture2D(texture_depth, vFlipUV).x;if (ray_origin.z < scene_z) {if (scene_z - ray_origin.z < hit_threshold) {return texture2D(texture, ray_origin.xy + 0.5).rgb;}ray_origin -= ray_direction; // step backray_direction /= 2.0; // decrease ray step to approach surface with greater precision}}return texture2D(texture, ray_origin.xy + 0.5).rgb;
}vec3 displacement(sampler2D texture,sampler2D texture_depth,vec2 uv
) {vec2 scale2 = vec2(scale * min(1.0, 1.0 / aspect), scale * min(1.0, aspect)) * vec2(1, -1) * vec2(1);vec2 mapCords = uv;// mapCords.y *= -1.0;// mapCords.y += 1.0;float map = 1.0 - texture2D(texture_depth, mapCords).r;map = map * -1.0 + focus;vec2 disCords = uv;disCords += offset.xy * map * scale2;return texture2D(texture, disCords).rgb;
}void main()
{if (cliped.x < 0.)discard;if (cliped.x > 1.)discard;if (cliped.y < 0.)discard;if (cliped.y > 1.)discard;// vec4 color = sampleTexture(texture, v_texcoordAlpha.xy);float gain = scale * 0.075;float persp_factor = scale * 3.0 * offset.z;vec4 color = vec4(perspective(texture, texture_depth, v_texcoordAlpha.xy, -gain * offset.x, gain * offset.y * aspect, persp_factor, 1.0 - focus, 1.0 - focus), 1.0);color.xyz = linearToGamma(color.xyz);// vec4 color = vec4(displacement(texture, texture_depth, v_texcoordAlpha.xy), 1.0);// if (v_useTex <= 0.)//     color = vec4(1., 1., 1., 1.);// color.a *= v_color.w;// vec4 transColor = v_color;// transColor = gammaToLinear(v_color);// color.rgb *= transColor.rgb;gl_FragColor = color;
}
样例源代码:
https://github.com/lear315/laya3_shader2d
本文来自互联网用户投稿,文章观点仅代表作者本人,不代表本站立场,不承担相关法律责任。如若转载,请注明出处。 如若内容造成侵权/违法违规/事实不符,请点击【内容举报】进行投诉反馈!