自动化测试工具-1-uiautomator2
自动化测试工具-1-uiautomator2
- 一:uiautomator2原理
- 1,作用
- 2,局限
- 3,工作原理
- 二: 环境的搭建
- 1,安装 uiautomator2 模块
- 2, 手机安装uiautomator apk
- 三: 设备连接
- 四: 元素获取
- 1, android +uiautomatorviewer 页面元素工具安装配置
- 2, weditor 工具 在以上uiautomatorviewer 基础上
- 五:uiautomator2 常用命令
- 1, 获取设备信息
- 2, 设备基本操作
- 3, press 传参操作屏幕
- 4,界面交互
- 5, 图像处理
- 六: UI对象
- 1, UI结构获取
- 2, UI对象信息获取
- 3, UI元素定位方式
- 单击UI对象
- 双击UI对象
- 长按UI对象
- 拖拽UI对象
- UI滑动
- UI双指操作
- UI界面滚动
- UI多点滑动
- xpath 常见用法
- UI相对位置操作
- UI 多个对象操作
- 注意
- 1, DeprecationWarning 报错
- 2, send_action
- 补充
- 1,python -cv2 图像处理
- 2,python -sift 算法图像处理
一:uiautomator2原理
python-uiautomator2 是一个自动化测试开源工具
1,作用
作用:uiautomator2是一个可以使用Python对Android设备进行UI自动化的库
python-uiautomator2 封装了谷歌自带的 uiautomator2 测试框架,提供便利的 python 接口。他允许测试人员直接在 PC 上编写 Python 的测试代码,操作手机应用,完成自动化,大大提高了自动化代码编写的效率
2,局限
局限:目前仅支持android平台的原生应用测试
3,工作原理
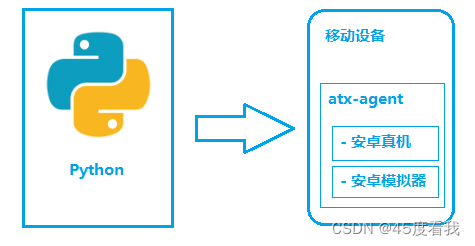
如图所示,python-uiautomator2 主要分为两个部分,python 客户端,移动设备
PC上的python端:运行脚本,并向通过wifi 或者usb系统设备发送http请求
移动设备:移动设备上运行了封装了uiautomator2的HTTP服务,解析收到的请求,并转化成uiautomator2的代码
过程:
a> 在移动设备上安装atx-agent(守护进程), 随后atx-agent启动 uiautomator2 服务 (默认 7912 端口) 进行监听
b> 在 PC 上编写测试脚本并执行(相当于发送 HTTP 请求到移动设备的 server 端)
c> 移动设备通过 WIFI 或 USB 接收到 PC 上发来的 HTTP 请求,执行制定的操作
二: 环境的搭建
1,安装 uiautomator2 模块
pip install uiautomator2
pip install pillow
2, 手机安装uiautomator apk
python -m uiautomator2 init (设备安装 atx-agent)
三: 设备连接
一种是通过 WIFI,另外一种是通过 USB
WIFI:
import uiautomator2 as u2
d = u2.connect('192.168.0.100')
USB:
import uiautomator2 as u2
d = u2.connect_usb('123456f')
d = u2.connect('123456f')
注意:
如果 一台设备可以直接使用d = u2.connect()
四: 元素获取
1, android +uiautomatorviewer 页面元素工具安装配置
https://blog.csdn.net/weixin_42914706/article/details/111087910
2, weditor 工具 在以上uiautomatorviewer 基础上
pip3 install --pre -U uiautomator2
pip install weditor
pip3 install --pre weditor
python3 -m weditor
输入设备号,连接获取元素
本文来自互联网用户投稿,文章观点仅代表作者本人,不代表本站立场,不承担相关法律责任。如若转载,请注明出处。 如若内容造成侵权/违法违规/事实不符,请点击【内容举报】进行投诉反馈!