如何用pyinstaller+NSIS来打包并发布自己的程序?
目录
- pyinstaller打包项目
- 安装pyinstaller加密用的pycrypto包
- NSIS制作软件安装、卸载界面
如何打包并发布一款用Python写的软件?
开发环境: win10, Pycharm2021
用到的工具:pyinstaller, NSIS
pyinstaller打包项目
利用Pyinstaller打包整个python工程,它会将项目所用到的所有依赖包打包在一起。这里通过 release.spec文件进行配置。
# -*- mode: python ; coding: utf-8 -*-# 这里将需要用到的resources文件添加一下,不要把自己的源码路径给添加进去了,否则你会在打包好的文件夹下看到自己的源码工程,当然如果你想要开源的话,那就没关系了。
added_files = [
("project_relative_path\\resources", "project_relative_path\\resources"),
]# 这里是为了给软件加密,pyinstaller只能加密Python Bytecode,一定要搞清楚什么是Bytecode,也即pyinstaller并不会给python源码加密。这里有一个比较复杂的点,那就是安装加密用的pycrypto包,后面我会单独讲。
block_cipher = pyi_crypto.PyiBlockCipher(key='1234567812345678')a = Analysis(['main.py'],  # 程序的入口pathex=[],binaries=[],datas=added_files,hiddenimports=[],hookspath=[],hooksconfig={},runtime_hooks=[],excludes=[],win_no_prefer_redirects=False,win_private_assemblies=False,cipher=block_cipher,noarchive=False,
)
pyz = PYZ(a.pure, a.zipped_data, cipher=block_cipher)exe = EXE(pyz,a.scripts,[],exclude_binaries=True,name='name_of_program',debug=False,bootloader_ignore_signals=False,strip=False,upx=True,console=False,disable_windowed_traceback=False,argv_emulation=False,target_arch=None,codesign_identity=None,entitlements_file=None,icon="absolute_path_of_logo.png"  # 这里给.exe加一个logo
)# onedir
coll = COLLECT(exe,a.binaries,a.zipfiles,a.datas,strip=False,upx=True,upx_exclude=[],name='name_of_program',
)
写好上面的 release.spec文件后,然后在终端相应的目录执行 pyinstaller .\release.spec,便可以对项目进行打包了。上面不懂的地方去看官方文档吧。下面有一个例子,读者可以看一下。
链接1
安装pyinstaller加密用的pycrypto包
注意,我试过网上说的PyCryptodome,但是并没有成功。还是得安装pyisntaller指定的pycrypto包才行。我的win10+python3.8.5在用虚拟环境中的pip3安装pycrypto包时,遇到了报错。解决办法参考 链接2,看下面这个回答。

NSIS制作软件安装、卸载界面
先看一下这个视频教程。要是使用最简单的安装,即只有一个路径选择,那么视频里已经讲了。若是想使用高级一点的安装、卸载,则要用脚本的形式,即写一个.nsi文件。这个.nsi文件在编译完可以生成一个.exe的文件,双击这个生成的.exe就可以进行程序的安装了。
下面讲一个demo。
写 Program_Name.nsi文件,代码如下。该文件的书写需要与实际的安装和卸载过程结合起来,多尝试几次就明白代码的语法了。
; Program_Name.nsi
;--------------------------------; The name of the installer
Name "Program_Name"; The file to write
OutFile "Install_Program_Name.exe"; Request application privileges for Windows Vista and higher
RequestExecutionLevel user; Build Unicode installer
Unicode True; The default installation directory
InstallDir $PROGRAMFILES\Program_Name; Registry key to check for directory (so if you install again, it will
; overwrite the old one automatically)
InstallDirRegKey HKLM "Software\Program_Name" "Install_Dir";--------------------------------; PagesPage components
Page directory
Page instfilesUninstPage uninstConfirm
UninstPage instfiles;--------------------------------; The stuff to install
Section "Program_Name (required)"SectionIn RO; Set output path to the installation directory.SetOutPath $INSTDIR; Put file there. Program_Name is the folder name that you wanna release, this is rightly the folder that pyinstaller packaged.File /r Program_Name\*.*; Write the installation path into the registryWriteRegStr HKLM SOFTWARE\Program_Name "Install_Dir" "$INSTDIR"; Write the uninstall keys for WindowsWriteRegStr HKLM "Software\Microsoft\Windows\CurrentVersion\Uninstall\Program_Name" "DisplayName" "Program_Name"WriteRegStr HKLM "Software\Microsoft\Windows\CurrentVersion\Uninstall\Program_Name" "UninstallString" '"$INSTDIR\uninstall.exe"'WriteRegDWORD HKLM "Software\Microsoft\Windows\CurrentVersion\Uninstall\Program_Name" "NoModify" 1WriteRegDWORD HKLM "Software\Microsoft\Windows\CurrentVersion\Uninstall\Program_Name" "NoRepair" 1WriteUninstaller "$INSTDIR\uninstall.exe"SectionEnd; Optional section (can be disabled by the user)
Section "Start Menu Shortcuts"CreateDirectory "$SMPROGRAMS\Program_Name"CreateShortcut "$SMPROGRAMS\Program_Name\Uninstall.lnk" "$INSTDIR\uninstall.exe"CreateShortcut "$SMPROGRAMS\Program_Name\Program_Name.lnk" "$INSTDIR\Program_Name.exe"SectionEnd; Optional section (can be disabled by the user)
Section "Desktop Shortcut" SectionXSetShellVarContext currentCreateShortCut "$DESKTOP\Program_Name.lnk" "$INSTDIR\Program_Name.exe"
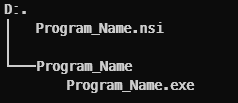
SectionEnd;--------------------------------; UninstallerSection "Uninstall"; Remove registry keysDeleteRegKey HKLM "Software\Microsoft\Windows\CurrentVersion\Uninstall\Program_Name"DeleteRegKey HKLM SOFTWARE\Program_Name; Remove all files in INSTDIRDelete $INSTDIR\*.*; Remove all shortcuts, if anyDelete "$SMPROGRAMS\Program_Name\*.lnk"Delete "$DESKTOP\*.lnk"; Remove directoriesRMDir "$SMPROGRAMS\Program_Name"RMDir "$INSTDIR"SectionEnd将 Program_Name.nsi放到与Program_name项目包的同一级,如下图所示。
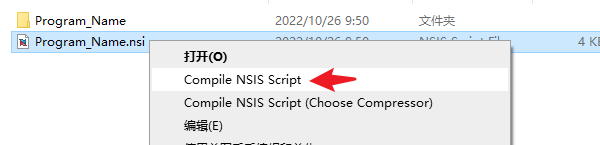
右击 Program_Name.nsi,点击Compile。
然后点击Test Installer,可以测试一下,也可以选择Close。
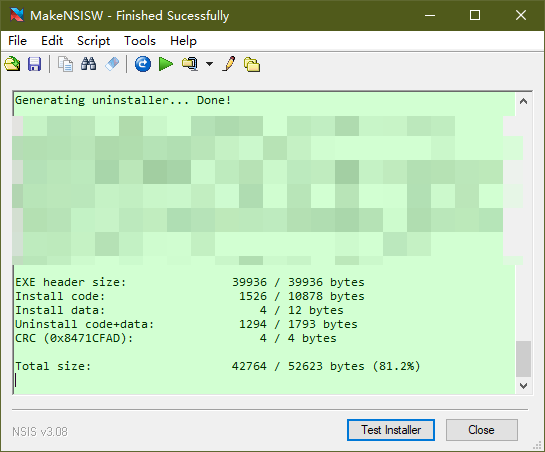
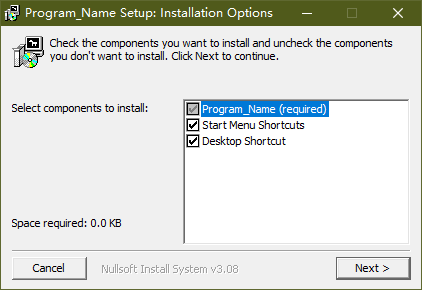
你会发现在当前文件夹下生成了一个 Install_Program_Name.exe,这个就是程序的安装文件。下面双击它进行安装。先勾选一些功能,然后选择安装路径,点击安装。
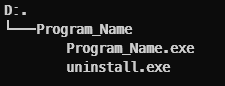
安装好了以后会在 Install_Dir文件夹下释放下面的文件:
并且在桌面和开始菜单会生成快捷方式。


若要卸载的话,双击那个 uninstall.exe即可。
我把这个demo上传到github了,需要的同学自取吧,记得给个星哦。
本文来自互联网用户投稿,文章观点仅代表作者本人,不代表本站立场,不承担相关法律责任。如若转载,请注明出处。 如若内容造成侵权/违法违规/事实不符,请点击【内容举报】进行投诉反馈!