node实现静态资源的上传发布
概述
需求是这样的:**产品通过axure生成导出的html页面发给开发的时候需要安装插件,很不方便,为方便大家的协同,决定开发一个简单的协同共享工具,实现导出html页面的打包上传,并发布生成可访问的url。**本文将讲述在node环境下如何实现上述的需求。
实现
实现思路
- 通过
Express实现上传接口; - 通过
shelljs调用服务器解压命令解压; - 通过
live-server实现解压资源的发布; - 通过
pm2实现node服务的运行与监控;
实现代码
1. 文件上传接口
接口实现文件的上传,并解压到制定目录,返回可访问的url。
router/file.js
const express = require('express')
const fs = require('fs')
const path = require('path');
const os = require('os')
const shell = require('shelljs');
const router = express.Router()
const fileUtils = require('../utils/files')
const config = require('../config')router.post('/upload', function (req, res) {const { code, name, version } = req.bodyconst filePath = path.resolve(__dirname, '../')const systemUrl = `//${config.url}/demploy/${code}/${version}/www/`const jsonPath = `${filePath}/${config.root}/data/system.json`const json = fileUtils.readJson(jsonPath)if(!json[code]) json[code] = {}json[code]['name'] = nameif(!json[code]['versions']) json[code]['versions'] = {}json[code]['versions'][version] = systemUrl
// 将操作记录到JSONfileUtils.writeJson(jsonPath, json)const basePath = `${filePath}/${config.root}/demploy/${code}/${version}/`fileUtils.dirExists(basePath).then(() => {const des_file = basePath + req.files[0].originalname;fs.readFile(req.files[0].path, function (err, data) {fs.writeFile(des_file, data, function (err) {const platform = os.platform()let cmd = ''if(platform === 'win32') {cmd = `7z x ${des_file} -o${basePath}`} else if(platform === 'linux') {cmd = `unzip -O CP936 ${des_file} -d ${basePath}`}if(cmd) {shell.exec(cmd, function () {const response = {code: 200,url: systemUrl};res.end(JSON.stringify(response));})} else {res.end(JSON.stringify({code: 500}));}});});})
})module.exports = router;
app.js
const express = require('express');
const bodyParser = require('body-parser'); // 这个模块是获取post请求传过来的数据。
const multer  = require('multer'); //multer - node.js 中间件,用于处理 enctype="multipart/form-data"(设置表单的MIME编码)的表单数据。
const fileRouter= require('./router/file');
const config = require('./config')const app = express();// 自定义跨域中间件
const allowCors = function (req, res, next) {res.header('Access-Control-Allow-Origin', req.headers.origin);res.header('Access-Control-Allow-Methods', 'GET,PUT,POST,DELETE,OPTIONS');res.header('Access-Control-Allow-Headers', 'Content-Type');res.header('Access-Control-Allow-Credentials', 'true');next();
};
app.use(allowCors);//使用跨域中间件
app.use(bodyParser.urlencoded({ extended: false })); // 判断请求体是不是json,不是的话把请求体转化为对象
app.use(multer({ dest: path.resolve(__dirname, '/www/demploy/')}).array('file'));//文件服务上传服务
app.use('/file', fileRouter);app.listen(18081, () => {console.log("接口已启动,访问地址为:http://localhost:18081")
})
2. live-server实现静态资源发布
app.js
liveServer.start({port: config.port, // Set the server port. Defaults to 8080.host: config.ip, // Set the address to bind to. Defaults to 0.0.0.0 or process.env.IP.root: `./${config.root}`, // Set root directory that's being served. Defaults to cwd.open: false, // When false, it won't load your browser by default.file: "index.html", // When set, serve this file (server root relative) for every 404 (useful for single-page applications)
});
config.js
const config = {ip: '0.0.0.0',port: '8181',url: 'localhost:8181',root: 'www'
}module.exports = config ;
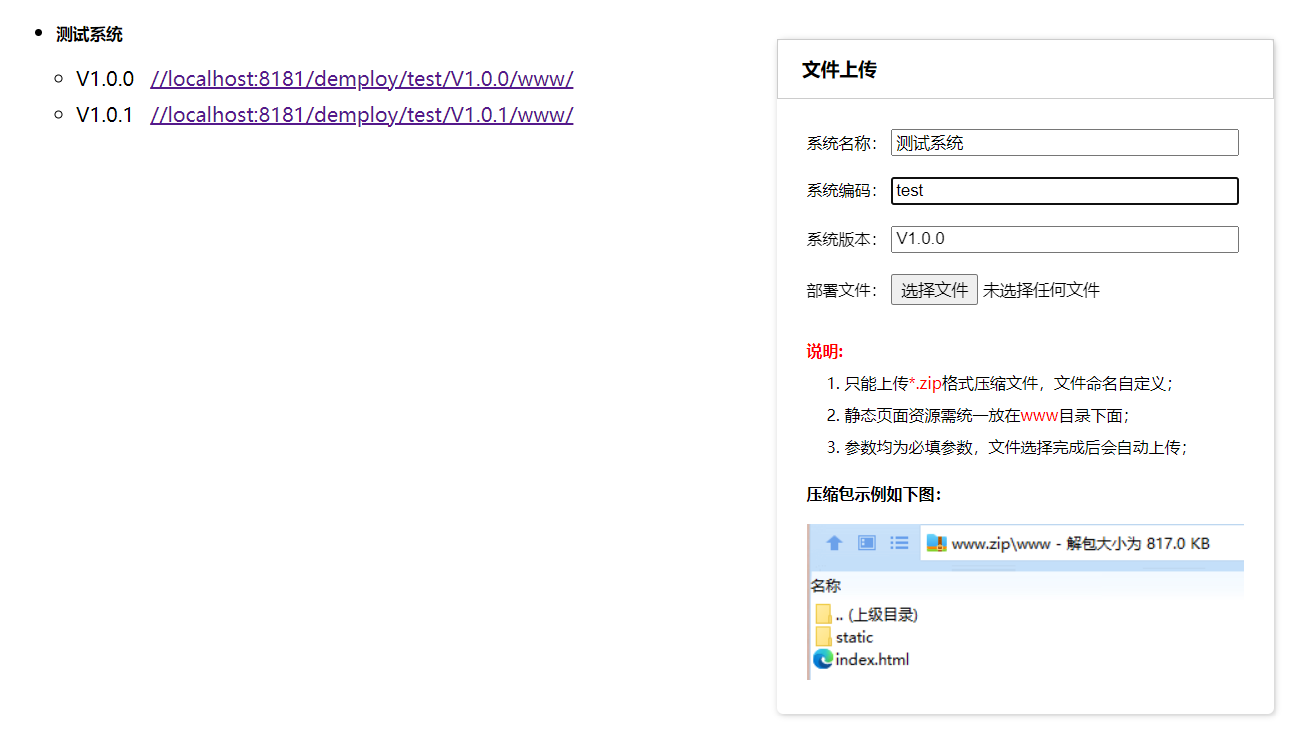
3. 前端页面实现
index.html
DOCTYPE html>
<html lang="en">
<head><meta charset="UTF-8"><title>原型发布系统title><link rel="stylesheet" href="index.css">
head>
<body>
<div class="file-upload-panel"><h3>文件上传h3><div class="upload-box"><label>系统名称:label><input type="text" id="name" value=""><br><br><label>系统编码:label><input type="text" id="code" value=""><br><br><label>系统版本:label><input type="text" id="version" value="V1.0.0"><br><br><label>部署文件:label><input type="file" id="file" accept="application/zip">div><ul class="tool-memo"><li><b style="color: red;">说明:b>li><li>1. 只能上传<span style="color: red;">*.zipspan>格式压缩文件,文件命名自定义; li><li>2. 静态页面资源需统一放在<span style="color: red;">wwwspan>目录下面; li><li>3. 参数均为必填参数,文件选择完成后会自动上传; li><div style="margin: 1rem 0;"><b>压缩包示例如下图:b>div><img src="demo.png">ul>
div>
<ul class="system-list" id="systemList">ul>
<script src="index.js">script>
body>
html>
index.css
html, body {font-size: 16px;
}.file-upload-panel {position: absolute;top: 2rem;right: 2rem;box-shadow: 1px 1px 5px #ccc;border-radius: 5px;font-size: 0.8rem;
}
.file-upload-panel .upload-box {padding: 1.5rem;
}
.file-upload-panel h3 {padding: 0.8rem 1.2rem;margin: 0;border: 1px solid #ccc;
}
.system-list h5 {margin: 0.8rem 0 0.8rem 0;padding: 0;
}
.url-list {margin: 0;padding: 0 1rem;
}
.url-list li {height: 1.8rem;line-height: 1.8rem;
}
.url-list span {margin-right: 0.8rem;
}.tool-memo {margin: 0;padding: 0 1.5rem 1.5rem 1.5rem;list-style: none;
}
.tool-memo li {line-height: 2;
}
.tool-memo li:not(:first-child) {padding-left: 1rem;
}.upload-box input {width: calc(100% - 5rem);
}
index.js
function refreshSystemList() {const url = `data/system.json`fetch(url).then(res => res.json()).then(res => {const systemList = document.getElementById('systemList')for(let sys in res) {const sysData = res[sys]const li = document.createElement('li')const h5 = document.createElement('h5')h5.innerText = sysData.nameconst ul = document.createElement('ul')ul.classList.add('url-list')const versions = sysData.versionsfor(let ver in versions) {const _li = document.createElement('li')_li.innerHTML = `${ver}${versions[ver]}" target="_blank">${versions[ver]}`ul.appendChild(_li)}li.appendChild(h5)li.appendChild(ul)systemList.appendChild(li)}})
}refreshSystemList()const fileDom = document.getElementById('file')
fileDom.onchange = function (e) {e.stopPropagation()const formData = new FormData();const file = fileDom.files[0]const code = document.getElementById('code').valueconst name = document.getElementById('name').valueconst version = document.getElementById('version').valueif(!code || !name || !version) {alert('有参数未填写,请填写后再上传!')fileDom.value = ''return false}formData.append('file', file);formData.append('code', code)formData.append('name', name)formData.append('version', version)fetch(`//${window.location.hostname}:18081/file/upload`, {method: 'post',body: formData,}).then(response => response.json()).then((data) => {copy_to_clipboard(data.url)alert('系统发布成功,访问地址已复制,请在浏览器粘贴地址并访问!')window.location.reload()});
}function copy_to_clipboard(txt_str){const input = document.createElement('input');document.body.appendChild(input);input.setAttribute('value', txt_str);input.select();if (document.execCommand('copy')) {document.execCommand('copy');}document.body.removeChild(input);
}
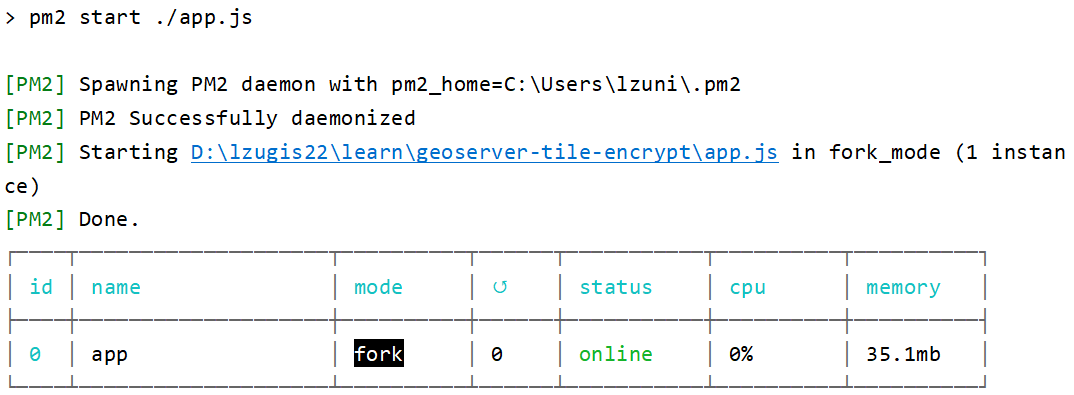
4. 部署
通过pm2来进行系统的部署和监控,因此需要先执行命令npm i pm2 --global安装。安装完之后就可通过命令pm2 start ./app.js启动,启动后界面如下:
pm2其他常用命令如下:
# 停止服务
pm2 stop app # app_name | app_id# 查看进程
pm2 list# 查看进程信息
pm2 describe 0 # app_id# 查看日志
pm2 logs app [--lines 1000]
本文来自互联网用户投稿,文章观点仅代表作者本人,不代表本站立场,不承担相关法律责任。如若转载,请注明出处。 如若内容造成侵权/违法违规/事实不符,请点击【内容举报】进行投诉反馈!