Spring Boot Security使用 JDBC 和 MySQL 进行 RBAC,自定义登录验证,登录界面增加kaptcha验证码
在本教程中,我将指导您如何编写代码,以使用具有基于表单的身份验证的Spring安全API来保护Spring Boot应用程序中的网页。用户详细信息存储在MySQL数据库中,并使用春季JDBC连接到数据库。我们将从本教程中的 ProductManager 项目开始,向现有的弹簧启动项目添加登录和注销功能。
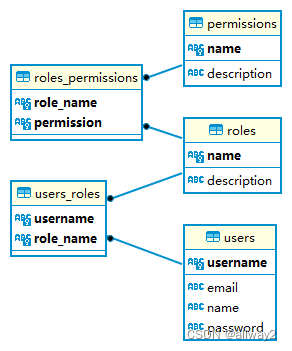
1. 创建用户表和虚拟凭据
凭据应存储在数据库中,因此让我们创建新表,表间关系ER图如下:
-- --------------------------------------------------------
-- 主机:                           127.0.0.1
-- 服务器版本:                        8.0.22 - MySQL Community Server - GPL
-- 服务器操作系统:                      Win64
-- HeidiSQL 版本:                  12.1.0.6537
-- --------------------------------------------------------/*!40101 SET @OLD_CHARACTER_SET_CLIENT=@@CHARACTER_SET_CLIENT */;
/*!40101 SET NAMES utf8 */;
/*!50503 SET NAMES utf8mb4 */;
/*!40103 SET @OLD_TIME_ZONE=@@TIME_ZONE */;
/*!40103 SET TIME_ZONE='+00:00' */;
/*!40014 SET @OLD_FOREIGN_KEY_CHECKS=@@FOREIGN_KEY_CHECKS, FOREIGN_KEY_CHECKS=0 */;
/*!40101 SET @OLD_SQL_MODE=@@SQL_MODE, SQL_MODE='NO_AUTO_VALUE_ON_ZERO' */;
/*!40111 SET @OLD_SQL_NOTES=@@SQL_NOTES, SQL_NOTES=0 */;-- 导出 product3 的数据库结构
CREATE DATABASE IF NOT EXISTS `product3` /*!40100 DEFAULT CHARACTER SET utf8mb4 COLLATE utf8mb4_unicode_ci */ /*!80016 DEFAULT ENCRYPTION='N' */;
USE `product3`;-- 导出  表 product3.permissions 结构
CREATE TABLE IF NOT EXISTS `permissions` (`name` varchar(30) CHARACTER SET utf8mb4 COLLATE utf8mb4_unicode_ci NOT NULL,`description` varchar(255) CHARACTER SET utf8mb4 COLLATE utf8mb4_unicode_ci DEFAULT NULL,PRIMARY KEY (`name`)
) ENGINE=InnoDB DEFAULT CHARSET=utf8mb4 COLLATE=utf8mb4_unicode_ci;-- 正在导出表  product3.permissions 的数据:~3 rows (大约)
INSERT INTO `permissions` (`name`, `description`) VALUES('ADMIN', NULL),('DELETE', 'delete'),('READ', 'read'),('WRITE', 'write');-- 导出  表 product3.product 结构
CREATE TABLE IF NOT EXISTS `product` (`id` bigint NOT NULL AUTO_INCREMENT,`brand` varchar(255) COLLATE utf8mb4_unicode_ci DEFAULT NULL,`madein` varchar(255) COLLATE utf8mb4_unicode_ci DEFAULT NULL,`name` varchar(255) COLLATE utf8mb4_unicode_ci DEFAULT NULL,`price` float NOT NULL,PRIMARY KEY (`id`)
) ENGINE=InnoDB AUTO_INCREMENT=3 DEFAULT CHARSET=utf8mb4 COLLATE=utf8mb4_unicode_ci;-- 正在导出表  product3.product 的数据:~1 rows (大约)
INSERT INTO `product` (`id`, `brand`, `madein`, `name`, `price`) VALUES(1, '666', '666', '数据库', 222);-- 导出  表 product3.roles 结构
CREATE TABLE IF NOT EXISTS `roles` (`name` varchar(20) CHARACTER SET utf8mb4 COLLATE utf8mb4_unicode_ci NOT NULL,`description` varchar(255) CHARACTER SET utf8mb4 COLLATE utf8mb4_unicode_ci DEFAULT NULL,PRIMARY KEY (`name`)
) ENGINE=InnoDB DEFAULT CHARSET=utf8mb4 COLLATE=utf8mb4_unicode_ci;-- 正在导出表  product3.roles 的数据:~3 rows (大约)
INSERT INTO `roles` (`name`, `description`) VALUES('ADMIN', 'Administrator role'),('USER_P1', 'Perfil 1'),('USER_P2', 'Perfil 2');-- 导出  表 product3.roles_permissions 结构
CREATE TABLE IF NOT EXISTS `roles_permissions` (`role_name` varchar(20) CHARACTER SET utf8mb4 COLLATE utf8mb4_unicode_ci NOT NULL,`permission` varchar(30) CHARACTER SET utf8mb4 COLLATE utf8mb4_unicode_ci NOT NULL,PRIMARY KEY (`role_name`,`permission`),KEY `RP_1` (`role_name`),KEY `RP_2` (`permission`),CONSTRAINT `RP_1` FOREIGN KEY (`role_name`) REFERENCES `roles` (`name`),CONSTRAINT `RP_2` FOREIGN KEY (`permission`) REFERENCES `permissions` (`name`)
) ENGINE=InnoDB DEFAULT CHARSET=utf8mb4 COLLATE=utf8mb4_unicode_ci;-- 正在导出表  product3.roles_permissions 的数据:~4 rows (大约)
INSERT INTO `roles_permissions` (`role_name`, `permission`) VALUES('ADMIN', 'ADMIN'),('ADMIN', 'DELETE'),('ADMIN', 'READ'),('ADMIN', 'WRITE'),('USER_P1', 'READ'),('USER_P2', 'DELETE'),('USER_P2', 'WRITE');-- 导出  表 product3.users 结构
CREATE TABLE IF NOT EXISTS `users` (`username` varchar(15) CHARACTER SET utf8mb4 COLLATE utf8mb4_unicode_ci NOT NULL,`email` varchar(100) CHARACTER SET utf8mb4 COLLATE utf8mb4_unicode_ci DEFAULT NULL,`name` varchar(65) CHARACTER SET utf8mb4 COLLATE utf8mb4_unicode_ci DEFAULT NULL,`password` varchar(255) CHARACTER SET utf8mb4 COLLATE utf8mb4_unicode_ci NOT NULL,`enabled` int DEFAULT NULL,PRIMARY KEY (`username`)
) ENGINE=InnoDB DEFAULT CHARSET=utf8mb4 COLLATE=utf8mb4_unicode_ci;-- 正在导出表  product3.users 的数据:~3 rows (大约)
INSERT INTO `users` (`username`, `email`, `name`, `password`, `enabled`) VALUES('admin', 'admin@example.com', 'Administrator', '$2a$10$2/LSmp3YoEOT97KzgrYODen7I88ErBovM2Qehw9DL1dW9DZ7DZSAm', 1),('u1', 'u1@example.com', 'User P1', '$2a$10$2/LSmp3YoEOT97KzgrYODen7I88ErBovM2Qehw9DL1dW9DZ7DZSAm', 1),('u2', 'u2@example.com', 'User P2', '$2a$10$2/LSmp3YoEOT97KzgrYODen7I88ErBovM2Qehw9DL1dW9DZ7DZSAm', 1);-- 导出  表 product3.users_roles 结构
CREATE TABLE IF NOT EXISTS `users_roles` (`username` varchar(15) CHARACTER SET utf8mb4 COLLATE utf8mb4_unicode_ci NOT NULL,`role_name` varchar(20) CHARACTER SET utf8mb4 COLLATE utf8mb4_unicode_ci NOT NULL,PRIMARY KEY (`username`,`role_name`),KEY `UR_1` (`username`),KEY `UR_2` (`role_name`),CONSTRAINT `UR_1` FOREIGN KEY (`username`) REFERENCES `users` (`username`),CONSTRAINT `UR_2` FOREIGN KEY (`role_name`) REFERENCES `roles` (`name`)
) ENGINE=InnoDB DEFAULT CHARSET=utf8mb4 COLLATE=utf8mb4_unicode_ci;-- 正在导出表  product3.users_roles 的数据:~0 rows (大约)
INSERT INTO `users_roles` (`username`, `role_name`) VALUES('admin', 'ADMIN'),('u1', 'USER_P1'),('u2', 'USER_P2');/*!40103 SET TIME_ZONE=IFNULL(@OLD_TIME_ZONE, 'system') */;
/*!40101 SET SQL_MODE=IFNULL(@OLD_SQL_MODE, '') */;
/*!40014 SET FOREIGN_KEY_CHECKS=IFNULL(@OLD_FOREIGN_KEY_CHECKS, 1) */;
/*!40101 SET CHARACTER_SET_CLIENT=@OLD_CHARACTER_SET_CLIENT */;
/*!40111 SET SQL_NOTES=IFNULL(@OLD_SQL_NOTES, 1) */;
2. 配置数据源属性
接下来,在应用程序属性文件中指定数据库连接信息,如下所示:根据您的MySQL数据库更新URL,用户名和密码。
spring.jpa.hibernate.ddl-auto=update
spring.datasource.url=jdbc:mysql://localhost:3306/product3?autoReconnect=true&useSSL=false&useUnicode=true&characterEncoding=UTF-8&serverTimezone=Asia/Shanghai
spring.datasource.username=root
spring.datasource.password=root
#logging.level.root=WARN
3. 声明弹簧安全性和 MySQL JDBC 驱动程序的依赖关系
要将Spring安全API用于项目,请在pom.xml文件中声明以下依赖项:并且要将JDBC与弹簧启动和MySQL一起使用:请注意,依赖项版本已由弹簧启动初学者父项目定义。
4.0.0 org.springframework.boot spring-boot-starter-parent 2.7.4 net.codejava ProductManagerJDBCAuthenticationManuallyAuthenticateCaptcha 2.0 ProductManagerJDBCAuthenticationManuallyAuthenticateCaptcha ProductManagerJDBCAuthentication jar 1.8 org.springframework.boot spring-boot-starter-data-jpa org.springframework.boot spring-boot-starter-thymeleaf org.springframework.boot spring-boot-starter-web org.springframework.boot spring-boot-devtools mysql mysql-connector-java runtime org.springframework.boot spring-boot-starter-security org.thymeleaf.extras thymeleaf-extras-springsecurity5 com.github.penggle kaptcha 2.3.2 org.springframework.boot spring-boot-maven-plugin 4. 配置 JDBC 身份验证详细信息
要将 Spring 安全性与基于表单的身份验证和 JDBC 结合使用,请按如下方式创建 WebSecurityConfig 类:
package net.codejava;import javax.sql.DataSource;import org.springframework.beans.factory.annotation.Autowired;
import org.springframework.context.annotation.Bean;
import org.springframework.context.annotation.Configuration;
import org.springframework.http.HttpMethod;
import org.springframework.security.authentication.AuthenticationManager;
import org.springframework.security.config.annotation.authentication.builders.AuthenticationManagerBuilder;
import org.springframework.security.config.annotation.web.builders.HttpSecurity;
import org.springframework.security.config.annotation.web.configuration.EnableWebSecurity;
import org.springframework.security.config.annotation.web.configuration.WebSecurityConfigurerAdapter;
import org.springframework.security.crypto.bcrypt.BCryptPasswordEncoder;@Configuration
@EnableWebSecurity
public class WebSecurityConfig extends WebSecurityConfigurerAdapter {@Autowiredprivate DataSource dataSource;@Bean@Overridepublic AuthenticationManager authenticationManagerBean() throws Exception {return super.authenticationManagerBean();}@Autowiredpublic void configAuthentication(AuthenticationManagerBuilder authBuilder) throws Exception {authBuilder.jdbcAuthentication().dataSource(dataSource).passwordEncoder(new BCryptPasswordEncoder()).usersByUsernameQuery("select username, password, enabled from users where username=?").authoritiesByUsernameQuery("SELECT users.username,permissions.name FROM users,roles,users_roles,permissions,roles_permissions WHERE users.username=users_roles.username AND roles.name=users_roles.role_name AND roles.name=roles_permissions.role_name AND permissions.name=roles_permissions.permission AND users.username=?");}@Overrideprotected void configure(HttpSecurity http) throws Exception {http.authorizeRequests().antMatchers("/edit/*", "/delete/*").hasAnyAuthority("ADMIN").antMatchers("/common/**").permitAll().antMatchers("/login").permitAll().antMatchers("/verify").permitAll().anyRequest().authenticated().and().formLogin().loginPage("/login").permitAll().and().logout().permitAll().and().exceptionHandling().accessDeniedPage("/403");}}
此安全配置类必须使用@EnableWebSecurity注释进行批注,并且是 Web 安全配置器适配器的子类。数据源对象的实例将由Spring框架创建并注入:
@Autowiredprivate DataSource dataSource;它将从应用程序属性文件中读取数据库连接信息。要使用JDBC配置身份验证,请编写以下方法:
@Autowiredpublic void configAuthentication(AuthenticationManagerBuilder authBuilder) throws Exception {authBuilder.jdbcAuthentication().dataSource(dataSource).passwordEncoder(new BCryptPasswordEncoder()).usersByUsernameQuery("select username, password, enabled from users where username=?").authoritiesByUsernameQuery("SELECT users.username,permissions.name FROM users,roles,users_roles,permissions,roles_permissions WHERE users.username=users_roles.username AND roles.name=users_roles.role_name AND roles.name=roles_permissions.role_name AND permissions.name=roles_permissions.permission AND users.username=?");}如您所见,我们需要指定密码编码器(建议使用BCrypt),数据源和两个SQL语句:第一个根据用户名选择用户,第二个选择用户的角色。请注意,Spring安全性要求列名必须是用户名,密码,启用和角色。为了配置基于表单的身份验证,我们重写了 configure(HttpSecurity) 方法,如下所示:
@Overrideprotected void configure(HttpSecurity http) throws Exception {http.authorizeRequests().antMatchers("/edit/*", "/delete/*").hasAnyAuthority("ADMIN").anyRequest().authenticated().and().formLogin().permitAll().and().logout().permitAll().and().exceptionHandling().accessDeniedPage("/403");}在这里,我们指定所有请求都必须进行身份验证,这意味着用户必须登录才能使用该应用程序。使用Spring安全性提供的默认登录表单。要显示已登录用户的用户名,请在Thymeleaf模板文件中编写以下代码:
Welcome Username Roles并添加注销按钮:
如您所见,Spring Security将处理应用程序的登录和注销。我们不必编写重复的代码,只需指定一些配置即可。
5.自定义登录验证过程
package net.codejava;import org.springframework.beans.factory.annotation.Autowired;
import org.springframework.stereotype.Controller;
import org.springframework.util.StringUtils;
import org.springframework.web.bind.annotation.*;import javax.servlet.http.HttpSession;
import org.springframework.security.authentication.AuthenticationManager;
import org.springframework.security.authentication.UsernamePasswordAuthenticationToken;
import org.springframework.security.core.Authentication;
import org.springframework.security.core.context.SecurityContext;
import org.springframework.security.core.context.SecurityContextHolder;
import static org.springframework.security.web.context.HttpSessionSecurityContextRepository.SPRING_SECURITY_CONTEXT_KEY;@Controllerpublic class LoginController {/*** 注入身份认证管理器*/@Autowiredprivate AuthenticationManager authenticationManager;@GetMapping("/login")public String login() {return "login";}@PostMapping(value = "/verify")public String login(@RequestParam("username") String username,@RequestParam("password") String password,@RequestParam("verifyCode") String verifyCode,HttpSession session) {System.out.println("username is:" + username);System.out.println("password is:" + password);System.out.println("verifyCode is:" + verifyCode);if (StringUtils.isEmpty(verifyCode)) {session.setAttribute("errorMsg", "The verification code cannot be empty");return "login";}if (StringUtils.isEmpty(username) || StringUtils.isEmpty(password)) {session.setAttribute("errorMsg", "User name or password cannot be empty");return "login";}String kaptchaCode = session.getAttribute("verifyCode") + "";System.out.println("kaptchaCode is:" + kaptchaCode);if (StringUtils.isEmpty(kaptchaCode) || !verifyCode.equals(kaptchaCode)) {session.setAttribute("errorMsg", "Verification code error");return "login";}
//        User user = userService.login(userName, password);System.out.println(username + "==" + password + "==" + verifyCode);// 创建用户名与密码认证对象UsernamePasswordAuthenticationToken token = new UsernamePasswordAuthenticationToken(username, password);try {// 调用认证方法,返回认证对象Authentication authenticate = authenticationManager.authenticate(token);// 判断是否认证成功if (authenticate.isAuthenticated()) {// 设置用户认证成功,往Session中添加认证通过信息SecurityContextHolder.getContext().setAuthentication(authenticate);SecurityContext sc = SecurityContextHolder.getContext();sc.setAuthentication(authenticate);session.setAttribute(SPRING_SECURITY_CONTEXT_KEY, sc);// 重定向到登录成功页面return "redirect:/";} else {session.setAttribute("errorMsg", "Login failed");return "login";}} catch (Exception ex) {ex.printStackTrace();}return "login";}
}
kaptcha验证码
package net.codejava;import com.google.code.kaptcha.impl.DefaultKaptcha;
import org.springframework.beans.factory.annotation.Autowired;
import org.springframework.stereotype.Controller;
import org.springframework.web.bind.annotation.GetMapping;import javax.imageio.ImageIO;
import javax.servlet.ServletOutputStream;
import javax.servlet.http.HttpServletRequest;
import javax.servlet.http.HttpServletResponse;
import java.awt.image.BufferedImage;
import java.io.ByteArrayOutputStream;@Controller
public class KaptchaController {@Autowiredprivate DefaultKaptcha captchaProducer;@GetMapping("/common/kaptcha")public void defaultKaptcha(HttpServletRequest httpServletRequest, HttpServletResponse httpServletResponse) throws Exception {byte[] captchaOutputStream = null;ByteArrayOutputStream imgOutputStream = new ByteArrayOutputStream();try {//Produce the verification code string and save it in the sessionString verifyCode = captchaProducer.createText();httpServletRequest.getSession().setAttribute("verifyCode", verifyCode);BufferedImage challenge = captchaProducer.createImage(verifyCode);ImageIO.write(challenge, "jpg", imgOutputStream);} catch (IllegalArgumentException e) {httpServletResponse.sendError(HttpServletResponse.SC_NOT_FOUND);return;}captchaOutputStream = imgOutputStream.toByteArray();httpServletResponse.setHeader("Cache-Control", "no-store");httpServletResponse.setHeader("Pragma", "no-cache");httpServletResponse.setDateHeader("Expires", 0);httpServletResponse.setContentType("image/jpeg");ServletOutputStream responseOutputStream = httpServletResponse.getOutputStream();responseOutputStream.write(captchaOutputStream);responseOutputStream.flush();responseOutputStream.close();}}
package net.codejava;import com.google.code.kaptcha.impl.DefaultKaptcha;
import com.google.code.kaptcha.util.Config;
import org.springframework.context.annotation.Bean;
import org.springframework.stereotype.Component;import java.util.Properties;@Component
public class KaptchaConfig {@Beanpublic DefaultKaptcha getDefaultKaptcha() {DefaultKaptcha defaultKaptcha = new DefaultKaptcha();Properties properties = new Properties();properties.put("kaptcha.border", "no");properties.put("kaptcha.textproducer.font.color", "black");properties.put("kaptcha.image.width", "150");properties.put("kaptcha.image.height", "40");properties.put("kaptcha.textproducer.font.size", "30");properties.put("kaptcha.session.key", "verifyCode");properties.put("kaptcha.textproducer.char.space", "5");Config config = new Config(properties);defaultKaptcha.setConfig(config);return defaultKaptcha;}}
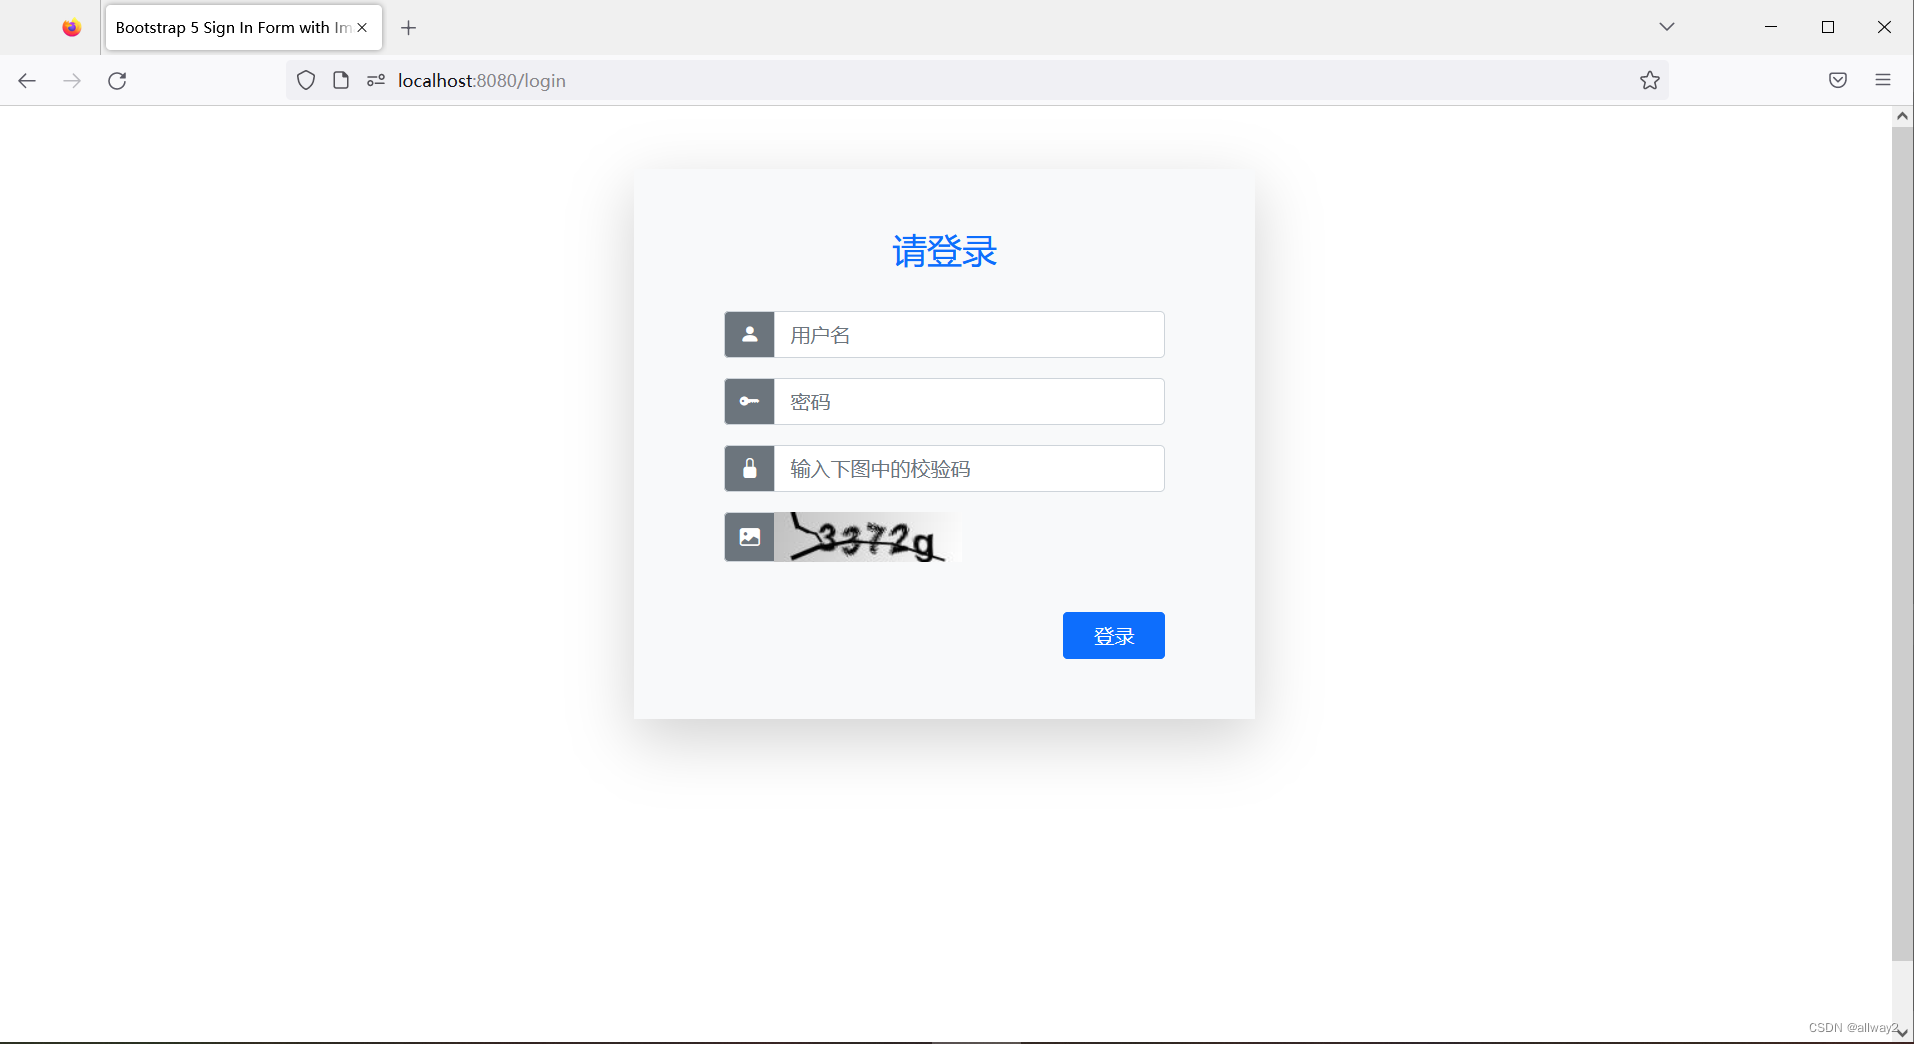
6.登录页面
Bootstrap 5 Sign In Form with Image Example 5. 测试登录和注销
启动Spring Boot应用程序并访问 http://localhost:8080 在Web浏览器中,您将看到自定义的登录页面出现:
现在输入正确的用户名admin和密码admin,您将看到主页如下:
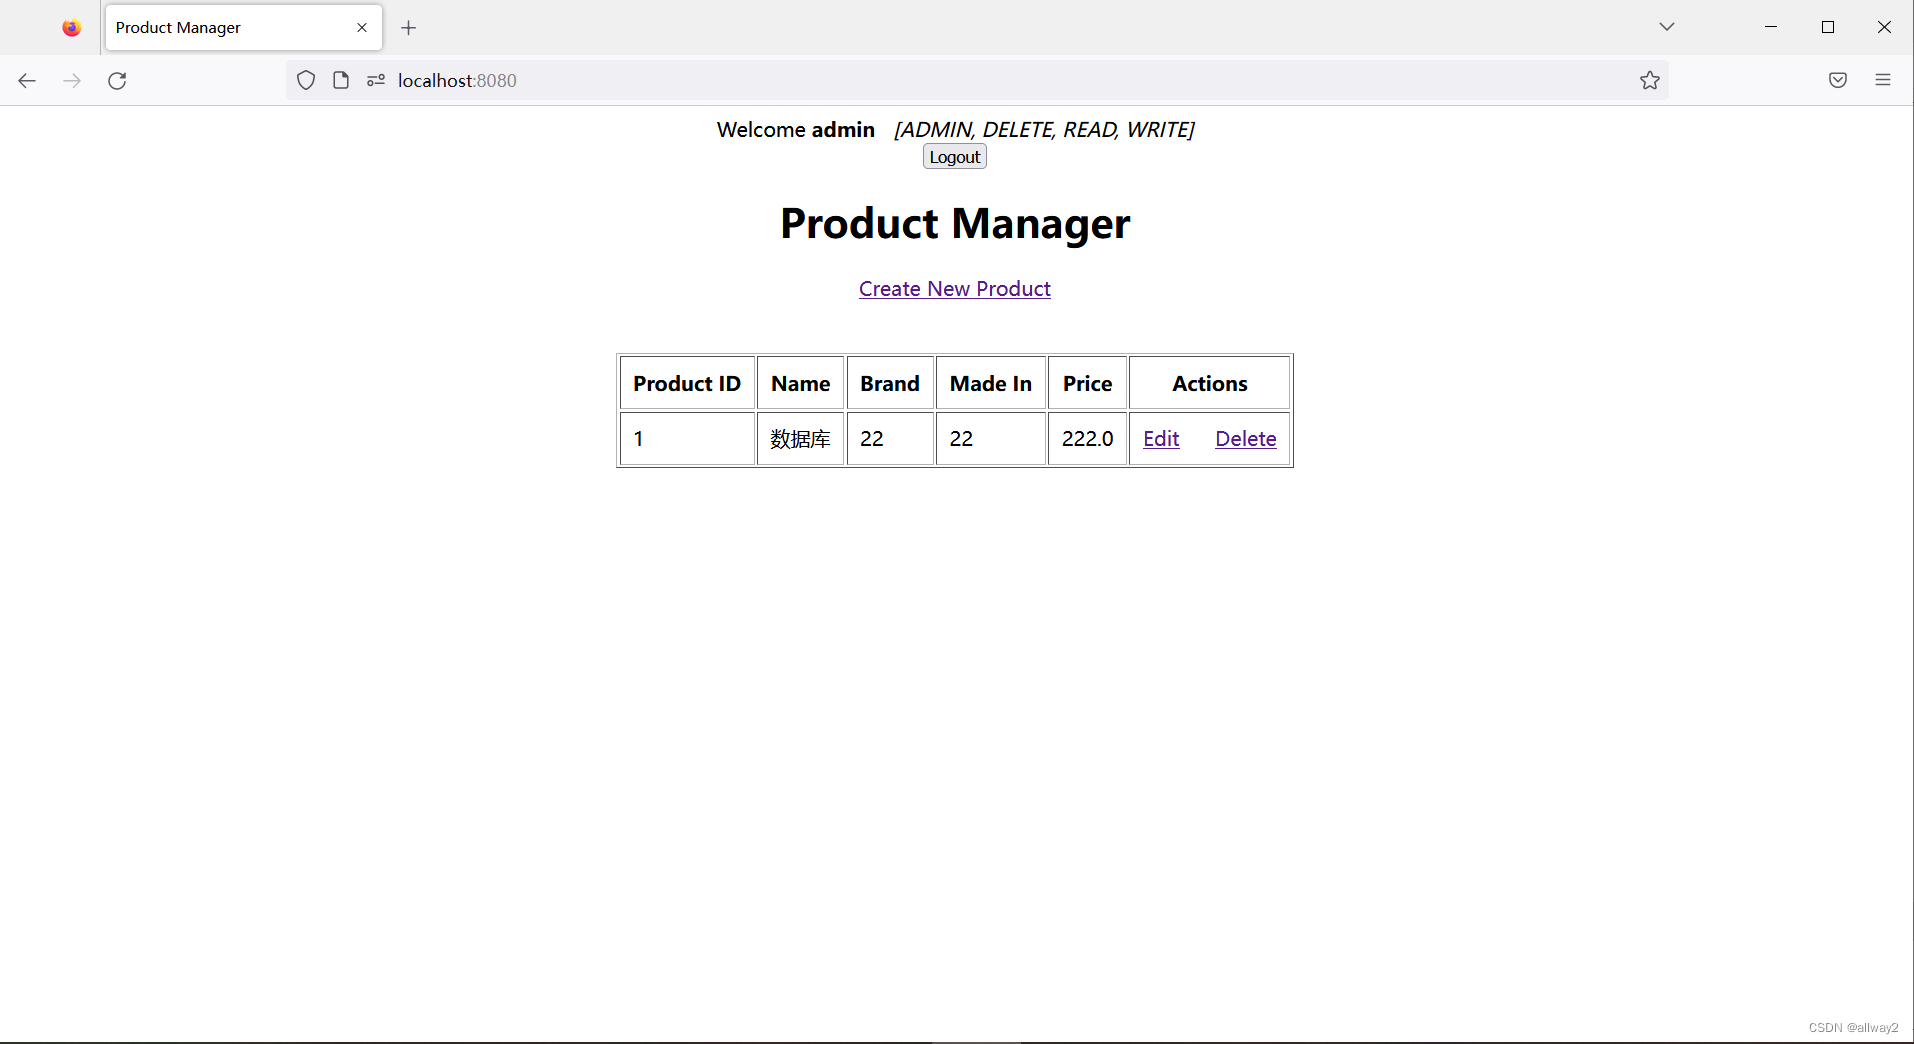
并注意欢迎消息后跟用户名。用户现在已通过身份验证以使用该应用程序。单击“注销”按钮,您将看到自定义的登录页面出现,这意味着我们已成功实现登录并注销到我们的Spring Boot应用程序。
结论:
到目前为止,您已经学会了使用基于表单的身份验证和数据库内凭据来保护Spring Boot应用程序。您会看到 Spring 安全性使实现登录和注销功能变得非常容易,并且非常方便。为方便起见,您可以下载下面的示例项目。
下载源码:https://github.com/allwaysoft/ProductManagerJDBCAuthenticationManuallyAuthenticateCaptcha/
本文来自互联网用户投稿,文章观点仅代表作者本人,不代表本站立场,不承担相关法律责任。如若转载,请注明出处。 如若内容造成侵权/违法违规/事实不符,请点击【内容举报】进行投诉反馈!