关于Linux中Keepalived高可用热备自动化部署的一些笔记
写在前面
- 今天和小伙伴们分享一些 Keepalived 相关笔记
- 博文内容涉及:
- vrrp 协议由来
- Ansible 方式 Keepalived安装部署
- Keepalived 脚本方式配置服务检查
- Keepalived 自动化部署 Ansible 角色编写
- 食用方式:
- 需要 Linux、Ansible 基础知识
- 理解不足小伙伴帮忙指正
勿忘国耻,铭记历史
官网帮助文档:https://www.keepalived.org/manpage.html
关于keepalived是什么,在官网中这样描述:
Keepalived 是一个用 C 语言编写的路由软件。该项目的主要目标是为 Linux 系统和基于 Linux 的基础架构提供简单而强大的负载平衡和高可用性设施。
负载平衡框架依赖于众所周知且广泛使用的Linux 虚拟服务器 (IPVS) 内核模块,提供第 4 层负载平衡。Keepalived 实现了一组检查器,以根据其健康状况动态和自适应地维护和管理负载平衡的服务器池。(本文不涉及)
高可用性是通过 VRRP实现的协议。VRRP 是路由器故障转移的基础。此外,Keepalived 实现了一组与 VRRP 有限状态机的挂钩,提供低级和高速协议交互。为了提供最快的网络故障检测,Keepalived 实现了BFD协议。VRRP 状态转换可以考虑 BFD 提示来驱动快速状态转换。Keepalived 框架可以单独使用,也可以一起使用,以提供弹性基础架构
Keepalived 是免费软件;您可以根据自由软件基金会发布的 GNU 通用公共许可条款重新分发和/或修改它;许可证的第 2 版,或(由您选择)任何更高版本。
今天和小伙伴分享的主要是高可用热备部署,关于负载均衡方面的之后和小伙伴们分享,在部署keepalived之前,需要了解下VRRP协议
vrrp协议由来
当网关路由器出现故障时,本网段内以该设备为网关的主机都不能与 Internet 进行通信。所以需要进行容灾处理,但是通过部署多网关的方式实现网关的备份,存在一些问题:网关间IP地址冲突;主机会频繁切换网络出口。所以为解决网关路由的单点故障,有了VRRP协议。
VRRP即虚拟路由冗余协议,VRRP能够在不改变组网的情况下,从多台网关设备里产生一个虚拟路由器,通过配置虚拟路由器的IP地址为默认网关,实现网关的备份。
对外提供网关服务的是这个虚拟路由器。这样不管是真实路由器哪个出现问题,都不会影响整个网络的运行,提高了网络结构的稳定性。
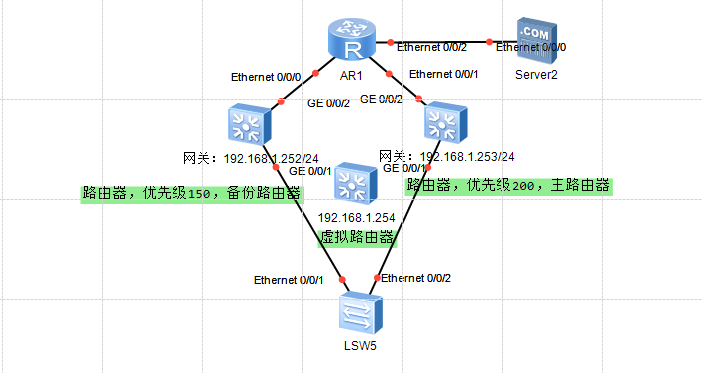
路由器VRRP配置方式
- 配置VRRP的成员;
- 配置VRRP的优先级 (默认100);
- 查看VRRP信息
VRRP协议通过一种竞选机制来将路由任务交给某个vrrp路由器的。
在VRRP物理结构中,有多个物理的VRRP路由器,其中有一台称为“master”(主节点路由器),其他的都是“backup”(备节点路由器)
在VRRP虚拟结构中,虚拟路由都是通过MAC+VRID的形式来标识的,如54-89-98-6F-3D-B5-{vrid}
只有master节点才会发送VRRP包(vrrp advertisement message)当master节点宕掉的时候,backup中优先级最高的VRRP设备会抢占并升级为master
下面为配置的简单Demo
三层交换机SW1上配置, 主路由器(Master)
#三层交换机SW1上配置, 主路由器(Master)
<Huawei>system-view #进入系统视图
[Huawei]sysname SW1 #修改设备名字
[SW1]
[SW1]undo info-center enable #取消信息提示
#给vlan1配置网关
[SW1]interface Vlanif 1
[SW1-Vlanif1]ip address 192.168.1.252 255.255.255.0
#将三层交换机SW1配置为VRRP的成员,设置虚拟IP地址
[SW1-Vlanif1]vrrp vrid 1 virtual-ip 192.168.1.254
#配置VRRP的优先级,不写默认为100
[SW1-Vlanif1]vrrp vrid 1 priority 105
[SW1-Vlanif1]
#查看VRRP配置信息
[SW1-Vlanif1]display vrrp brief
三层交换机SW2上配置,,备用路由器(backup)
#三层交换机SW2上配置,,备用路由器(backup)
<Huawei>system-view #进入系统视图
[Huawei]sysname SW2 #修改设备名字
[SW2]
[SW2]undo info-center enable #取消信息提示
#给vlan1配置网关
[SW2]interface Vlanif 1
[SW2-Vlanif1]ip address 192.168.1.253 255.255.255.0
#将三层交换机SW1配置为VRRP的成员,设置虚拟IP地址
[SW2-Vlanif1]vrrp vrid 1 virtual-ip 192.168.1.254
#不用设置优先级,默认为100
#查看VRRP配置信息
[SW2-Vlanif1]display vrrp brief
keepalived 安装部署
回到keepalived中,keepalived 通过VRRP(Virtual Router Redundancy Protocol)虚拟路由冗余协议来实现故障转移。keepalived正常工作时,主节点(master)会不断的发送心跳信息给备节点(backup)
┌──[root@vms153.liruilongs.github.io]-[~]
└─$tcpdump -i  ens32 -nn host 224.0.0.18 #组播地址
tcpdump: verbose output suppressed, use -v or -vv for full protocol decode
listening on ens32, link-type EN10MB (Ethernet), capture size 262144 bytes
23:27:36.149062 IP 192.168.26.153 > 224.0.0.18: VRRPv2, Advertisement, vrid 51, prio 100, authtype simple, intvl 1s, length 20
23:27:37.150969 IP 192.168.26.153 > 224.0.0.18: VRRPv2, Advertisement, vrid 51, prio 100, authtype simple, intvl 1s, length 20
23:27:38.152021 IP 192.168.26.153 > 224.0.0.18: VRRPv2, Advertisement, vrid 51, prio 100, authtype simple, intvl 1s, length 20
^C
3 packets captured
3 packets received by filter
0 packets dropped by kernel
┌──[root@vms153.liruilongs.github.io]-[~]
└─$
当备节点在一定时间内没有收到主节点的心跳信息时,备节点会认为主节点宕了,就会接管主节点上的资源,并继续向外提供服务保证其可用性,当主节点恢复时,备节点会自动让出资源并再次自动成为备节点
这里我们通过 ansible 安装配置,下面的两台机器为我们要配置的机器,也就是node组,在master节点操作
- 192.168.26.153
- 192.168.26.154
┌──[root@vms152.liruilongs.github.io]-[~]
└─$cat inventory
[master]
192.168.26.152
[node]
192.168.26.153
192.168.26.154
安装web服务测试用
┌──[root@vms152.liruilongs.github.io]-[~]
└─$ansible node -m shell -a "yum -y install httpd"
编写一个小剧本用于环境初始化,这个剧本实现对httpd服务的欢迎页进行内容填充,重启服务,设置防火墙域为trusted,即没有规则
┌──[root@vms152.liruilongs.github.io]-[~]
└─$cat httpd.yaml
---
- name: httpd inithosts: nodetasks:- name: httpd contentshell: "echo `hostname` > /var/www/html/index.html"- name: Restart service httpd, in all casesservice:name: httpdstate: restarted- name: firewallshell: firewall-cmd --set-default-zone=trusted
┌──[root@vms152.liruilongs.github.io]-[~]
└─$
执行剧本并测试填充结果测试
┌──[root@vms152.liruilongs.github.io]-[~]
└─$ansible-playbook httpd.yaml
........
┌──[root@vms152.liruilongs.github.io]-[~]
└─$ansible node -m shell -a 'hostname;cat /var/www/html/index.html'
192.168.26.154 | CHANGED | rc=0 >>
vms154.liruilongs.github.io
vms154.liruilongs.github.io
192.168.26.153 | CHANGED | rc=0 >>
vms153.liruilongs.github.io
vms153.liruilongs.github.io
安装 keepalived,我们使用的版本为:keepalived-1.3.5-19.el7.x86_64
┌──[root@vms152.liruilongs.github.io]-[~]
└─$ansible node -m yum -a 'name=keepalived state=installed'
192.168.26.154 | SUCCESS => {
。。。。。。
编辑配置文件模板,把主备节点配置文件中不一样的,或者希望单独设置的内容做成变量
┌──[root@vms152.liruilongs.github.io]-[~]
└─$cat keepalived.conf.j2
! Configuration File for keepalivedglobal_defs {router_id LVS_DEVEL #设置路由ID,可以和主机名相同,也可以随便定义vrrp_iptables       #手动添加(禁止设置防火墙规则,keepalved每次启动都会自动添加防火墙拒绝所有的规则)
}vrrp_instance VI_1 {state {{ role }}interface ens32 #定义网络接口,根据自己虚拟机上的网卡修改virtual_router_id 51  #主备服务器VRID号必须保持一致priority {{ priority }} #服务器优先级,优先级高则优先获得浮动IPadvert_int 1authentication {auth_type PASSauth_pass 1111}virtual_ipaddress {192.168.26.200}
}
编写剧本,复制模板文件,然后重启keepalived服务,这里我们通过两个小剧本的方式传递不同的变量
┌──[root@vms152.liruilongs.github.io]-[~]
└─$cat keepalived.yaml
---
- name: vms153.liruilongs.github.io confighosts: 192.168.26.153tags:- mastervars:role: MASTERpriority: 100tasks:- name: copy keeplived configtemplate:src: keepalived.conf.j2dest: /etc/keepalived/keepalived.conf- name: restart keeplivedservice:name: keepalivedstate: restarted- name: vms154.liruilongs.github.io confighosts: 192.168.26.154tags:- backupvars:role: BACKUPpriority: 50tasks:- name: copy keepalived configtemplate:src: keepalived.conf.j2dest: /etc/keepalived/keepalived.conf- name: restart keepalivedservice:name: keepalivedstate: restarted
运行剧本并测试
┌──[root@vms152.liruilongs.github.io]-[~]
└─$ansible-playbook keepalived.yaml
。。。。。。。。。。。
假设153机器应为某些原因,需要进行停机处理,我们可以直接把 keepalived 干掉,vip自动切到154
┌──[root@vms152.liruilongs.github.io]-[~]
└─$curl 192.168.26.200:80
vms153.liruilongs.github.io
┌──[root@vms152.liruilongs.github.io]-[~]
└─$ansible 192.168.26.153 -m shell -a "systemctl stop keepalived"
192.168.26.153 | CHANGED | rc=0 >>┌──[root@vms152.liruilongs.github.io]-[~]
└─$curl 192.168.26.200:80
vms154.liruilongs.github.io
┌──[root@vms152.liruilongs.github.io]-[~]
└─$
如果这个时候153机器恢复,那么我们可以重新拉起keepalived服务,vip回到153
┌──[root@vms152.liruilongs.github.io]-[~]
└─$ansible 192.168.26.153 -m shell -a "systemctl start keepalived"
192.168.26.153 | CHANGED | rc=0 >>┌──[root@vms152.liruilongs.github.io]-[~]
└─$curl 192.168.26.200:80
vms153.liruilongs.github.io
上面的操作,我们可以整合到一个剧本里
┌──[root@vms152.liruilongs.github.io]-[~]
└─$cat keepalived.yaml
---
- name:  keepalived inithosts: nodetasks:- name: installyum:name:- httpd- keepalivedstate: installed- name: httpd contentshell: "echo `hostname` > /var/www/html/index.html"- name: Restarted  httpdservice:name: httpdstate: restarted - name: firewall clonsshell: firewall-cmd --set-default-zone=trusted
# 主机配置
- name: vms153.liruilongs.github.io confighosts: 192.168.26.153tags:- mastervars:role: MASTERpriority: 100vip: 192.168.26.200interface: ens32tasks:- name: copy keeplived configtemplate:src: keepalived.conf.j2dest: /etc/keepalived/keepalived.conf- name: restart keepalivedservice: name: keepalived state: restarted
# 备机配置
- name: vms154.liruilongs.github.io confighosts: 192.168.26.154tags:- backupvars:role: BACKUPpriority: 90vip: 192.168.26.200interface: ens32tasks:- name: copy keepalived configtemplate:src: keepalived.conf.j2dest: /etc/keepalived/keepalived.conf- name: restart keepalivedservice: name: keepalived state: restarted
对于配置文件也可以更灵活一点
┌──[root@vms152.liruilongs.github.io]-[~]
└─$cat keepalived.conf.j2
! Configuration File for keepalivedglobal_defs {router_id LVS_DEVEL #设置路由ID,可以和主机名相同,也可以随便定义vrrp_iptables       #手动添加(禁止设置防火墙规则,keepalved每次启动都会自动添加防火墙拒绝所有的规则)
}vrrp_instance VI_1 {state {{ role }}interface {{ interface }} #定义网络接口,根据自己虚拟机上的网卡修改virtual_router_id 51  #主备服务器VRID号必须保持一致priority {{ priority }} #服务器优先级,优先级高则优先获得浮动IPadvert_int 1authentication {auth_type PASSauth_pass 1111}virtual_ipaddress {{{ vip }}}
}
有小伙伴会讲,这也太水了,每次故障都需要自己去进行主备切换,其实上面的配置为keepalived的最简单配置,没有使用keepalived 的检查配置,,告警等其他的功能。
如果是IPVS使用keepalived,可以对后端RealServer进行健康状况检查,支持网络层、传输层、应用层进行健康检查。
配置文件解析
熟悉下配置文件,keepalived的配置文件主要由3部分构造,ipvs配置,全局配置,VRRP配置。
# 全局配置(全局配置有Global definitions和Static routes/address,全局定义和静态路由)global_defs                {...}# 配置vrrp实例(VRRP实例和VRRP同步组)
# vrrp instance                  # 虚拟路由器,VRRP实例vrrp_instance  NAME {...}
# vrrp synchronization group     # VRRP同步组vrrp_sync_group  NAME  {...}
# ipvs的相关配置
# LVS CONFIGURATION:# 集群服务,服务内的RSVirtual server groups Virtual server               #ipvs集群的vs和rs
下面为具体的参数解释
┌──[root@vms152.liruilongs.github.io]-[~]
└─$cat /etc/keepalived/keepalived.conf
! Configuration File for keepalived
# 全局配置(全局配置有Global definitions和Static routes/address,全局定义和静态路由)
global_defs {# 全局部分定义邮件报警系统,定义邮件发送目标,收件人邮箱地址 notification_email {  acassen@firewall.locfailover@firewall.locsysadmin@firewall.loc}# 定义发件人邮箱地址notification_email_from Alexandre.Cassen@firewall.loc# 定义邮件发送服务器IP,本地发送写localhostsmtp_server 192.168.200.1# 定义邮件服务器建立连接的超时时长smtp_connect_timeout 30# 标识keepalived服务器的字符串,物理节点的标识符;router_id LVS_DEVEL # 如果通告与接收的上一个通告来自相同的master路由器,则不执行检查vrrp_skip_check_adv_addr# 严格遵守VRRP协议,这一项最好关闭(加感叹号),若不关闭,可用vip无法被ping通! vrrp_strict # 在一个接口发送的两个免费ARP之间的延迟,可以精确到毫秒级(默认是0)vrrp_garp_interval 0vrrp_gna_interval 0# IPV4多播地址,默认224.0.0.18vrrp_mcast_group4 225.0.0.18
}# 检查调用
vrrp_script  <SCRIPT_NAME>  {          # 脚本名,后面要基于脚本名来进行调用script  "/etc/keepalived/chk_script.sh"   # 执行的命令或脚本interval  INT          # 每隔多少时间,这个监控脚本要执行一次weight   -INT          # 失败了,当前节点的权重要减去多少,对于“weight”值的设置,有一个简单的标准,即“weight”值的绝对值要大于Master和Backup节点“priority”值之差
}# 虚拟路由器,VRRP实例
vrrp_instance VI_1 {# 定义实例的角色状态是master还是backup,在当前VRRP实例中此节点的初始状态state MASTER# 定义vrrp绑定的接口,即接收或发送心跳通告的接口,即HA监测接口interface eth0# 虚拟路由标识(VRID),同一实例该数值必须相同,即master和backup中该值要相同virtual_router_id 51# 该vrrp实例中本机的keepalived的优先级,优先级最高的为master(可用范围0-255)# 该选项的优先级高于state选项,# 即若state指定的是backup,但这里设置的值最高,则仍为masterpriority 100# 心跳信息发送和接收时间间隔,单位为秒advert_int 1# 认证方式,同一实例中这个配置必须完全一样才可通过认证,只建议使用PASS认证authentication {# 使用简单字符认证的方式auth_type PASS# 最多支持8字符,超过8字符将只取前8字符auth_pass 1111}# 设置的VIP,当master出现故障后,VIP会故障转移到backupvirtual_ipaddress {# 一般情况下我们只设置一个VIP地址,也可以设置多个# 这些vip默认配置在interface指定的接口别名上,可使用dev选项来指定网卡: 192.168.200.19/24 dev eth1# 使用ip add的方式添加,若要被ifconfig查看,在IP地址后加上label即可192.168.200.16192.168.200.17192.168.200.18}# 调用检查    track_script {chk_service}# 使用非抢占模式nopreempt   #非抢占式:如果backup路由器工作在此模式下,则若Master路由器没有出现故障,backup即使随后被配置了更高的优先级也不会成为Master     # 使用延迟抢占模式preempt_delay  TIME #抢占式:如果backup路由器工作在抢占方式下,当它收到VRRP报文后,会将主机的优先级与通告报文中的优先级进行比较,如果主机的优先级比当前的Master路由器的优先级高,就会主动抢占成为Master路由器,否则,将保持Backup状态notify_master  <STRING>|<QUOTED-STRING>  # 当切换到master模式时,执行此脚本notify_backup  <STRING>|<QUOTED-STRING>  # 当切换到backup模式时,执行此脚本notify_fault  <STRING>|<QUOTED-STRING>   # 当切换到fault模式时,执行此脚本notify  <STRING>|<QUOTED-STRING> }
服务检查
在上面的Demo的基础上,我们添加一个检查脚本,使用下面的检查策略。来检查httpd服务是否可用
┌──[root@vms153.liruilongs.github.io]-[/etc/keepalived]
└─$systemctl status httpd > /dev/null
┌──[root@vms153.liruilongs.github.io]-[/etc/keepalived]
└─$echo $?
0
┌──[root@vms153.liruilongs.github.io]-[/etc/keepalived]
└─$systemctl stop httpd.service
┌──[root@vms153.liruilongs.github.io]-[/etc/keepalived]
└─$systemctl status httpd > /dev/null
┌──[root@vms153.liruilongs.github.io]-[/etc/keepalived]
└─$echo $?
3
也可以這樣
┌──[root@vms153.liruilongs.github.io]-[/etc/keepalived]
└─$systemctl is-active  httpd  -q
┌──[root@vms153.liruilongs.github.io]-[/etc/keepalived]
└─$echo $?
3
┌──[root@vms153.liruilongs.github.io]-[/etc/keepalived]
└─$systemctl start  httpd
┌──[root@vms153.liruilongs.github.io]-[/etc/keepalived]
└─$systemctl is-active  httpd  -q
┌──[root@vms153.liruilongs.github.io]-[/etc/keepalived]
└─$echo $?
0
或者這樣
┌──[root@vms153.liruilongs.github.io]-[/etc/keepalived]
└─$systemctl show httpd -p ActiveState
ActiveState=active
┌──[root@vms153.liruilongs.github.io]-[/etc/keepalived]
└─$systemctl show httpd -p ActiveState | sed 's/ActiveState=//g'
active
是否运行和是否活跃是两个概念,对于某些一次性服务可以使用下面的方式验证
┌──[root@vms153.liruilongs.github.io]-[/etc/keepalived]
└─$systemctl show httpd -p ActiveState | cut -d'=' -f2
active
┌──[root@vms153.liruilongs.github.io]-[/etc/keepalived]
└─$systemctl show httpd -p SubState | cut -d'=' -f2
running
┌──[root@vms153.liruilongs.github.io]-[/etc/keepalived]
└─$
keepalived部署服务健康检查剧本
┌──[root@vms152.liruilongs.github.io]-[~]
└─$cat keepaliveds.yaml
---
- name:  keepalived inithosts: nodetasks:- name: installyum:name:- httpd- keepalivedstate: installed- name: httpd contentshell: "echo `hostname` > /var/www/html/index.html"- name: Restarted  httpdservice:name: httpdstate: restarted- name: firewall clonsshell: firewall-cmd --set-default-zone=trusted
# 主机配置
- name: vms153.liruilongs.github.io confighosts: 192.168.26.153tags:- mastervars:role: MASTERpriority: 100tasks:- name: copy keeplived configtemplate:src: keepalived.conf.j2dest: /etc/keepalived/keepalived.conf- name: copy che_servicecopy:content: "#!/bin/sh\nsystemctl is-active  httpd  -q"dest: /etc/keepalived/che_service.shbackup: yesmode: '0755'- name: restart keepalivedservice:name: keepalivedstate: restarted# 备机配置
- name: vms154.liruilongs.github.io confighosts: 192.168.26.154tags:- backupvars:role: BACKUPpriority: 90tasks:- name: copy keepalived configtemplate:src: keepalived.conf.j2dest: /etc/keepalived/keepalived.conf- name: copy che_servicecopy:content: "#!/bin/sh\nsystemctl is-active  httpd  -q"dest: /etc/keepalived/che_service.shmode: '0755'backup: yes- name: restart keepalivedservice:name: keepalivedstate: restarted
运行测试
┌──[root@vms152.liruilongs.github.io]-[~]
└─$curl 192.168.26.200
vms153.liruilongs.github.io
┌──[root@vms152.liruilongs.github.io]-[~]
└─$ansible 192.168.26.153 -m service -a 'name=httpd state=stopped'
192.168.26.153 | CHANGED => {"ansible_facts": {"discovered_interpreter_python": "/usr/bin/python"},"changed": true,"name": "httpd","state": "stopped",.............
┌──[root@vms152.liruilongs.github.io]-[~]
└─$curl 192.168.26.200
vms154.liruilongs.github.io
┌──[root@vms152.liruilongs.github.io]-[~]
└─$
配置文件模板
┌──[root@vms152.liruilongs.github.io]-[~]
└─$cat keepalived.conf.j2
! Configuration File for keepalivedglobal_defs {router_id LVS_DEVEL #设置路由ID,可以和主机名相同,也可以随便定义vrrp_iptables       #手动添加(禁止设置防火墙规则,keepalved每次启动都会自动添加防火墙拒绝所有的规则)
}vrrp_script chk_service {script /etc/keepalived/che_service.shinterval 2
}vrrp_instance VI_1 {state {{ role }}interface ens32 #定义网络接口,根据自己虚拟机上的网卡修改virtual_router_id 51  #主备服务器VRID号必须保持一致priority {{ priority }} #服务器优先级,优先级高则优先获得浮动IPadvert_int 1authentication {auth_type PASSauth_pass 1111}virtual_ipaddress {192.168.26.200}track_script {chk_service}
}
这个剧本调了好些时间,需要注意的是,配置文件不能有其他的非空格的字符,检查脚本要记得授权,如果没有执行检查脚本,可以看下 /var/log/messages 日志文件
┌──[root@vms153.liruilongs.github.io]-[/etc/keepalived]
└─$cat /var/log/messages | grep -C 10 track
keepalived 角色编写
我们也可以把上面的剧本编写为角色,需要把handlers和和其他的东西抽出来
┌──[root@vms152.liruilongs.github.io]-[~]
└─$ansible-galaxy init keepalived --init-path=./roles
- Role keepalived was created successfully
┌──[root@vms152.liruilongs.github.io]-[~]
└─$ansible-galaxy list
# /root/roles
- keepalived, (unknown version)
┌──[root@vms152.liruilongs.github.io]-[~]
└─$
编写task
┌──[root@vms152.liruilongs.github.io]-[~/roles/keepalived]
└─$cat tasks/main.yml
---
# tasks file for keepalived# 安装 keepalived
- name: Install keepalivedyum:name: keepalivedstate: latesttags: keepalivednotify: restart keepalived# copy 配置文件
- name: Keepalived configurationtemplate:src: keepalived.conf.j2dest: /etc/keepalived/keepalived.confnotify: restart keepalived
# copy 检查脚本
- when:  check_service_name | default(False)name: Install check scriptcopy:content: "#!/bin/sh\nsystemctl is-active  {{ check_service_name }}  -q"dest: /etc/keepalived/che_service.shbackup: yesmode: 0755owner: rootgroup: rootnotify: restart keepalived# 启动 服务
- name: Start keepalivedservice:name: keepalivedstate: startedenabled: yes
编写handlers
┌──[root@vms152.liruilongs.github.io]-[~/roles/keepalived]
└─$cat handlers/main.yml
---
# handlers file for keepalived- name: restart keepalivedservice:name: keepalivedstate: restarted
┌──[root@vms152.liruilongs.github.io]-[~/roles/keepalived]
└─$
编写template
┌──[root@vms152.liruilongs.github.io]-[~/roles/keepalived]
└─$cat templates/keepalived.conf.j2
! Configuration File for keepalivedglobal_defs {router_id LVS_DEVEL #设置路由ID,可以和主机名相同,也可以随便定义vrrp_iptables       #手动添加(禁止设置防火墙规则,keepalved每次启动都会自动添加防火墙拒绝所有的规则)
}vrrp_script chk_service {script /etc/keepalived/che_service.shinterval 2
}vrrp_instance VI_1 {state {{ keep_role }}interface {{ keep_interface }} #定义网络接口,根据自己虚拟机上的网卡修改virtual_router_id 51  #主备服务器VRID号必须保持一致{% if keep_role.lower() == 'master' %}priority {{ keep_priority }}{% else %}priority {{ keep_backup_priority }}{% endif %}advert_int 1authentication {auth_type PASSauth_pass 1111}virtual_ipaddress {{{ virtual_ipaddress }} dev {{ keep_interface }}}track_script {chk_service}
}
┌──[root@vms152.liruilongs.github.io]-[~/roles/keepalived]
└─$
编写defaults变量
┌──[root@vms152.liruilongs.github.io]-[~/roles/keepalived]
└─$cat defaults/main.yaml
---keep_role: "master"
keep_priority: 100
keep_backup_priority: 50
keep_interface: "ens32"
virtual_ipaddress: "192.168.26.200"
check_service_name: httpd
编写调用剧本
┌──[root@vms152.liruilongs.github.io]-[~/roles/keepalived]
└─$cat tests/test.yml
---
- hosts: 192.168.26.153vars:keep_role: MASTERroles:- keepalived- hosts: 192.168.26.154vars:keep_role: BACKUProles:- keepalived
┌──[root@vms152.liruilongs.github.io]-[~/roles/keepalived]
└─$
博文参考
https://www.keepalived.org/manpage.html
https://www.cnblogs.com/hgzero/p/13718516.html
https://unix.stackexchange.com/questions/396630/the-proper-way-to-test-if-a-service-is-running-in-a-script
https://github.com/tcomerma/ansible-keepalived/
https://github.com/demis-svenska/aws-echis/tree/master/src/commcare_cloud/ansible/roles/keepalived
本文来自互联网用户投稿,文章观点仅代表作者本人,不代表本站立场,不承担相关法律责任。如若转载,请注明出处。 如若内容造成侵权/违法违规/事实不符,请点击【内容举报】进行投诉反馈!