SVN服务器安装与本地连接
服务器系统环境 Centos7 查看是否安装了低版本SVN [root@svn-server ~]# rpm -qa subversion 卸载旧版本SVN [root@svn-server ~]# yum remove subversion 安装 [root@svn-server ~]# yum install httpd httpd-devel subversion mod_dav_svn mod_auth_mysql 确认是否安装SVN模块 [root@svn-server ~]# ls /etc/httpd/modules/ |grep svn mod_authz_svn.so mod_dav_svn.so 查看版本 [root@svn-server ~]# svnserve --version svnserve, version 1.7.14 (r1542130) 建立SVN目录 [root@svn-server ~]# mkdir -p /opt/svn/bgmrepo 建立版本库 [root@svn-server ~]# svnadmin create /opt/svn/bgmrepo/ 配置SVN文件 [root@svn-server ~]# vim /opt/svn/bgmrepo/conf/svnserve.conf 19 anon-access = none 20 auth-access = write 27 password-db = passwd 34 authz-db = authz 39 realm = /opt/svn/bgmrepo 编辑用户配置文件 [root@svn-server ~]# vim /opt/svn/bgmrepo/conf/passwd [users] admin = admin 编辑权限控制配置文件 [root@svn-server ~]# vim /opt/svn/bgmrepo/conf/authz [/] 表示版本仓库的根路径 admin = rw 查看端口是否开启 [root@svn-server ~]# firewall-cmd --query-port=3690/tcp --permanent no 开启端口 [root@svn-server ~]# firewall-cmd --add-port=3690/tcp --permanent success [root@svn-server ~]# firewall-cmd --reload success 启动SVN服务 [root@svn-server ~]# svnserve -dr /opt/svn/bgmrepo 查看进程 [root@svn-server ~]# ps aux|grep svn root 1417 0.0 0.0 162188 912 ? Ss 11:36 0:00 svnserve -dr /opt/svn/bgmrepo 停止SVN服务 [root@svn-server ~]# kill -s 9 1417
开始远程连接 windows 环境: 1、安装svn客户端: 如果需要中文的。也可以再安装:


点击此菜单,会弹出svn检出对话框
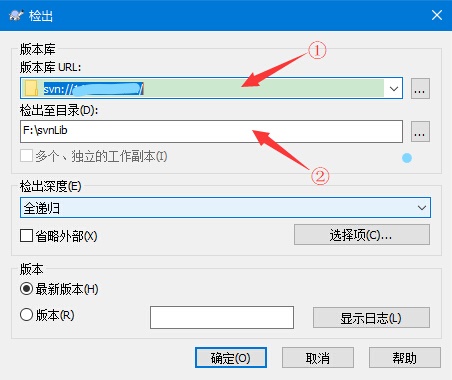
①位置为 svn服务器地址:svn://127.0.0.1/ IP地址可以自行更换 ②位置是刚才新建的文件夹目录
4、单击确定按钮,弹出如下对话框:
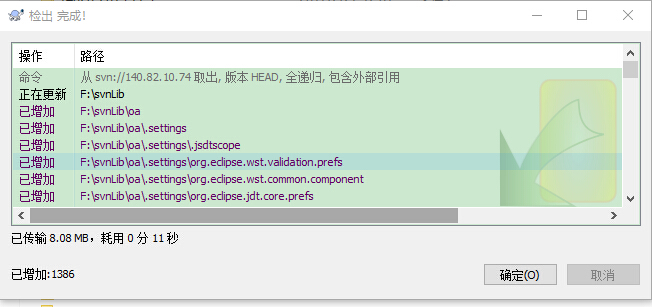
此时,如果svn有文件有文件就会更新到该目录下,点击确定结束。
eclipse 连接:
1、打开,在Eclipse里打开SVN资源库窗口:点击菜单window-->show view-->other;然后再弹出窗口展开SVN节点,选择SVN资源库
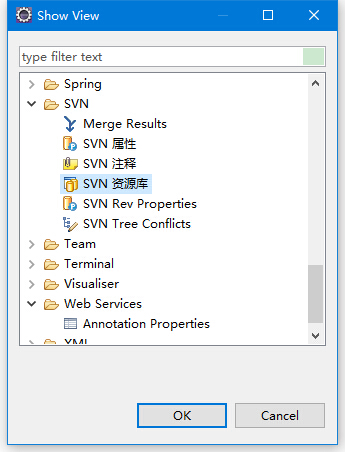
2、 点击ok,出现在SVN资源库窗口
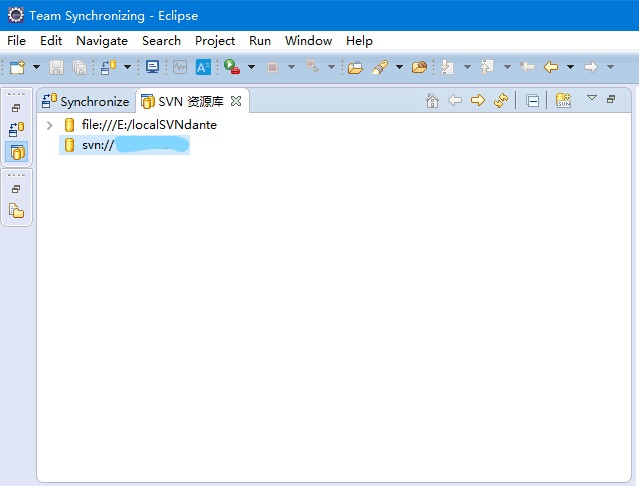
3、在SVN资源库窗口下使用右键菜单新建资源库位置,出现添加SVN资源库窗口

在Url位置填入svn服务器地址:svn://127.0.0.1/ IP地址可以自行更换 完成后点击Finish 4、在弹出对话框输入用户名,密码,即可成功连接。 5、右键svn资源库,单击检出为菜单,即可将svn服务器的内容检测到本地。
本文来自互联网用户投稿,文章观点仅代表作者本人,不代表本站立场,不承担相关法律责任。如若转载,请注明出处。 如若内容造成侵权/违法违规/事实不符,请点击【内容举报】进行投诉反馈!