UWP 证书
一、简单制造一年test证书
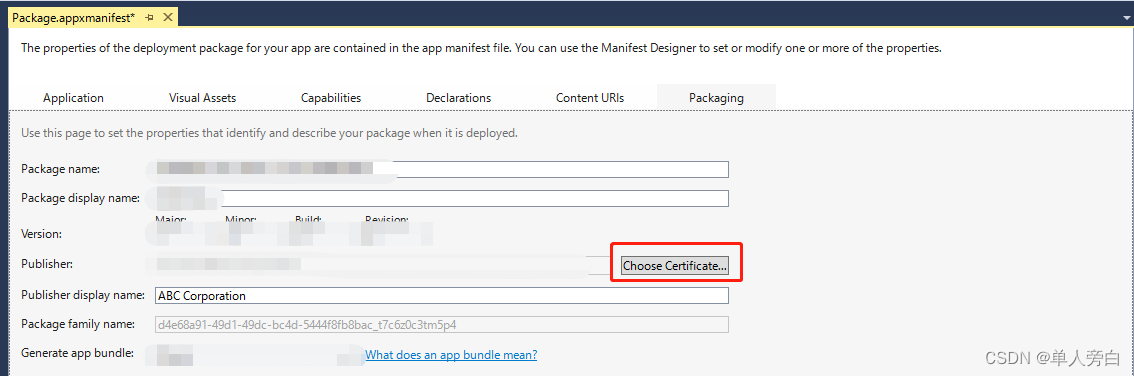
(1)打开uwp工程 选择 Package.appxmanifest
(2)点击 Choose Certificate
(3)点击Create test certificate

(4)输入发布者名以及密码都是自定义的
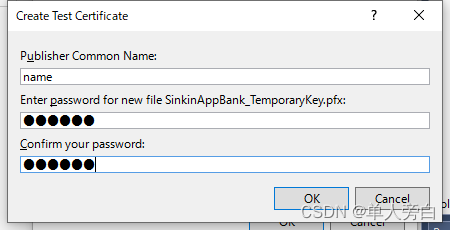
点击ok即可完成
---------------------------------------------------------------------------------------------------------------------------------
二、制造uwp十年证书
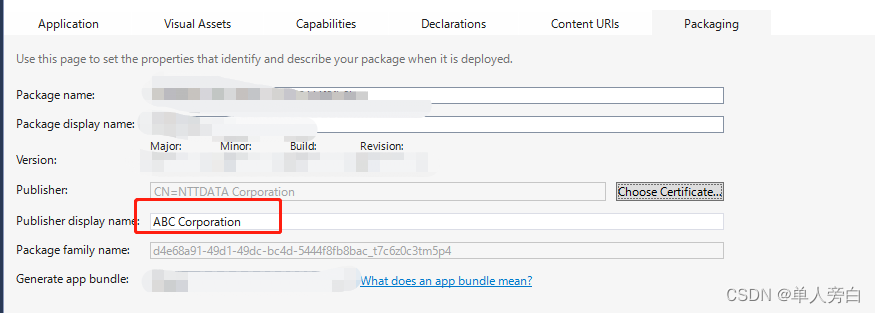
(1)打开uwp工程 选择 Package.appxmanifest
(2)复制publisher display name
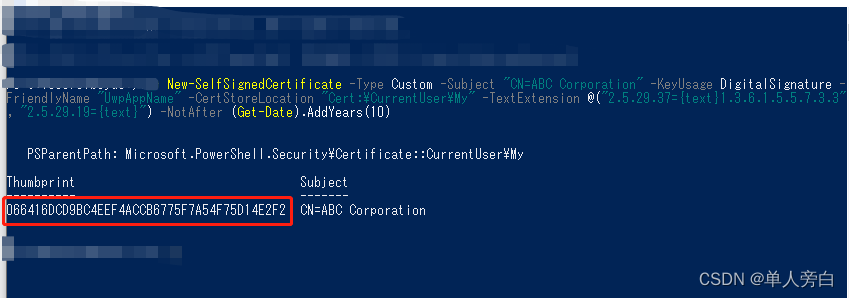
(3) 打开powershell
// 具体参数参考新自签名证书 (pki) |微软文档 (microsoft.com)
ABC Corporation: 使用(2)publisher display name
UwpAppName: 自定义name
10:有效时间10年
New-SelfSignedCertificate -Type Custom -Subject "CN=ABC Corporation" -KeyUsage DigitalSignature -FriendlyName "UwpAppName" -CertStoreLocation "Cert:\CurrentUser\My" -TextExtension @("2.5.29.37={text}1.3.6.1.5.5.7.3.3", "2.5.29.19={text}") -NotAfter (Get-Date).AddYears(10)
New-SelfSignedCertificate -Type Custom -Subject "CN=ABC Corporation" -KeyUsage DigitalSignature -FriendlyName "UwpAppName" -CertStoreLocation "Cert:\CurrentUser\My" -TextExtension @("2.5.29.37={text}1.3.6.1.5.5.7.3.3", "2.5.29.19={text}") -NotAfter (Get-Date).AddYears(10)(4)复制运行后的Thumbprint
(5)导出
setpwd :自定义密码
066416DCD9BC4EEF4ACCB6775F7A54F75D14E2F2:(4)复制运行后的Thumbprint
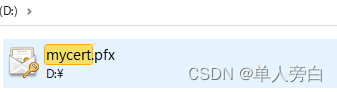
D:mycert.pfx :输出地址以及文件
1)$pwd = ConvertTo-SecureString -String setpwd -Force -AsPlainText
2) Export-PfxCertificate -cert "Cert:\CurrentUser\My\066416DCD9BC4EEF4ACCB6775F7A54F75D14E2F2" -FilePath D:mycert.pfx -Password $pwd
$pwd = ConvertTo-SecureString -String setpwd -Force -AsPlainTextExport-PfxCertificate -cert "Cert:\CurrentUser\My\066416DCD9BC4EEF4ACCB6775F7A54F75D14E2F2" -FilePath D:mycert.pfx -Password $pwd

(5)找到相应文件夹 D:mycert.pfx
(6)
点击select fromfile。。。 这个按钮找不到去吧把【一、简单制造一年test证书】看一下
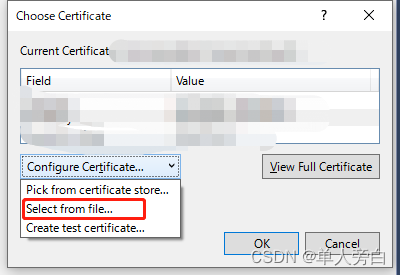
(7)选择刚刚生成的
mycert.pfx
(8)点击后输入密码即可

本文来自互联网用户投稿,文章观点仅代表作者本人,不代表本站立场,不承担相关法律责任。如若转载,请注明出处。 如若内容造成侵权/违法违规/事实不符,请点击【内容举报】进行投诉反馈!