VSCode在windows下使用MinGW-w64的gcc/g++编写调试程序
VSCode在windows下使用MinGW-w64的gcc/g++编写调试程序
如需转载请标明出处:http://blog.csdn.net/itas109
QQ技术交流群:129518033
文章目录
- VSCode在windows下使用MinGW-w64的gcc/g++编写调试程序
- @[toc]
- 前言
- 1.安装vs code
- 2.安装c++插件
- 3.编写测试代码
- 4.配置相关参数
- 4.1 C/C++编辑配置
- 4.2 tasks.json运行前任务配置
- 4.3 lauch.json启动配置
- 4.单步调试
- 5.结果
- @[toc]
- 前言
- 1.安装vs code
- 2.安装c++插件
- 3.编写测试代码
- 4.配置相关参数
- 4.1 C/C++编辑配置
- 4.2 tasks.json运行前任务配置
- 4.3 lauch.json启动配置
- 4.单步调试
- 5.结果
环境:
OS : winows 7 64bit
MinGW-w64 Version : x86_64-8.1.0-release-win32-seh-rt_v6-rev0
VSCode : 1.37( Electron: 4.2.7 Chrome: 69.0.3497.128 Node.js: 10.11.0 V8: 6.9.427.31-electron.0)
VSCode C++插件:C/C++ for Visual Studio Code 0.25.0-insiders: August 8, 2019
相关文章:
MinGW-w64简介
MinGW-w64在windows下的离线安装
前言
为什么会使用VSCode在windows下调试C++程序呢?windows下不是有Visual Studio吗?
主要因为Visual Studio太重量级了,而且跨平台支持不够完善,因此才有了本文
1.安装vs code
略过
2.安装c++插件
vs code应用商店所有C/C++,其中Microsoft发布的就是,全名C/C++ for Visual Studio Code
源码:
https://github.com/microsoft/vscode-cpptools
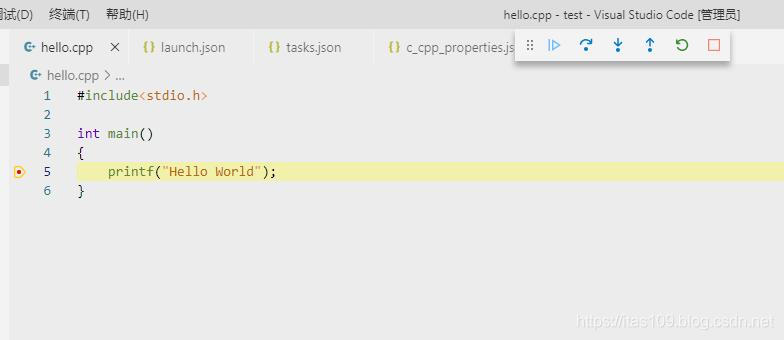
3.编写测试代码
文件命名为hello.cpp
#includeint main()
{printf("Hello World");
}
4.配置相关参数
4.1 C/C++编辑配置
c_cpp_properties.json可以配置头文件、编译器、标准等
//c_cpp_properties.json
{"configurations": [{"name": "Win32","includePath": ["${workspaceFolder}/**"],"defines": ["_DEBUG","UNICODE","_UNICODE"],"compilerPath": "D:/mingw64/bin/g++.exe","cStandard": "c11","cppStandard": "c++17","intelliSenseMode": "clang-x64"}],"version": 4
}
4.2 tasks.json运行前任务配置
配置任务可以自动编译生成.exe
//tasks.json
{// See https://go.microsoft.com/fwlink/?LinkId=733558 // for the documentation about the tasks.json format"version": "2.0.0","tasks": [{"type": "shell","label": "g++", //与launch.json的preLaunchTask选项一致"command": "D:/mingw64/bin/g++.exe",//指定g++"args": [//设置编译参数"-g","${workspaceFolder}/hello.cpp","-o","hello.exe"],"options": {"cwd": "D:/mingw64/bin"//指定编译环境位置},"problemMatcher": ["$gcc"]}]
}
4.3 lauch.json启动配置
通过lauch.json(调试 - 打开配置)来配置启动参数
//lauch.json
{// 使用 IntelliSense 了解相关属性。 // 悬停以查看现有属性的描述。// 欲了解更多信息,请访问: https://go.microsoft.com/fwlink/?linkid=830387"version": "0.2.0","configurations": [{"name": "(gdb) Launch","type": "cppdbg","request": "launch","program": "${workspaceFolder}/hello.exe",//修改运行的exe名称"args": [],"stopAtEntry": false,"cwd": "${workspaceFolder}","environment": [],"externalConsole": false,"MIMode": "gdb","miDebuggerPath": "D:/mingw64/bin/gdb.exe",//修改gdb路径"preLaunchTask": "g++", // 调试会话开始前执行的任务,一般为编译程序,c++为g++, c为gcc"setupCommands": [{"description": "Enable pretty-printing for gdb","text": "-enable-pretty-printing","ignoreFailures": true}]}]
}
4.单步调试
打断点,F5开始调试即可
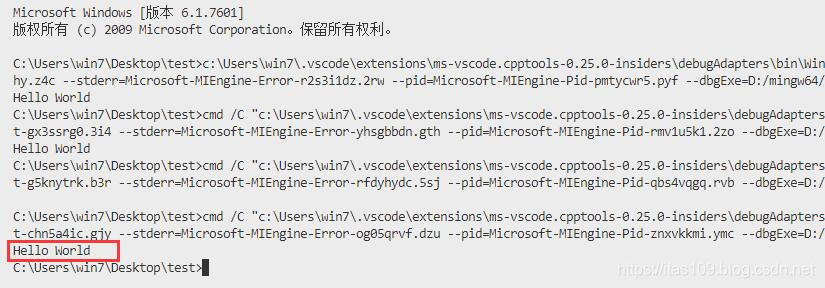
5.结果
觉得文章对你有帮助,可以扫描二维码捐赠给博主,谢谢!

如需转载请标明出处:http://blog.csdn.net/itas109
QQ技术交流群:129518033
License
License under CC BY-NC-ND 4.0: 署名-非商业使用-禁止演绎
Reference:
1.http://www.mingw-w64.org
2.MinGW-w64简介
3.MinGW-w64在windows下的离线安装
本文来自互联网用户投稿,文章观点仅代表作者本人,不代表本站立场,不承担相关法律责任。如若转载,请注明出处。 如若内容造成侵权/违法违规/事实不符,请点击【内容举报】进行投诉反馈!