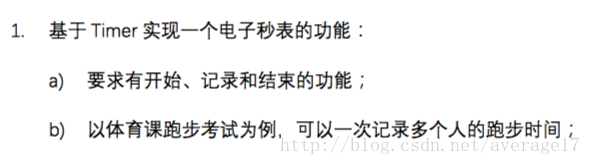
(作业)基于Timer实现电子秒表
哎呀,最近考试太多iOS、Java Web还有软件需求都在进行阶段考试了,所以就没那么多时间写博客啦(哈哈哈,这么牵强的理由就只有我信吧)
管它了!还是老规矩,直接上要求
好吧,这次的第一个作业实在是,不难!对,只要会用Timer,再结合前面学的一些知识,就能很快速地解决了。
这次博主换一个套路了,我们先看看最终的运行效果吧。
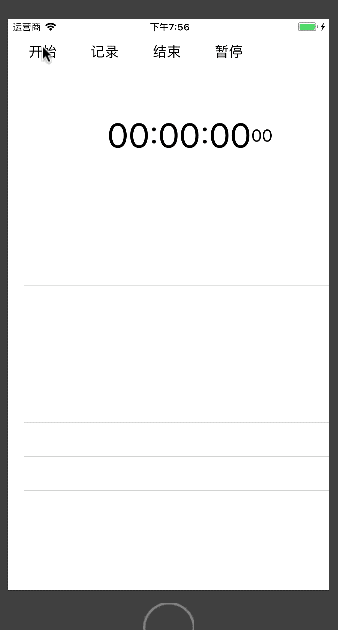
可以从动图里面看出,博主用了UITableView,所以这里需要先准备一些东西,我们在控制器中声明或初始化几个属性
var hour = 0
var minute = 0
var second = 0
var millsecond = 0
var timer: Timer?
var label: UILabel!
var millLabel: UILabel!
var table: UITableView! //用于展示多条用户记录的时间
var array = [String]() //用于记录每次点击"记录"按钮后时的时间
var isEnd = false //用于记录是否点击过"结束"按钮
其中最开始的4个变量分别用于保存当前的小时、分钟、秒和毫秒,然后timer是计时器(本次作业考核的核心),和两个展示当前时间的UILabel。
然后我们需要在界面上添加UIButton、UIButton和UITableView
//设置视图背景颜色self.view.backgroundColor = UIColor.white//"开始"按钮let startBtn = UIButton(frame: CGRect(x: 10, y: 20, width: 70, height: 44))startBtn.setTitle("开始", for: .normal)startBtn.setTitleColor(UIColor.black, for: .normal)startBtn.setTitleColor(UIColor.brown, for: .highlighted)startBtn.addTarget(self, action: #selector(start), for: .touchUpInside)self.view.addSubview(startBtn)//"记录"按钮let recordBtn = UIButton(frame: CGRect(x: 90, y: 20, width: 70, height: 44))recordBtn.setTitle("记录", for: .normal)recordBtn.setTitleColor(UIColor.black, for: .normal)recordBtn.setTitleColor(UIColor.brown, for: .highlighted)recordBtn.addTarget(self, action: #selector(record), for: .touchUpInside)self.view.addSubview(recordBtn)//"结束"按钮let endBtn = UIButton(frame: CGRect(x: 170, y: 20, width: 70, height: 44))endBtn.setTitle("结束", for: .normal)endBtn.setTitleColor(UIColor.black, for: .normal)endBtn.setTitleColor(UIColor.brown, for: .highlighted)endBtn.addTarget(self, action: #selector(end), for: .touchUpInside)self.view.addSubview(endBtn)//"暂停"按钮let pauseBtn = UIButton(frame: CGRect(x: 250, y: 20, width: 70, height: 44))pauseBtn.setTitle("暂停", for: .normal)pauseBtn.setTitleColor(UIColor.black, for: .normal)pauseBtn.setTitleColor(UIColor.brown, for: .highlighted)pauseBtn.addTarget(self, action: #selector(pause), for: .touchUpInside)self.view.addSubview(pauseBtn)//展示时、分、秒的UILabellet width = self.view.frame.widthlabel = UILabel(frame: CGRect(x: 0, y: 100, width: width - 100, height: 100))label.font = UIFont.systemFont(ofSize: 44)label.textColor = UIColor.blacklabel.textAlignment = .rightlabel.text = "00:00:00"self.view.addSubview(label)//展示毫秒的UILabelmillLabel = UILabel(frame: CGRect(x: width - 100, y: 100, width: 100, height: 100))millLabel.font = UIFont.systemFont(ofSize: 22)millLabel.textColor = UIColor.blackmillLabel.textAlignment = .leftmillLabel.text = "00"self.view.addSubview(millLabel)//展示记录的数据table = UITableView(frame: CGRect(x: 0, y: 300, width: width, height: self.view.frame.height - 300))table.delegate = selftable.dataSource = selfself.view.addSubview(table)做完这些,我们不要忘记让控制器遵循UITableViewDelegate协议和UITableViewDataSource协议,这时我们就需要实现UITableViewDataSource中两个要求实现的方法了,这次数据比较简单,所以不需要做太多UITableView的设置
func tableView(_ tableView: UITableView, numberOfRowsInSection section: Int) -> Int {return array.count
}func tableView(_ tableView: UITableView, cellForRowAt indexPath: IndexPath) -> UITableViewCell {var cell = table.dequeueReusableCell(withIdentifier: "Cell")if cell == nil {cell = UITableViewCell(style: .default, reuseIdentifier: "Cell")}cell?.textLabel?.text = String(indexPath.row+1) + ": " + array[indexPath.row]return cell!
}
最后就是我们的4个按钮了,我们先来实现”开始”按钮的功能吧,需求就是点击”开始”按钮之后,两个UILabel中的数字就会开始跑动起来。
@objc func start() {if timer == nil || !(timer?.isValid)! {//timer的时间间隙为0.01毫秒也就是10毫秒,并且一直重复timer = Timer.scheduledTimer(withTimeInterval: 0.01, repeats: true, block: { (t) inself.millsecond += 1//满1000毫秒时秒数加1if self.millsecond >= 100 {self.second += 1self.millsecond = 0}//满60秒时分数加1if self.second >= 60 {self.minute += 1self.second = 0}//满60分时时数加1if self.minute >= 60 {self.hour += 1self.minute = 0}//满24时时将时重置为0if self.hour >= 24 {self.hour = 0}let h = self.hour >= 10 ? String(self.hour) : "0"+String(self.hour)let m = self.minute >= 10 ? String(self.minute) : "0"+String(self.minute)let s = self.second >= 10 ? String(self.second) : "0"+String(self.second)self.label.text = h + ":" + m + ":" + sself.millLabel.text = self.millsecond >= 10 ? String(self.millsecond) : "0"+String(self.millsecond)})}if isEnd {array = [String]()table.reloadData()isEnd = false}
}
可以看到,我在最开始对timer做了一个判断,判断它是否为空或者是否有效,如果其不为空并且无效时,才在Timer中使用其单例创建一个timer来让数字跑动起来。如果我们不进行判断,那么系统就会创建很多个Timer的单例,这时会让数字记录的速度加快,这就不是我们需要的了。
在创建Timer单例的闭包中我们根据秒表的进制对数字进行了处理,这里就不用博主过多赘述了,各位读者也可以用更加简便的方法处理数据,博主懒,用了比较直观的处理方式。
最后我们要判断是否是在点击过”结束”按钮后再点击的”开始”按钮,因为一旦结束之后再开始,我们就需要清空UITableView中的数据。
到这里”开始”按钮的功能也就完成了,我们这次考试的核心大半都结束了。然后我们实现”记录”按钮的功能。
@objc func record() {array.append(self.label.text! + " " + self.millLabel.text!)table.reloadData()
}
“记录”按钮并不涉及对timer的操作,它只需要从两个UILabel中取出展示的数据,并放到数组当中去即可。
接下来我们实现”结束”按钮。
@objc func end() {timer?.invalidate()hour = 0minute = 0second = 0millsecond = 0isEnd = true
}
在该方法中,我们先让计时器失效,然后将所有需要的数据清0,最后将记录是否点击过”结束”按钮的变量置为真即可。
最后我们实现”暂停”按钮的功能,”暂停”按钮与”结束”按钮的功能类似,只需要删减部分代码即可。
@objc func pause() {timer?.invalidate()isEnd = false
}
到这里,上面的功能就实现了,各位读者可以在电脑上运行一下,是不是非常神奇呀!(咳咳,正经点)
接下来贴一下所有的代码吧。
import UIKitclass ViewController: UIViewController, UITableViewDelegate, UITableViewDataSource {var hour = 0var minute = 0var second = 0var millsecond = 0var timer: Timer?var label: UILabel!var millLabel: UILabel!var table: UITableView! //用于展示多条用户记录的时间var array = [String]() //用于记录每次点击"记录"按钮后时的时间var isEnd = false //用于记录是否点击过"结束"按钮override func viewDidLoad() {super.viewDidLoad()// Do any additional setup after loading the view, typically from a nib.//设置视图背景颜色self.view.backgroundColor = UIColor.white//"开始"按钮let startBtn = UIButton(frame: CGRect(x: 10, y: 20, width: 70, height: 44))startBtn.setTitle("开始", for: .normal)startBtn.setTitleColor(UIColor.black, for: .normal)startBtn.setTitleColor(UIColor.brown, for: .highlighted)startBtn.addTarget(self, action: #selector(start), for: .touchUpInside)self.view.addSubview(startBtn)//"记录"按钮let recordBtn = UIButton(frame: CGRect(x: 90, y: 20, width: 70, height: 44))recordBtn.setTitle("记录", for: .normal)recordBtn.setTitleColor(UIColor.black, for: .normal)recordBtn.setTitleColor(UIColor.brown, for: .highlighted)recordBtn.addTarget(self, action: #selector(record), for: .touchUpInside)self.view.addSubview(recordBtn)//"结束"按钮let endBtn = UIButton(frame: CGRect(x: 170, y: 20, width: 70, height: 44))endBtn.setTitle("结束", for: .normal)endBtn.setTitleColor(UIColor.black, for: .normal)endBtn.setTitleColor(UIColor.brown, for: .highlighted)endBtn.addTarget(self, action: #selector(end), for: .touchUpInside)self.view.addSubview(endBtn)//"暂停"按钮let pauseBtn = UIButton(frame: CGRect(x: 250, y: 20, width: 70, height: 44))pauseBtn.setTitle("暂停", for: .normal)pauseBtn.setTitleColor(UIColor.black, for: .normal)pauseBtn.setTitleColor(UIColor.brown, for: .highlighted)pauseBtn.addTarget(self, action: #selector(pause), for: .touchUpInside)self.view.addSubview(pauseBtn)//展示时、分、秒的UILabellet width = self.view.frame.widthlabel = UILabel(frame: CGRect(x: 0, y: 100, width: width - 100, height: 100))label.font = UIFont.systemFont(ofSize: 44)label.textColor = UIColor.blacklabel.textAlignment = .rightlabel.text = "00:00:00"self.view.addSubview(label)//展示毫秒的UILabelmillLabel = UILabel(frame: CGRect(x: width - 100, y: 100, width: 100, height: 100))millLabel.font = UIFont.systemFont(ofSize: 22)millLabel.textColor = UIColor.blackmillLabel.textAlignment = .leftmillLabel.text = "00"self.view.addSubview(millLabel)//展示记录的数据table = UITableView(frame: CGRect(x: 0, y: 300, width: width, height: self.view.frame.height - 300))table.delegate = selftable.dataSource = selfself.view.addSubview(table)}@objc func pause() {timer?.invalidate()isEnd = false}@objc func end() {timer?.invalidate()hour = 0minute = 0second = 0millsecond = 0isEnd = true}@objc func record() {array.append(self.label.text! + " " + self.millLabel.text!)table.reloadData()}@objc func start() {if timer == nil || !(timer?.isValid)! {timer = Timer.scheduledTimer(withTimeInterval: 0.01, repeats: true, block: { (t) inself.millsecond += 1if self.millsecond >= 100 {self.second += 1self.millsecond = 0}if self.second >= 60 {self.minute += 1self.second = 0}if self.minute >= 60 {self.hour += 1self.minute = 0}if self.hour >= 24 {self.hour = 0}let h = self.hour >= 10 ? String(self.hour) : "0"+String(self.hour)let m = self.minute >= 10 ? String(self.minute) : "0"+String(self.minute)let s = self.second >= 10 ? String(self.second) : "0"+String(self.second)self.label.text = h + ":" + m + ":" + sself.millLabel.text = self.millsecond >= 10 ? String(self.millsecond) : "0"+String(self.millsecond)})}if isEnd {array = [String]()table.reloadData()isEnd = false}}func tableView(_ tableView: UITableView, numberOfRowsInSection section: Int) -> Int {return array.count}func tableView(_ tableView: UITableView, cellForRowAt indexPath: IndexPath) -> UITableViewCell {var cell = table.dequeueReusableCell(withIdentifier: "Cell")if cell == nil {cell = UITableViewCell(style: .default, reuseIdentifier: "Cell")}cell?.textLabel?.text = String(indexPath.row+1) + ": " + array[indexPath.row]return cell!}override func didReceiveMemoryWarning() {super.didReceiveMemoryWarning()// Dispose of any resources that can be recreated.}
}
本文来自互联网用户投稿,文章观点仅代表作者本人,不代表本站立场,不承担相关法律责任。如若转载,请注明出处。 如若内容造成侵权/违法违规/事实不符,请点击【内容举报】进行投诉反馈!