贝赛尔曲线初步(二) - 高仿QQ未读消息气泡拖拽黏连效果
欢迎star~
@Override
protected void onSizeChanged(int w, int h, int oldw, int oldh) {super.onSizeChanged(w, h, oldw, oldh);mBubbleCenterX = w / 2;mBubbleCenterY = h / 2;mCircleCenterX = mBubbleCenterX;mCircleCenterY = mBubbleCenterY;
}- 1
- 2
- 3
- 4
- 5
- 6
- 7
- 8
- 1
- 2
- 3
- 4
- 5
- 6
- 7
- 8
/* 气泡的状态 */
private int mState;
/* 默认,无法拖拽 */
private static final int STATE_DEFAULT = 0x00;
/* 拖拽 */
private static final int STATE_DRAG = 0x01;
/* 移动 */
private static final int STATE_MOVE = 0x02;
/* 消失 */
private static final int STATE_DISMISS = 0x03;- 1
- 2
- 3
- 4
- 5
- 6
- 7
- 8
- 9
- 10
- 1
- 2
- 3
- 4
- 5
- 6
- 7
- 8
- 9
- 10
@Override
public boolean onTouchEvent(MotionEvent event) {switch (event.getAction()) {case MotionEvent.ACTION_DOWN:if (mState != STATE_DISMISS) {d = (float) Math.hypot(event.getX() - mBubbleCenterX, event.getY() - mBubbleCenterY);if (d < mBubbleRadius + maxD / 4) {//当指尖坐标在圆内的时候,才认为是可拖拽的//一般气泡比较小,增加(maxD/4)像素是为了更轻松的拖拽mState = STATE_DRAG;} else {mState = STATE_DEFAULT;}}break;case MotionEvent.ACTION_MOVE:if (mState != STATE_DEFAULT) {mBubbleCenterX = event.getX();mBubbleCenterY = event.getY();//计算气泡圆心与黏连小球圆心的间距d = (float) Math.hypot(mBubbleCenterX - mCircleCenterX, mBubbleCenterY - mCircleCenterY);//float d = (float) Math.sqrt(Math.pow(mBubbleCenterX - mCircleCenterX, 2) //+ Math.pow(mBubbleCenterY - mCircleCenterY, 2));if (mState == STATE_DRAG) {//如果可拖拽//间距小于可黏连的最大距离if (d < maxD - maxD / 4) {//减去(maxD/4)的像素大小,是为了让黏连小球半径到一个较小值快消失时直接消失mCircleRadius = mBubbleRadius - d / 8;//使黏连小球半径渐渐变小if (mOnBubbleStateListener != null) {mOnBubbleStateListener.onDrag();}} else {//间距大于于可黏连的最大距离mState = STATE_MOVE;//改为移动状态if (mOnBubbleStateListener != null) {mOnBubbleStateListener.onMove();}}}invalidate();}break;case MotionEvent.ACTION_UP:if (mState == STATE_DRAG) {//正在拖拽时松开手指,气泡恢复原来位置并颤动一下setBubbleRestoreAnim();} else if (mState == STATE_MOVE) {//正在移动时松开手指//如果在移动状态下间距回到两倍半径之内,我们认为用户不想取消该气泡if (d < 2 * mBubbleRadius) {//那么气泡恢复原来位置并颤动一下setBubbleRestoreAnim();} else {//气泡消失setBubbleDismissAnim();}}break;}return true;
}- 1
- 2
- 3
- 4
- 5
- 6
- 7
- 8
- 9
- 10
- 11
- 12
- 13
- 14
- 15
- 16
- 17
- 18
- 19
- 20
- 21
- 22
- 23
- 24
- 25
- 26
- 27
- 28
- 29
- 30
- 31
- 32
- 33
- 34
- 35
- 36
- 37
- 38
- 39
- 40
- 41
- 42
- 43
- 44
- 45
- 46
- 47
- 48
- 49
- 50
- 51
- 52
- 53
- 54
- 55
- 1
- 2
- 3
- 4
- 5
- 6
- 7
- 8
- 9
- 10
- 11
- 12
- 13
- 14
- 15
- 16
- 17
- 18
- 19
- 20
- 21
- 22
- 23
- 24
- 25
- 26
- 27
- 28
- 29
- 30
- 31
- 32
- 33
- 34
- 35
- 36
- 37
- 38
- 39
- 40
- 41
- 42
- 43
- 44
- 45
- 46
- 47
- 48
- 49
- 50
- 51
- 52
- 53
- 54
- 55
getParent().requestDisallowInterceptTouchEvent(true);- 1
- 1
getParent().requestDisallowInterceptTouchEvent(false);- 1
- 1
@Override
protected void onDraw(Canvas canvas) {super.onDraw(canvas);//画拖拽气泡canvas.drawCircle(mBubbleCenterX, mBubbleCenterY, mBubbleRadius, mBubblePaint);if (mState == STATE_DRAG && d < maxD - 48) {//画黏连小圆canvas.drawCircle(mCircleCenterX, mCircleCenterY, mCircleRadius, mBubblePaint);//计算二阶贝塞尔曲线做需要的起点、终点和控制点坐标calculateBezierCoordinate();//画二阶贝赛尔曲线mBezierPath.reset();mBezierPath.moveTo(mCircleStartX, mCircleStartY);mBezierPath.quadTo(mControlX, mControlY, mBubbleEndX, mBubbleEndY);mBezierPath.lineTo(mBubbleStartX, mBubbleStartY);mBezierPath.quadTo(mControlX, mControlY, mCircleEndX, mCircleEndY);mBezierPath.close();canvas.drawPath(mBezierPath, mBubblePaint);}//画消息个数的文本if (mState != STATE_DISMISS && !TextUtils.isEmpty(mText)) {mTextPaint.getTextBounds(mText, 0, mText.length(), mTextRect);canvas.drawText(mText, mBubbleCenterX - mTextRect.width() / 2, mBubbleCenterY + mTextRect.height() / 2, mTextPaint);}
}- 1
- 2
- 3
- 4
- 5
- 6
- 7
- 8
- 9
- 10
- 11
- 12
- 13
- 14
- 15
- 16
- 17
- 18
- 19
- 20
- 21
- 22
- 23
- 24
- 25
- 26
- 1
- 2
- 3
- 4
- 5
- 6
- 7
- 8
- 9
- 10
- 11
- 12
- 13
- 14
- 15
- 16
- 17
- 18
- 19
- 20
- 21
- 22
- 23
- 24
- 25
- 26
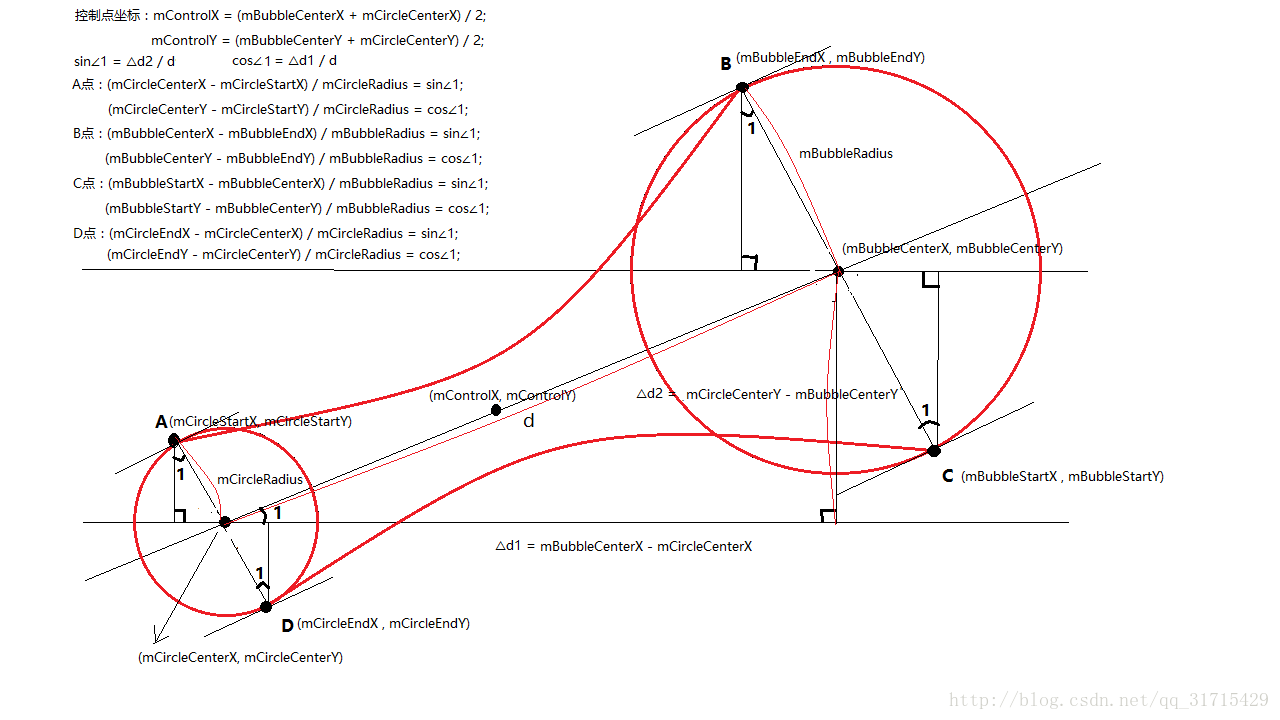
先来张示意图:
/*** 计算二阶贝塞尔曲线做需要的起点、终点和控制点坐标*/
private void calculateBezierCoordinate(){//计算控制点坐标,为两圆圆心连线的中点mControlX = (mBubbleCenterX + mCircleCenterX) / 2;mControlY = (mBubbleCenterY + mCircleCenterY) / 2;//计算两条二阶贝塞尔曲线的起点和终点float sin = (mBubbleCenterY - mCircleCenterY) / d;float cos = (mBubbleCenterX - mCircleCenterX) / d;mCircleStartX = mCircleCenterX - mCircleRadius * sin;mCircleStartY = mCircleCenterY + mCircleRadius * cos;mBubbleEndX = mBubbleCenterX - mBubbleRadius * sin;mBubbleEndY = mBubbleCenterY + mBubbleRadius * cos;mBubbleStartX = mBubbleCenterX + mBubbleRadius * sin;mBubbleStartY = mBubbleCenterY - mBubbleRadius * cos;mCircleEndX = mCircleCenterX + mCircleRadius * sin;mCircleEndY = mCircleCenterY - mCircleRadius * cos;
}- 1
- 2
- 3
- 4
- 5
- 6
- 7
- 8
- 9
- 10
- 11
- 12
- 13
- 14
- 15
- 16
- 17
- 18
- 19
- 1
- 2
- 3
- 4
- 5
- 6
- 7
- 8
- 9
- 10
- 11
- 12
- 13
- 14
- 15
- 16
- 17
- 18
- 19
/*** 设置气泡复原的动画*/
private void setBubbleRestoreAnim() {ValueAnimator anim = ValueAnimator.ofObject(new PointFEvaluator(),new PointF(mBubbleCenterX, mBubbleCenterY),new PointF(mCircleCenterX, mCircleCenterY));anim.setDuration(200);//使用OvershootInterpolator差值器达到颤动效果anim.setInterpolator(new OvershootInterpolator(5));anim.addUpdateListener(new ValueAnimator.AnimatorUpdateListener() {@Overridepublic void onAnimationUpdate(ValueAnimator animation) {PointF curPoint = (PointF) animation.getAnimatedValue();mBubbleCenterX = curPoint.x;mBubbleCenterY = curPoint.y;invalidate();}});anim.addListener(new AnimatorListenerAdapter() {@Overridepublic void onAnimationEnd(Animator animation) {//动画结束后状态改为默认mState = STATE_DEFAULT;if (mOnBubbleStateListener != null) {mOnBubbleStateListener.onRestore();}}});anim.start();
}- 1
- 2
- 3
- 4
- 5
- 6
- 7
- 8
- 9
- 10
- 11
- 12
- 13
- 14
- 15
- 16
- 17
- 18
- 19
- 20
- 21
- 22
- 23
- 24
- 25
- 26
- 27
- 28
- 29
- 30
- 31
- 1
- 2
- 3
- 4
- 5
- 6
- 7
- 8
- 9
- 10
- 11
- 12
- 13
- 14
- 15
- 16
- 17
- 18
- 19
- 20
- 21
- 22
- 23
- 24
- 25
- 26
- 27
- 28
- 29
- 30
- 31
/*** PointF动画估值器*/
public class PointFEvaluator implements TypeEvaluator<PointF> {@Overridepublic PointF evaluate(float fraction, PointF startPointF, PointF endPointF) {float x = startPointF.x + fraction * (endPointF.x - startPointF.x);float y = startPointF.y + fraction * (endPointF.y - startPointF.y);return new PointF(x, y);}
}- 1
- 2
- 3
- 4
- 5
- 6
- 7
- 8
- 9
- 10
- 11
- 12
- 1
- 2
- 3
- 4
- 5
- 6
- 7
- 8
- 9
- 10
- 11
- 12
/*** 气泡状态的监听器*/
public interface OnBubbleStateListener {/*** 拖拽气泡*/void onDrag();/*** 移动气泡*/void onMove();/*** 气泡恢复原来位置*/void onRestore();/*** 气泡消失*/void onDismiss();
}/*** 设置气泡状态的监听器*/
public void setOnBubbleStateListener(OnBubbleStateListener onBubbleStateListener) {mOnBubbleStateListener = onBubbleStateListener;
}- 1
- 2
- 3
- 4
- 5
- 6
- 7
- 8
- 9
- 10
- 11
- 12
- 13
- 14
- 15
- 16
- 17
- 18
- 19
- 20
- 21
- 22
- 23
- 24
- 25
- 26
- 27
- 28
- 29
- 30
- 31
- 1
- 2
- 3
- 4
- 5
- 6
- 7
- 8
- 9
- 10
- 11
- 12
- 13
- 14
- 15
- 16
- 17
- 18
- 19
- 20
- 21
- 22
- 23
- 24
- 25
- 26
- 27
- 28
- 29
- 30
- 31
/* 气泡爆炸的图片id数组 */
private int[] mExplosionDrawables = {R.drawable.explosion_one, R.drawable.explosion_two, R.drawable.explosion_three, R.drawable.explosion_four, R.drawable.explosion_five};
/* 气泡爆炸的bitmap数组 */
private Bitmap[] mExplosionBitmaps;
/* 气泡爆炸当前进行到第几张 */
private int mCurExplosionIndex;
/* 气泡爆炸动画是否开始 */
private boolean mIsExplosionAnimStart = false;- 1
- 2
- 3
- 4
- 5
- 6
- 7
- 8
- 9
- 1
- 2
- 3
- 4
- 5
- 6
- 7
- 8
- 9
mExplosionPaint = new Paint(Paint.ANTI_ALIAS_FLAG);
mExplosionPaint.setFilterBitmap(true);
mExplosionRect = new Rect();
mExplosionBitmaps = new Bitmap[mExplosionDrawables.length];
for (int i = 0; i < mExplosionDrawables.length; i++) {//将气泡爆炸的drawable转为bitmapBitmap bitmap = BitmapFactory.decodeResource(getResources(), mExplosionDrawables[i]);mExplosionBitmaps[i] = bitmap;
}- 1
- 2
- 3
- 4
- 5
- 6
- 7
- 8
- 9
- 1
- 2
- 3
- 4
- 5
- 6
- 7
- 8
- 9
/*** 设置气泡消失的动画*/
private void setBubbleDismissAnim() {mState = STATE_DISMISS;//气泡改为消失状态mIsExplosionAnimStart = true;if (mOnBubbleStateListener != null) {mOnBubbleStateListener.onDismiss();}//做一个int型属性动画,从0开始,到气泡爆炸图片数组个数结束ValueAnimator anim = ValueAnimator.ofInt(0, mExplosionDrawables.length);anim.setInterpolator(new LinearInterpolator());anim.setDuration(500);anim.addUpdateListener(new ValueAnimator.AnimatorUpdateListener() {@Overridepublic void onAnimationUpdate(ValueAnimator animation) {//拿到当前的值并重绘mCurExplosionIndex = (int) animation.getAnimatedValue();invalidate();}});anim.addListener(new AnimatorListenerAdapter() {@Overridepublic void onAnimationEnd(Animator animation) {//动画结束后改变状态mIsExplosionAnimStart = false;}});anim.start();
}- 1
- 2
- 3
- 4
- 5
- 6
- 7
- 8
- 9
- 10
- 11
- 12
- 13
- 14
- 15
- 16
- 17
- 18
- 19
- 20
- 21
- 22
- 23
- 24
- 25
- 26
- 27
- 28
- 29
- 30
- 1
- 2
- 3
- 4
- 5
- 6
- 7
- 8
- 9
- 10
- 11
- 12
- 13
- 14
- 15
- 16
- 17
- 18
- 19
- 20
- 21
- 22
- 23
- 24
- 25
- 26
- 27
- 28
- 29
- 30
if (mIsExplosionAnimStart && mCurExplosionIndex < mExplosionDrawables.length) {//设置气泡爆炸图片的位置mExplosionRect.set((int) (mBubbleCenterX - mBubbleRadius), (int) (mBubbleCenterY - mBubbleRadius), (int) (mBubbleCenterX + mBubbleRadius), (int) (mBubbleCenterY + mBubbleRadius));//根据当前进行到爆炸气泡的位置index来绘制爆炸气泡bitmapcanvas.drawBitmap(mExplosionBitmaps[mCurExplosionIndex], null, mExplosionRect, mExplosionPaint);
}- 1
- 2
- 3
- 4
- 5
- 6
- 7
- 1
- 2
- 3
- 4
- 5
- 6
- 7
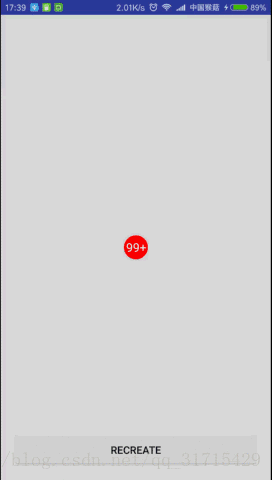
<RelativeLayout xmlns:android="http://schemas.android.com/apk/res/android"xmlns:monkey="http://schemas.android.com/apk/res-auto"xmlns:tools="http://schemas.android.com/tools"android:layout_width="match_parent"android:layout_height="match_parent"android:clipChildren="false"tools:context=".MainActivity"><com.monkey.dragpopview.DragBubbleView
android:id="@+id/dragBubbleView"android:layout_width="wrap_content"android:layout_height="wrap_content"android:layout_centerInParent="true"monkey:bubbleColor="#ff0000"monkey:bubbleRadius="12dp"monkey:text="99+"monkey:textColor="#ffffff"monkey:textSize="12sp" />RelativeLayout>- 1
- 2
- 3
- 4
- 5
- 6
- 7
- 8
- 9
- 10
- 11
- 12
- 13
- 14
- 15
- 16
- 17
- 18
- 19
- 20
- 21
- 1
- 2
- 3
- 4
- 5
- 6
- 7
- 8
- 9
- 10
- 11
- 12
- 13
- 14
- 15
- 16
- 17
- 18
- 19
- 20
- 21
public void setText(String text){mText = text;invalidate();
}- 1
- 2
- 3
- 4
- 1
- 2
- 3
- 4
DragBubbleView dragBubbleView = (DragBubbleView) findViewById(R.id.dragBubbleView);dragBubbleView.setText("99+");dragBubbleView.setOnBubbleStateListener(new DragBubbleView.OnBubbleStateListener() {@Overridepublic void onDrag() {Log.e("---> ", "拖拽气泡");}@Overridepublic void onMove() {Log.e("---> ", "移动气泡");}@Overridepublic void onRestore() {Log.e("---> ", "气泡恢复原来位置");}@Overridepublic void onDismiss() {Log.e("---> ", "气泡消失");}});- 1
- 2
- 3
- 4
- 5
- 6
- 7
- 8
- 9
- 10
- 11
- 12
- 13
- 14
- 15
- 16
- 17
- 18
- 19
- 20
- 21
- 22
- 23
- 1
- 2
- 3
- 4
- 5
- 6
- 7
- 8
- 9
- 10
- 11
- 12
- 13
- 14
- 15
- 16
- 17
- 18
- 19
- 20
- 21
- 22
- 23
这次既练习了自定义View,还囊括了贝赛尔曲线,坐标的计算一定要画图,简单直观。
本文来自互联网用户投稿,文章观点仅代表作者本人,不代表本站立场,不承担相关法律责任。如若转载,请注明出处。 如若内容造成侵权/违法违规/事实不符,请点击【内容举报】进行投诉反馈!