关于ssh登录时卡顿30s左右的问题调试恢复过程
一、问题描述
内网ssh一台主机时,每次总是卡顿30s左右才能跳到远程主机上,其他主机ssh均正常,对比各主机配置并无特殊不同,那我们接下来分析下如何定位主机的可能原因
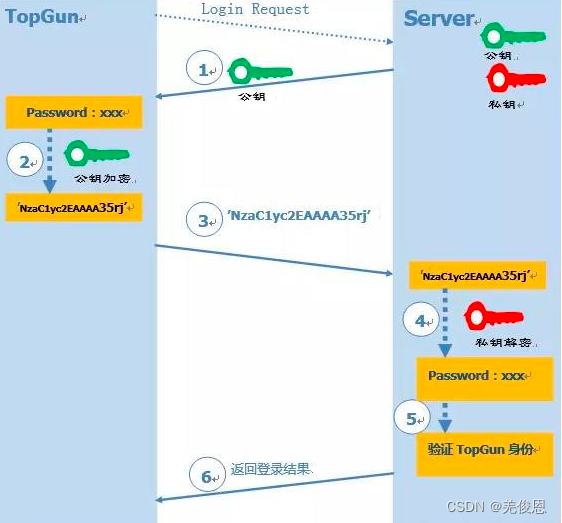
ssh采用对称你要加密,即使用公钥 (public key):提供给远程主机进行数据加密的行为,大家都能取得你的公钥来将数据加密的意思;私钥 (private key):远程主机使用你的公钥加密的数据,在本地端就能够使用私钥来进行解密。
关联资源: ssh stuck at “pledge: network”、serverfault、ixing slow SSH logins、systemd-logind.service 中文手册、pam_systemd 中文手册
二、分析处理
1)命令选项调试
-o GSSAPIAuthentication=no或-o strictHostKeyChecking=no选项进行ssh登录测试。
debug1: SSH2_MSG_SERVICE_ACCEPT received    //ssh卡顿出现在此处,从下可发现,在GSS认证过程中,尝试了多次,最好采用密钥对方式
debug1: Authentications that can continue: publickey,gssapi-keyex,gssapi-with-mic,password
debug1: Next authentication method: gssapi-keyex
debug1: No valid Key exchange context
debug1: Next authentication method: gssapi-with-mic
debug1: Unspecified GSS failure.  Minor code may provide more information
Cannot determine realm for numeric host addressdebug1: Unspecified GSS failure.  Minor code may provide more information
Cannot determine realm for numeric host addressdebug1: Unspecified GSS failure.  Minor code may provide more informationdebug1: Unspecified GSS failure.  Minor code may provide more information
Cannot determine realm for numeric host addressdebug1: Next authentication method: publickey
debug1: Trying private key: /root/.ssh/identity
debug1: Offering public key: /root/.ssh/id_rsa
debug1: Server accepts key: pkalg ssh-rsa blen 277
debug1: read PEM private key done: type RSA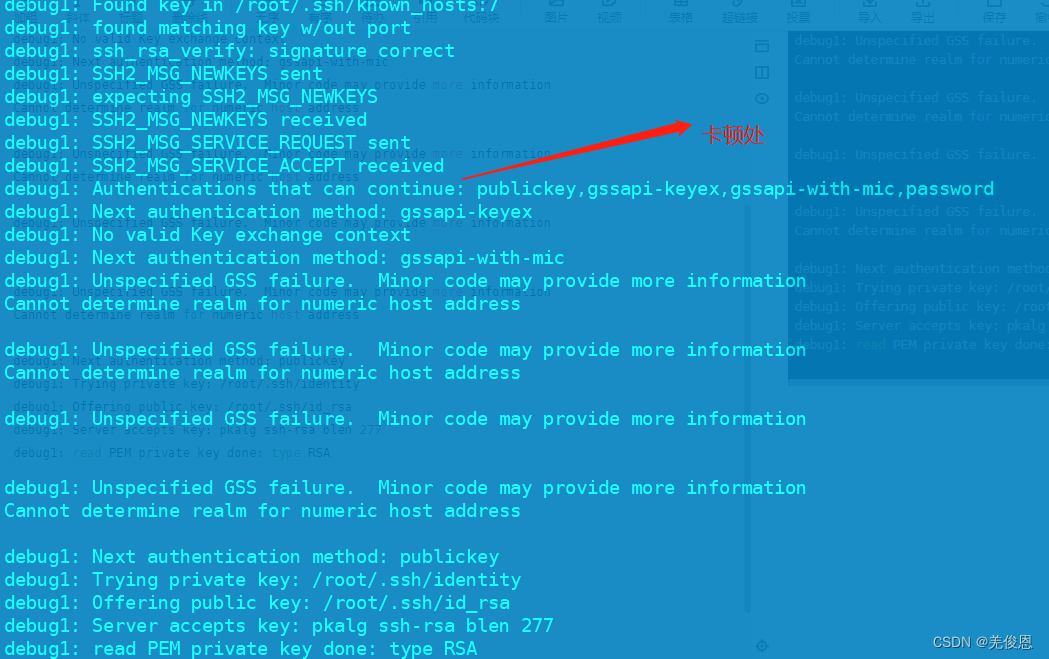
2)修改GSS认证
vim /etc/ssh/sshd_config   //注释如下2行,验证未果
#GSSAPIAuthentication yes
#GSSAPICleanupCredentials yes
3)重启后再次验证发现,仍出现卡顿,卡顿点如下:
debug1: SSH2_MSG_SERVICE_REQUEST sent
debug1: SSH2_MSG_SERVICE_ACCEPT received  //卡顿仍出现在此处debug1: Authentications that can continue: publickey,password
debug1: Next authentication method: publickey
debug1: Trying private key: /root/.ssh/identity
debug1: Offering public key: /root/.ssh/id_rsa
debug1: Server accepts key: pkalg ssh-rsa blen 277
debug1: read PEM private key done: type RSA
debug1: Authentication succeeded (publickey).
debug1: channel 0: new [client-session]
debug1: Requesting no-more-sessions@openssh.com
debug1: Entering interactive session.
debug1: Sending environment.
debug1: Sending env LANG = zh_CN.UTF-8
对比正常登录的主机日志,并未发现异常;正常主机即时使用GSS认证也未出现卡顿,唯一区别就是卡顿主机使用别的ssh端口;对比/etc/pam.d/sshd 也是一样的,未发现异同;
4)关闭DNS解析,编辑/etc/ssh/sshd_config ,修改 UseDNS no,测试验证登录不再卡顿。即现场验证:ssh默认开启DNS解析的,即使未配置为yes;
5)经测试验证,开启GSS认证并不是导致本次ssh登录卡顿的原因,UseDNS选项是本次的主要直接原因;但是其他正常主机未开启运行ssh登录也正常,受影响主机与其他正常主机不同的地方就是主机名修改了,不是默认的localhost了,但是ping测试依然显示正常。
注:UseDNS特性是SSH服务的安全增强特性,默认是打开的。开启后,服务端会先根据客户端IP进行DNS PTR反向查询,得到客户端主机名。再根据得到的客户端主机名进行DNS正向A记录查询,最后比对得到的IP与原始IP是否一致,用以防止客户端欺骗。尤其启用GSSAPI认证后,它需要借助于域名进行身份认证。
三、另一起ssh登录卡顿事件
1)问题描述:ssh登录时输入密码后卡顿15s左右后才能登陆
2)调试分析:测试卡顿出出现在debug1: pledge: network位置,如下所示:
OpenSSH_7.4p1, OpenSSL 1.0.2k-fips  26 Jan 2017
debug1: Reading configuration data /etc/ssh/ssh_config
debug1: /etc/ssh/ssh_config line 58: Applying options for *
debug1: Connecting to 172.xx.34 [172.xx.34] port 22.
debug1: Connection established.
debug1: permanently_set_uid: 0/0
debug1: key_load_public: No such file or directory
debug1: identity file /root/.ssh/id_rsa type -1
debug1: key_load_public: No such file or directory
debug1: identity file /root/.ssh/id_rsa-cert type -1
debug1: key_load_public: No such file or directory
debug1: identity file /root/.ssh/id_dsa type -1
debug1: key_load_public: No such file or directory
debug1: identity file /root/.ssh/id_dsa-cert type -1
debug1: key_load_public: No such file or directory
debug1: identity file /root/.ssh/id_ecdsa type -1
debug1: key_load_public: No such file or directory
debug1: identity file /root/.ssh/id_ecdsa-cert type -1
debug1: key_load_public: No such file or directory
debug1: identity file /root/.ssh/id_ed25519 type -1
debug1: key_load_public: No such file or directory
debug1: identity file /root/.ssh/id_ed25519-cert type -1
debug1: Enabling compatibility mode for protocol 2.0
debug1: Local version string SSH-2.0-OpenSSH_7.4
debug1: Remote protocol version 2.0, remote software version OpenSSH_8.2
debug1: match: OpenSSH_8.2 pat OpenSSH* compat 0x04000000
debug1: Authenticating to 172.xx.34 as 'blue'
debug1: SSH2_MSG_KEXINIT sent
debug1: SSH2_MSG_KEXINIT received
debug1: kex: algorithm: curve25519-sha256
debug1: kex: host key algorithm: ecdsa-sha2-nistp256
debug1: kex: server->client cipher: aes128-ctr MAC: hmac-sha1 compression: none
debug1: kex: client->server cipher: aes128-ctr MAC: hmac-sha1 compression: none
debug1: kex: curve25519-sha256 need=20 dh_need=20
debug1: kex: curve25519-sha256 need=20 dh_need=20
debug1: expecting SSH2_MSG_KEX_ECDH_REPLY
debug1: Server host key: ecdsa-sha2-nistp256 SHA256:ADY8Z7fFyqMiglr7xxAb1ikpf0/Ojg0Lwg
debug1: Host '[172.xx34]:22' is known and matches the ECDSA host key.
debug1: Found key in /root/.ssh/known_hosts:3
debug1: rekey after 4294967296 blocks
debug1: SSH2_MSG_NEWKEYS sent
debug1: expecting SSH2_MSG_NEWKEYS
debug1: SSH2_MSG_NEWKEYS received
debug1: rekey after 4294967296 blocks
debug1: SSH2_MSG_EXT_INFO received
debug1: kex_input_ext_info: server-sig-algs=<ssh-ed25519,sk-ssh-ed25519@openssh.com,ssh-rsa,rsa-sha2-256,rsa-sha2-512,ssh-dss,ecdsa-sha2-nistp256,ecdsa-sha2-nistp384,ecdsa-sha2-nistp521,sk-ecdsa-sha2-nistp256@openssh.com>
debug1: SSH2_MSG_SERVICE_ACCEPT received
You have logged onto a secured server..All accesses logged
debug1: Authentications that can continue: publickey,password
debug1: Next authentication method: publickey
debug1: Trying private key: /root/.ssh/id_rsa
debug1: Trying private key: /root/.ssh/id_dsa
debug1: Trying private key: /root/.ssh/id_ecdsa
debug1: Trying private key: /root/.ssh/id_ed25519
debug1: Next authentication method: password
ygcg@172.16.18.34's password:
debug1: Authentication succeeded (password).
Authenticated to 172.xx.34 ([172.xx.34]:22).
debug1: channel 0: new [client-session]
debug1: Requesting no-more-sessions@openssh.com
debug1: Entering interactive session.
debug1: pledge: network					#卡在此处15s左右
debug1: client_input_global_request: rtype hostkeys-00@openssh.com want_reply 0
debug1: Sending environment.
debug1: Sending env LANG = en_US.UTF-8
Last login: Fri Jul 14 15:28:30 2023 from 172.16.18.9
Authorized users only. All activity may be monitored and reported
也可以执行:strace -o trace.log ssh blue@172,x.x.34 ,查看日志
服务状态检查:systemctl status sshd和systemctl status dbus,查看是否有相关报错
查看日志:tail -100 /var/log/authpriv.log |grep ssh -C 10|less,日志中有报错:pam_systemd(sshd:session): Failed to create session: Connection timed out

正常如下才对:

执行:busctl #可看到如下

另可检查/var/log/btmp文件,查看登录失败情况记录,因它记录了失败的登录尝试次数和btmp上一次失败尝试的日期,可用lastb命令查看;相关经验表明如果ssh遭到爆破,会导致该文件过大会造成读取耗时也会导致ssh卡慢,可执行sudo truncate -s 0 /var/log/btmp或执行:echo "" > /var/log/btmp清空,直接将该文件置为空。更多参看PAM performance and causes 2-3 seconds delay,该文件由/etc/pam.d/postlogin里规则设定;

其他日志查询:journalctl --list-boots,然后按2天截断:journalctl --vacuum-time 2d
相关解释如下:
This is probably an issue with D-Bus and systemd. If the dbus service is restarted for some reason, you will also need to restart systemd-logind.
You can check if this is the issue by opening the ssh daemon log (on Ubuntu it should be /var/log/auth.log) and check if it has these lines:
sshd[2721]: pam_systemd(sshd:session): Failed to create session: Connection timed out
If yes, just restart systemd-logind service:
systemctl restart systemd-logind
I had this same issue on CentOS 7, because the messagebus was restarted (which is how the D-Bus service is called on CentOS).
查看ssh的pam配置:cat /etc/pam.d/sshd和 cat /etc/pam.d/password-auth


3)结论:综上,本次问题主要是dbus导致system报错超时,D-Bus是一个为应用程序间提供通信的消息总线系统, 用于进程之间的通信,之后system -logind服务导致ssh,su,nfs,samba,ftp等服务超时,最后跳过。有研究表明,实际是由于系统内模块org.freedesktop.login1不能由systemd启动,导致的ssh登录时间缓慢,甚至无法登陆。
关于systemd-logind,它是一个管理用户登录的系统服务,ssh登录时,systemd-logind负责为这个登录用户创建一个Session ID,并进行管理。我们主要也就是阻塞在了这里。systemd-logind主要负责:
1、持续跟踪用户的会话、进程、空闲状态。 这将在 user.slice 之下,为每个用户分配一个 slice 单元、为每个用户的当前会话分配一个 scope 单元。 同时,针对每个已登录的用户,将会启动一个专属的服务管理器(作为user@.service 模版的一个实例)。
2、生成并管理"session ID"。如果启用了审计并且已经为一个会话设置了审计"session ID", 那么该ID也将同时被用作"session ID", 否则将会使用一个独立的会话计数器(也就是独立生成一个"session ID")。
3、为用户的特权操作(例如关闭或休眠系统) 提供基于 polkit 的认证与授权;
4、为应用程序实现阻止关闭/休眠系统的逻辑,处理 硬件关机/休眠按钮的动作
5、多席位(Multi-Seat)管理
6、会话切换管理
7、管理 用户对设备的访问
8、在启动虚拟终端时 自动启动文本登录程序(agetty), 并管理用户的运行时目录。
另:systemd-login的用户会话是通过PAM模块注册的,而PAM模块pam_systemd中有一个desktop选项,因此,如果服务器是桌面版的,重启systemd-logind,这个用户桌面上的一切程序都会被关闭(包括桌面上的开启的终端与程序),这一点请注意。
整个SSh登录过程中,pam_systemd 会将用户会话注册到 systemd 登录管理器(systemd-logind.service(8) 服务)中, 也就同时注册到了 systemd 控制组(control group)之中。在登录(login)时,此模块与 systemd-logind.service 服务一起, 确保实现如下功能:
1、如果用户运行时目录(/run/user/$UID)不存在, 那么就创建该目录或者以"tmpfs"文件系统挂载该目录, 同时根据登录用户为该目录设置磁盘配额、属主与属组。
2、设置 $XDG_SESSION_ID 环境变量的值。 如果开启了审计并且 pam_loginuid.so 运行在此模块之前(强烈建议这么做), 那么将使用审计会话ID(/proc/self/sessionid)的值, 否则将使用独立的会话计数器的值。
3、为会话创建一个新的 scope 单元。如果此会话是该用户多个并行会话中第一个建立的会话, 那么将会在 user.slice 之下自动创建一个针对该用户的 slice 单元,并将新建的 scope 单元置于其中。 按照会话用户的身份启动一个 user@.service 系统服务实例 (也就是运行一个 systemd 用户实例)。
在退出(logout)时,此模块确保实现如下功能:
1、如果在 logind.conf(5) 中设置了 KillUserProcesses=yes (无论明确还是隐含), 那么将会杀死会话中的所有进程。如果此会话是该用户多个并行会话中最后一个退出的会话, 那么还会同时终止该用户的 systemd 用户实例以及 slice 单元。
如果此会话是该用户多个并行会话中最后一个退出的会话, 那么将会删除该用户的运行时目录(/run/user/$UID) 以及其中的所有内容。
如果系统的 init 进程不是 systemd , 那么此模块什么也不做,并且立即返回 PAM_SUCCESS 值。
4)处理:systemctl restart systemd-logind,另修改sshd_config 的UsePAM为 no ,现场验证这并不是主要原因;另修改UseDNS=no;注意:重启systemd-logind.service失败,会导致linux很多命令不能正常执行,甚至reboot命令。

方式2:编辑/etc/pam.d/password-auth和/etc/pam.d/systemd-auth,注释掉-session optional pam_systemd.so,前面加#;或直接销掉/etc/pam.d/sshd也行。

5)附录:有经验显示,如果修改了默认root的用户名也会导致ssh登录卡慢,这时应该修改回来尝试是否恢复。
本文来自互联网用户投稿,文章观点仅代表作者本人,不代表本站立场,不承担相关法律责任。如若转载,请注明出处。 如若内容造成侵权/违法违规/事实不符,请点击【内容举报】进行投诉反馈!