Hands-On GUI Programming with C++ and Qt5学习笔记 -MapView
Qt Location 模块为开发人员提供了对地理编码和导航信息的访问。它还可以允许用户执行需要从服务器或用户设备检索数据的地点搜索。
目前,Qt 的地图视图不支持 C++,仅支持 QML。这意味着我们只能使用 QML 脚本来更改与视觉相关的任何内容——显示地图、添加标记等;另一方面,我们可以使用模块提供的 C++ 类从数据库或服务提供者获取信息,然后通过 QML 将其显示给用户。
除了位置模块,我们还添加了 qml 和 quickwidgets 模块,这是下一节中地图显示小部件所需的。 这就是我们在项目中启用 Qt Location 模块所需要做的全部工作。 接下来,我们将继续将地图显示小部件添加到我们的项目中。
还有一个重要的功能叫做 Geo Routing Request,它是一组功能,可以帮助您绘制从 A 点到 B 点的路线(通常是最短路线)。此功能需要服务提供商; 在这种情况下,我们将使用 Open Street Map (OSM),因为它是完全免费的。
请注意,OSM 是一个在线协作项目,这意味着如果您所在地区没有人将路线数据提供给 OSM 服务器,那么您将无法获得准确的结果。 或者,您还可以使用付费服务,例如 Mapbox 或 ESRI。
mapview.qml
import QtQuick 2.0
import QtLocation 5.3
import QtPositioning 5.0Item
{id: window//我们创建一个 Plugin 对象并将其命名为 osm (Open Street Map)Plugin{id: mapPluginname: "osm"}function addMarker(name, latitude, longitude){//我们首先通过加载 marker.qml 文件来创建一个组件        var component = Qt.createComponent("qrc:///qml/marker.qml")//然后,我们通过调用 createObject() 从组件创建了一个对象/项目//在 createObject() 函数中,我们将 window 对象作为其父对象,并将其位置设置为 addMarker() 函数提供的坐标//我们可以通过为每个标记添加一个文本标签var item = component.createObject(window, { coordinate: QtPositioning.coordinate(latitude, longitude), labelText: name })//然后通过调用 map.addMapItem() 将标记添加到地图//该函数必须在地图创建并准备好显示后调用,这意味着我们只能在 Component.onCompleted 事件被触发后调用它map.addMapItem(item)}//我们只更改了一些属性,例如颜色、形状和边框宽度。 完成后,让我们打开 mapview.qml 并定义一些添加形状的函数//这些函数与 addMarker() 函数非常相似,只是它接受稍后传递给 createObject()函数的不同参数function addCircle(latitude, longitude, radius, color, borderWidth){var component = Qt.createComponent("qrc:///qml/circle.qml")var item = component.createObject(window, { center: QtPositioning.coordinate(latitude, longitude), radius: radius, color: color, borderWidth: borderWidth })map.addMapItem(item)}function addRectangle(startLat, startLong, endLat, endLong, color, borderWidth){var component = Qt.createComponent("qrc:///qml/rectangle.qml")var item = component.createObject(window, { topLeft: QtPositioning.coordinate(startLat, startLong), bottomRight: QtPositioning.coordinate(endLat, endLong), color: color, borderWidth: borderWidth })map.addMapItem(item)//我们将项目添加到地图以进行渲染//每当我们想要创建一个新的位置标记时,我们只需要调用这个 addMarker() 函数}function addPolygon(path, color, borderWidth){var component = Qt.createComponent("qrc:///qml/polygon.qml")var item = component.createObject(window, { path: path, color: color, borderWidth: borderWidth })map.addMapItem(item)}//然后我们创建一个 Map 对象并将插件应用到它的 plugin 属性Map{id: mapanchors.fill: parentplugin: mapPlugin//我们还将起始坐标设置为 (40.7264175,-73.99735),它位于纽约的某个地方center: QtPositioning.coordinate(40.7264175,-73.99735)//除此之外,默认缩放级别设置为 14zoomLevel: 14Component.onCompleted:{// Use QML to add markers to the map//让我们通过调用 addMarker() 三次来创建三个不同的标记addMarker("Restaurant", 40.7274175,-73.99835)addMarker("My Home", 40.7276432,-73.98602)addMarker("School", 40.7272175,-73.98935)addCircle(40.7274175,-73.99835, 250, "green", 3);addRectangle(40.7274175,-73.99835, 40.7376432, -73.98602, "red", 2)var path = [{ latitude: 40.7324281, longitude: -73.97602 },{ latitude: 40.7396432, longitude: -73.98666 },{ latitude: 40.7273266, longitude: -73.99835 },{ latitude: 40.7264281, longitude: -73.98602 }];addPolygon(path, "blue", 3);}}
}
marker.qml
import QtQuick 2.0
import QtQuick.Controls 2.0
import QtLocation 5.3
//我们首先添加了一个将用作标记图像的图像对象。
//我们创建一个 MapQuickItem 对象,它将作为标记本身
MapQuickItem
{id: marker//我们还必须将标记图像的锚点设置为图像的中心底部anchorPoint.x: marker.width / 4anchorPoint.y: marker.height//向 MapQuickItem 对象添加一个名为 labelText 的自定义属性property string labelText//将标记图像设置为 MapQuickItem 对象的 sourceItem//我们创建了一个 Item 对象来将多个对象组合在一起sourceItem: Item{Image{id: iconsource: "qrc:///images/map-marker-icon.png"//于原始图像确实很大,我们必须通过将 sourceSize 属性设置为 50x50 来调整其大小,因为这是标记尖端所在的位置sourceSize.width: 50sourceSize.height: 50}//创建了一个 Rectangle 对象作为标签背景Rectangle{id: taganchors.centerIn: labelwidth: label.width + 4height: label.height + 2color: "black"}//我们可以通过为每个标记添加一个文本标签//一个 Label 对象作为文本Label{id: labelanchors.centerIn: parentanchors.horizontalCenterOffset: 20anchors.verticalCenterOffset: -12font.pixelSize: 16//Label 对象的 text 属性将链接到 MapQuickItem 对象的 labelText 属性//我们可以向 addMarker() 函数添加另一个输入以设置 labelText 属性text: labelTextcolor: "white"}}
}
mainwindow.h
#ifndef MAINWINDOW_H
#define MAINWINDOW_H#include mainwindow.cpp
#include "mainwindow.h"
#include "ui_mainwindow.h"MainWindow::MainWindow(QWidget *parent) :QMainWindow(parent),ui(new Ui::MainWindow)
{ui->setupUi(this);// Get user's position (only work on mobile)/*QGeoPositionInfoSource *source = QGeoPositionInfoSource::createDefaultSource(this);if (source){connect(source, SIGNAL(positionUpdated(QGeoPositionInfo)),this, SLOT(positionUpdated(QGeoPositionInfo)));source->startUpdates();}*/// Use C++ to add marker to the map//前面函数的第一个参数是我们要从中调用函数的对象//在本例中,它是地图视图widget的根对象(mapview.qml 中的 Item 对象)//接下来,我们要告诉我们要调用哪个函数名称,它是 addMarker() 函数//第三个参数是信号槽系统用来调用这个方法的连接类型//我们使用 Q_ARG 宏来指示数据的类型和值//我们将让它成为默认设置,即 Qt::AutoConnection。 其余的是 addMarker() 函数所需的参数//QMetaObject::invokeMethod(qobject_cast(ui->quickWidget->rootObject()), "addMarker", Qt::AutoConnection, Q_ARG(QVariant, "Testing"), Q_ARG(QVariant, 40.7274175), Q_ARG(QVariant, -73.99835)); // Routing request//构造函数方法中创建一个服务提供者对象。 我们将使用 OSM 服务,因此我们将在启动 QGeoServiceProvider 类时放置首字母缩略词“osm”//之后,我们将从刚刚创建的服务提供者对象中获取路由管理器的指针QGeoServiceProvider* serviceProvider = new QGeoServiceProvider("osm");QGeoRoutingManager* routingManager = serviceProvider->routingManager();//然后,将来自路由管理器的finished() 信号和error() 信号与我们刚刚定义的槽函数连接起来//当请求成功时服务提供者有回复,或者请求失败并返回错误消息时,这些槽函数将被触发。 connect(routingManager, SIGNAL(finished(QGeoRouteReply*)), this, SLOT(routeCalculated(QGeoRouteReply*)));connect(routingManager, SIGNAL(error(QGeoRouteReply*,QGeoRouteReply::Error,QString)), this, SLOT(routeError(QGeoRouteReply*,QGeoRouteReply::Error,QString)));//MainWindow 构造函数方法中启动一个地理路由请求并将其发送给服务提供者QGeoRouteRequest request(QGeoCoordinate(40.675895,-73.9562151), QGeoCoordinate(40.6833154,-73.987715));routingManager->calculateRoute(request);
}MainWindow::~MainWindow()
{delete ui;
}void MainWindow::positionUpdated(const QGeoPositionInfo &info)
{qDebug() << "Position updated:" << info;
}
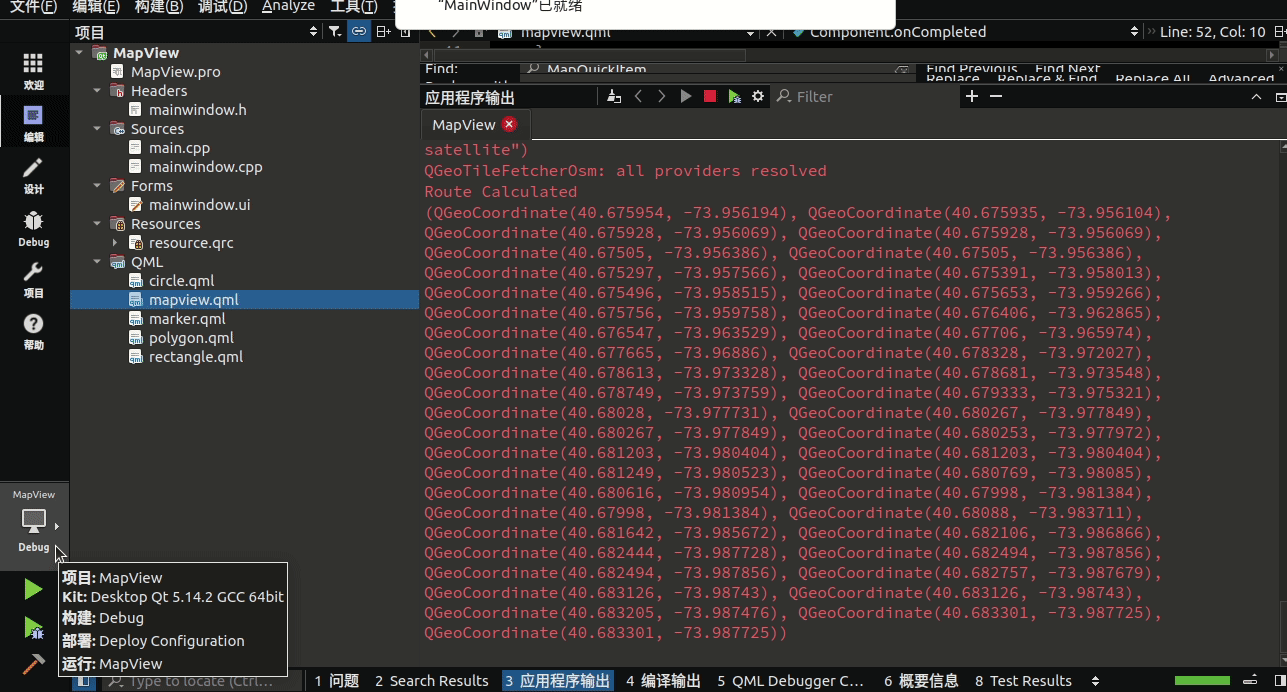
//QGeoRouteReply 指针包含服务提供者在请求成功时发送的路由信息。 有时它带有多个路由,因此在示例中,我们只获取第一个路由并通过 Qt 的应用程序输出窗口显示它。 或者,您可以使用这些坐标来绘制路径或沿路线设置标记动画。
void MainWindow::routeCalculated(QGeoRouteReply *reply)
{qDebug() << "Route Calculated";if (reply->routes().size() != 0){// There could be more than 1 path// But we only get the first routeQGeoRoute route = reply->routes().at(0);qDebug() << route.path();}reply->deleteLater();
}
//对于 routeError() 槽函数,我们只输出服务提供者发送的错误字符串
void MainWindow::routeError(QGeoRouteReply *reply, QGeoRouteReply::Error error, const QString &errorString)
{qDebug() << "Route Error" << errorString;reply->deleteLater();
}除了在地图上添加标记外,我们还可以在地图上绘制不同类型的形状来指示感兴趣的区域或用作地理围栏,每当目标进入或离开该形状覆盖的区域时都会发出警告。地理围栏是一种多边形形状,用于在地图上为基于位置的服务定义感兴趣的区域或虚拟地理边界。通常,地理围栏用于在设备进入和/或退出地理围栏时触发警报。使用地理围栏的一个很好的例子是,当您需要购物提醒时,您可以在超市周围绘制一个地理围栏,并随地理围栏附上购物清单。当您(和您的手机)进入地理围栏区域时,您会在手机上收到一条通知,提醒您购买什么。
为了在地图视图小部件上绘制形状,我们将为每种类型的形状创建更多 QML 文件并将它们添加到程序的资源中:
circle.qml
import QtQuick 2.0
import QtLocation 5.3
MapCircle
{property int borderWidthborder.width: borderWidth
}
rectangle.qml
import QtQuick 2.0
import QtLocation 5.3MapRectangle
{property int borderWidthborder.width: borderWidth
}
polygon.qml
import QtQuick 2.0
import QtLocation 5.3MapPolygon
{property int borderWidthborder.width: borderWidth
}
本文来自互联网用户投稿,文章观点仅代表作者本人,不代表本站立场,不承担相关法律责任。如若转载,请注明出处。 如若内容造成侵权/违法违规/事实不符,请点击【内容举报】进行投诉反馈!