接口自动化实践
接口自动化实践
- 接口自动化采用框架:Java+Httpclient+TestNG+Jenkins
- 新建一个maven的sass项目
- 进行模块分层,该sass项目大致分为controller层,model层,utils层
- 连接数据库
- 新增一个查询组织用户的接口
- 组装各个接口,达到完整的业务流的功能
接口自动化采用框架:Java+Httpclient+TestNG+Jenkins
新建一个maven的sass项目
1.新建一个maven项目
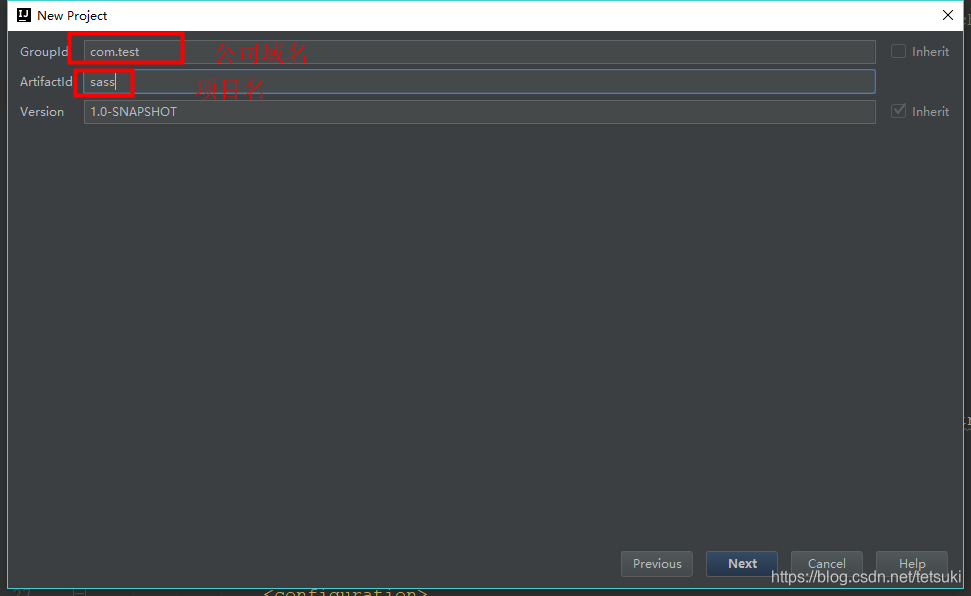
2.引入pom文件所需要的依赖
org.apache.maven.plugins maven-surefire-plugin 2.19.1 true ${project.basedir}/src/main/resources/testng.xml org.apache.maven.plugins maven-compiler-plugin 1.8 1.8 UTF-8 org.springframework.boot spring-boot-maven-plugin com.gs.Application repackage org.springframework.boot spring-boot-starter-parent 2.1.6.RELEASE UTF-8 UTF-8 1.8 org.springframework.boot spring-boot-starter org.springframework.boot spring-boot-starter-web org.springframework.boot spring-boot-starter-test test org.testng testng 6.9.10 com.relevantcodes extentreports 2.41.2 com.vimalselvam testng-extentsreport 1.3.1 com.aventstack extentreports 3.0.6 org.apache.httpcomponents httpclient 4.5.6 org.json json 20170516 com.alibaba fastjson 1.2.29 org.mybatis mybatis 3.4.6 mysql mysql-connector-java 8.0.13 org.projectlombok lombok 1.16.14 net.sourceforge.jexcelapi jxl 2.6.12 进行模块分层,该sass项目大致分为controller层,model层,utils层
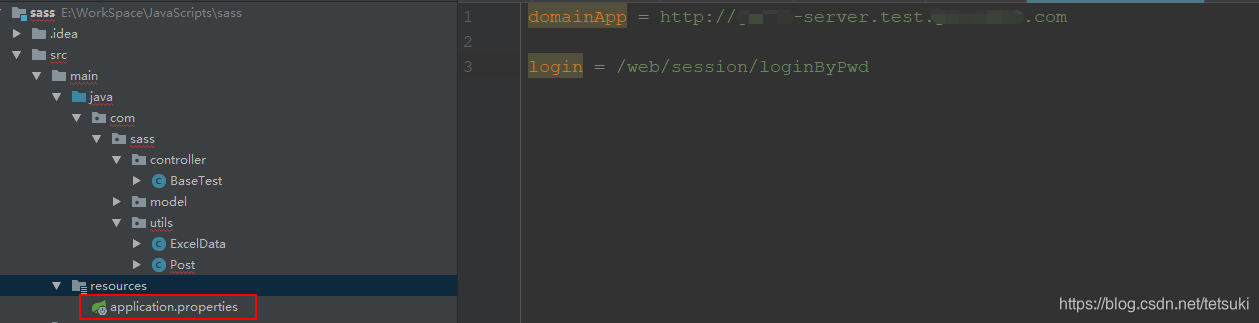
1.建立各个层次的目录结构,如下

2.在controller下建立测试基类BaseTest
package com.sass.controller;import org.testng.annotations.BeforeTest;
import org.testng.annotations.Parameters;/*** @Author: lzq* @Date: 2019/8/14 14:43*/
public class BaseTest {public static String localFileName = "";//测试用例执行前,通过Parameters参数获取excel的文件名@BeforeTest@Parameters({"fileName"})public void initExcelData(String fileName){localFileName = fileName;}
}
3.在utils下新建一个ExcelData工具类,用来解析excel数据,框架采用excel作为数据输入源
package com.sass.utils;
import java.io.File;
import java.io.IOException;
import java.util.ArrayList;
import java.util.HashMap;
import jxl.Cell;
import jxl.Sheet;
import jxl.Workbook;
import jxl.read.biff.BiffException;/*** @Author: lzq* @Date: 2019/3/19 14:03*/public class ExcelData {public Workbook workbook;public Sheet sheet;public Cell cell;int rows;int columns;public String fileName;public String caseName;public ArrayList arrkey = new ArrayList();String sourceFile;/*** @param fileName   excel文件名* @param caseName   sheet名*/public ExcelData(String fileName, String caseName) {super();this.fileName = fileName;this.caseName = caseName;}/*** 获得excel表中的数据*/public Object[][] getExcelData() throws BiffException, IOException {workbook = Workbook.getWorkbook(new File(getPath()));sheet = workbook.getSheet(caseName);rows = sheet.getRows();columns = sheet.getColumns();// 为了返回值是Object[][],定义一个多行单列的二维数组HashMap[][] arrmap = new HashMap[rows - 1][1];// 对数组中所有元素hashmap进行初始化if (rows > 1) {for (int i = 0; i < rows - 1; i++) {arrmap[i][0] = new HashMap<>();}} else {System.out.println("excel中没有数据");}// 获得首行的列名,作为hashmap的key值for (int c = 0; c < columns; c++) {String cellvalue = sheet.getCell(c, 0).getContents();arrkey.add(cellvalue);}// 遍历所有的单元格的值添加到hashmap中for (int r = 1; r < rows; r++) {for (int c = 0; c < columns; c++) {String cellvalue = sheet.getCell(c, r).getContents();arrmap[r - 1][0].put(arrkey.get(c), cellvalue);}}return arrmap;}/*** 获得excel文件的路径* @return* @throws IOException*///excel同一存放在/src/main/resources/TestCaseExcelData路径下public String getPath() throws IOException {File directory = new File(".");sourceFile = directory.getCanonicalPath() + "/src/main/resources/TestCaseExcelData/"+ fileName + ".xls";return sourceFile;}}
4.在resources目录下创建application.properties存放域名和uri,框架暂时仅支持测试环境
5.在utils下编写post方法工具类
package com.sass.utils;import org.apache.http.HttpEntity;
import org.apache.http.NameValuePair;
import org.apache.http.client.entity.UrlEncodedFormEntity;
import org.apache.http.client.methods.CloseableHttpResponse;
import org.apache.http.client.methods.HttpPost;
import org.apache.http.impl.client.CloseableHttpClient;
import org.apache.http.impl.client.HttpClients;
import org.apache.http.message.BasicNameValuePair;
import org.apache.http.util.EntityUtils;
import org.json.JSONObject;import java.io.IOException;
import java.util.*;import static org.apache.commons.codec.CharEncoding.UTF_8;/*** @Author: lianzheqi* @Date: 2019/3/21 10:08*/public class Post {public static String cookie = "";public static HttpPost post = null;public static HashMap map = new HashMap<>();public static String getUrl(String domainKey,String uriKey){//通过ResourceBundle获取resources下的application资源ResourceBundle bundle = ResourceBundle.getBundle("application", Locale.CHINA);String domain = bundle.getString(domainKey);String uri = bundle.getString(uriKey);//拼接urlreturn domain + uri;} public static String post(String urikey)throws IOException {post = new HttpPost(getUrl("domainApp",urikey));CloseableHttpClient client = HttpClients.createDefault();//设置请求头post.setHeader("Content-Type","application/x-www-form-urlencoded");post.setHeader("Origin","http://gs-oa.test.youximao.com");if (!Post.cookie.isEmpty()){post.setHeader("Cookie",Post.cookie);}//设置请求体List paramenters = new ArrayList();if(null != map){for (Map.Entry entry : Post.map.entrySet()) {paramenters.add(new BasicNameValuePair(entry.getKey(),entry.getValue()));System.out.println("key = " + entry.getKey() + ", value = " + entry.getValue());}map.clear();//设置post方法传递编码格式为UTF_8HttpEntity requestEntity = new UrlEncodedFormEntity(paramenters,UTF_8);post.setEntity(requestEntity);}//执行post请求CloseableHttpResponse response = client.execute(post);//获得响应内容HttpEntity entity = response.getEntity();String entityString = EntityUtils.toString(entity);//对响应内容断言JSONObject json = new JSONObject(entityString);System.out.println(json);return entityString;}}
6.由于该项目登录有不同的角色,故将登录接口抽离出一个公共方法,在utils下新建一个Login的工具类,
package com.sass.utils;import com.alibaba.fastjson.JSON;
import com.sass.model.BaseBean;
import jxl.read.biff.BiffException;
import org.testng.Assert;import java.io.IOException;
import java.util.HashMap;/*** @Author: lzq* @Date: 2019/8/14 15:35*/
public class Login {//fileName:excel文件名,caseName:excel sheet名public static Object[][] expectedData(String fileName, String caseName) throws BiffException, IOException {ExcelData e = new ExcelData(fileName, caseName);return e.getExcelData();}public static void login(HashMap excelData) throws IOException {//传入的参数为excel的数据Post.map.put("account", excelData.get("account"));Post.map.put("password", excelData.get("password"));String str = Post.post("login");//通过fastjson进行解析BaseBean json = JSON.parseObject(str, BaseBean.class);//断言登录返回码是否是excel对应的返回码Assert.assertEquals(json.getCode(), excelData.get("code"), "sass系统登录异常");}
}
7.登录方法中的Bean采用fastjson来解析,在model下建立对应的BaseBean类,通用的接口返回值只有code、data、message
package com.sass.model;import lombok.Data;/*** @Author: lzq* @Date: 2019/8/14 14:44*/
@Data
public class BaseBean {private String code;private String data;private String message;@Overridepublic String toString(){return("{code:"+code+","+"data:"+data+","+"message:"+message+"}");}
}
8.框架的设计思想是一个类为一个用例集,一个类中可以有多个方法,自行组合用例执行顺序,下面会讲到,目前先在controller下创建一个负责人登录类,excel数据通过testng的DataProvider,经过excelData的解析,返回一个HashMap,key为excel的文件的第一行,value为excel第一行对应的值
package com.sass.controller;import com.sass.utils.Login;
import jxl.read.biff.BiffException;
import org.testng.annotations.DataProvider;
import org.testng.annotations.Test;import java.io.IOException;
import java.util.HashMap;/*** @Author: lzq* @Date: 2019/8/14 15:45*/
public class LeaderLogin extends BaseTest {//提供excel的参数@DataProvider(name="loginDataExpected")public Object[][] expectedData() throws BiffException, IOException {return Login.expectedData(localFileName,"loginLeader");}@Test(dataProvider="loginDataExpected")public void loginExpected(HashMap excelData) throws IOException {Login.login(excelData);}
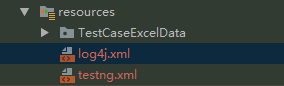
} 9.resources下建立TestCaseExcelData文件夹,在该文件夹内建立对应的excel文件
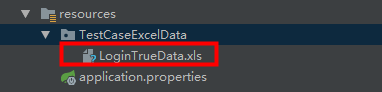
文件路径要和ExcelData类里的路径对应,要修改路径的话需要对应修改ExcelData里的路径即可
10.查看excel格式要求如下
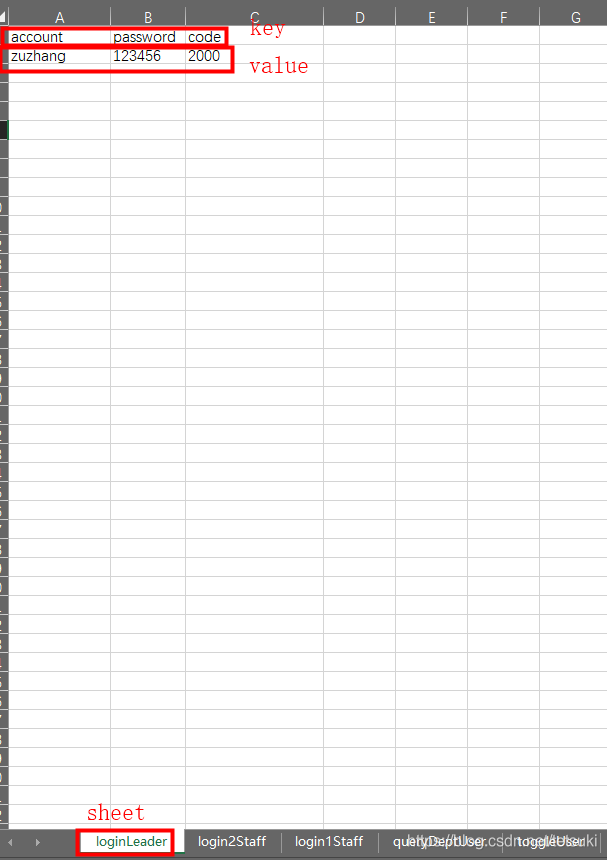
ps: 如果数据有多行的话,该框架会遍历全部数据,一行数据作为1次测试用例
11.框架由testng.xml文件作为入口,用例执行顺序有testng.xml统一管理,在resources下建立testng.xml文件
12.在utils下建立输出报告文件样式 ExtentTestNGIReporterListener,样式有需要可以自行修改
package com.sass.utils;import com.aventstack.extentreports.ExtentReports;
import com.aventstack.extentreports.ExtentTest;
import com.aventstack.extentreports.ResourceCDN;
import com.aventstack.extentreports.Status;
import com.aventstack.extentreports.model.TestAttribute;
import com.aventstack.extentreports.reporter.ExtentHtmlReporter;
import com.aventstack.extentreports.reporter.configuration.ChartLocation;
import com.aventstack.extentreports.reporter.configuration.Theme;
import org.testng.*;
import org.testng.xml.XmlSuite;import java.io.File;
import java.util.*;public class ExtentTestNGIReporterListener implements IReporter {//生成的路径以及文件名private static final String OUTPUT_FOLDER = "test-output/";private static final String FILE_NAME = "AutoTest.html";private ExtentReports extent;@Overridepublic void generateReport(List xmlSuites, List suites, String outputDirectory) {init();boolean createSuiteNode = false;if(suites.size()>1){createSuiteNode=true;}for (ISuite suite : suites) {Map result = suite.getResults();//如果suite里面没有任何用例,直接跳过,不在报告里生成if(result.size()==0){continue;}//统计suite下的成功、失败、跳过的总用例数int suiteFailSize=0;int suitePassSize=0;int suiteSkipSize=0;ExtentTest suiteTest=null;//存在多个suite的情况下,在报告中将同一个一个suite的测试结果归为一类,创建一级节点。if(createSuiteNode){suiteTest = extent.createTest(suite.getName()).assignCategory(suite.getName());}boolean createSuiteResultNode = false;if(result.size()>1){createSuiteResultNode=true;}for (ISuiteResult r : result.values()) {ExtentTest resultNode;ITestContext context = r.getTestContext();if(createSuiteResultNode){//没有创建suite的情况下,将在SuiteResult的创建为一级节点,否则创建为suite的一个子节点。if( null == suiteTest){resultNode = extent.createTest(r.getTestContext().getName());}else{resultNode = suiteTest.createNode(r.getTestContext().getName());}}else{resultNode = suiteTest;}if(resultNode != null){resultNode.getModel().setName(suite.getName()+" : "+r.getTestContext().getName());if(resultNode.getModel().hasCategory()){resultNode.assignCategory(r.getTestContext().getName());}else{resultNode.assignCategory(suite.getName(),r.getTestContext().getName());}resultNode.getModel().setStartTime(r.getTestContext().getStartDate());resultNode.getModel().setEndTime(r.getTestContext().getEndDate());//统计SuiteResult下的数据int passSize = r.getTestContext().getPassedTests().size();int failSize = r.getTestContext().getFailedTests().size();int skipSize = r.getTestContext().getSkippedTests().size();suitePassSize += passSize;suiteFailSize += failSize;suiteSkipSize += skipSize;if(failSize>0){resultNode.getModel().setStatus(Status.FAIL);}resultNode.getModel().setDescription(String.format("Pass: %s ; Fail: %s ; Skip: %s ;",passSize,failSize,skipSize));}buildTestNodes(resultNode,context.getFailedTests(), Status.FAIL);buildTestNodes(resultNode,context.getSkippedTests(), Status.SKIP);buildTestNodes(resultNode,context.getPassedTests(), Status.PASS);}if(suiteTest!= null){suiteTest.getModel().setDescription(String.format("Pass: %s ; Fail: %s ; Skip: %s ;",suitePassSize,suiteFailSize,suiteSkipSize));if(suiteFailSize>0){suiteTest.getModel().setStatus(Status.FAIL);}}}
//        for (String s : Reporter.getOutput()) {
//            extent.setTestRunnerOutput(s);
//        }extent.flush();}private void init() {//文件夹不存在的话进行创建File reportDir= new File(OUTPUT_FOLDER);if(!reportDir.exists()&& !reportDir .isDirectory()){reportDir.mkdir();}ExtentHtmlReporter htmlReporter = new ExtentHtmlReporter(OUTPUT_FOLDER + FILE_NAME);// 设置静态文件的DNS//怎么样解决csdn无法加载的问题htmlReporter.config().setResourceCDN(ResourceCDN.EXTENTREPORTS);htmlReporter.config().setDocumentTitle("自动化测试报告");htmlReporter.config().setReportName("自动化测试报告");htmlReporter.config().setChartVisibilityOnOpen(true);htmlReporter.config().setTestViewChartLocation(ChartLocation.TOP);htmlReporter.config().setTheme(Theme.STANDARD);htmlReporter.config().setCSS(".node.level-1  ul{ display:none;} .node.level-1.active ul{display:block;}");// htmlReporter.config().setEncoding("gbk");extent = new ExtentReports();extent.attachReporter(htmlReporter);extent.setReportUsesManualConfiguration(true);}private void buildTestNodes(ExtentTest extenttest, IResultMap tests, Status status) {//存在父节点时,获取父节点的标签String[] categories=new String[0];if(extenttest != null ){List categoryList = extenttest.getModel().getCategoryContext().getAll();categories = new String[categoryList.size()];for(int index=0;index 0) {//调整用例排序,按时间排序Set treeSet = new TreeSet(new Comparator() {@Overridepublic int compare(ITestResult o1, ITestResult o2) {return o1.getStartMillis()0){if(name.length()>50){name= name.substring(0,49)+"...";}}else{name = result.getMethod().getMethodName();}if(extenttest==null){test = extent.createTest(name);}else{//作为子节点进行创建时,设置同父节点的标签一致,便于报告检索。test = extenttest.createNode(name).assignCategory(categories);}//test.getModel().setDescription(description.toString());//test = extent.createTest(result.getMethod().getMethodName());for (String group : result.getMethod().getGroups())test.assignCategory(group);List outputList = Reporter.getOutput(result);for(String output:outputList){//将用例的log输出报告中test.debug(output);}if (result.getThrowable() != null) {test.log(status, result.getThrowable());}else {test.log(status, "TestDemo " + status.toString().toLowerCase() + "ed");}test.getModel().setStartTime(getTime(result.getStartMillis()));test.getModel().setEndTime(getTime(result.getEndMillis()));}}}private Date getTime(long millis) {Calendar calendar = Calendar.getInstance();calendar.setTimeInMillis(millis);return calendar.getTime();}
}
13.至此,我们先来运行一下用例,右键testng.xml,选择run
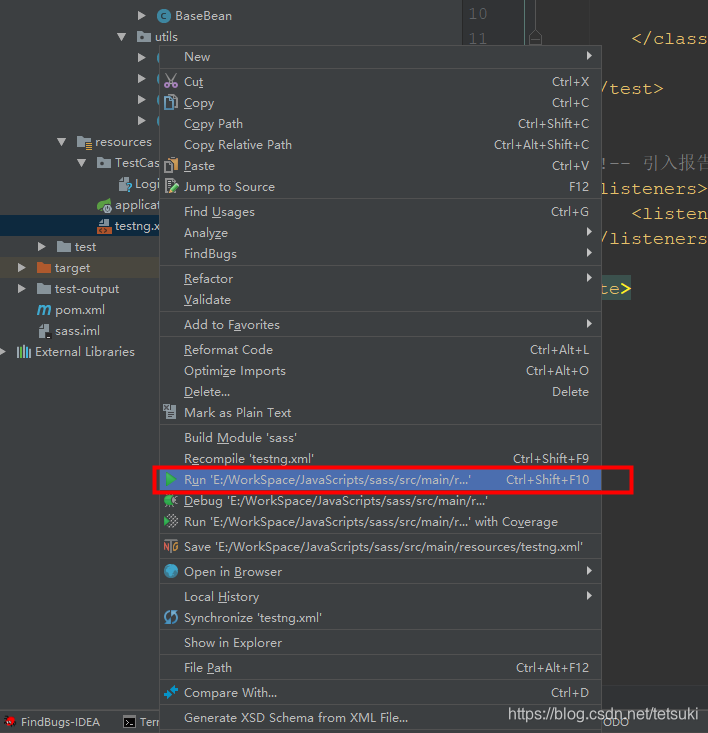
出现环境问题的报错请自行配置jdk解决,配置方法本文不在阐述
结果如下:
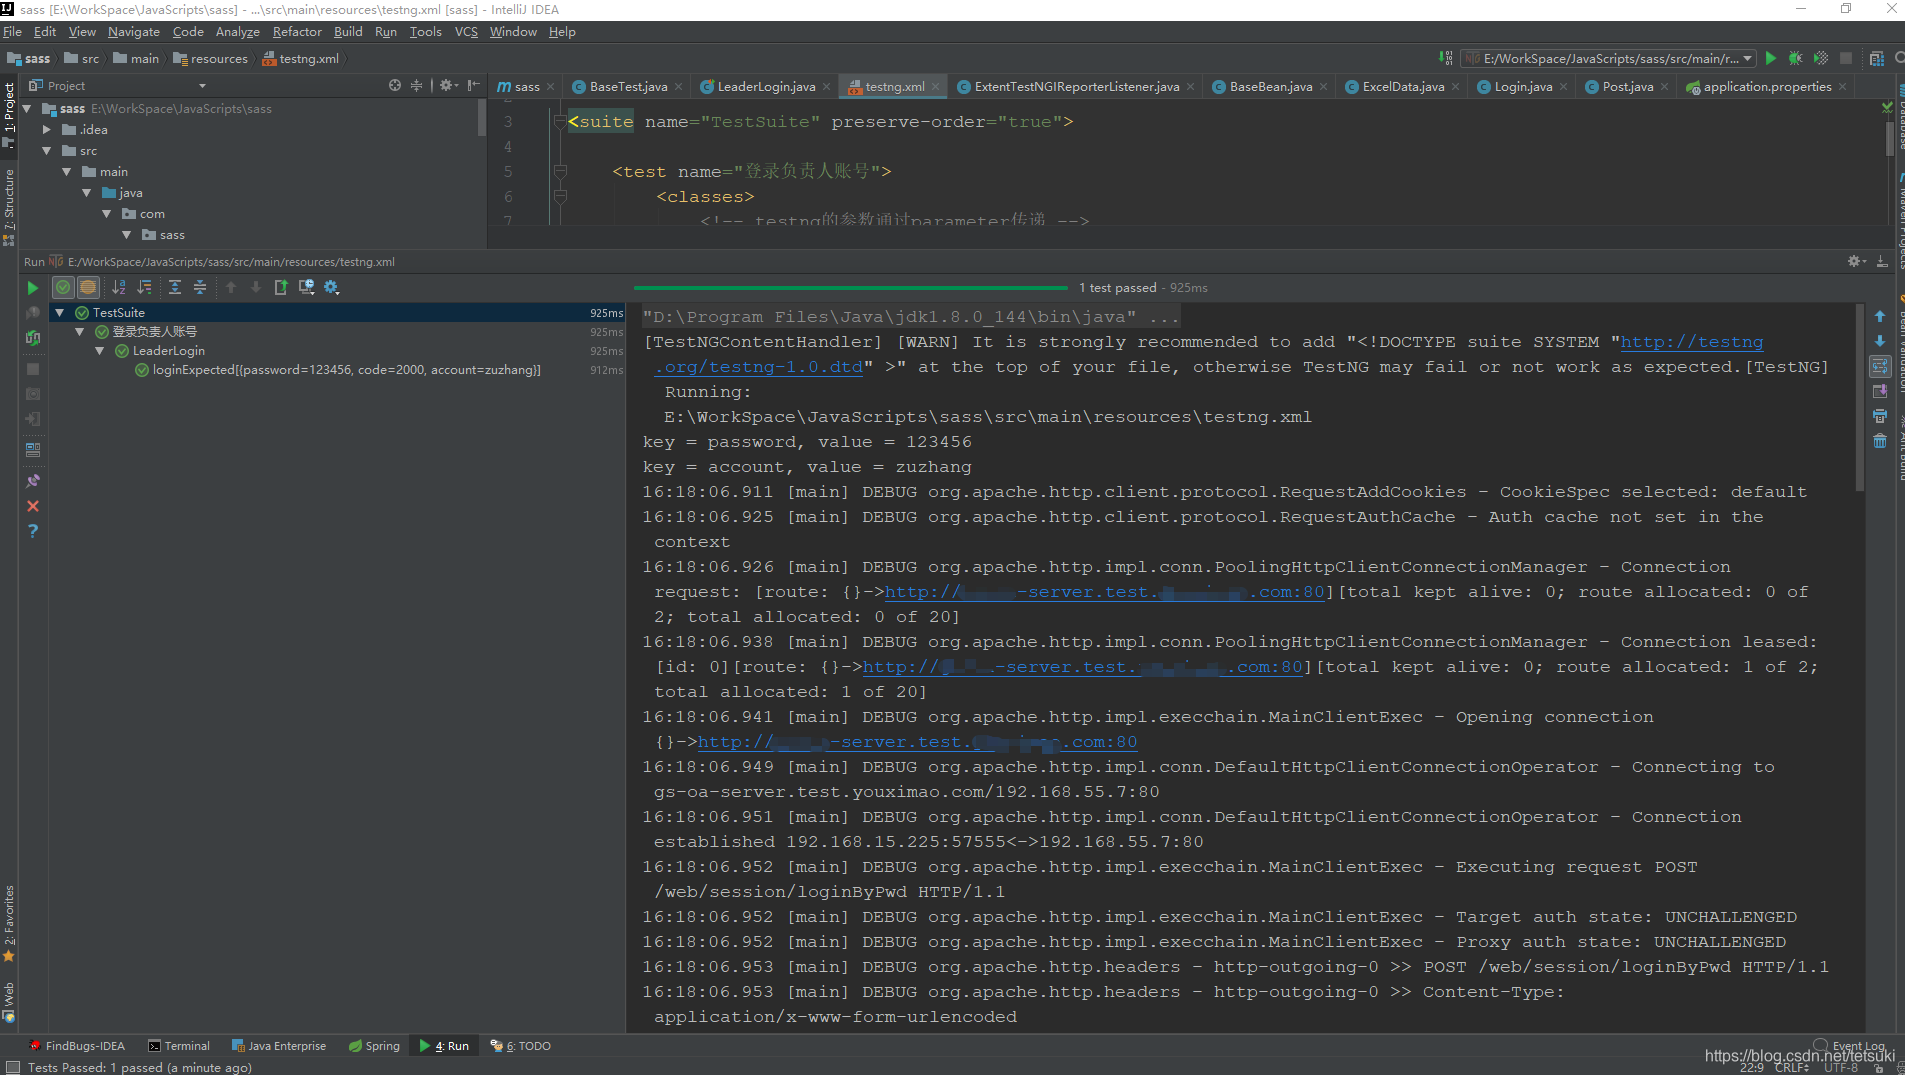
结果出现很多WARN,配置一下log4j.xml
实际项目中登录是不返回Token,为了获取token,需要我们自己去链接数据库获取token
连接数据库
1.在resources目录下新建一个数据库配置文件
2.在resources下建立数据库映射文件,结构如下

先建一个mapper文件夹,再在mapper建立对应的xml文件
3.在utils下新建数据库配置加载类DatabaseUtil
package com.sass.utils;import org.apache.ibatis.io.Resources;
import org.apache.ibatis.session.SqlSession;
import org.apache.ibatis.session.SqlSessionFactory;
import org.apache.ibatis.session.SqlSessionFactoryBuilder;import java.io.IOException;
import java.io.Reader;/*** @Author: lianzheqi* @Date: 2019/6/28 17:41*/
public class DatabaseUtil {public static SqlSession getSqlSession() throws IOException {//获取配置的资源文件Reader reader = Resources.getResourceAsReader("databaseConfig.xml");//得到SqlSessionFactory,使用类加载器加载xml文件SqlSessionFactory factory = new SqlSessionFactoryBuilder().build(reader);//得到sqlsession对象,这个对象就能执行配置文件中的sql语句啦SqlSession session = factory.openSession();return session;}
}
4.在model建立对应的User_oa_token 类和User_register_account类,对应数据库表的各个字段
package com.sass.model;import lombok.Data;/*** @Author: lzq* @Date: 2019/8/14 17:05*/
@Data
public class User_oa_token {private String uid;private String token;
}
package com.sass.model;import lombok.Data;/*** @Author: lzq* @Date: 2019/8/14 16:59*/
@Data
public class User_register_account {private String uid;private String account;private String account_type;
}
数据库表字段如下
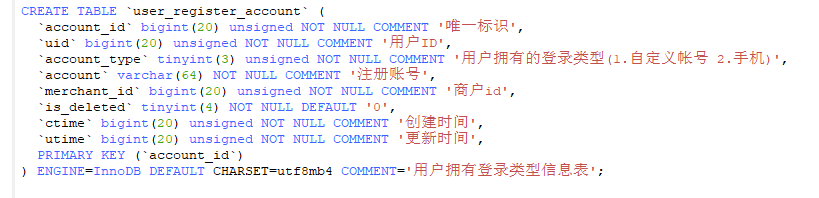
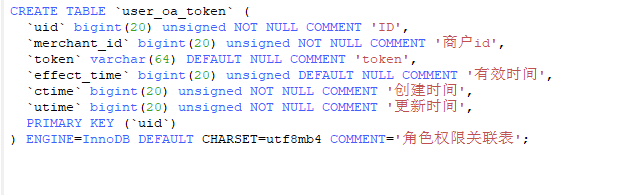
过程:先从注册表根据excel表测试数据中的account账号获得uid,再从token表根据uid获取token值
5.获得token会在后面反复用到,so写成一个工具类GetToken,存放在utils下
package com.sass.utils;import com.sass.model.User_oa_token;
import com.sass.model.User_register_account;
import jxl.read.biff.BiffException;
import org.apache.ibatis.session.SqlSession;
import org.apache.ibatis.session.SqlSessionException;import java.io.IOException;
import java.util.HashMap;/*** @Author: lianzheqi* @Date: 2019/6/28 17:31*/
public class GetToken {private static User_oa_token user;public static Object[][] expectedData(String fileName, String caseName) throws BiffException, IOException {//fileName:excel文件名,caseName:excel sheet名ExcelData e = new ExcelData(fileName, caseName);return e.getExcelData();}public static void getToken(HashMap excelData) throws IOException {SqlSession session = null;try {//链接数据库session = DatabaseUtil.getSqlSession();if(session == null){throw new SqlSessionException();}User_register_account user_register_account = session.selectOne("user_register_account", excelData.get("account"));user = session.selectOne("user_oa_token", user_register_account.getUid());//在这里给post方法里的token赋值Post.cookie = "token=" + user.getToken();System.out.println("数据库取到的token为:" + user.getToken());} finally {if (session != null) {session.close();}}}}
6.登录用户后首先会调用列表接口,在controller新建一个LeaderListMenu类
package com.sass.controller;import com.alibaba.fastjson.JSON;
import com.sass.utils.GetToken;
import com.sass.utils.Post;
import jxl.JXLException;
import org.testng.Assert;
import org.testng.annotations.DataProvider;
import org.testng.annotations.Test;import java.io.IOException;
import java.util.HashMap;/*** @Author: lzq* @Date: 2019/6/28 16:34*/
public class LeaderListMenu extends BaseTest {@DataProvider(name="loginLeader")public Object[][] getToken() throws IOException, JXLException{return GetToken.expectedData(localFileName,"loginLeader");}@Test(dataProvider = "loginLeader",priority = 1)public void getToken(HashMap excelData) throws IOException {GetToken.getToken(excelData);}@Test(priority = 2)public void listMenu() throws IOException {String str = Post.post("listMenu");ListMenuBean json = JSON.parseObject(str,ListMenuBean.class);Assert.assertEquals(json.getCode(),"2000","/web/auth/listMenu接口异常");System.out.println(json.getData().getMenus().get(0).getName());}}
这里涉及到一个知识点,testng的执行顺序问题,加上优先级(priority = 1)可以单独设立方法的执行顺序,不加的话默认都是0,根据方法名字典排序执行,加上后手动排序,越小的越先执行
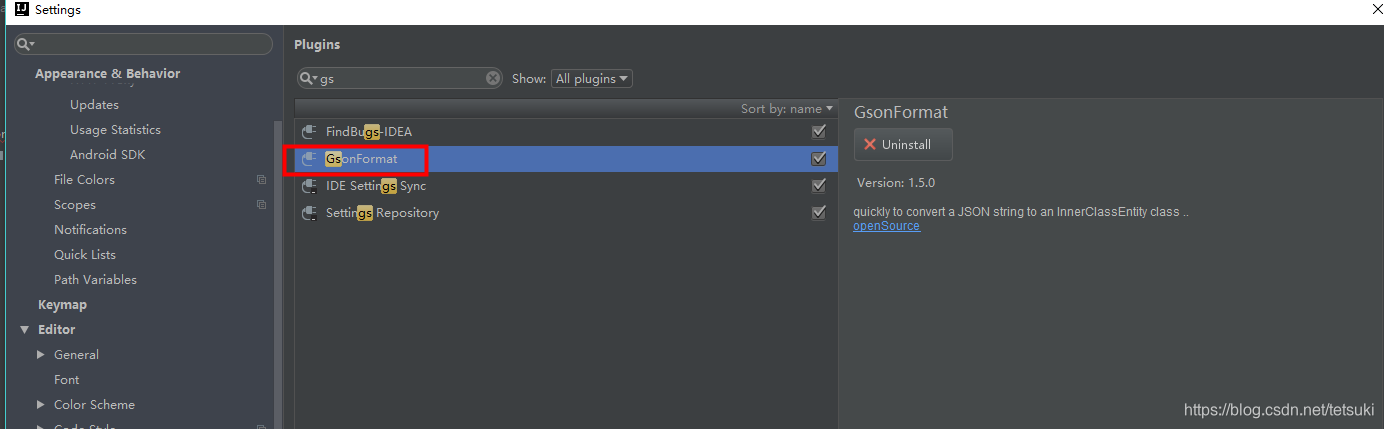
这里涉及到复杂的Bean的编写,idea有个好用的插件,GsonFormat,自行安装
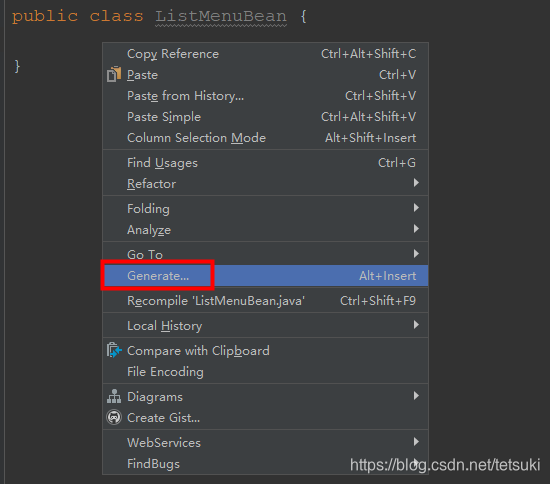
在model新建一个ListMenuBean类,右键Generate
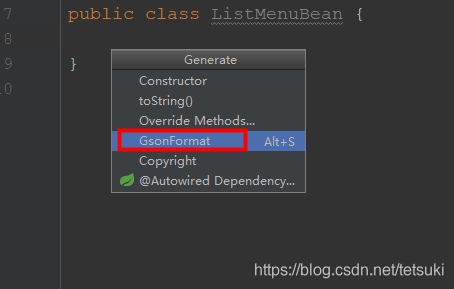
选择GsonFormat
将json返回值复制进去,如下,直接点击ok即可
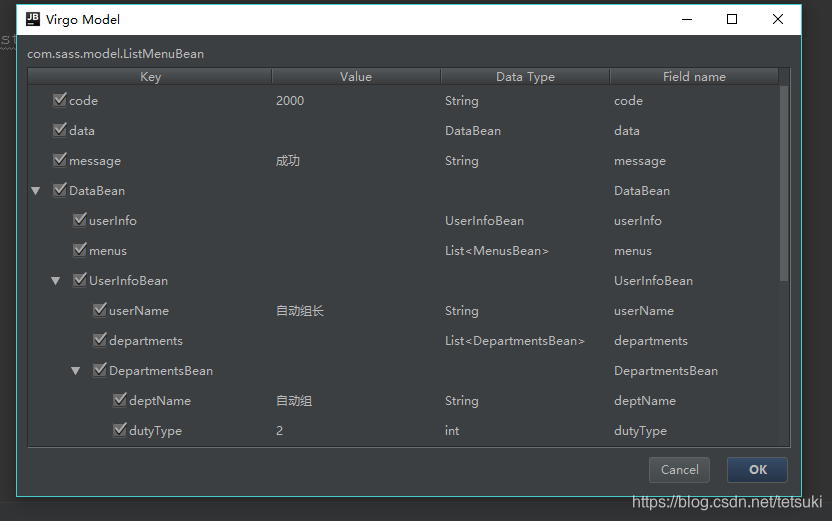
Bean文件就自动创建好了,极其方便,创建的bean如下
package com.sass.model;import java.util.List;/*** @Author: lzq* @Date: 2019/8/14 17:54*/
public class ListMenuBean {private String code;private DataBean data;private String message;public String getCode() {return code;}public void setCode(String code) {this.code = code;}public DataBean getData() {return data;}public void setData(DataBean data) {this.data = data;}public String getMessage() {return message;}public void setMessage(String message) {this.message = message;}public static class DataBean {private UserInfoBean userInfo;private List menus;public UserInfoBean getUserInfo() {return userInfo;}public void setUserInfo(UserInfoBean userInfo) {this.userInfo = userInfo;}public List getMenus() {return menus;}public void setMenus(List menus) {this.menus = menus;}public static class UserInfoBean {private String userName;private List departments;public String getUserName() {return userName;}public void setUserName(String userName) {this.userName = userName;}public List getDepartments() {return departments;}public void setDepartments(List departments) {this.departments = departments;}public static class DepartmentsBean {/*** deptName : 自动组* dutyType : 2* uid : null* deptId : 1157188773538131969* dutyName :*/private String deptName;private int dutyType;private Object uid;private String deptId;private String dutyName;public String getDeptName() {return deptName;}public void setDeptName(String deptName) {this.deptName = deptName;}public int getDutyType() {return dutyType;}public void setDutyType(int dutyType) {this.dutyType = dutyType;}public Object getUid() {return uid;}public void setUid(Object uid) {this.uid = uid;}public String getDeptId() {return deptId;}public void setDeptId(String deptId) {this.deptId = deptId;}public String getDutyName() {return dutyName;}public void setDutyName(String dutyName) {this.dutyName = dutyName;}}}public static class MenusBean {/*** icon :* name : OA首页* permission : welcome* id : 1* type : 1* parentId : 0*/private String icon;private String name;private String permission;private String id;private int type;private String parentId;public String getIcon() {return icon;}public void setIcon(String icon) {this.icon = icon;}public String getName() {return name;}public void setName(String name) {this.name = name;}public String getPermission() {return permission;}public void setPermission(String permission) {this.permission = permission;}public String getId() {return id;}public void setId(String id) {this.id = id;}public int getType() {return type;}public void setType(int type) {this.type = type;}public String getParentId() {return parentId;}public void setParentId(String parentId) {this.parentId = parentId;}}}
}
json内容可以通过postman先跑通,复制;若前端已联调完该接口,也可在浏览器直接复制response
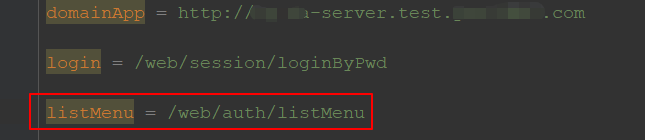
7.由于新增了一个接口,需要在application.properties文件中新增一个uri
新增配置如下
8.在testng.xml中新增一个class用例
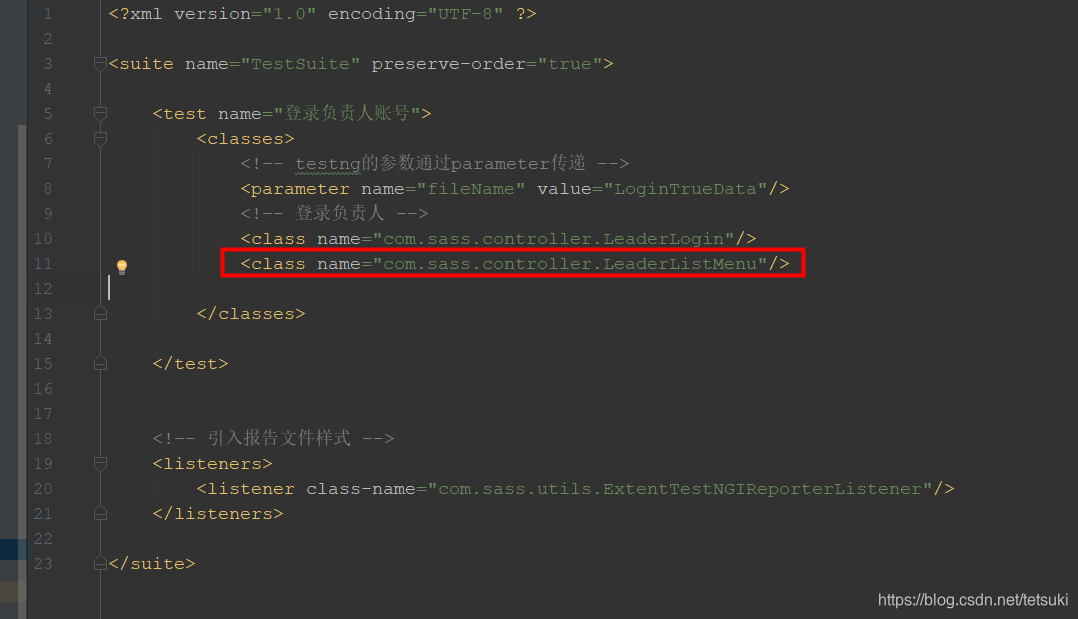
然后再次执行用例

结果按照预期的顺序执行了
9.查看报告文件,在sass\test-output\AutoTest.html里,打开该文件
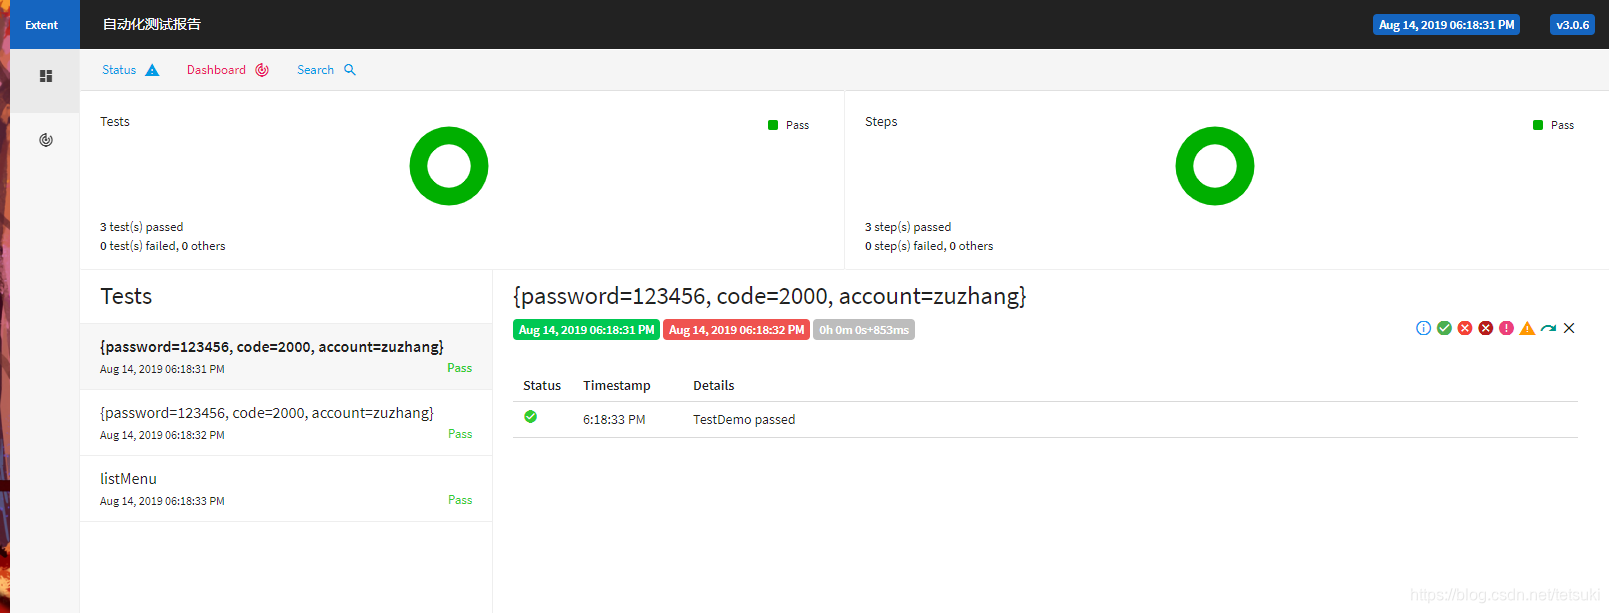
测试报告的样式还算美观
至此,初步的框架已搭建完成,后续的接口只需在此基础上进行组合即可
新增一个查询组织用户的接口
1.首先在application.properties文件中新增一个uri
queryDeptUser = /web/userInfo/queryDeptUser
2.建立对应json返回的Bean类(QueryDeptUserBean)
3.使用插件自动生成Bean,上面有讲到
package com.sass.model;import java.util.List;/*** @Author: lianzheqi* @Date: 2019/8/5 11:34*/
public class QueryDeptUserBean {/*** code : 2000* data : {"list":[{"account":"yuangong1","deptInfos":[{"deptId":"1157188773538131969","deptName":"自动组","dutyName":"成员","dutyType":1,"uid":"1157192455092662273"}],"isEnable":true,"leaderName":"自动组长","mobile":"18823434543","roleId":"1157191595524583425","roleName":"自动组","uid":"1157192455092662273","userName":"自动员工1"}],"total":1}* message : 成功*/private String code;private DataBean data;private String message;public String getCode() {return code;}public void setCode(String code) {this.code = code;}public DataBean getData() {return data;}public void setData(DataBean data) {this.data = data;}public String getMessage() {return message;}public void setMessage(String message) {this.message = message;}public static class DataBean {/*** list : [{"account":"yuangong1","deptInfos":[{"deptId":"1157188773538131969","deptName":"自动组","dutyName":"成员","dutyType":1,"uid":"1157192455092662273"}],"isEnable":true,"leaderName":"自动组长","mobile":"18823434543","roleId":"1157191595524583425","roleName":"自动组","uid":"1157192455092662273","userName":"自动员工1"}]* total : 1*/private int total;private List list;public int getTotal() {return total;}public void setTotal(int total) {this.total = total;}public List getList() {return list;}public void setList(List list) {this.list = list;}public static class ListBean {/*** account : yuangong1* deptInfos : [{"deptId":"1157188773538131969","deptName":"自动组","dutyName":"成员","dutyType":1,"uid":"1157192455092662273"}]* isEnable : true* leaderName : 自动组长* mobile : 18823434543* roleId : 1157191595524583425* roleName : 自动组* uid : 1157192455092662273* userName : 自动员工1*/private String account;private boolean isEnable;private String leaderName;private String mobile;private String roleId;private String roleName;private String uid;private String userName;private List deptInfos;public String getAccount() {return account;}public void setAccount(String account) {this.account = account;}public boolean isIsEnable() {return isEnable;}public void setIsEnable(boolean isEnable) {this.isEnable = isEnable;}public String getLeaderName() {return leaderName;}public void setLeaderName(String leaderName) {this.leaderName = leaderName;}public String getMobile() {return mobile;}public void setMobile(String mobile) {this.mobile = mobile;}public String getRoleId() {return roleId;}public void setRoleId(String roleId) {this.roleId = roleId;}public String getRoleName() {return roleName;}public void setRoleName(String roleName) {this.roleName = roleName;}public String getUid() {return uid;}public void setUid(String uid) {this.uid = uid;}public String getUserName() {return userName;}public void setUserName(String userName) {this.userName = userName;}public List getDeptInfos() {return deptInfos;}public void setDeptInfos(List deptInfos) {this.deptInfos = deptInfos;}public static class DeptInfosBean {/*** deptId : 1157188773538131969* deptName : 自动组* dutyName : 成员* dutyType : 1* uid : 1157192455092662273*/private String deptId;private String deptName;private String dutyName;private int dutyType;private String uid;public String getDeptId() {return deptId;}public void setDeptId(String deptId) {this.deptId = deptId;}public String getDeptName() {return deptName;}public void setDeptName(String deptName) {this.deptName = deptName;}public String getDutyName() {return dutyName;}public void setDutyName(String dutyName) {this.dutyName = dutyName;}public int getDutyType() {return dutyType;}public void setDutyType(int dutyType) {this.dutyType = dutyType;}public String getUid() {return uid;}public void setUid(String uid) {this.uid = uid;}}}}
}
4.controller下编写用例类(QueryDeptUser)
package com.sass.controller;import com.alibaba.fastjson.JSON;
import com.sass.model.QueryDeptUserBean;
import com.sass.utils.ExcelData;
import com.sass.utils.Post;
import jxl.read.biff.BiffException;
import org.testng.Assert;
import org.testng.annotations.*;import java.io.IOException;
import java.util.HashMap;/*** @Author: lianzheqi* @Date: 2019/8/5 10:39*/
public class QueryDeptUser extends BaseTest {@DataProvider(name="queryDeptUserData")public static Object[][] expectedData() throws BiffException, IOException {ExcelData e=new ExcelData(localFileName, "queryDeptUser");return e.getExcelData();}@Test(dataProvider="queryDeptUserData")public void queryDeptUser(HashMap excelData) throws IOException {Post.map.put("mobile",excelData.get("mobile"));Post.map.put("userName",excelData.get("userName"));Post.map.put("isEnable",excelData.get("isEnable"));Post.map.put("deptId",excelData.get("deptId"));Post.map.put("currentPage",excelData.get("currentPage"));Post.map.put("pageSize",excelData.get("pageSize"));String str = Post.post("queryDeptUser");QueryDeptUserBean json = JSON.parseObject(str,QueryDeptUserBean.class);//断言员工存不存在,根据自己测试需要断言Assert.assertEquals(json.getData().getList().get(0).getAccount(),excelData.get("account"),"查询员工查不到");}
}
5.将该测试类组装到testng.xml中

5.右键运行testng文件
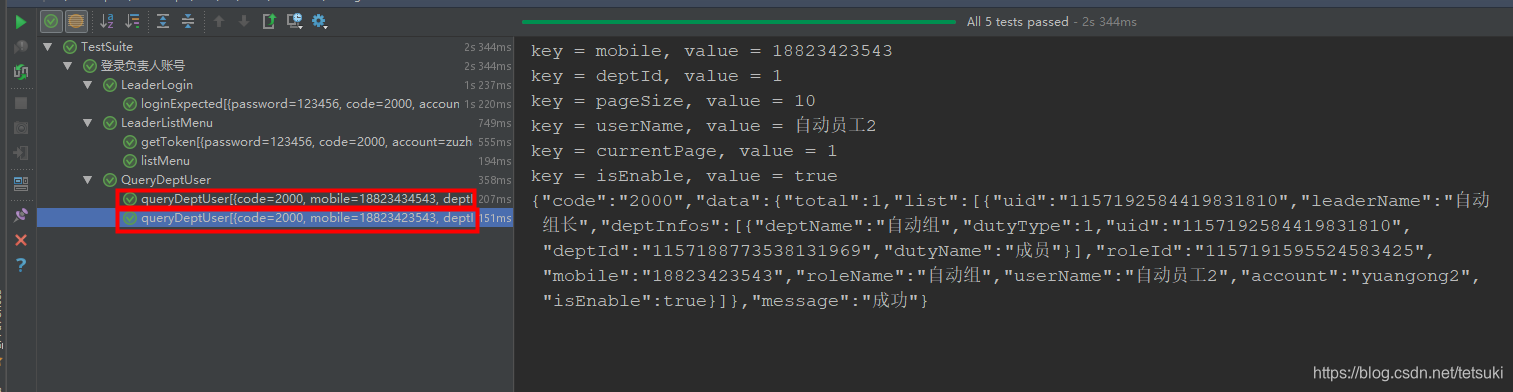
结果该接口执行了2次,是因为excel文件中有2条数据

后面单个接口的过程类似,只是有的接口的返回值需要临时存储一下,当做另一个接口的入参
组装各个接口,达到完整的业务流的功能
具体过程不再展示,最终效果如下
testng不支持同一个test跑2个相同的class,所以将单个用户的操作设计为一个test,切换用户时切换test
至此,通过接口自动化跑业务流已全部完成,后面要做的就是配置持续集成
本文来自互联网用户投稿,文章观点仅代表作者本人,不代表本站立场,不承担相关法律责任。如若转载,请注明出处。 如若内容造成侵权/违法违规/事实不符,请点击【内容举报】进行投诉反馈!