ES+ik+Kibana(win10安装)
1. es-head安装
1.1. 下载地址:https://github.com/mobz/elasticsearch-head## 1.2. 解压文件夹
1.3. crx下es-head.crx改为es-head.zip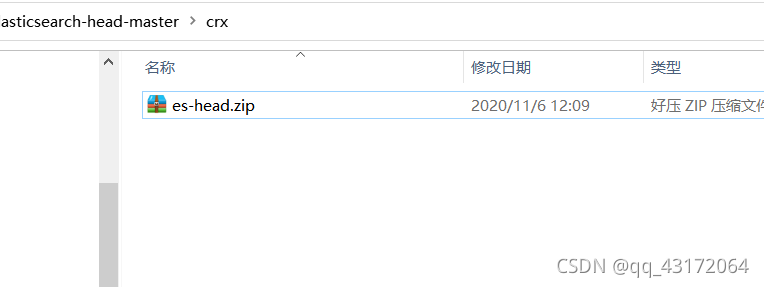
1.4. 解压

1.5. 谷歌扩展程序引入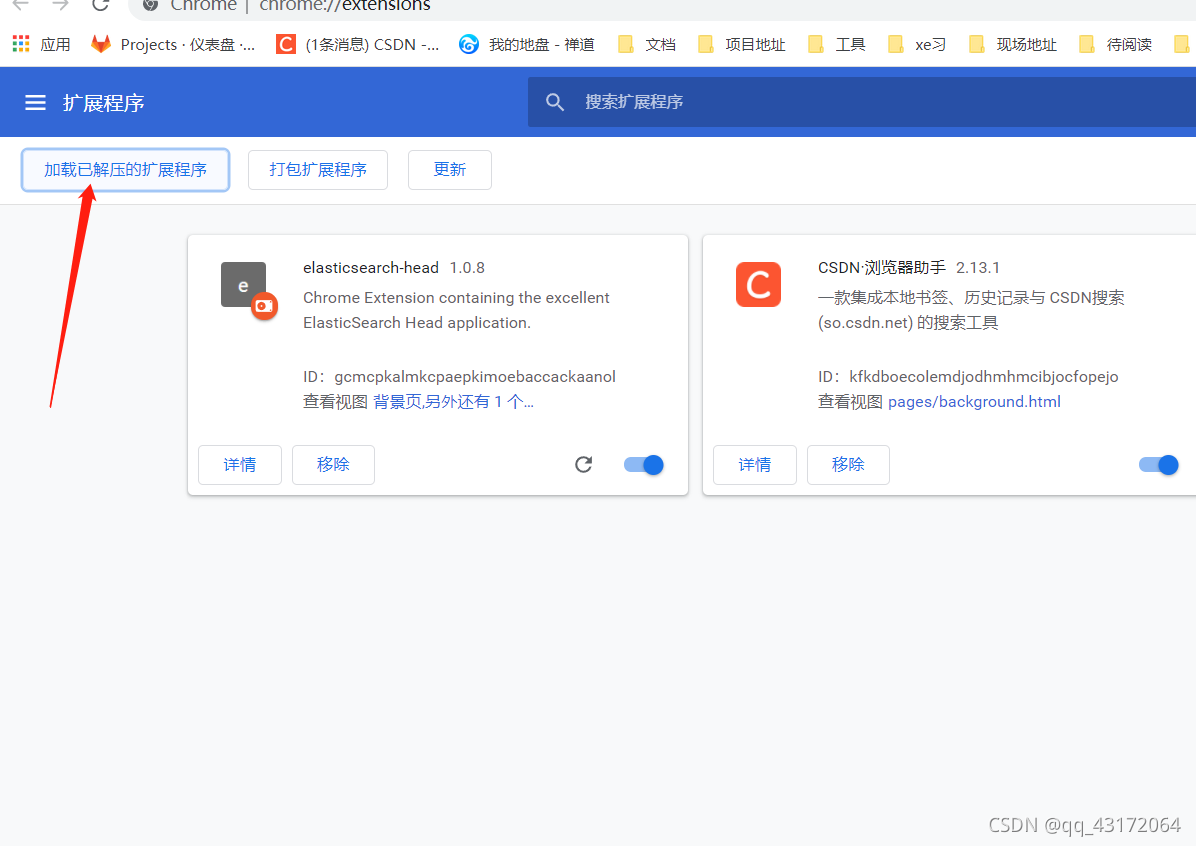
1.6. 打开位置
1.7. 测试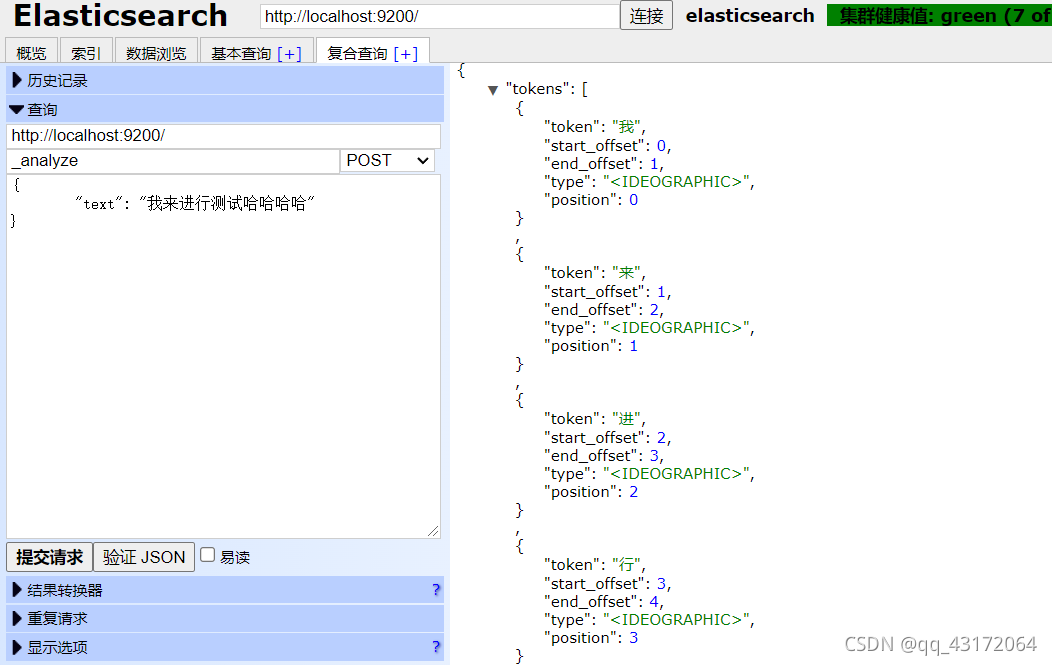
2. ik分词器
2.1 下载es对应版本
https://github.com/medcl/elasticsearch-analysis-ik/releases
2.2 解压到 es目录下的plugins下 命名为ik
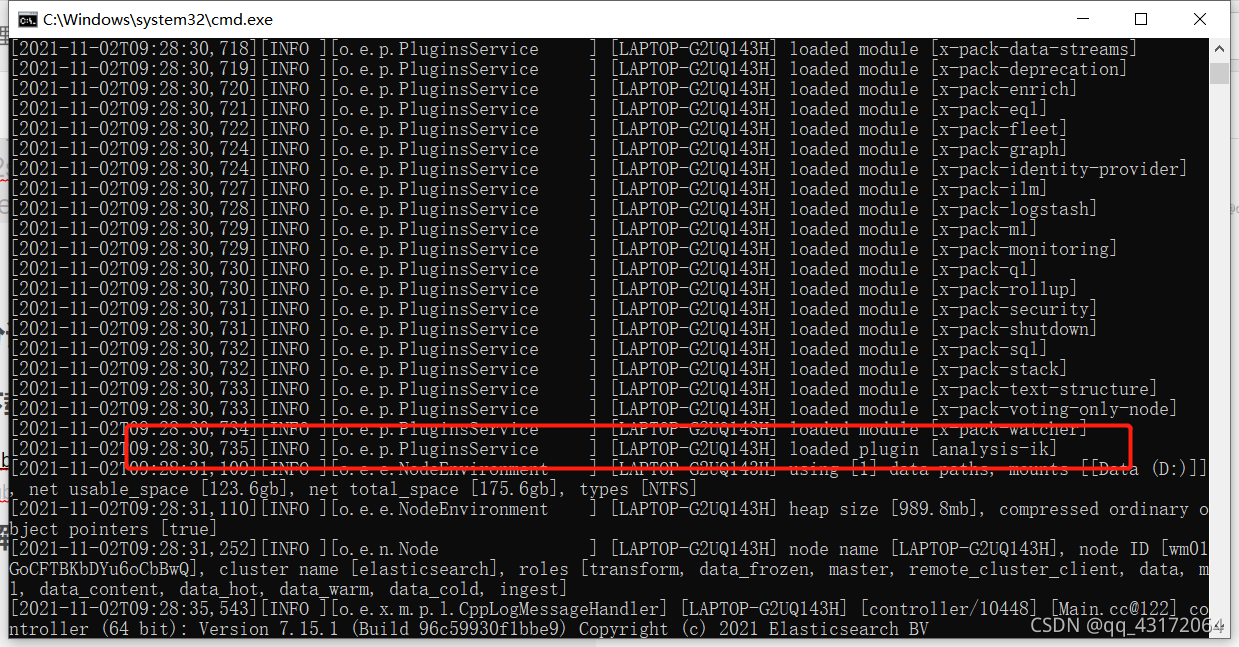
重新启动-打印出如图的日志,则为安装成功
2.3 ik分词器模式
细粒度模式 ik_max_word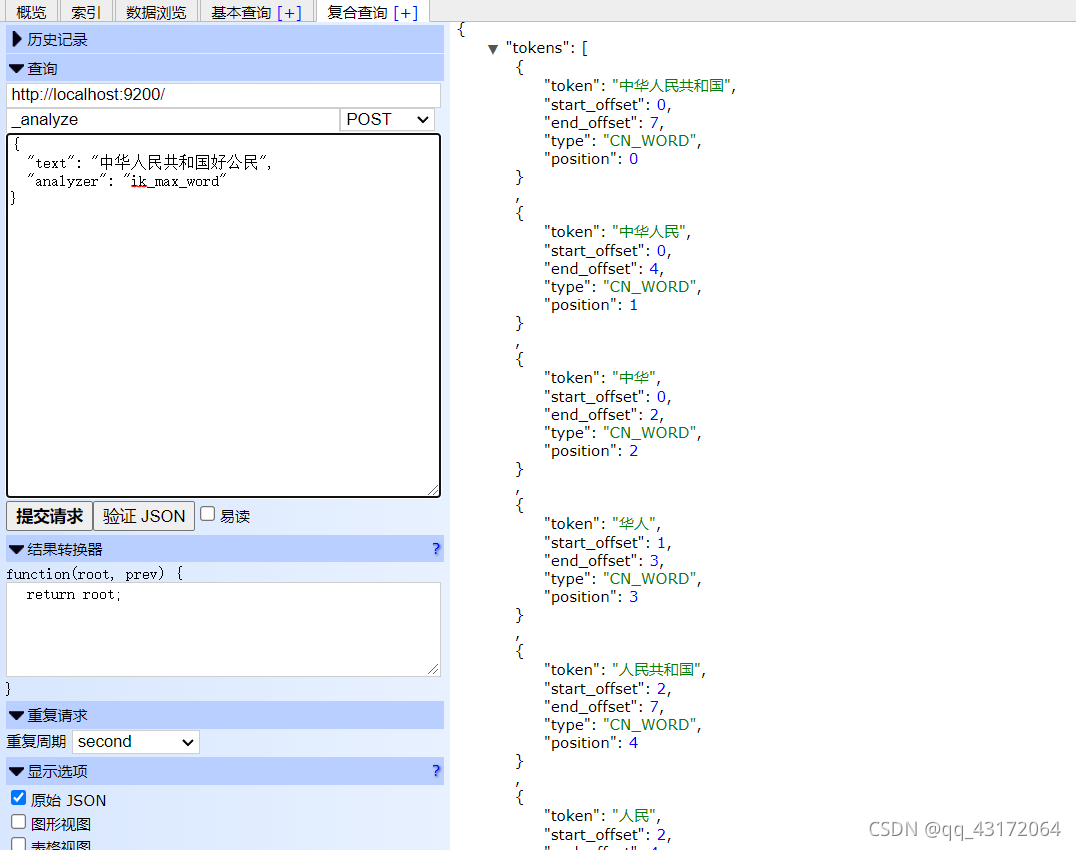
2.4 es中有默认的分词器
处理非汉字的内容
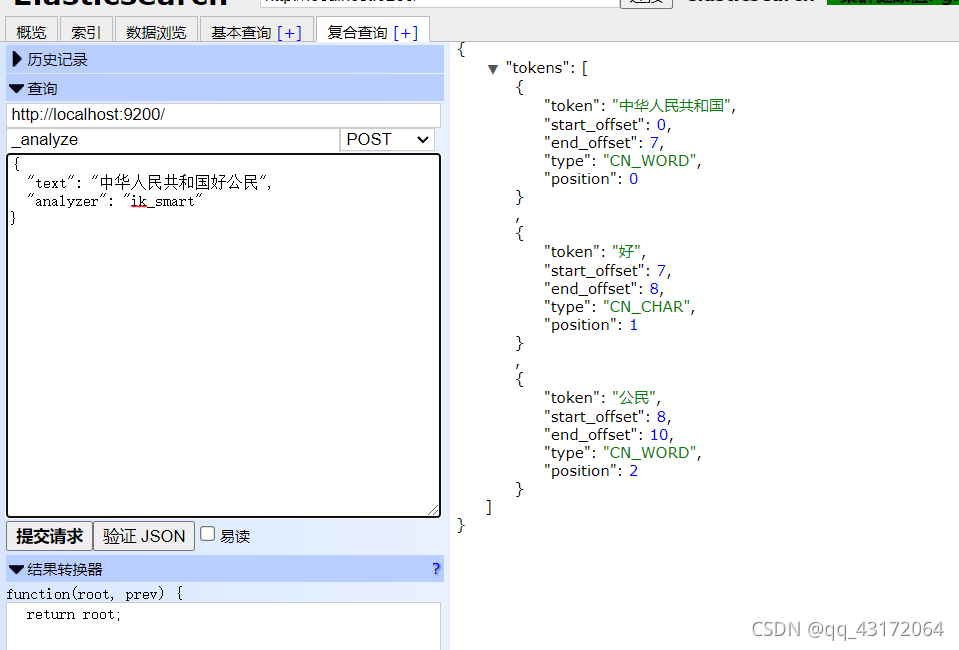
智能模式 ik_smart
3. kibana安装
3.1 下载地址
3.2 启动
启动完成后:http://localhost:5601/app/home#/ 进入页面
3.3 汉化页面
config/kibana.yml 打开
修改为
i18n.locale: "zh-CN"
保存,重启es
3.4 连接es
config/kibana.yml 打开
修改为
elasticsearch.hosts: ["http://localhost:9200"]
保存,重启es
3.5 使用
4. es使用
4.1 官方文档
学习文档
https://www.yiibai.com/elasticsearch/elasticsearch-getting-start.html
中文社区
https://learnku.com/elasticsearch
4.2 基本概念
| 索引库(indices) | Database 数据库 |
|---|---|
| 类型(type) | Table 数据表 |
| 文档(Document) | Row 行 |
| 字段(Field) | Columns 列 |
| 映射配置(mappings) | 每个列的约束(类型、长度) |
详细说明:
| 概念 | 说明 |
|---|---|
| 索引库 (indices) | indices是index的复数,代表许多的索引, |
| 类型(type) | 类型是模拟mysql中的table概念,一个索引库下可以有不同类型的索引,类似 数据库中的表概念。数据库表中有表结构,也就是表中每个字段的约束信息; 索引库的类型中对应表结构的叫做 映射(mapping) ,用来定义每个字段的约束。 |
| 文档 (document) | 存入索引库原始的数据。比如每一条商品信息,就是一个文档 |
| 字段(field) | 文档中的属性 |
| 映射配置 (mappings) | 字段的数据类型、属性、是否索引、是否存储等特性 |
4.3 创建 (简单创库)
创建student库
PUT student
{"settings": {"number_of_shards": 1}
}
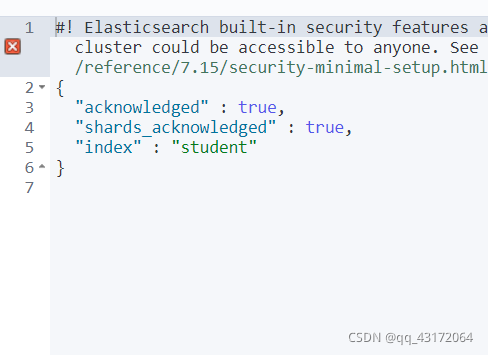
查看
GET student
删除
DELETE student
4.4 操作类型及映射(对应数据库中的列)
* type:类型,可以是text、long、short、date、integer、object等
* index:是否索引,默认为true
* store:是否存储,默认为false
* analyzer:分词器,这里的 ik_max_word 即使用ik分词器
-- 创建库
PUT student
{"settings": {"number_of_shards": 1}
}
-- 创建映射
PUT student/_mapping/_doc?include_type_name=true
{"properties": {"id":{"type": "integer","index": true,"store": true},"name":{"type": "text","index": true,"store": true},"age":{"type": "integer","index": true,"store": true},"sex":{"type":"integer","index": true,"store": true}}
}-- 查看映射
GET student/_mapping
-- 查看多个
GET student,student1/_mapping
-- 查看所有表
GET _all/_mapping
添加映射
POST student1/_mapping
{"properties": {"id":{"type": "integer","index": true,"store": true},"name":{"type": "text","index": true,"store": true},"age":{"type": "integer","index": true,"store": true},"sex":{"type":"integer","index": true,"store": true}}
}
新增数据(不指定id)
POST student/_doc
{"id":1,"name":"王政","age":"24","sex":"1"
}
指定id
POST student/_doc/1
{"id":1,"name":"王政","age":"24","sex":"1"
}
更新
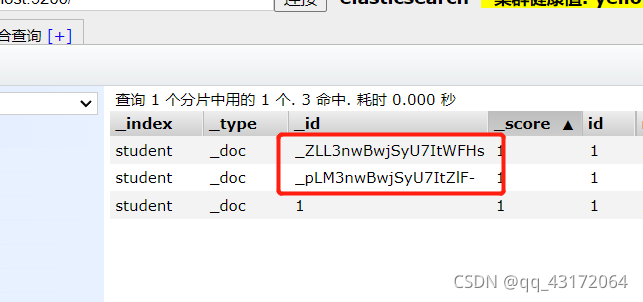
PUT student/_doc/_pLM3nwBwjSyU7ItZlF-
{"id":123
}
注意:其他为空的字段内容会被赋予空值
删除
DELETE student/_doc/_ZLL3nwBwjSyU7ItWFHs
4.5 进阶版-》查询
4.5.1 查询所有(match_all)
GET student/_search
{"query": {"match_all": {}}
}
4.5.2 match 条件查询
match 类型查询,会把查询条件进行分词(针对text类型),然后进行查询,多个词条之间默认是or的关系
GET student/_search
{"query": {"match": {"name": "毛"}  }
}
and 关系
GET student/_search
{"query": {"match": {"name": {"query": "王红","operator": "and"} }  }
}
4.5.3 term词条匹配
term 查询被用于精确值 匹配,这些精确值可能是数字、时间、布尔或者那些未分词的字符串
一般是在keyword上进行查询
GET student/_search
{"query": {"term": {"name":  "毛毛"}}
}
4.5.4 bool 布尔组合
bool 把各种其它查询通过 must (与)、 must_not (非)、 should (或)进行组合
GET student/_doc/_search
{"query":{"bool":{"must":{"match":{"name": "毛"}},"must_not":{"match":{"name":"阿"}},"should":{"match":{"name":"三"}}}}
}
4.5.5 range范围查询
range 查询找出指定区间内的数字或者时间
| 操作符 | 解释 |
|---|---|
| gt | 大于 |
| gte | 大于等于 |
| lt | 小于 |
| lte | 小于等于 |
-- 搜索id小于5
GET student/_doc/_search
{"query":{"range":{"id":{"lt":5}}}
}--搜索小于5大于等于2的
GET student/_doc/_search
{"query":{"range":{"id":{"lt":5,"gte":"2"}}}
}
4.5.6 fuzzy模糊查询
term的模糊查询,偏差不得超过1个
-- 搜索跟山西相近的
GET student1/_doc/_search
{"query":{"fuzzy":{"address":"山西村"}}
}
4.5.7 指定返回字段(includes)
-- 显示 id 和 name
GET student/_doc/_search
{"_source":{"includes":["id","name"]},"query":{"term":{"name":"毛"}}
}
-- 同样的效果
GET student/_doc/_search
{"_source":["id","name"],"query":{"term":{"name":"毛"}}
}
4.5.8 指定字段不返回(excludes )
GET student/_doc/_search
{"_source":{"excludes":["id","name"]},"query":{"term":{"name":"毛"}}
}
4.5.9 filter过滤
-- 搜索name包含毛,并且id大于3且小于5的数据
GET student/_doc/_search
{"query":{"bool":{"must":{"match":{"name":"毛"}},"filter":{"range":{"id":{"gt": 3,"lt": 5}}}}}
}
4.5.10 sort排序
text类型不可用
-- 升序
GET student/_doc/_search
{"query":{"match":{"name":"毛"}},"sort":[{"id":{"order":"asc"}}]
}--降序
GET student/_doc/_search
{"query":{"match":{"name":"毛"}},"sort":[{"id":{"order":"desc"}}]
}-- 多字段
GET student/_doc/_search
{"query":{"match":{"name":"毛"}},"sort":[{"id":{"order":"desc"}},{"age":{"order":"desc"}}]
}
4.5.11 分页
-- 从第1个开始取1个
GET student/_doc/_search
{"query":{"term":{"name":"毛"}},"from":0,"size":1
}
4.5.12 高亮
-- name中包含毛的字段将会高亮
GET student/_doc/_search
{"query":{"term":{"name":"毛"}},"highlight": {"pre_tags": "","post_tags": "","fields": {"name": {}}}
}
4.6 聚合
比较常用的一些度量聚合方式:
- Avg Aggregation:求平均值
- Max Aggregation:求最大值
- Min Aggregation:求最小值
- Percentiles Aggregation:求百分比
- Stats Aggregation:同时返回avg、max、min、sum、count等
- Sum Aggregation:求和
- Top hits Aggregation:求前几
- Value Count Aggregation:求总数
5. spring boot集成es
5.1 引入依赖
<dependency><groupId>org.springframework.bootgroupId><artifactId>spring-boot-starter-data-elasticsearchartifactId>dependency>
5.2 配置
spring:elasticsearch:rest:uris: 127.0.0.1:9200
6. Spring Boot集成es(spring-boot-starter-data-elasticsearch )
6.1引入依赖
! 注意 sprign - boot的版本是2.3.4.RELEASE, spring-boot-starter-data-elasticsearch版本也一样,版本不同使用会有很大的差异
<dependency><groupId>org.springframework.bootgroupId><artifactId>spring-boot-starter-data-elasticsearchartifactId>dependency><dependency><groupId>org.springframework.bootgroupId><artifactId>spring-boot-starter-webartifactId>dependency>
6.2 实体类注解
* @Document:声明索引库配置* indexName:索引库名称* shards:分片数量,默认5* replicas:副本数量,默认1
* @Id:声明实体类的id
* @Field:声明字段属性* type:字段的数据类型* analyzer:指定分词器类型* index:是否创建索引* nullValue:默认初始值
踩坑:type 类型为 FieldType.Date,需要添加格式化
@Field(type = FieldType.Date,format = DateFormat.basic_date_time)
6.3 代码创建索引库以及映射
    @Testvoid contextLoads() {IndexOperations indexOperations = template.indexOps(KnowledgeArticle.class);
//        创建-索引库boolean b = indexOperations.create();System.out.println("新增结果:" + b1);}
6.4 增删改查
mapper类
@Mapper
public interface KaMapper extends ElasticsearchRepository<KnowledgeArticle,String>{
} @Autowiredprivate ElasticsearchRestTemplate template;@Autowiredprivate TestMapper testMapper;@Autowiredprivate KaMapper kaMapper;
// 创建@Testvoid contextLoads() {IndexOperations indexOperations = template.indexOps(KnowledgeArticle.class);
// 创建-索引库
// boolean b = indexOperations.create();//创建字符串映射boolean b1 = template.putMapping(KnowledgeArticle.class);System.out.println("新增结果:" +b1);}/*新增*/@Testvoid add() {KnowledgeArticle knowledgeArticle = testMapper.selectById(629657898296803328L);knowledgeArticle.setId(1L);KnowledgeArticle save = kaMapper.save(knowledgeArticle);System.out.println(save);
// IndexQuery indexQuery = new IndexQueryBuilder()
// .withId(knowledgeArticle.getId().toString())
// .withObject(knowledgeArticle)
// .build();
// IndexCoordinates icd = template.getIndexCoordinatesFor(knowledgeArticle.getClass());
// String index = template.index(indexQuery, icd);
// System.out.println(index);}
/*获取*/@TestKnowledgeArticle get(){return template.queryForObject(GetQuery.getById("629657898296803328"), KnowledgeArticle.class);}//更新@Testvoid update(){KnowledgeArticle knowledgeArticle = get();knowledgeArticle.setIncId(1);KnowledgeArticle save = kaMapper.save(knowledgeArticle);System.out.println(save);}
// 删除@Testvoid delete(){kaMapper.deleteById("1");}7 pinyin插件(了解有这个东西)
8 设置es登录密码
es设置
1. 在es安装目录conf下
2. 打开elasticsearch.yml
3. 末尾添加:xpack.security.enabled: true xpack.license.self_generated.type: basicxpack.security.transport.ssl.enabled: true
4. bin目录下执行:elasticsearch-setup-passwords interactive
5. 需要数据6位数密码(123456)
6. 创建的用户:elastic apm_systemkibana_systemlogstash_systembeats_systemremote_monitoring_user
kibana设置
在kibana安装目录config下添加:
elasticsearch.username: "kibana_system"
elasticsearch.password: "123456"
登录使用该账户登录:elastic(有权限)
本文来自互联网用户投稿,文章观点仅代表作者本人,不代表本站立场,不承担相关法律责任。如若转载,请注明出处。 如若内容造成侵权/违法违规/事实不符,请点击【内容举报】进行投诉反馈!