Django自定义Swagger写接口文档
引言
最近因为公司业务问题,需要用到django来处理关于接口文档的问题
因为是之前常用Swagger编写接口文档,所以这次Django的接口文档也选择了用Swagger来处理,没想到在Django的Swagger中却有很多不明就里的坑。特此记录,也算为后来者铺平一些道路。
本文主要介绍两种接口的写法,其一是默认接口参数的定义法,其二是自定义接口参数的定义法
环境
Django==2.1
django-rest-swagger==2.1.2
djangorestframework==3.9.1
目录结构
F:.
│  manage.py
│
├─example
│  │  admin.py
│  │  apps.py
│  │  models.py
│  │  tests.py
│  │  views.py
│  │  __init__.py
│  │
│  └─migrations
│          __init__.py
│
└─swagger_demo│  settings.py│  urls.py│  wsgi.py└─ __init__.py
settings.py配置
INSTALLED_APPS = ['django.contrib.admin','django.contrib.auth','django.contrib.contenttypes','django.contrib.sessions','django.contrib.messages','django.contrib.staticfiles',"rest_framework","rest_framework_swagger","example",
]
我们导入了rest_framework,rest_framework_swagger,example三个框架,其中example是我们创建的app
继续往settings.py中添加配置
REST_FRAMEWORK = {'DEFAULT_PERMISSION_CLASSES': ('rest_framework.permissions.IsAuthenticated',# 'rest_framework.permissions.AllowAny',),'DEFAULT_AUTHENTICATION_CLASSES': ('rest_framework_jwt.authentication.JSONWebTokenAuthentication','rest_framework.authentication.BasicAuthentication','rest_framework.authentication.SessionAuthentication',# 'rest_framework.authentication.TokenAuthentication',),'DEFAULT_PARSER_CLASSES': ['rest_framework.parsers.FormParser','rest_framework.parsers.MultiPartParser','rest_framework.parsers.JSONParser',]
}SWAGGER_SETTINGS = {'SECURITY_DEFINITIONS': {"basic": {'type': 'apiKey','in': 'header','name': 'Authorization',}},# 如果需要登录才能够查看接口文档, 登录的链接使用restframework自带的.'LOGIN_URL': 'rest_framework:login','LOGOUT_URL': 'rest_framework:logout',# 'DOC_EXPANSION': None,# 'SHOW_REQUEST_HEADERS':True,# 'USE_SESSION_AUTH': True,# 'DOC_EXPANSION': 'list',# 接口文档中方法列表以首字母升序排列'APIS_SORTER': 'alpha',# 如果支持json提交, 则接口文档中包含json输入框'JSON_EDITOR': True,# 方法列表字母排序'OPERATIONS_SORTER': 'alpha','VALIDATOR_URL': None,'SHOW_REQUEST_HEADERS': True,
}
编写接口
默认schema接口参数
./swagger_demo/urls.py
from django.contrib import admin
from django.urls import path, includefrom rest_framework.schemas import get_schema_view
from rest_framework_swagger.renderers import SwaggerUIRenderer, OpenAPIRendererschema_view = get_schema_view(title='API', renderer_classes=[SwaggerUIRenderer, OpenAPIRenderer])urlpatterns = [path('admin/', admin.site.urls),path('docs/', schema_view, name='docs'),path('example/', include('example.urls')),
]
可以看到,这里我们采用的是默认的schema来编写的接口。
配置example.urls
./example/urls.py
from django.urls import path
from . import viewsurlpatterns = [path('post_text/', views.PostText.as_view()),
]
编写接口
./example/views.py
from .serializer import *
from django.http import HttpResponse
from rest_framework.permissions import AllowAny
from rest_framework.generics import GenericAPIView
# Create your views here.class PostText(GenericAPIView):"""POST Field sample"""serializer_class = PostTextSerialzerpermission_classes = (AllowAny,)@staticmethoddef post(request, *args, **kwargs):text = request.POST['text']return HttpResponse(text)
创建serializer.py文件
swagger之所以能够构建我们的接口参数都是依靠serializer.py中的序列字段
./example/serializer.py
from rest_framework import serializers# 如果是非模型字段,继承serializers.Serializer。模型字段需要继承serializers.ModelSerializer
class PostTextSerialzer(serializers.Serializer):# 参数字段,通过设定不同的参数可以出现不同的组合效果,可以具体参照django文档text = serializers.CharField()class Meta:fields = "__all__"最后同步数据库python manage.py migrate
启动djangopython manage.py runserver访问localhost:8000/docs可以看到
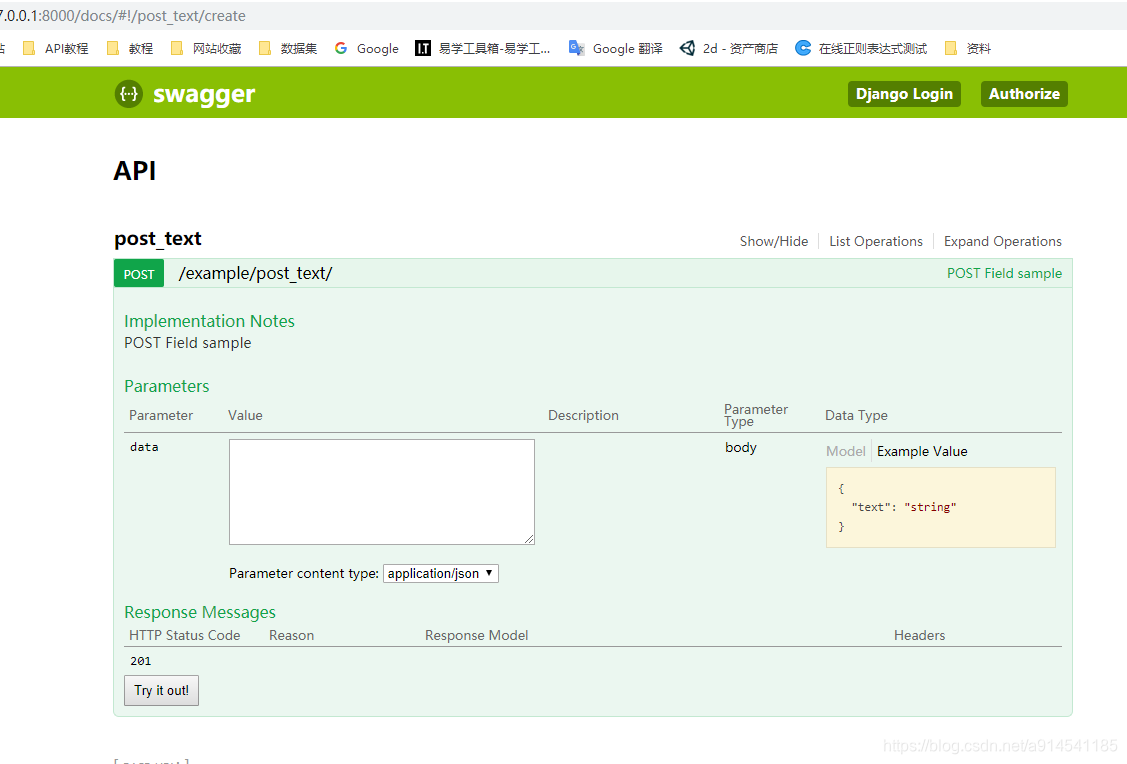
这样,一个接口参数就成功构造出来了
自定义schema参数
创建新文件schema.py
./swagger_demo/scheam.py
from rest_framework.renderers import CoreJSONRenderer, coreapi
from rest_framework.views import APIView
from rest_framework.response import Response
from rest_framework.permissions import AllowAny
from rest_framework.schemas import SchemaGenerator
from rest_framework.schemas.generators import LinkNode, insert_into
from rest_framework_swagger import renderersclass MySchemaGenerator(SchemaGenerator):def get_links(self, request=None):# from rest_framework.schemas.generators import LinkNode,links = LinkNode()paths = []view_endpoints = []for path, method, callback in self.endpoints:view = self.create_view(callback, method, request)path = self.coerce_path(path, method, view)paths.append(path)view_endpoints.append((path, method, view))# Only generate the path prefix for paths that will be includedif not paths:return Noneprefix = self.determine_path_prefix(paths)for path, method, view in view_endpoints:if not self.has_view_permissions(path, method, view):continuelink = view.schema.get_link(path, method, base_url=self.url)link._fields += self.get_core_fields(view)subpath = path[len(prefix):]keys = self.get_keys(subpath, method, view)insert_into(links, keys, link)return links# Take our custom parameters from the class and pass them to swagger to generate the interface documentation.@staticmethoddef get_core_fields(view):return getattr(view, 'core_api_fields', ())class SwaggerSchemaView(APIView):_ignore_model_permissions = Trueexclude_from_schema = Truepermission_classes = [AllowAny]renderer_classes = [CoreJSONRenderer,renderers.OpenAPIRenderer,renderers.SwaggerUIRenderer]def get(self, request):generator = MySchemaGenerator(title='API',description='''api文档''')schema = generator.get_schema(request=request)return Response(schema)def DocParam(name="default", location="query",required=True, description=None, type="string",schema=None, example=None,*args, **kwargs):"""构造参数:param name: Field name:param location: Parameter input method E.g: query, header, from, fromData...:param required: Enter Field True or False:param description: Parameter Description:param type: Parameter format E.g: string, file...:param args::param kwargs::return:"""return coreapi.Field(name=name, location=location,required=required, description=description,type=type)
通过重写SchemaGenerator来自定义我们的参数
swagger_demo.urls需要进行更改
./swagger_demo/urls.py
from django.contrib import admin
from django.urls import path, include
from .schema import SwaggerSchemaView
# from rest_framework.schemas import get_schema_view
# from rest_framework_swagger.renderers import SwaggerUIRenderer, OpenAPIRenderer# schema_view = get_schema_view(title='API', renderer_classes=[SwaggerUIRenderer, OpenAPIRenderer])urlpatterns = [path('admin/', admin.site.urls),# path('docs/', schema_view, name='docs'),path('docs/', SwaggerSchemaView.as_view(), name='apiDocs'),path('example/', include('example.urls')),
]
由于自定义的schema只是添加了自定义的功能,之前的并没有改变,所以我们之前写的接口可以保留,同时添加新的接口作为对比
./example/urls.py
from django.urls import path
from . import viewsurlpatterns = [path('post_text/', views.PostText.as_view()),path('file_upload/', views.FileUpload.as_view()),path('get_text/', views.GetText.as_view()),
]
编写接口
./example/views.py
import uuid
from .serializer import *
from swagger_demo.schema import DocParam
from django.http import HttpResponse
from rest_framework.views import APIView
from rest_framework.permissions import AllowAny
from rest_framework.generics import GenericAPIView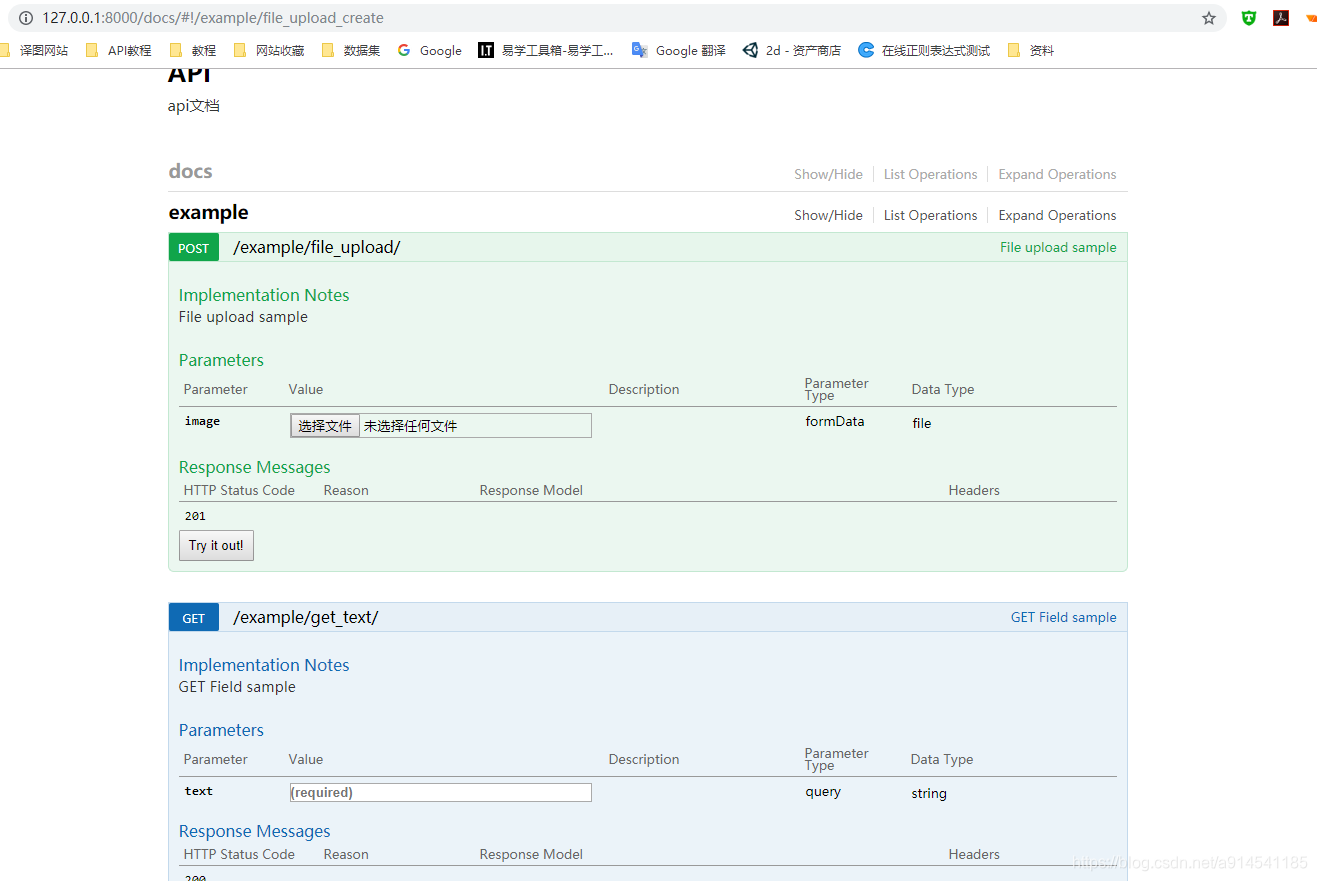
# Create your views here.class PostText(GenericAPIView):"""POST Field sample"""# core_api_fields = (# DocParam("text", "formData", type="string"),# )serializer_class = PostTextSerialzerpermission_classes = (AllowAny,)@staticmethoddef post(request, *args, **kwargs):text = request.POST['text']return HttpResponse(text)class FileUpload(APIView):"""File upload sample"""core_api_fields = (DocParam("image", "formData", type="file"),)permission_classes = (AllowAny,)def post(self, request, *args, **kwargs):image = request.FILES.get('image')image_name = self.write_image(image)return HttpResponse(image_name)def write_image(self, image):# 写入图片image_name = uuid.uuid4()image_path = f"example/static/image/{image_name}.jpg"with open(image_path, 'wb') as f:for buf in image.chunks():f.write(buf)return image_nameclass GetText(APIView):"""GET Field sample"""core_api_fields = (DocParam("text", "query", type="string"),)permission_classes = (AllowAny,)@staticmethoddef get(request, *args, **kwargs):text = request.GET['text']return HttpResponse(text)做完这些,我们就可以再次运行python manage.py runserver看看效果了
访问localhost:8000/docs可以看到出现如下界面
结语
以上代码只是示范了少数接口参数的做法,更多的需要大家进行拓展,很多不便理解的地方都在代码中写有注释,大家可以仔细看看注释
欢迎大家关注我的博客爱吃回锅肉的胖子技术文章我会先发布到我的个人博客中
本文来自互联网用户投稿,文章观点仅代表作者本人,不代表本站立场,不承担相关法律责任。如若转载,请注明出处。 如若内容造成侵权/违法违规/事实不符,请点击【内容举报】进行投诉反馈!