OpenCV+Tensorflow的手势识别
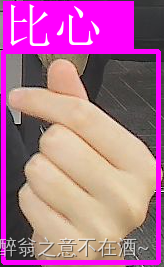
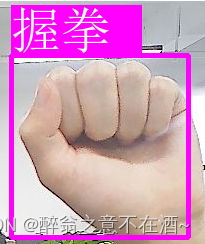
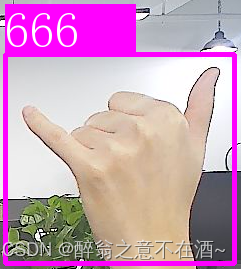
一、效果展示
此次只选录了以下4种手势,当然你可以自己选择增加手势。

二、项目实现原理
首先通过opencv的手部检测器检测出我们的手,然后录入自己想要检测的手部信息,使用Tensorflow训练得到预训练权重文件(此处已经训练完成,直接调用即可!),调用预训练权重文件对opencv检测的手部信息进行预测,实时返回到摄像头画面,到此整体项目已经实现,此外还可以添加语音模块如speech,对检测到的手势信息进行语音播报。
三、项目环境安装
首先python的版本此处选择为3.7.7(其余版本相差不大的都可)
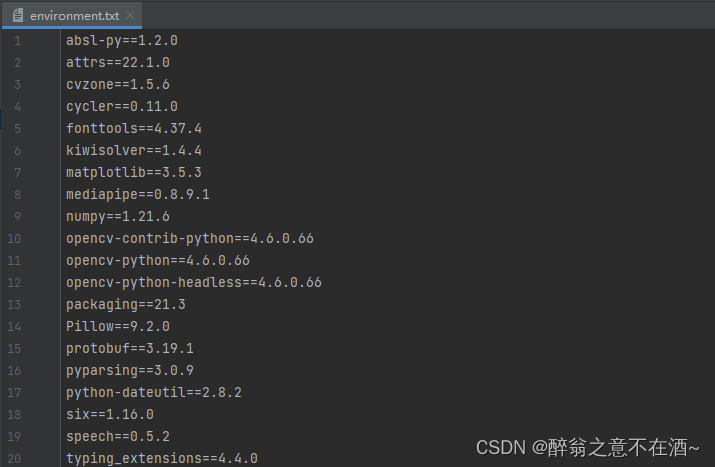
然后,我们所需要下载的环境如下所示,你可以将其存为txt格式直接在终端输入(具体格式如下图):
pip install -r environment.txt -i https://pypi.tuna.tsinghua.edu.cn/simpleabsl-py==1.2.0
attrs==22.1.0
cvzone==1.5.6
cycler==0.11.0
fonttools==4.37.4
kiwisolver==1.4.4
matplotlib==3.5.3
mediapipe==0.8.9.1
numpy==1.21.6
opencv-contrib-python==4.6.0.66
opencv-python==4.6.0.66
opencv-python-headless==4.6.0.66
packaging==21.3
Pillow==9.2.0
protobuf==3.19.1
pyparsing==3.0.9
python-dateutil==2.8.2
six==1.16.0
speech==0.5.2
typing_extensions==4.4.0
保存格式如下:
四、代码实现
模型预训练权重如下
链接:https://pan.baidu.com/s/1pAJvE0zvhdw8cpwQ4Gmz1Q?pwd=good
提取码:good
import cv2
from cvzone.HandTrackingModule import HandDetector
from cvzone.ClassificationModule import Classifier
from PIL import Image, ImageDraw, ImageFont
import numpy as np
import math
import time
# import speechcap = cv2.VideoCapture(0)
cap.set(3, 1280)
cap.set(4, 720)detector = HandDetector(maxHands=1)
classifile = Classifier("./model/keras_model.h5", "./model/labels.txt")offset = 20
imgSize = 300
counter = 0
labels = ['666', '鄙视', 'Good', '比心', '击掌', '握拳']# folder = r"F:\opencv_game\HandSignDetection\Data\Love"while True:success, img = cap.read()img = cv2.flip(img, 1)imgOutput = img.copy()hands, img = detector.findHands(img)if hands:hand = hands[0]x, y, w, h = hand['bbox']imgWhite = np.ones((imgSize, imgSize, 3), np.uint8)*255imgCrop = img[y - offset:y + h + offset, x - offset:x + w + offset]imgCropShape = imgCrop.shapeaspectRatio = h/wif aspectRatio > 1:k = imgSize/hwCal = math.ceil(k*w)imgResize = cv2.resize(imgCrop, (wCal, imgSize))imgResizeShape = imgResize.shapewGap = math.ceil((imgSize - wCal)/2)imgWhite[:, wGap:wCal+wGap] = imgResizeprediction, index = classifile.getPrediction(imgWhite)print(prediction, index)else:k = imgSize / whCal = math.ceil(k * h)imgResize = cv2.resize(imgCrop, (imgSize, hCal))imgResizeShape = imgResize.shapehGap = math.ceil((imgSize - hCal) / 2)imgWhite[hGap:hCal + hGap,:] = imgResizeprediction, index = classifile.getPrediction(imgWhite)# 解决cv2.putText绘制中文乱码def cv2AddChineseText(img, text, position, textColor=(255, 255, 255), textSize=50):if (isinstance(img, np.ndarray)):  # 判断是否OpenCV图片类型img = Image.fromarray(cv2.cvtColor(img, cv2.COLOR_BGR2RGB))# 创建一个可以在给定图像上绘图的对象draw = ImageDraw.Draw(img)# 字体的格式fontStyle = ImageFont.truetype("simsun.ttc", textSize, encoding="utf-8")# 绘制文本draw.text(position, text, textColor, font=fontStyle)# 转换回OpenCV格式return cv2.cvtColor(np.asarray(img), cv2.COLOR_RGB2BGR)cv2.rectangle(imgOutput, (x - offset, y - offset - 50),(x-offset+130, y-offset), (255, 0, 255), cv2.FILLED)# cv2.putText(imgOutput, labels[index], (x,y-24),#             cv2.FONT_HERSHEY_COMPLEX, 1.5, (255, 255, 255), 2)# 中文img = cv2AddChineseText(imgOutput, labels[index], (x - offset, y - offset - 50))cv2.rectangle(img, (x-offset, y-offset),(x+w+offset, y+h+offset), (255,0,255),4)# speech.say(labels[index])# cv2.imshow('ImageCrop', imgCrop)# cv2.imshow('ImageWhite', imgWhite)cv2.imshow('Image', img)key = cv2.waitKey(1)if key == ord('s'):passelif key == 27:break
四、总结
如有帮助,点赞收藏,感谢!!
本文来自互联网用户投稿,文章观点仅代表作者本人,不代表本站立场,不承担相关法律责任。如若转载,请注明出处。 如若内容造成侵权/违法违规/事实不符,请点击【内容举报】进行投诉反馈!