Pytest-测试报告Allure
Allure
模块下载
pip install allure-pytest包下载
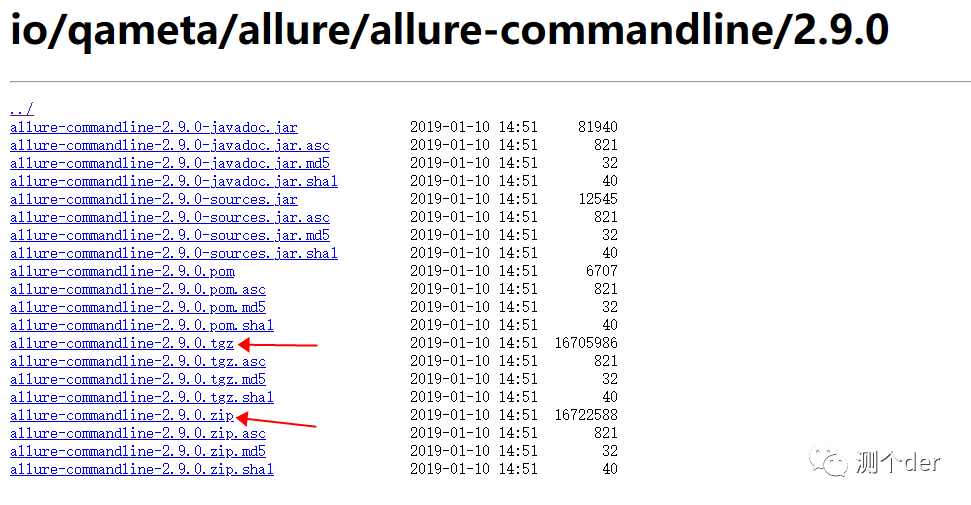
https://repo.maven.apache.org/maven2/io/qameta/allure/allure-commandline/此处我选择下载最新的,版本上可以选择不是最新的,2.9.0的。下载zip或者tgz后缀格式的都可以。
配置环境变量
找到解压缩后的包》》》找到环境变量》》》找到系统环境变量》》》找到Path》》》把allure的bin目录添加进去
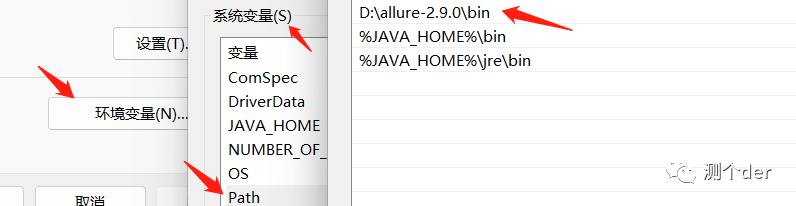
D:\allure-2.9.0\binallure需要依赖JDK,所以,电脑需要先配置好JDK环境。
执行命令
首先,配置文件中:
addopts = -vs --alluredir ./report/xml意思是使用在当前文件目录中生成一个report文件,并且在report下生成一个xml文件。至于生成报告的路径可以自己设定修改./report/xml,这里生成的是生成测试报告前的数据文件,还不是完整的测试报告。 其次,生成测试报告:
import pytest
import osif __name__ == '__main__':pytest.main()# os.system('allure serve ./report')os.system('allure generate --clean ./report/xml -o ./report/html')
使用os模块生成.html测试文件,也就是我们说的测试报告。--clean覆盖的意思,如果不加:Allure: Target directory D:\pytest_.\report\html for the report is already in use, add a '--clean' option to overwrite,再就是使用-o参数生成测试报告文件地址是./report/html。
当然还有一种,也是用os模块生成,但是会自动打开测试报告:
os.system('allure serve ./report')此处不要将./report改成某某绝对路径,例如:D:\pytest_\no_Case
Generating report to temp directory...
Report successfully generated to C:\Users\admin\AppData\Local\Temp\6235808475101309995\allure-report
Starting web server...
2023-01-04 12:33:56.667:INFO::main: Logging initialized @1480ms to org.eclipse.jetty.util.log.StdErrLog
Server started at to exit 虽然也能生成测试报告成功,并且在C盘的指定目录下,但是测试报告是没有内容的。因为此处的命令中的./report是存放测试数据的地方,是allure拿来生成测试报告的数据取货点。
关于测试数据重复
在运行的时候,如果不清除之前的数据,那么测试报告中的数据就会一直存在,且会展示在测试报告中,我们只需要使用--clean-alluredir即可。
addopts = -vs --alluredir ./report/xml --capture=sys --clean-alluredir关于测试报告中没有数据
❝1、目录结构错误,也就是说测试数据在./report/xml中,生成测试报告文件的时候写错了路径,写在了./report/xmll等,这样会导致加载错误。 2、版本问题。下载使用的版本过低,而pip时是新版本,也可能导致测试数据没有的情况。
❞
测试报告的一些内容
| Allure用例描述 | ||
|---|---|---|
| 使用方法 | 参数值 | 参数说明 |
| @allure.epic() | epic描述 | 定义项目、当有多个项目是使用。往下是feature |
| @allure.feature() | 模块名称 | 用例按照模块区分,有多个模块时给每个起名字 |
| @allure.story() | 用例名称 | 一个用例的描述 |
| @allure.title(用例的标题) | 用例标题 | 一个用例标题 |
| @allure.testcase() | 测试用例的连接地址 | 自动化用例对应的功能用例存放系统的地址 |
| @allure.issue() | 缺陷地址 | 对应缺陷管理系统里边的缺陷地址 |
| @allure.description() | 用例描述 | 对测试用例的详细描述 |
| @allure.step() | 操作步骤 | 测试用例的操作步骤 |
| @allure.severity() | 用例等级 | blocker 、critical 、normal 、minor 、trivial |
| @allure.link() | 定义连接 | 用于定义一个需要在测试报告中展示的连接 |
| @allure.attachment() | 附件 | 添加测试报告附件 |
关于中英文
 此处是可选的。
测试报告代码示例
此节跟上一节测试报告的一些内容有着密不可分的关系!
from loguru import logger
import alluredef test01():"""我是test01"""logger.debug('This is information')time.sleep(1)def test02():"""这是第二个用例"""print("--02--")@allure.story("这是03用例")
def test03():"""这是第三个用例"""print("--03--")
@allure.story("这是04用例")
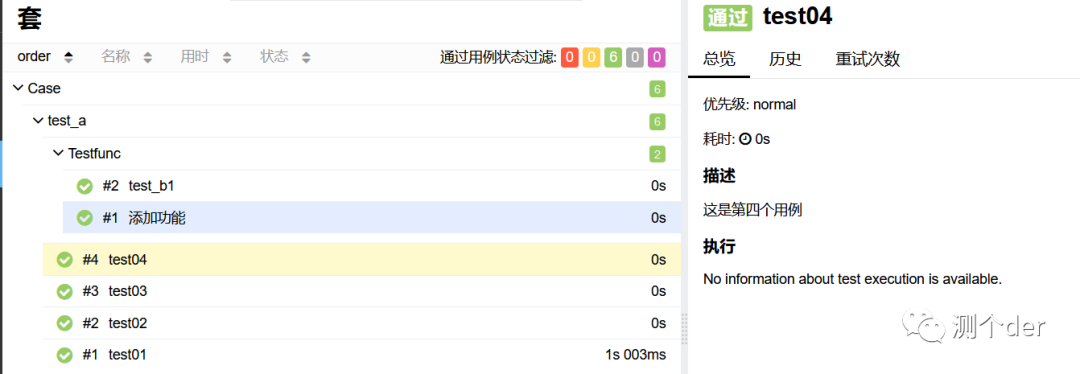
def test04():"""这是第四个用例"""print("--04--")@allure.feature("这是func类模块")
class Testfunc:@allure.title("添加功能")@allure.step("操作步骤1:这是func类用例步骤a1")@allure.description("添加数据操作")@allure.link("https://blog.csdn.net/weixin_52040868")def test_a1(self):"""这是Testfunc中的a1用例"""print("数据--添加--成功!")print("SUCCESS")@allure.step("操作步骤1:这是用例步骤b1")def test_b1(self):"""这是Testfunc中的b1用例"""print("数据--删除--成功!")print("SUCCESS") allure基础使用先对而言没有特别的麻烦,但是比较的复杂,因为装饰器太多了。在上述中已经有体现了。运行结果:
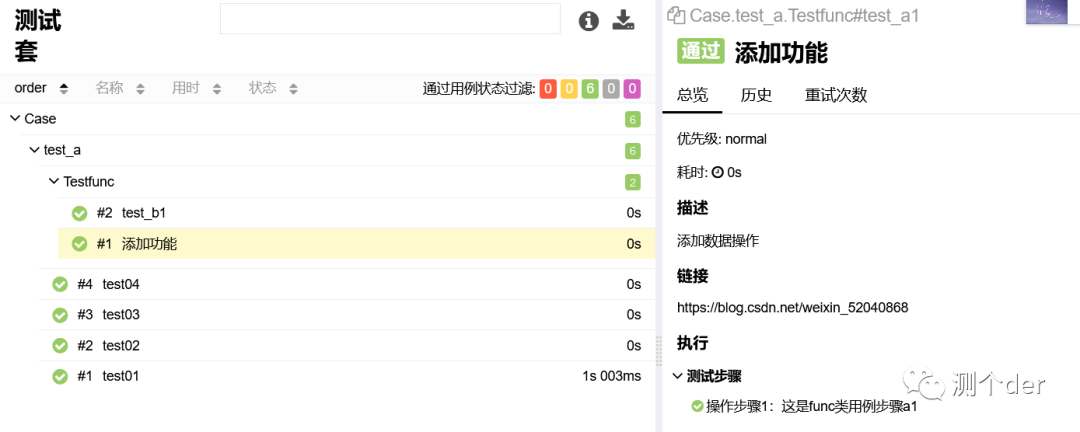
看到了吗,allure的装饰器虽然繁琐,看是用习惯了,在测试报告中看起来还是比较的赏心悦目的,仔细看你会发现@allure.description("添加数据操作")跟""""""中的描述一样,说明默认情况下allure会默认将用例中的""""""收集起来用于描述。
关于日志
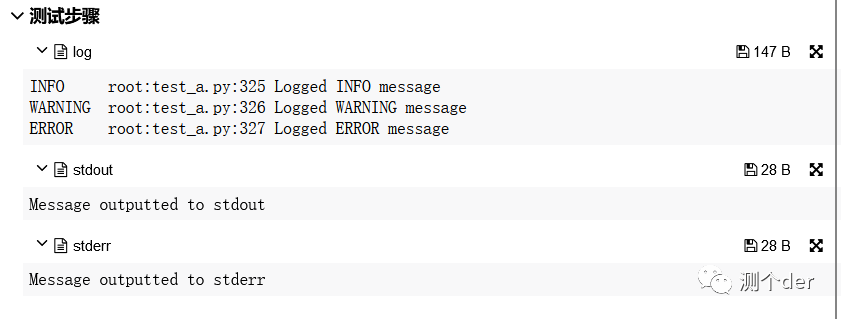
import logging
import syslogger = logging.getLogger()
logger.setLevel(logging.DEBUG)def test_06():logger.info('Logged INFO message')logger.warning('Logged WARNING message')logger.error('Logged ERROR message')print('Message outputted to stdout')print('Message outputted to stderr', file=sys.stderr)assert 1 == 1❝说明: 1、图片中体现了三处日志信息,分别是自定义的log,stdout以及stderr 2、stdout,stderr只需要一个命令参数即可:--capture=sys 3、自定义的log,只需要自己将logging日志信息写好即可如上代码所示(简略版本)
❞
关于stdout/stderr捕获
有三种方法 pytest 可以执行捕获:
fd (文件描述符)级别捕获(默认):将捕获到操作系统文件描述符1和2的所有写入。
sys 级别捕获:仅写入python文件 sys.stdout 和 sys.stderr 将被捕获。不捕获对文件描述符的写入。
tee-sys 捕获:Python写入 sys.stdout 和 sys.stderr 将被捕获,但是写入也将传递到实际 sys.stdout 和 sys.stderr . 这允许输出被“实时打印”并捕获以供插件使用,例如junitxml(pytest 5.4中的新功能)。
pytest -s                  # disable all capturing
pytest --capture=sys       # replace sys.stdout/stderr with in-mem files
pytest --capture=fd        # also point filedescriptors 1 and 2 to temp file
pytest --capture=tee-sys   # combines 'sys' and '-s', capturing sys.stdout/stderr# and passing it along to the actual sys.stdout/stderr
详细可以参考:https://www.osgeo.cn/pytest/capture.html
关于用例名称story
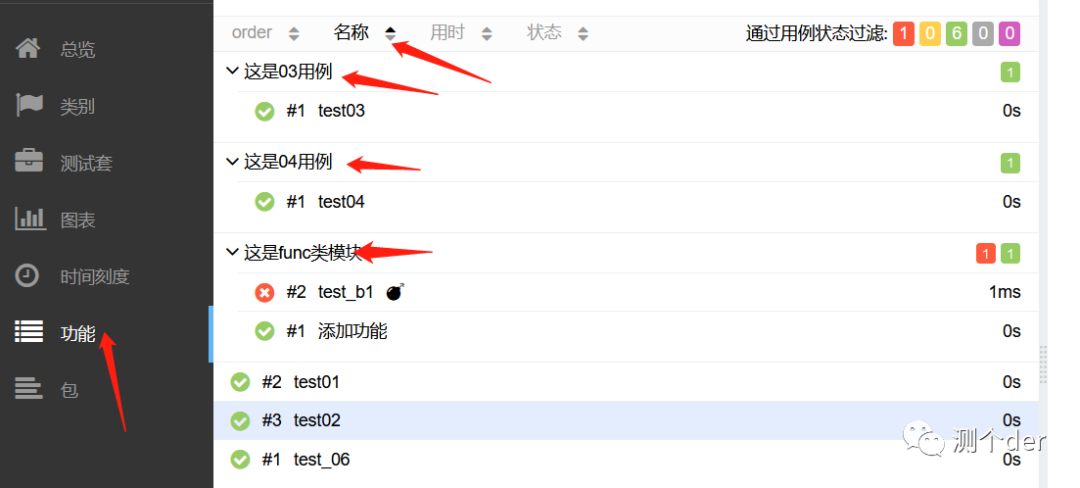
此项在测试套中是看不到的,只有在功能这一块可以看到。所以在使用@allure.story()的时候需要注意。一般性情况下可以拿来左一个归类的操作。
关于操作步骤step
import pytest
from selenium import webdriver
from selenium.webdriver.chrome.service import Service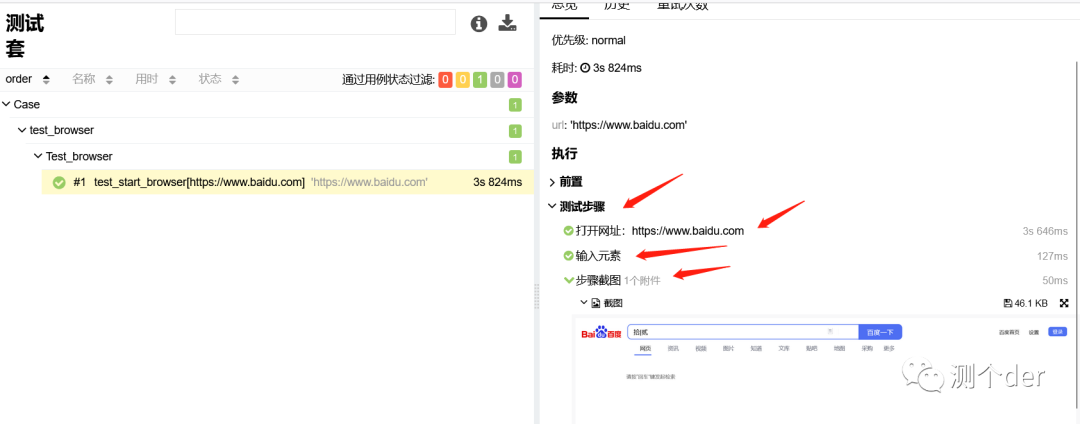
from selenium.webdriver.common.by import Bydata = ['https://www.baidu.com']class Test_browser:def setup_method(self):s = Service(r'D:\pytest_\Case\geckodriver.exe')self.driver = webdriver.Firefox(service=s)@pytest.mark.parametrize("url",data)def test_start_browser(self,url):with allure.step(f"打开网址:{url}"):self.driver.get(url)with allure.step("输入元素"):self.driver.find_element(By.ID,'kw').send_keys('拾|贰')with allure.step("步骤截图"):allure.attach(self.driver.get_screenshot_as_png(),'截图',allure.attachment_type.PNG)def teardown_method(self):self.driver.quit()❝此处我也没有再用allure装饰器了,用的是with语句,上下文管理协议,这样可以帮助我们在测试报告上精确到每一步的操作,就是写起来比较的麻烦:
❞
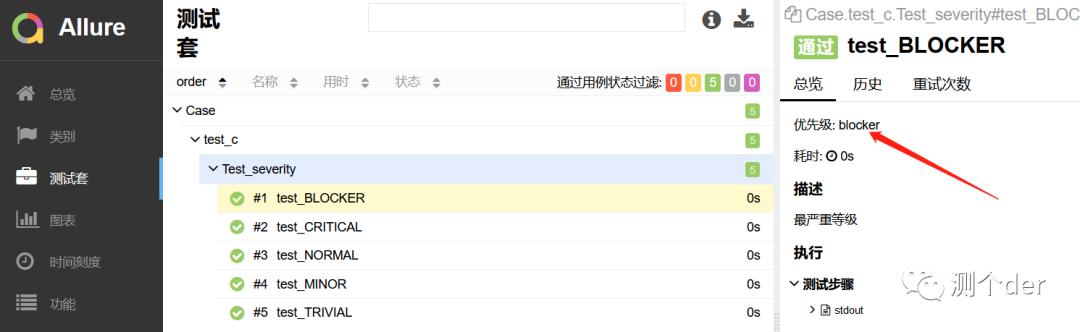
用例等级
class Test_severity:@allure.severity(allure.severity_level.BLOCKER)def test_BLOCKER(self:"""最严重等级"""print("BLOCKER")@allure.severity(allure.severity_level.CRITICAL)def test_CRITICAL(self):"""严重"""print("CRITICAL")@allure.severity(allure.severity_level.NORMAL)def test_NORMAL(self):"""普通"""print("NORMAL")@allure.severity(allure.severity_level.MINOR)def test_MINOR(self):"""不严重"""print("MINOR")@allure.severity(allure.severity_level.TRIVIAL)def test_TRIVIAL(self):"""最不严重"""print("TRIVIAL")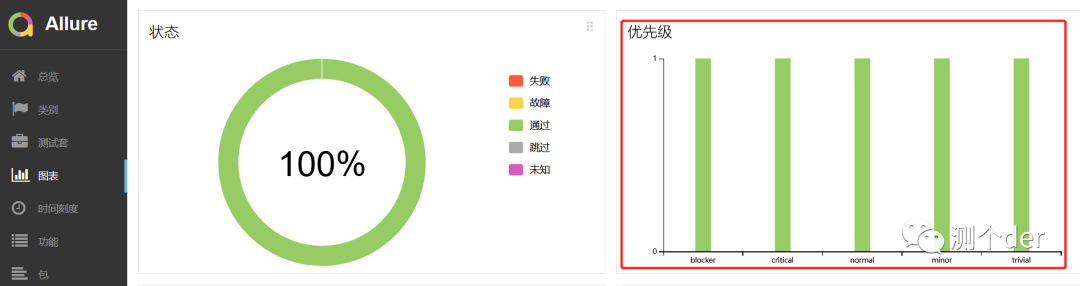
也可以在测试套中看到:
快速回归示例
在用例很多的时候,可以使用这个方法进行标记,只回归部分或执行部分模块的测试用例:
❝--allure-severities blocker,critical,执行什么等级的用例就在后面写什么级别的。在pytest.ini中完整的命令示范:
❞
addopts = -vs --alluredir ./report/xml --capture=sys --clean-alluredir --allure-severities blocker,critical关于severities部分命令也可以写成:
--allure-severities=blocker,critical关于用例等级的代码写法
上述的@allure.severity写的太复杂、繁琐了,也可以写成这样:
class Test_severity:@allure.severity("blocker")def test_BLOCKER(self):"""最严重等级"""print("BLOCKER")@allure.severity("critical")def test_CRITICAL(self):"""严重"""print("CRITICAL")关于测试报告的用例参数展示
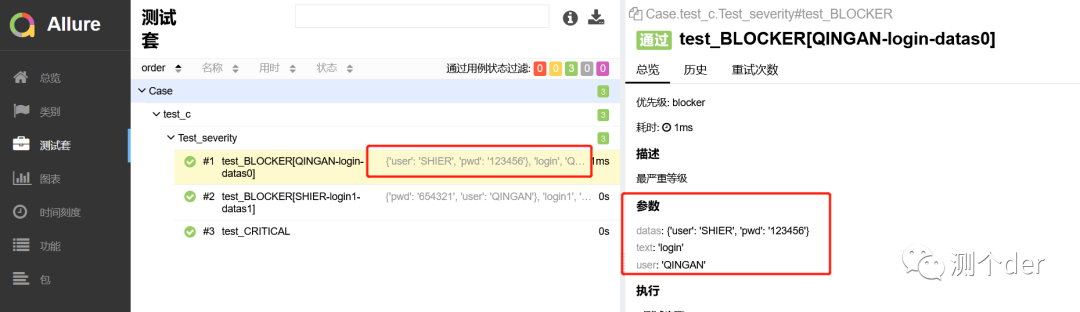
import pytest
import alluredatas = [["QINGAN", 'login', {"user": "SHIER", "pwd": "123456"}],["SHIER", 'login1', {"pwd": "654321", "user": "QINGAN"}]]class Test_severity:@allure.severity("blocker")@pytest.mark.parametrize("user,text,datas",datas)def test_BLOCKER(self,user,text,datas):"""最严重等级"""assert userassert textassert datasprint("BLOCKER")
对于数据驱动,在测试报告上展示测试数据还是很有必要的!
测试数据展示
import pytest
import alluredatas = [["QINGAN", 'login', {"user": "SHIER", "pwd": "123456"}],["SHIER", 'login1', {"pwd": "654321", "user": "QINGAN"}]]class Test_severity:@allure.severity("blocker")@allure.step("测试数据")@pytest.mark.parametrize("user,text,datas",datas)def test_BLOCKER(self,user,text,datas):"""最严重等级"""assert userassert textassert datasprint("BLOCKER")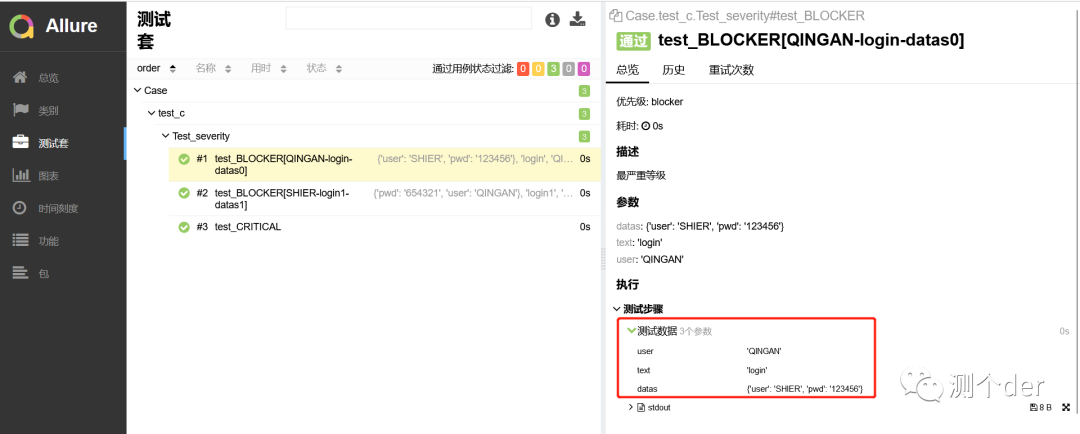
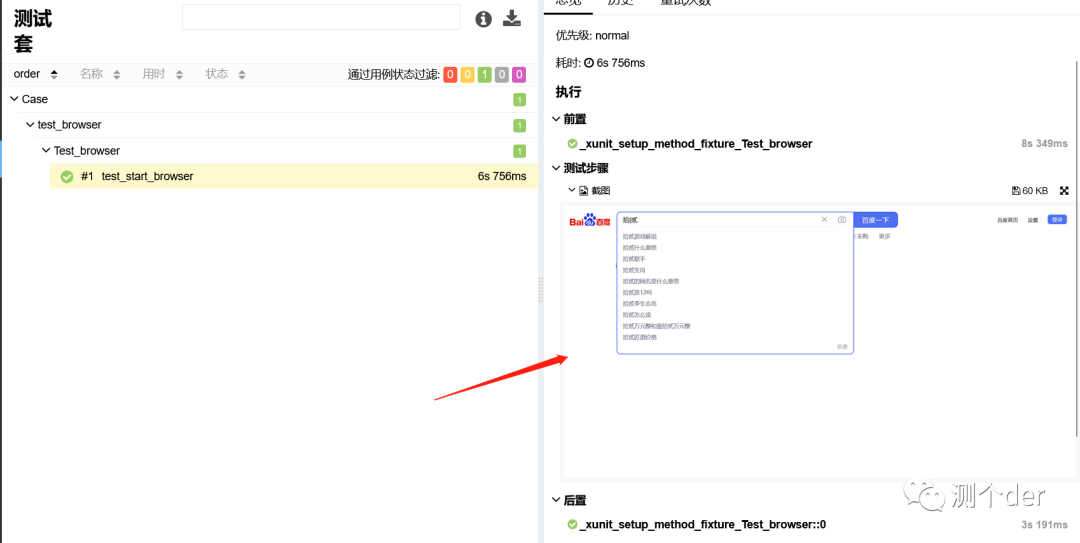
测试报告截图
from selenium import webdriver
from selenium.webdriver.chrome.service import Service
from selenium.webdriver.common.by import By
from time import sleepclass Test_browser:def setup_method(self):s = Service(r'D:\pytest_\Case\geckodriver.exe')self.driver = webdriver.Firefox(service=s)def test_start_browser(self):self.driver.get("https://www.baidu.com")self.driver.find_element(By.ID,'kw').send_keys('拾|贰')sleep(1)allure.attach(self.driver.get_screenshot_as_png(),'截图',allure.attachment_type.PNG)def teardown_method(self):self.driver.quit()❝用到了一个新的方法,attach,命令已经在上述体现出来了,attachment_type.PNG是可选的,PNG,MP4,GIF等等,这些都不常用,最常用的还是图片PNG。
❞
错误自动截图
"""conftest.py"""import pytest
import allure
import os
from selenium import webdriver
from selenium.webdriver.chrome.service import Service@pytest.fixture(scope='session')
def browser():global drivers = Service(r'D:\pytest_\Case\geckodriver.exe')driver = webdriver.Firefox(service=s)yield driverdriver.quit()@pytest.hookimpl(tryfirst=True, hookwrapper=True)
def pytest_runtest_makereport(item, call):'''获取每个用例状态的钩子函数:param item::param call:'''# 获取钩子方法的调用结果outcome = yieldrep = outcome.get_result()# 仅仅获取用例call 执行结果是失败的情况, 不包含 setup/teardownif rep.when == "call" and rep.failed:mode = "a" if os.path.exists("failures") else "w"with open("failures", mode) as f:# let's also access a fixture for the fun of itif "tmpdir" in item.fixturenames:extra = " (%s)" % item.funcargs["tmpdir"]else:extra = ""f.write(rep.nodeid + extra + "\n")# 添加allure报告截图if hasattr(driver, "get_screenshot_as_png"):with allure.step('用例失败截图'):allure.attach(driver.get_screenshot_as_png(), "失败图片", allure.attachment_type.PNG)
此处跟pytest-html用的是类似的方法,具体已经在pytest-html中已经体现。唯一不同的就是集成了allure库,以此来达到嵌入图片的操作。
关于测试报告logo与标题
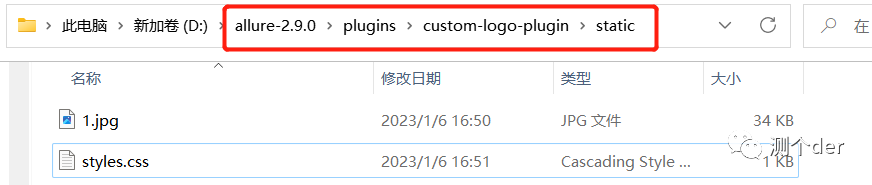
里面的1.jpg是我更换过的图片,原来的是custom-logo.svg,更改后,点开styles.css文件:
.side-nav__brand {background: url('logo.png') no-repeat 10px center !important;      # url括号内写的就是自己图片的名字,我这里的是logo.pngheight: 40px;background-size: contain !important;
}
.side-nav__brand span{display: none;margin: 20px;
}
.side-nav__brand:after{content: "拾贰";    # 这是的内容对应的是我logo后面的内容,在接下来的截图中可以看到,如果不写这个样式,默认的就是allureposition: relative;top: 0;left:16%;bottom:0;right:0;
}
将url里面的custom-logo.svg改成自己的预先准备号的图片名字。如果未生效,请把上述代码中的注释部分删掉并保存。
.side-nav__brand {background: url('logo.png') no-repeat 10px center !important;height: 40px;background-size: contain !important;
}
.side-nav__brand span{display: none;margin: 20px;
}
.side-nav__brand:after{content: "拾贰";position: relative;top: 0;left:16%;bottom:0;right:0;
}
然后再找到:

plugins:- junit-xml-plugin- xunit-xml-plugin- trx-plugin- behaviors-plugin- packages-plugin- screen-diff-plugin- xctest-plugin- jira-plugin- xray-plugin- custom-logo-plugin将- custom-logo-plugin添加进去保存即可,接下来重写运行一下用例生成测试报告就可以看到更改了。
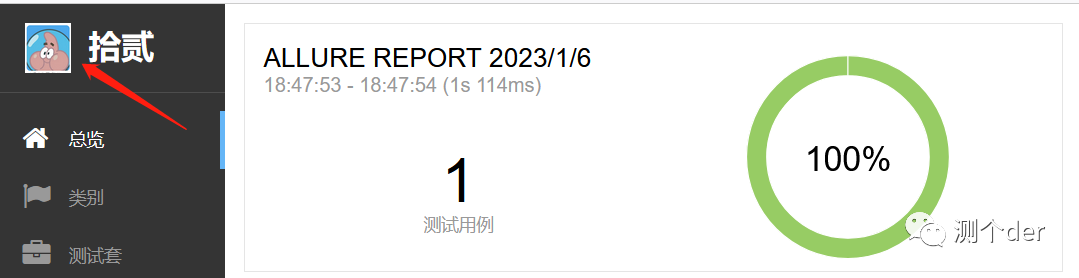
看到了吗,这就改过来了。至于名称,可以根据自己需要进行调整:
# CSS文件的此处,主要是left
top: 0;
left:16%;
bottom:0;
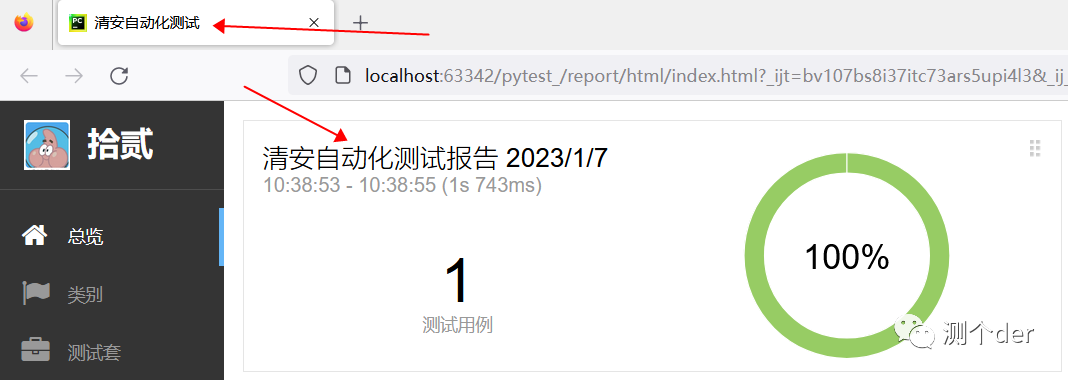
right:0;网页标题与测试报告文案修改
# -*- coding: utf-8 -*-
"""run.py文件"""import pytest
import os
from time import sleep
import json# 测试报告文案获取的文件地址
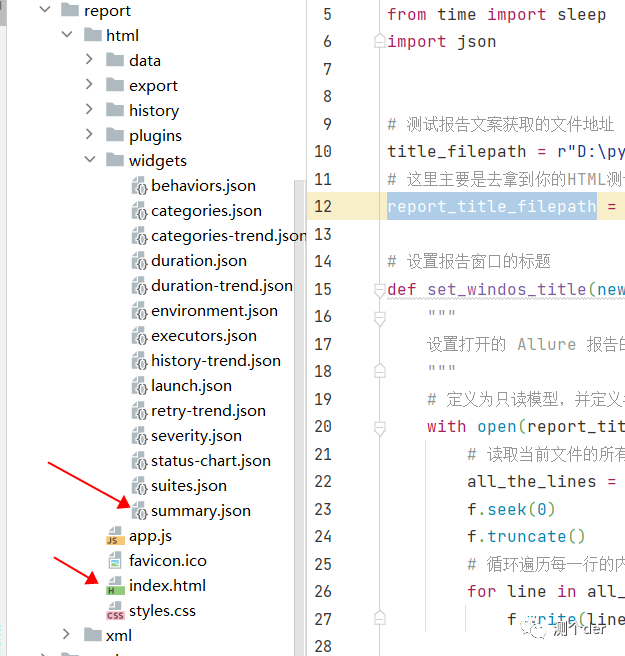
title_filepath = r"D:\pytest_\report\html\widgets\summary.json"
# 这里主要是去拿到你的HTML测试报告的绝对路径【记得换成你自己的】
report_title_filepath = r"D:\pytest_\report\html\index.html"# 设置报告窗口的标题
def set_windos_title(new_title):"""设置打开的 Allure 报告的浏览器窗口标题文案"""# 定义为只读模型,并定义名称为: fwith open(report_title_filepath, 'r+',encoding="utf-8") as f:# 读取当前文件的所有内容all_the_lines = f.readlines()f.seek(0)f.truncate()# 循环遍历每一行的内容,将 "Allure Report" 全部替换为 → new_title(新文案)for line in all_the_lines:f.write(line.replace("Allure Report", new_title))# 获取 summary.json 文件的数据内容
def get_json_data(name):# 定义为只读模型,并定义名称为fwith open(title_filepath, 'rb') as f:# 加载json文件中的内容给paramsparams = json.load(f)# 修改内容params['reportName'] = name# 将修改后的内容保存在dict中dict = params# 返回dict字典内容return dict# 写入json文件
def write_json_data(dict):# 定义为写模式,名称定义为rwith open(title_filepath, 'w', encoding="utf-8") as r:# 将dict写入名称为r的文件中json.dump(dict, r, ensure_ascii=False, indent=4)if __name__ == '__main__':pytest.main()os.system('allure generate --clean ./report/xml -o ./report/html')sleep(3)# 自定义测试报告标题set_windos_title("清安自动化测试")# 自定义测试报告标题report_title = get_json_data("清安自动化测试报告")write_json_data(report_title)❝title_filepath、report_title_filepath可以修改成先对路径,绝对路径并不靠谱。可以使用OS模块进行先对定位。这两个文件所在的位置,是自己设定的allure测试报告生成的位置:
❞
❝当然,可以不写在run文件中,可以单独写一个执行修改文件,然后进行调用。
❞
本文来自互联网用户投稿,文章观点仅代表作者本人,不代表本站立场,不承担相关法律责任。如若转载,请注明出处。 如若内容造成侵权/违法违规/事实不符,请点击【内容举报】进行投诉反馈!