Cesium中的BoxGeometry渲染流程,及模型本地坐标
通过BoxGeometry探索Cesium中的坐标变换
Cesium中有两种对象可以添加到场景中,Entity、Primitive。Entity对用户更友好,方便使用,但是灵活性和性能差一些。Primitive,支持自定义几何形状和几何对象的材质,可以实现更复杂的效果。
添加Primitive
为了减少需要阅读的代码量,方便调试,将primitive的asynchronous,translucent设置为false,即同步方式加载Box,几何材质为不透明。
viewer.scene.primitives.add(new Cesium.Primitive({geometryInstances:instance,appearance:aper,asynchronous:false,translucent:false})
)
Cesium中内置的几何体需要通过GeometryInstance方式代理,进行渲染。下面从BoxGeometry开始查看坐标变换流程。
BoxGeometry.fromDimensions
通过fromDimensions方法创建BoxGeometry。创建的Box默认原点在立方体中心,且该立方体为轴对称,BoxGeometry实例对象通过记录立方体的最大坐标,最小坐标用来计算每个顶点的坐标位置。如,当Dimensions为Cesium.Cartesian3(20,15,10)时,BoxGeometry记录两个坐标minimum,maximum,依次为(-10,-7.5,-5),(10,7.5,5)。
Primitive
几何对象和材质创建好后,接下来创建Primitvie对象。Primitvie构造函数中,设置该实例的相关属性。几何对象的顶点构造在update方法中实现。
Primitive.update方法
update方法中实现每个顶点位置的计算。上面为了调试看代码方便,异步加载设置为false。这里重点看loadSynchronous方法。
[外链图片转存失败,源站可能有防盗链机制,建议将图片保存下来直接上传(img-RfWeP1UV-1644028669557)(images\image-20220203110048744.png)]
loadSynchronous方法中,当几何体第一次更新时,调用geometry.constructor.createGeometry(geometry),对于BoxGeometry来说就是调用BoxGeometry.createGeometry方法来计算几何体的顶点、索引、包围球等。
之后调用PrimitivePipeline.combineGeometry方法。其中针对scene3DOnly分两种情况
scene3DOnly == true
当只渲染三维场景时,几何体的顶点坐标为几何体的本地坐标,即几何体中心为坐标原点,东北上指定坐标轴,同时modelMatrix将本地坐标变换为世界坐标。
scene3DOnly == false
当渲染二、三维场景时,通过调用GeometryPipeline.transformToWorldCoordinates()方法,将模型本地坐标变换为世界坐标,同时将geometryInstance的modelMatrix设置为单位矩阵,此时已经无法访问模型本地坐标。
设置attributes
模型坐标变换完成后,后续设置geometry的attribute,对position来说,通过将double拆分为高低位两个部分,来保证数据在GPU中的计算精度,即将position替换为position3DHigh和position3DLow两个varying变量。其他浮点类型也类似进行拆分,替换。
使用模型本地坐标
通过将scene3DOnly设置为true即可通过position3DHigh、position3DLow访问模型本地坐标。
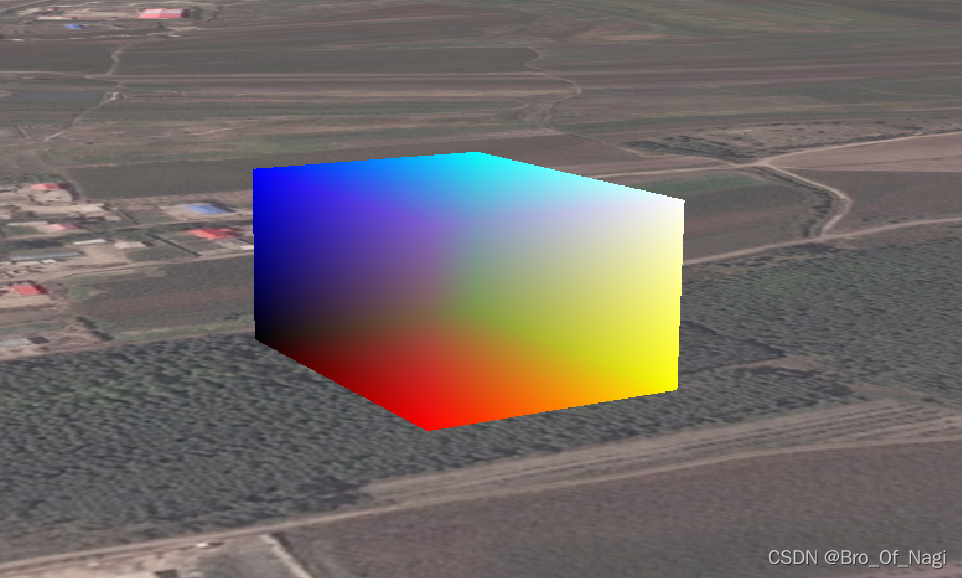
通过构造MaterialAppearance,在vertexShaderSource中即可访问到模型本地坐标,如下代码中的wc_p为模型本地坐标。
attribute vec3 position3DHigh;attribute vec3 position3DLow;attribute vec3 normal;attribute vec2 st;attribute float batchId;varying vec3 v_positionEC;varying vec3 v_normalEC;varying vec2 v_st;varying vec3 wc_p;void main(){ vec4 p = czm_computePosition(); wc_p=position3DHigh+position3DLow; //模型本地坐标v_positionEC = (czm_modelViewRelativeToEye * p).xyz; // position in eye coordinatesv_normalEC = czm_normal * normal; // normal in eye coordinatesv_st = st;vec3 cameraPos=czm_encodedCameraPositionMCHigh+czm_encodedCameraPositionMCLow;gl_Position = czm_modelViewProjectionRelativeToEye * p;}
通过将模型本地坐标归一化后,就可以得到如下效果,可以明显看到沿对角线,从黑色过渡到白色:
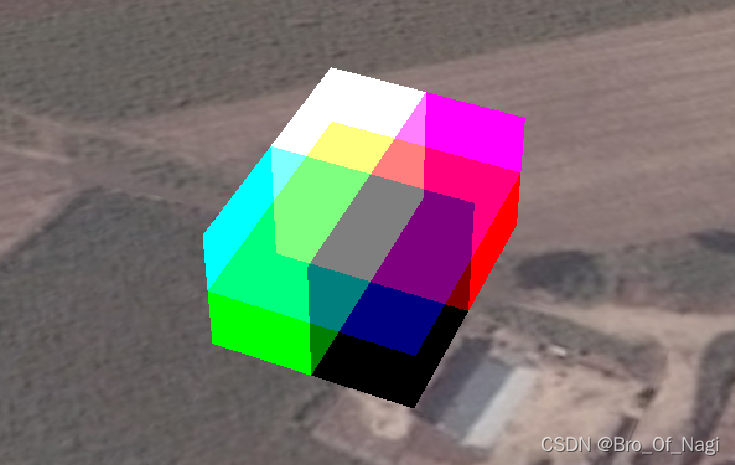
其他效果
拿到本地坐标后,就可以开始做一些效果了:


坑
最后一个效果中,发现部分面有破面情况,看起来是一个面有多个三角形的样子,设置appearance的close属性也没有解决,貌似没也有剔除背面。
看下图,shader中alpha分量设置为1.0,而且translucent也设置为了false,但是仍有混合现象。留个坑后面再看看吧。
更新
Sandcastle中粘贴如下代码可运行查看效果:
var viewer = new Cesium.Viewer("cesiumContainer", {infoBox: false,selectionIndicator: true,shadows: true,shouldAnimate: true,scene3DOnly:true
});
viewer.scene.logarithmicDepthBuffer = true;
var geometry = Cesium.BoxGeometry.fromDimensions({vertexFormat: Cesium.VertexFormat.POSITION_AND_NORMAL,dimensions: new Cesium.Cartesian3(20.0, 15.0, 10.0),
});var instance = new Cesium.GeometryInstance({geometry: geometry,modelMatrix: Cesium.Matrix4.multiplyByTranslation(Cesium.Transforms.eastNorthUpToFixedFrame(Cesium.Cartesian3.fromDegrees(124.21936679679918,45.85136872098397)),new Cesium.Cartesian3(0.0, 0.0, 80.0),new Cesium.Matrix4()),id: "lsh",
});var material=new Cesium.Material({fabric:{uniforms:{u_time:0.0}},translucent:true
});var aper = new Cesium.MaterialAppearance({fragmentShaderSource: ` varying vec3 v_positionEC;varying vec3 v_normalEC;varying vec2 v_st;varying vec3 wc_p;void main(){vec3 positionToEyeEC = -v_positionEC;vec3 normalEC = normalize(v_normalEC);#ifdef FACE_FORWARDnormalEC = faceforward(normalEC, vec3(0.0, 0.0, 1.0), -normalEC);#endifvec3 wc_p_lxs=wc_p/vec3(10.0,7.5,5.0);wc_p_lxs=(wc_p_lxs+1.0)/2.0;float lxs_z=fract(wc_p_lxs.z-u_time_0);gl_FragColor = vec4(vec3(0.,0.5,.9),lxs_z);}`,vertexShaderSource: `attribute vec3 position3DHigh;attribute vec3 position3DLow;attribute vec3 normal;attribute vec2 st;attribute float batchId;varying vec3 v_positionEC;varying vec3 v_normalEC;varying vec2 v_st;varying vec3 wc_p;void main(){    vec4 p = czm_computePosition();  //世界坐标wc_p=position3DHigh+position3DLow;v_positionEC = (czm_modelViewRelativeToEye * p).xyz;      // position in eye coordinatesv_normalEC = czm_normal * normal;                         // normal in eye coordinatesv_st = st;vec3 cameraPos=czm_encodedCameraPositionMCHigh+czm_encodedCameraPositionMCLow;gl_Position = czm_modelViewProjectionRelativeToEye * p;}`,closed:false
});var lxs=viewer.scene.primitives.add(new Cesium.Primitive({geometryInstances: instance,appearance: aper,asynchronous:true,})
);
lxs.appearance.material=material;viewer.camera.lookAt(new Cesium.Cartesian3.fromDegrees(124.21936679679918,45.85136872098397, 80),new Cesium.Cartesian3(-115,12,0));viewer.scene.preRender.addEventListener(function(s,t){var elaspTime=Cesium.JulianDate.now().secondsOfDay/10.0;lxs.appearance.material.uniforms.u_time=elaspTime;});
之后发现,破面应该是shader中写的不对,有时间再改改。
本文来自互联网用户投稿,文章观点仅代表作者本人,不代表本站立场,不承担相关法律责任。如若转载,请注明出处。 如若内容造成侵权/违法违规/事实不符,请点击【内容举报】进行投诉反馈!