【Unity】用射线触发局部区域进行贴图切换

类似于一个刮刮乐的效果,通过射线检测Mesh上的某一点,然后是这一点上的贴图采用别的图片的一个效果
在这里插入图片描述
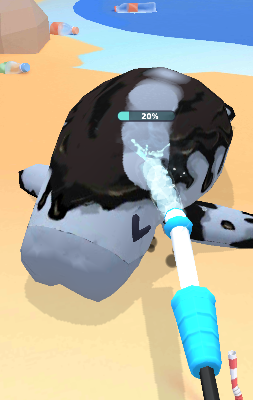
如图就是射线检测水流碰撞点,然后把脏贴图替换为干净贴图

using System.Collections;
using System.Collections.Generic;
using UnityEngine;public class TextureChangeHelper : MonoBehaviour
{[SerializeField] Texture2D _beforeTextrue;[SerializeField] Texture2D _afterTexture;[SerializeField] SkinnedMeshRenderer _renderer;float[,] colorLerp;Texture2D _mergaTextrue;[SerializeField] int _radius;float _dirtyTimer = 0;int _totalPixel = 0;int _changePixelCount = 0;int _width;int _height;public float Process { get { if (_totalPixel == 0) return 0; else return _changePixelCount / (float)_totalPixel; } }bool[,] _changePixel;/// /// 初始化这个组件/// public void Init(){_width = _beforeTextrue.width;_height = _beforeTextrue.height;colorLerp = new float[_width, _height];_mergaTextrue = new Texture2D(_width, _height);//_changePixel = new bool[_width, _height];for (int i = 0; i < _width; i++){for (int j = 0; j < _height; j++){_mergaTextrue.SetPixel(i, j, _beforeTextrue.GetPixel(i, j));_totalPixel += 1;//_changePixel[i, j] = false;}}_changePixelCount = 0;_mergaTextrue.Apply();_renderer.material.SetTexture("_MainTex", _mergaTextrue);}/// /// 根据检测到的位置进行修改贴图/// /// public float SetRayCheck(RaycastHit hitInfo){Vector2 uv = hitInfo.textureCoord;Vector2Int o = new Vector2Int((int)(_width * uv.x), (int)(_height * uv.y));//Vector2Int o_1 = new Vector2Int((int)(_width * uv.x), (int)(_height * uv.y));int changedPixel = 0;for (int i = -_radius; i < _radius; i++){for (int j = -_radius; j < _radius; j++){if (Vector2.Distance(new Vector2(o.x + i, o.y + j), new Vector2(o.x, o.y)) <= _radius){Color beforeColor = _mergaTextrue.GetPixel(o.x + i, o.y + j);Color afterColor = _afterTexture.GetPixel(o.x + i, o.y + j);//做一个边缘顺滑float tLerp = Vector2.Distance(new Vector2(i, j), Vector2.zero) / _radius;tLerp = 1 - tLerp + 0.2f; /*+ 0.5f;*/Color color = Color.Lerp(beforeColor, afterColor, tLerp);if (!CheckIsChange(o.x + i, o.y + j, color)){_mergaTextrue.SetPixel(o.x + i, o.y + j, color);//_mergaTextrue.SetPixel(o.x + i, o.y + j, _afterTexture.GetPixel(o_1.x + i, o_1.y + j));//判断修改前后颜色,是否接近干净颜色以及是否接近上次改成的颜色if (!IsNearColor(beforeColor, afterColor) && !IsNearColor(beforeColor, color))//if(!CheckIsChange(o.x+i,o.)){_changePixelCount += 1;}changedPixel += 1;//colorLerp[o.x + i, o.y + j] = tLerp;}}}}_mergaTextrue.Apply();_renderer.material.SetTexture("_MainTex", _mergaTextrue);//Debug.Log(changedPixel + "/" + 0.1f * _radius * _radius);if (changedPixel > 0.1f * _radius * _radius){_dirtyTimer = 1f;}return _dirtyTimer / 1f;}/// /// 判断两个颜色是否相近/// /// /// /// bool IsNearColor(Color a, Color b){Vector3 hsv_a;Vector3 hsv_b;Color.RGBToHSV(a, out hsv_a.x, out hsv_a.y, out hsv_a.z);Color.RGBToHSV(b, out hsv_b.x, out hsv_b.y, out hsv_b.z);float ClanpH = Mathf.Abs(hsv_a.x * 360 - hsv_b.x * 360);float ClanpS = Mathf.Abs(hsv_a.y * 255 - hsv_b.y * 255);float ClanpV = Mathf.Abs(hsv_a.z * 255 - hsv_b.z * 255);ClanpH = Mathf.Floor(ClanpH);ClanpS = Mathf.Floor(ClanpS);ClanpV = Mathf.Floor(ClanpV);//色相,明度,饱和if (ClanpH <= 20 && ClanpS <= 50 && ClanpV < 50){return true;}return false;}private void Update(){_dirtyTimer -= Time.deltaTime;if (_dirtyTimer < 0) _dirtyTimer = 0;}/// /// 把整个贴图都换成贴图2/// public void ChangeToAfterTexture(){_changePixelCount = _totalPixel;_renderer.material.SetTexture("_MainTex", _afterTexture);_mergaTextrue = null;Resources.UnloadUnusedAssets();}/// /// 判断这个像素点的颜色是否一样/// /// /// /// public bool CheckIsChange(int x, int y, Color color){return _mergaTextrue.GetPixel(x, y) == color;}private void OnDestroy(){_mergaTextrue = null;Resources.UnloadUnusedAssets();}
}

这里使用两个贴图A和贴图B,先生成混合用的贴图C,替换到材质上。通过落点的textureCoord可以获取对应的UV位置,然后根据范围去把贴图C对应的像素点换成贴图A对应的像素点。可以使用Color.Lerp的方法让边缘变得平滑。以此达到刮刮乐由贴图A转换为贴图B的效果。

需要注意的是基础的贴图A和B需要相同的尺寸,并且导入配置要打开读写许可,模型也同理


本文来自互联网用户投稿,文章观点仅代表作者本人,不代表本站立场,不承担相关法律责任。如若转载,请注明出处。 如若内容造成侵权/违法违规/事实不符,请点击【内容举报】进行投诉反馈!

相关文章

立即
投稿

微信公众账号

微信扫一扫加关注

返回
顶部