Nextjs12结合TypeScript+Mobx6+antd+less初体验
Next.js是什么
Next.js 是一个轻量级的 React 服务端渲染应用框架。
它支持多种渲染方式:客户端渲染、静态页面生成、服务端渲染。
使用Next.js 实现 SSR 是一件很简单的事,我们完全可以不用自己去写webpack等配置,Next.js 都帮我们做好了。
为什么要使用TypeScript
通过静态类型检测可以尽早检测出程序中隐藏的的逻辑错误,对于JavaScript动态的弱类型语言,虽然灵活性高,但是对于初学者来说,如果不熟悉JavaScript内部的语言机制,很容易造成隐藏的事故。但是通过TypeScript的静态类型检测可以规避这些问题,因为其能够约束变量产生的类型。结合IDE编辑器可以推导变量对应的类型以及内部的结构,提高代码的健壮性和可维护性。
他的类型系统能够强化规范编程,TypeScript提供定义接口。在开发大型复杂的应用软件时十分重要,一个系统模块可以抽象的看做一个TypeScript定义的接口。让设计脱离实现,最终体现出一种 IDL(接口定义语言,Interface Define Language),让程序设计回归本质。
为什么要使用Mobx
Mobx基础知识很简单,学习了半小时官方文档和示例代码就搭建了新项目实例;并且Mobx支持面向对象编程,我们可以使用@observable and @observer,以面向对象编程方式使得JavaScript对象具有响应式能力;而Redux最推荐遵循函数式编程,当然Mobx也支持函数式编程;
模版代码少:相对于Redux的各种模版代码,如,actionCreater,reducer,saga/thunk等,Mobx则不需要编写这类模板代码;
创建Next.js项目
npx create-next-app@latest
// or
yarn create next-app
进入应用,用命令行启动项目 npm run dev。
看到下图,就说明你的项目启动成功啦。
配置 TypeScrip!
安装依赖typescript依赖
npm install typescript @types/react @types/node --save在根目录下创建tsconfig.json,这是 TypeScript 的配置文件。
//tsconfig.json配置
{  "compilerOptions": {    "experimentalDecorators": true,    "target": "es5",    "lib": [      "dom",      "dom.iterable",      "esnext"    ],    "allowJs": true,    "skipLibCheck": true,    "strict": true,    "forceConsistentCasingInFileNames": true,    "noEmit": true,    "esModuleInterop": true,    "module": "esnext",    "moduleResolution": "node",    "resolveJsonModule": true,    "isolatedModules": true,    "jsx": "preserve",    "incremental": true  },  "include": [       "**/*.ts",    "**/*.tsx"  ],  "exclude": [    "node_modules"  ]
}
把文件名 index.js 改为 index.tsx,新增typescript的类型检测
import React from "react";
import {NextPage} from 'next'; const Home: NextPage = () => {  return (    首页  )
}
export default Home;
这个时候访问 http://localhost:3000/就能看见页面了。

也可直接创建项目的时候配置使用typescript模板
npx create-next-app@latest --ts
// or
yarn create next-app --typescript
配置less!
npm install less less-loader next-with-less --save在next.config.js配置支持less
const withLess = require("next-with-less");
module.exports = withLess({})
配置完成即可引入less使用。
注意:理论上withLess是一个方法,应该不需要传入空对象即可,但是不传对象报错:Cannot read property 'lessLoaderOptions' of undefined。
安装Ant Design
npm install antd修改 pages/index.tsx,引入 antd 的按钮组件。
import React from "react";
import {NextPage} from 'next';
import { Button } from 'antd';
const Home: NextPage = () => {      return (          Button    )
}
export default Home;
修改 style/globals.css,在文件顶部引入 antd/dist/antd.css。
@import '~antd/dist/antd.css';现在你应该能看到页面上已经有了 antd 的蓝色按钮组件,接下来就可以继续选用其他组件开发应用了。
配置Mobx
npm install mobx --save
npm install mobx-react --save
配置.babelrc
npm install @babel/core @babel/plugin-proposal-class-properties @babel/plugin-proposal-decorators --save根目录下创建.babelrc
{    "presets": [        "next/babel"    ],    "plugins": [        [            "@babel/plugin-proposal-decorators",            {                "legacy": true            }        ],        [            "@babel/plugin-proposal-class-properties",            {                "loose": false            }        ]    ]
}
在根目录创建store文件夹,在文件夹创建index.ts文件
import { action, makeObservable, observable } from 'mobx'//声明Store里属性类型
export interface StoreType {  count: number,  addCount: Function,  reduceCount: Function
}class Store {  constructor() {    makeObservable(this) }  @observable count: number = 0  @action addCount():void {    this.count++  }  @action reduceCount():void {    this.count--  }
}
export default new Store()
定义了响应式变量count, 还有2个行为方法性 触发addCount方法变量count加1,触发reduceCount方法变量count减1
在App组件中引入
import '../styles/globals.less'
import { Provider } from 'mobx-react'
import store from '../store'export default function App({ Component, pageProps }) { return ( 编译时错误代码:
“类型“Readonly<{}> & Readonly<{ children?: ReactNode; }>”上不存在属性“store”。ts(2339)” index.tsx中并没有对App组件传递属性。这是因为,App组件会一直去Props中找这个值,而没有去store中找。类似下面的
都是同一个问题。
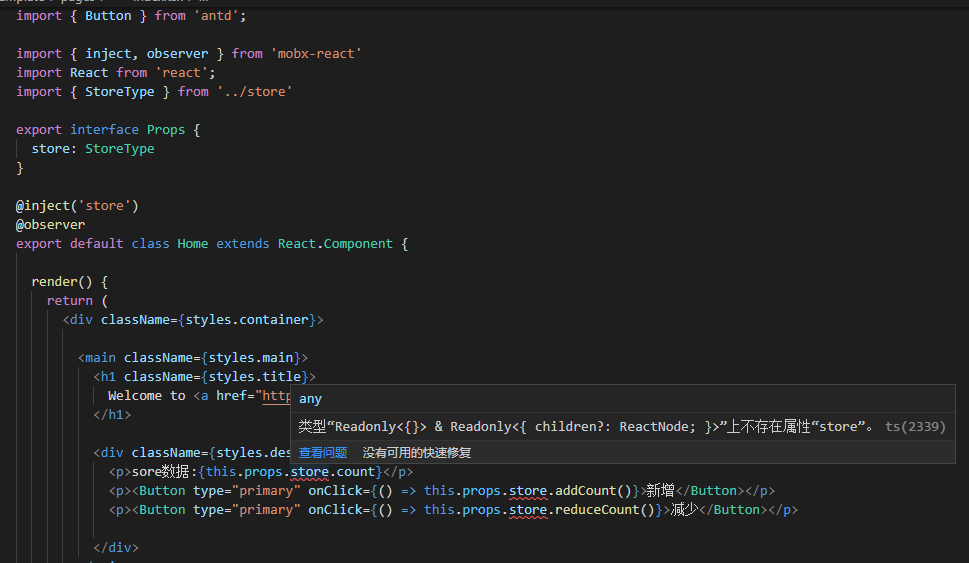
这样可以解决上面的问题,如下:
import { Button } from 'antd';
import { inject, observer } from 'mobx-react'
import React from 'react';
import { StoreType } from '../store'export interface Props { store: StoreType // 这里比较关键 ?表示不或缺,如果没有就会报错。
}@inject('store')
@observer
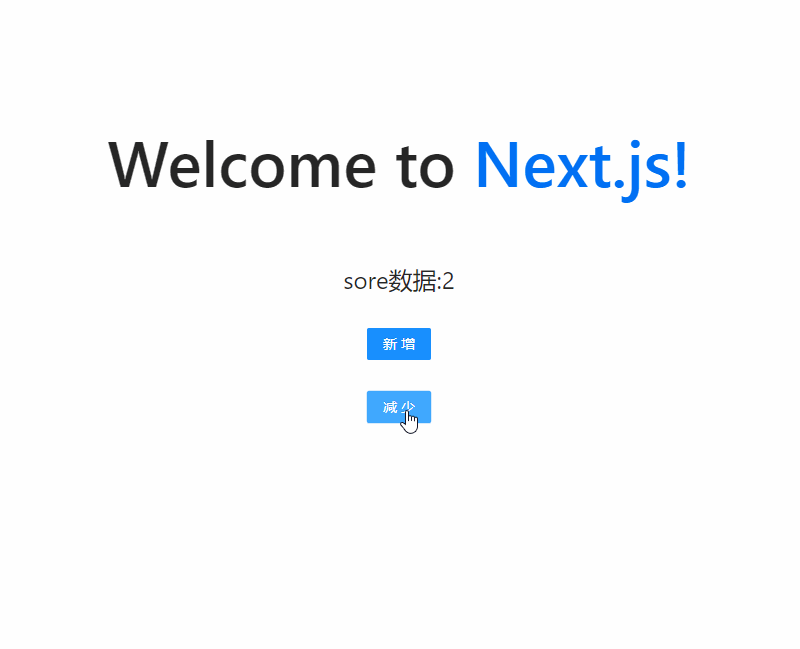
export default class Home extends React.Component { render() { return ( Welcome to Next.js! sore数据:{this.props.store.count}
this.props.store.addCount()}>新增
this.props.store.reduceCount()}>减少
) }
} 非常简单的小示例:
到这里其实以及完成对Nextjs下TypeScript结合antd和Mobx的配置。
有兴趣可以参阅项目模板:next-template: next12集成Ant Design+mobx6+typescript模板
文章来源:Nextjs12结合TypeScript+Mobx6+antd+less初体验 | 猿小莫的博客
本文来自互联网用户投稿,文章观点仅代表作者本人,不代表本站立场,不承担相关法律责任。如若转载,请注明出处。 如若内容造成侵权/违法违规/事实不符,请点击【内容举报】进行投诉反馈!