RXjava+Retrofit+dagger2打造自己的MVP框架
RXjava+Retrofit+dagger的入门
前言:现在RXjava+Retrofit+dagger可谓是如日中天,当时头一次接触都有一种无从入手的感觉,那么我来分享一下我的学习方式。将RXjava Retrofit dagger分开来学 最后整合到一起
RXjava篇
相信各位看官对RxJava早有耳闻,那么关于什么是RxJava我就不再赘述了,不知道的可自行百度。如果你已经大致了解过什么是RxJava,想开始学习,那么本文不失为你良好的选择,为什么这么说呢,因为我也是刚学几天,正所谓“知己知彼,百战不殆”。网上流传,RxJava的入门门槛高,而经过我这几天的学习,我反而不那么认为,精通我不敢说,但入门确实也不难,不信?我先来个简单的例子预热一下。
先创建个数据发射源,很好理解,就是发射数据用的:
Observable<String> sender = Observable.create(new Observable.OnSubscribe<String>() {@Overridepublic void call(Subscribersuper String> subscriber) {subscriber.onNext("Hi,Weavey!"); //发送数据"Hi,Weavey!"}});再创建个数据接收源,同理,接收数据用的:
Observer receiver = new Observer() {@Overridepublic void onCompleted() {//数据接收完成时调用}@Overridepublic void onError(Throwable e) {//发生错误调用}@Overridepublic void onNext(String s) {//正常接收数据调用System.out.print(s); //将接收到来自sender的问候"Hi,Weavey!"}}; 好了,将发射源和接收源关联起来:
sender.subscribe(receiver);这样就形成RxJava一个简单的用法,sender发射"Hi,Weavey!",将会被receiver的onNext的接收,通过这个例子,也许你会想到“异步”、“观察者模式”,没错,这些都是RxJava所做的事情,并且让他们变得更简单和简洁,而RxJava所有的一切都将围绕这两个点展开,一个是发射数据,一个是接收数据,是不是很通俗易懂?如果你理解了这点或者你已经知道RxJava就是这么一回事,那么恭喜你,你已经一只脚跨进RxJava的大门了,如果不是!!!!那也无所谓,请继续往下看...
论概念的重要性
网上关于RxJava的博文也有很多,我也看过许多,其中不乏有优秀的文章,但绝大部分文章都有一个共同点,就是侧重于讲RxJava中各种强大的操作符,而忽略了最基本的东西——概念,所以一开始我也看的一脸懵逼,看到后面又忘了前面的,脑子里全是问号,这个是什么,那个又是什么,这两个长得怎么那么像。举个不太恰当的例子,概念之于初学者,就像食物之于人,当你饿了,你会想吃面包、牛奶,那你为什么不去吃土呢,因为你知道面包牛奶是用来干嘛的,土是用来干嘛的。同理,前面已经说过,RxJava无非是发送数据与接收数据,那么什么是发射源,什么是接收源,这就是你应该明确的事,也是RxJava的入门条件之一,下面就依我个人理解,对发射源和接收源做个归类,以及RxJava中频繁出现的几个“单词”解释一通,说的不好还请海涵,欢迎补充。
基本概念
Observable:发射源,英文释义“可观察的”,在观察者模式中称为“被观察者”或“可观察对象”;
Observer:接收源,英文释义“观察者”,没错!就是观察者模式中的“观察者”,可接收Observable、Subject发射的数据;
Subject:Subject是一个比较特殊的对象,既可充当发射源,也可充当接收源,为避免初学者被混淆,本章将不对Subject做过多的解释和使用,重点放在Observable和Observer上,先把最基本方法的使用学会,后面再学其他的都不是什么问题;
Subscriber:“订阅者”,也是接收源,那它跟Observer有什么区别呢?Subscriber实现了Observer接口,比Observer多了一个最重要的方法unsubscribe( ),用来取消订阅,当你不再想接收数据了,可以调用unsubscribe( )方法停止接收,Observer 在subscribe() 过程中,最终也会被转换成 Subscriber 对象,一般情况下,建议使用Subscriber作为接收源;
Subscription :Observable调用subscribe( )方法返回的对象,同样有unsubscribe( )方法,可以用来取消订阅事件;
Action0:RxJava中的一个接口,它只有一个无参call()方法,且无返回值,同样还有Action1,Action2...Action9等,Action1封装了含有 1个参的call()方法,即call(T t),Action2封装了含有 2 个参数的call方法,即call(T1 t1,T2 t2),以此类推;
Func0:与Action0非常相似,也有call()方法,但是它是有返回值的,同样也有Func0、Func1...Func9;
基本用法
-
Observable的创建
1.使用create( ),最基本的创建方式:normalObservable = Observable.create(new Observable.OnSubscribe<String>() {@Overridepublic void call(Subscribersuper String> subscriber) {subscriber.onNext("create1"); //发射一个"create1"的Stringsubscriber.onNext("create2"); //发射一个"create2"的Stringsubscriber.onCompleted();//发射完成,这种方法需要手动调用onCompleted,才会回调Observer的onCompleted方法}});2.使用just( ),将为你创建一个Observable并自动为你调用
onNext( )发射数据:justObservable = Observable.just("just1","just2");//依次发送"just1"和"just2"3.使用from( ),遍历集合,发送每个item:
Listlist = new ArrayList<>(); list.add("from1"); list.add("from2"); list.add("from3"); fromObservable = Observable.from(list); //遍历list 每次发送一个 /** 注意,just()方法也可以传list,但是发送的是整个list对象,而from()发送的是list的一个item** / 4.使用defer( ),有观察者订阅时才创建Observable,并且为每个观察者创建一个新的Observable:
deferObservable = Observable.defer(new Func05.使用interval( ),创建一个按固定时间间隔发射整数序列的Observable,可用作定时器:
intervalObservable = Observable.interval(1, TimeUnit.SECONDS);//每隔一秒发送一次6.使用range( ),创建一个发射特定整数序列的Observable,第一个参数为起始值,第二个为发送的个数,如果为0则不发送,负数则抛异常:
rangeObservable = Observable.range(10, 5);//将发送整数10,11,12,13,147.使用timer( ),创建一个Observable,它在一个给定的延迟后发射一个特殊的值,等同于Android中Handler的postDelay( )方法:
timeObservable = Observable.timer(3, TimeUnit.SECONDS); //3秒后发射一个值8.使用repeat( ),创建一个重复发射特定数据的Observable:
repeatObservable = Observable.just("repeatObservable").repeat(3);//重复发射3次 -
Observer的创建
mObserver = new Observer() {@Overridepublic void onCompleted() {LogUtil.log("onCompleted");}@Overridepublic void onError(Throwable e) {}@Overridepublic void onNext(String s) {LogUtil.log(s);}}; ok,有了Observable和Obsever,我们就可以随便玩了,任取一个已创建的Observable和Observer关联上,即形成一个RxJava的例子,如:
justObservable.subscribe(mObserver);mObserver的
onNext方法将会依次收到来自justObservable的数据"just1"、"just2",另外,如果你不在意数据是否接收完或者是否出现错误,即不需要Observer的onCompleted()和onError()方法,可使用Action1,subscribe()支持将Action1作为参数传入,RxJava将会调用它的call方法来接收数据,代码如下:justObservable.subscribe(new Action1<String>() {@Overridepublic void call(String s) {LogUtil.log(s);}});以上就是RxJava最简单的用法。看到这里,我也不知道我写的是否简单明了,也许你会想,“哎呀,写个异步的东西,怎么这么麻烦,为什么不用Thread+Handler呢”,那你就错了,RxJava也以代码的简洁深受广大用户喜爱,简洁不能理解为代码量少,而是随着逻辑的复杂,需求的更改,代码可依然能保持极强的阅读性,举个简单的例子(前方高能预警~~~),领导要我从数据库的用户表查找出所有用户数据,我二话不说拿出心仪的RxJava就写:
Observable.create(new Observable.OnSubscribe<List>() {@Overridepublic void call(Subscribersuper List > subscriber) {List userList = null;···//从数据库获取用户表数据并赋给userList···subscriber.onNext(userList);}}).subscribe(new Action1<List >() {@Overridepublic void call(List users) {//获取到用户信息列表}}); 但是,领导突然又不想要所有用户了,只要名字叫“小明”的用户,行吧,领导最大,我改(假设名字唯一):
Observable.create(new Observable.OnSubscribe> subscriber) {ListuserList = null;···//从数据库获取用户表数据并赋给userList···subscriber.onNext(userList);}}).flatMap(new Func1 >() {@Overridepublic Observable call(List users) {return Observable.from(users);}}).filter(new Func1 () {@Overridepublic void call(User user) {//拿到谜之小明的数据}}); 搞定,这时候领导又说,我不要小明了,我要小明的爸爸的数据,(坑爹啊~~),我继续改:
Observable.create(new Observable.OnSubscribe> subscriber) {ListuserList = null;···//从数据库获取用户表数据并赋给userList···subscriber.onNext(userList);} }).flatMap(new Func1 >() {@Overridepublic Observable call(List users) {return Observable.from(users);}}).filter(new Func1 () {@Overridepublic void call(User user2) {//拿到谜之小明的爸爸的数据}}); 搞定,“还想怎么改?领导请说···”。
以上例子,涉及到几个操作符,初学者可能无法理解,但是无所谓,这不是重点,我的目的只是为了向你展示RxJava在需求不断变更、逻辑愈加复杂的情况下,依旧可以保持代码简洁、可阅读性强的一面,没有各种回调,也没有谜之缩进!
Retrofit篇
Retrofit与okhttp共同出自于Square公司,retrofit就是对okhttp做了一层封装。把网络请求都交给给了Okhttp,我们只需要通过简单的配置就能使用retrofit来进行网络请求了,其主要作者是Android大神JakeWharton。
导包:
compile 'com.squareup.retrofit2:retrofit:2.0.0-beta4'//Retrofit2所需要的包
compile 'com.squareup.retrofit2:converter-gson:2.0.0-beta4'//ConverterFactory的Gson依赖包
compile 'com.squareup.retrofit2:converter-scalars:2.0.0-beta4'//ConverterFactory的String依赖包
首先定义我们请求的Api,我们假设是这样的
http://106.3.227.33/pulamsi/mobileLogin/submit.html
public interface RequestServes {@POST("mobileLogin/submit.html")CallgetString(@Query("loginname") String loginname, @Query("nloginpwd") String nloginpwd); }
@GET
和
@POST
,参数注解有
@PATH
和
@Query
等,我们只介绍常用的;前两个顾名思义就是定义你的请求方式
Get or Post
,后面的
@PATH
指的是通过参数填充完整的路径,一般用法:
("{name}")
Call
getUser(@Path("name") String name)
这里的参数username会被填充至{name}中,形成完整的Url请求地址,{name}相当于一个占位符;
@Query就是我们的请求的键值对的设置,我们构建Call对象的时候会传入此参数,
1 2 3 | ("mobileLogin/submit.html") Call |
@Query("loginname")
就是键,后面的
loginname
就是具体的值了,值得注意的是Get和Post请求,都是这样填充参数的;
接口写完了之后我们需要来定义Retrofit对象来进行请求了;
创建一个Retrofit 对象
Retrofit retrofit = new Retrofit.Builder()
               .baseUrl("http://106.3.227.33/pulamsi/")
               //增加返回值为String的支持
               .addConverterFactory(ScalarsConverterFactory.create())
               //增加返回值为Gson的支持(以实体类返回)
               .addConverterFactory(GsonConverterFactory.create())
               //增加返回值为Oservable的支持
               .addCallAdapterFactory(RxJavaCallAdapterFactory.create())
               .build();
这里的baseUrl加上之前@POST("mobileLogin/submit.html")定义的参数形成完整的请求地址;
addConverterFactory(ScalarsConverterFactory.create())的意思是构建了一个返回支持,如果你的Call对象的泛型接收另外的格式需要添加另外的支持,上述代码已经列出;
接下来我们用这个Retrofit对象创建一个RequestSerives接口对象,也就是我们之前定义的那个接口,并且得到我们的Call对象;
RequestSerives requestSerives = retrofit.create(RequestSerives.class);//这里采用的是Java的动态代理模式 Call |
call.enqueue(new Callback() { public void onResponse(Call call, Response response) { Log.e("===","return:"response.body().toString()); } public void onFailure(Call call, Throwable t) { Log.e("===","失败"); }});
导入Dagger2
使用Dagger2之前需要一些配置,该配置是在Android Studio中进行操作。
在工程的build.gradle文件中添加android-apt插件(该插件后面介绍)
buildscript {....dependencies {classpath 'com.android.tools.build:gradle:2.1.0'// 添加android-apt 插件classpath 'com.neenbedankt.gradle.plugins:android-apt:1.8'}
}
在app的中的build.gradle文件中添加配置
apply plugin: 'com.android.application'
// 应用插件
apply plugin: 'com.neenbedankt.android-apt'android {compileSdkVersion 23buildToolsVersion "23.0.2"defaultConfig {applicationId "com.mahao.alex.architecture"minSdkVersion 15targetSdkVersion 23versionCode 1versionName "1.0"}buildTypes {release {minifyEnabled falseproguardFiles getDefaultProguardFile('proguard-android.txt'), 'proguard-rules.pro'}}
}dependencies {compile fileTree(dir: 'libs', include: ['*.jar'])testCompile 'junit:junit:4.12'compile 'com.android.support:appcompat-v7:23.3.0'// dagger 2 的配置compile 'com.google.dagger:dagger:2.4'apt 'com.google.dagger:dagger-compiler:2.4'compile 'org.glassfish:javax.annotation:10.0-b28'// 添加java 注解库
}
以上两个配置就可以了。
android-apt是Gradle编译器的插件,根据其官方文档,主要两个目的:
编译时使用该工具,最终打包时不会将该插件打入到apk中。
能够根据设置的源路径,在编译时期生成相应代码。
在导入类库时,
compile 'com.google.dagger:dagger:2.4'apt 'com.google.dagger:dagger-compiler:2.4'
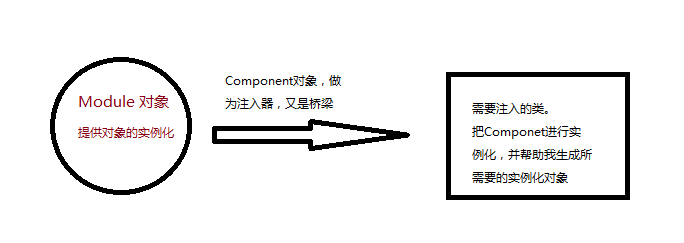
@Module   //提供依赖对象的实例
public class MainModule {@Provides // 关键字,标明该方法提供依赖对象Person providerPerson(){//提供Person对象return new Person();}}
沟通部分Component
@Component(modules = MainModule.class)  // 作为桥梁,沟通调用者和依赖对象库
public interface MainComponent {//定义注入的方法void inject(MainActivity activity);}使用者Actvity中调用。
public class MainActivity extends AppCompatActivity{@Inject   //标明需要注入的对象Person person;@Overrideprotected void onCreate(@Nullable Bundle savedInstanceState) {super.onCreate(savedInstanceState);// 构造桥梁对象MainComponent component = DaggerMainComponent.builder().mainModule(new MainModule()).build();//注入component.inject(this);}
}
看一下Person类
public class Person {public Person(){Log.i("dagger","person create!!!");}}
// 构造桥梁对象MainComponent component = DaggerMainComponent.builder().mainModule(new MainModule()).build();//注入component.inject(this); @Inject //标明需要注入的对象Person person;
@Provides // 关键字,标明该方法提供依赖对象Person providerPerson(){//提供Person对象return new Person();}
在使用过程出现了很多注解:
@Module:作为实例对象的容器。@Provides:标注能够提供实例化对象的方法。@Component:作为桥梁,注入对象的通道。@Inject:需要注入的方法
如上使用有一种变通,修改MainModule和Person类。
@Module   //提供依赖对象的实例
public class MainModule {/*@Provides // 关键字,标明该方法提供依赖对象Person providerPerson(){//提供Person对象Log.i("dagger"," from Module");return new Person();}*/}
public class Person {@Inject // 添加注解关键字public Person(){Log.i("dagger","person create!!!");}}
将Module中的providePerson()方法注释,在Person中添加@Inject注解,依然能够实现。
逻辑如下:
- 先判断Module中是否有提供该对象实例化的方法。
- 如果有则返回。结束。
- 如果没有,则查找该类的构造方法,是否有带有@Inject的方法。如过存在,则返回。
@Singleton 单例注解
假如,对于同一个对象,我们需要注入两次,如下方式
 public class MainActivity extends AppCompatActivity{@InjectPerson person;@InjectPerson person2;@Overrideprotected void onCreate(@Nullable Bundle savedInstanceState) {super.onCreate(savedInstanceState);// 构造桥梁对象MainComponent component = DaggerMainComponent.builder().mainModule(new MainModule()).build();//注入component.inject(this);// 打印两个对象的地址Log.i("dagger","person = "+ person.toString()+"; person2 = "+ person2.toString());}
}
看一下结果:
person = com.mahao.alex.architecture.dagger2.Person@430d1620; person2 = com.mahao.alex.architecture.dagger2.Person@430d17c8
@Provides // 关键字,标明该方法提供依赖对象@SingletonPerson providerPerson(){return new Person();}
@Singleton
@Component(modules = MainModule.class)  // 作为桥梁,沟通调用者和依赖对象库
public interface MainComponent {//定义注入的方法void inject(MainActivity activity);}
此时在Log,会发现两个对象的地址一样,可见是同一个对象。
person = com.mahao.alex.architecture.dagger2.Person@4310f898; person2 = com.mahao.alex.architecture.dagger2.Person@4310f898那么不同的Activity之间,能否保持单例呢?
创建一个新的Activity,代码如下:
public class Main2Actvity extends AppCompatActivity {@InjectPerson person;@Overrideprotected void onCreate(@Nullable Bundle savedInstanceState) {super.onCreate(savedInstanceState);// 构造桥梁对象MainComponent component = DaggerMainComponent.builder().mainModule(new MainModule()).build();//注入component.inject(this);Log.i("dagger","person = "+ person.toString());}
}
结果如下:
person create!!!person = com.mahao.alex.architecture.dagger2.Person@4310f898; person2 = com.mahao.alex.architecture.dagger2.Person@4310f898person create!!!person = com.mahao.alex.architecture.dagger2.Person@43130058public class Person {private Context mContext;public Person(Context context){mContext = context;Log.i("dagger","create");}}
这样的话,我们需要修改MainModule
@Module   //提供依赖对象的实例
public class MainModule {private Context mContext;public MainModule(Context context){mContext = context;}@ProvidesContext providesContext(){// 提供上下文对象return mContext;}@Provides // 关键字,标明该方法提供依赖对象@SingletonPerson providerPerson(Context context){return new Person(context);}}
- 修改
providerPerson方法,传入Context对象。 - 添加
providesContext(),用以提供Context对象。
看一下使用
// 构造桥梁对象MainComponent component = DaggerMainComponent.builder().mainModule(new MainModule(this)).build();//注入component.inject(this);
@Module
public class AppModule {private Context mContext;public AppModule(Context context){mContext = context;}@ProvidesContext providesContext(){// 提供Context对象 return mContext;}}
而在另一个Module中需要依赖Context对象,那么怎么写呢?
首先编写当前AppModule的Component类
/**** 全局的Component 组件* Created by MH on 2016/7/18.*/@Component(modules = AppModule.class)
public interface AppComponent {// 向其下层提供Context 对象Context proContext();
}
在此种,因为Module中需要向下层提供Context对象,而其与下层的联系时通过Component
,所以需要在这里声明一个其所提供对象的方法。以便下层Module获取。
/**** 下层Module类* Created by MH on 2016/7/18.*/
@Module
public class ActivityMoudule {@ProvidesPerson providePerson(Context context){// 此方法需要Context 对象return new Person(context);}
}
/*** 子的Component* Created by MH on 2016/7/18.*/
@Component(dependencies = AppComponent.class,modules = ActivityMoudule.class)
public interface ActivityComponent {// 注入void inject(MainActivity activity);
}
// 依赖对象 ComponentAppComponent appCom = DaggerAppComponent.builder().appModule(new AppModule(this)).build();// 子类依赖对象 ,并注入DaggerActivityComponent.builder().appComponent(appCom).activityMoudule(new ActivityMoudule()).build().inject(this);
在其中使用过程中,有很重的两点。
- 父依赖的
Component中需要添加提供对象的接口。 - 子依赖的
Component中的注解中添加dependencies = AppComponent.class。
@Qualifier 自定义标记
在使用中,会出现两个方法返回对象相同时的情况,那么如何区分呢。
Person对象具有两个构造方法,根据不同的参数值构造不同的方法。
public class Person {private Context mContext;public Person(Context context){mContext = context;Log.i("dagger","create");}public Person(String name){Log.i("dagger",name);}
}
ActivityModule中添加@Named标记
@Module
public class ActivityMoudule {@Named("Context")  // 通过context创建Person 对象@ProvidesPerson providePersonContext(Context context){// 此方法需要Context 对象return new Person(context);}@Named("name")  // 通过name创建Person 对象@ProvidesPerson providePersonName(){// 此方法需要namereturn new Person("1234");}
}
使用时,也需要添加此标记
public class MainActivity extends AppCompatActivity{@Named("context") // 标记@InjectPerson person;@Named("name") // 标记@InjectPerson person2;@Overrideprotected void onCreate(@Nullable Bundle savedInstanceState) {super.onCreate(savedInstanceState);setContentView(R.layout.activity_main);//注入component.inject(this);*/// 依赖对象 ComponentAppComponent appCom = DaggerAppComponent.builder().appModule(new AppModule(this)).build();// 子类依赖对象 ,并注入DaggerActivityComponent.builder().appComponent(appCom).activityMoudule(new ActivityMoudule()).build().inject(this);}}
使用时,使用者的@Inject上,必须要加入注解@Named("xxx"),不然编译期会报错。
这样使用过程中,虽然解决了问题,但是通过字符串标记一个对象,容易导致前后不匹配,可以通过自定义注解的方式解决。
添加两个注解,分别对应Context和name。
@Qualifier  // 关键词
@Retention(RetentionPolicy.RUNTIME)  // 运行时仍可用
public @interface PersonForContext {// Context 对象的注解
}
@Qualifier
@Retention(RetentionPolicy.RUNTIME)
public @interface PersonForName {// name 对象的注解
}@PersonForContext // 通过context创建Person 对象@ProvidesPerson providePersonContext(Context context){// 此方法需要Context 对象return new Person(context);}@PersonForName // 通过name创建Person 对象@ProvidesPerson providePersonName(){// 此方法需要Context 对象return new Person("123");}注入时:
@PersonForContext // 标记@InjectPerson person;@PersonForName // 标记@InjectPerson person2; @Provides // 关键字,标明该方法提供依赖对象@SingletonPerson providerPerson(Context context){return new Person(context);}
@Singleton
@Component(modules = MainModule.class)  // 作为桥梁,沟通调用者和依赖对象库
public interface MainComponent {
}
@Scope //注明是Scope
@Documented //标记在文档
@Retention(RUNTIME) // 运行时级别
public @interface Singleton {}
/*** 全局的生命周期单例*/
@Scope
@Documented
@Retention(RetentionPolicy.RUNTIME)
public @interface PerApp {}在使用中完全和@Singleton相同。
@Module
public class AppModule {private Context mContext;public AppModule(Context context){mContext = context;}@Provides@PerApp  // 添加该标记表明该方法只产生一个实例Context providesContext(){// 提供上下文对象return mContext;}}
@PerApp // 因为Module 中使用了该标记,所以需要在此添加
@Component(modules = AppModule.class)
public interface AppComponent {// 向其下层提供Context 对象Context proContext();
}因为单例的依托于他所在的Component中,所以需要在Application中进行实例化。
public class App extends Application {// 为什么可以使用静态public static AppComponent appComponent;@Overridepublic void onCreate() {super.onCreate();// 实例化appComponent = DaggerAppComponent.builder().appModule(new AppModule(this)).build();}
}
/*** Activity 单例生命周期*/
@Scope
@Documented
@Retention(RetentionPolicy.RUNTIME)
public @interface PerActivity {
}
会发现,除了定义名不一样,其余都和PerApp一样。在前面,说过这样一句话:保持唯一的条件是通过@Scope标记的注解相同。
@Module
public class ActivityMoudule {@PersonForContext@Provides@PerActivity  // 添加标记,生命其所构造的对象单例Person providePersonContext(Context context){// 此方法需要Context 对象return new Person(context);}.....
}
@PerActivity  // ActivityMoudule 中使用了该标记
@Component(dependencies = AppComponent.class,modules = ActivityMoudule.class)
public interface ActivityComponent {// 注入void inject(MainActivity activity);
}
public class MainActivity extends AppCompatActivity{@PersonForContext // 标记@InjectPerson person;@PersonForName // 标记@InjectPerson person2;/*** 不使用静态的,因为该Component只是针对于该Activity,而不是全局的*/ActivityComponent activityComponent;@Overrideprotected void onCreate(@Nullable Bundle savedInstanceState) {super.onCreate(savedInstanceState);setContentView(R.layout.activity_main);activityComponent = DaggerActivityComponent.builder().appComponent(App.appComponent) // 添加了全局的AppComponent组件,可以使用全局的实例化对象.activityMoudule(new ActivityMoudule()).build();activityComponent.inject(this);
对于具有依赖关系的Component,不能使用相同的Scope,如果使用相同的会带来语意不明
懒加载Lazy和强制重新加载Provider
public class MainActivity extends AppCompatActivity{@PersonForContext // 标记@InjectLazy lazyPerson; // 注入Lazy元素@PersonForName // 标记@InjectProvider providerPerson; // 注入Provider/*** 不使用静态的,因为该Component只是针对于该Activity,而不是全局的*/ActivityComponent  activityComponent;@Overrideprotected void onCreate(@Nullable Bundle savedInstanceState) {super.onCreate(savedInstanceState);setContentView(R.layout.activity_main);activityComponent = DaggerActivityComponent.builder().appComponent(App.appComponent)  // 添加了全局的AppComponent组件.activityMoudule(new ActivityMoudule()).build();activityComponent.inject(this);Person person = lazyPerson.get();// 调用该方法时才会去创建Person,以后每次调用获取的是同一个对象// 调用该方法时才回去创建Person1,以后每次调用都会重新加载Module中的具体方法,根据Module中的实现,可能相同,可能不相同。Person person1 = providerPerson.get();}
} 说这么多都没用,不如实践一下。下面提供一个链接github上的一个开源项目,RXjava+Retrofit+dagger2的框架。希望这篇文章对想要学习RXjava+Retrofit+dagger2有一些帮助点击打开链接
本文来自互联网用户投稿,文章观点仅代表作者本人,不代表本站立场,不承担相关法律责任。如若转载,请注明出处。 如若内容造成侵权/违法违规/事实不符,请点击【内容举报】进行投诉反馈!