Vue中extend的学习
vue中通过extend动态创建全局组件;
1、什么是动态创建组件
只有在触发事件的时候,才产生某组件,平时它并不存在;
2、Vue.extend()
使用基础 Vue 构造器,创建一个“子类”。参数是一个包含组件选项的对象;其实就是一个子类构造器是Vue组件的核心api,实现思路就是使用原型继承的方法返回了Vue的子类,并且利用mergeOptions把传入组件的options和父类的options进行了合并。
extend创建的是一个组件构造器,而不是一个具体的实例;
接收一个对象(包含组件选项的对象)作为参数,需要使用new来创建实例,并且需要$mount手动挂载到一个元素上,才可以获取到这个元素的相应的信息。
- 脱离填鸭式的写法;代码自由
- 代码复用,解耦
- 原生JS语法结合vue(jsx)
- 通过传入参数,可以显示不同状态的模板
基础用法:
<div id="mount-point"></div>
// 创建构造器
/* Vue.extend( options )参数:{Object} options用法:使用基础 Vue 构造器,创建一个“子类”。参数是一个包含组件选项的对象;data 选项是特例,需要注意: 在 Vue.extend() 中它必须是函数;*/
var Profile = Vue.extend({template: '{{firstName}} {{lastName}} aka {{alias}}
',data: function () {return {firstName: 'Walter',lastName: 'White',alias: 'Heisenberg'}}
})
// 创建 Profile 实例,并挂载到一个元素上。
new Profile().$mount('#mount-point')
// 结果如下:
<p>Walter White aka Heisenberg</p>
/*
可以看到,extend 创建的是 Vue 构造器,而不是我们平时常写的组件实例,所以不可以通过 new Vue({ components: testExtend }) 来直接使用,需要通过 new Profile().$mount(’#mount-point’) 来挂载到指定的元素上。
*/
3、通过extend实现弹窗的动态创建
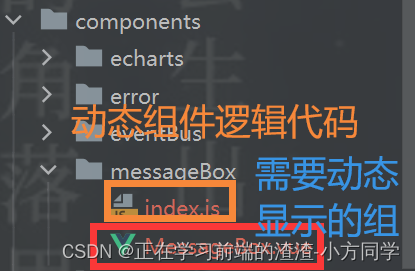
3.1、创建动态组件
<!--动态组件的模板-->
<template><!--  可以用MessageBox做蒙尘--><div :class="['MessageBox',type]"><div class="inner"><header class="header"><h1 class="title">{{ title }}</h1><span @click="$messageBox.hide()">x</span></header><div class="content">{{ content }}</div></div></div>
</template><script>
export default {name: "MessageBox",props: {title: {type: String,default: "this is title",},content: {type: String,default: "this is content",},type: {type: String,default: "primary",//检测传进来的类型是否是这四种,通过ES6提供的includes方法模糊查询validator(value) {return ["primary","success","warn","danger"].includes(value);}}}
}
</script><style scoped lang="less">
.MessageBox {position: fixed;left: 50%;top: 0;//蒙尘的大小设置width: 50%;height: 400px;background-color: rgba(0, 0, 0, .5);//不同弹窗的样式&.primary {.header {background-color: blue;color: #fff;}}&.success {.header {background-color: green;color: #fff;}}&.warn {.header {background-color: rgba(255, 138, 71, 0.96);color: #fff;}}&.danger {.header {background-color: red;color: #fff;}}.inner {position: absolute;top: 100px;left: 50%;width: 500px;margin-left: -250px;background-color: #fff;box-shadow: 1px 3px 5px #ddd;border-radius: 5px;overflow: hidden;.header {height: 44px;padding: 0 10px;line-height: 44px;box-sizing: border-box;h1 {margin: 0;font-weight: normal;}.title {font-size: 16px;float: left;}span {//将鼠标改为小手样式cursor: pointer;float: right;}}.content {padding: 20px;box-sizing: border-box;}}
}</style>
3.2、编辑动态组件的逻辑
//引入需要动态创建的模板
import _MessageBox from "@/components/messageBox/MessageBox";export default {//install开发插件的方法,install带有Vue的构造器,可以使用Vue.extend,和Vue.component(注册组件)//在Vue.use的时候就会调用这个installinstall(Vue) {let messageBox = null;//使用Vue.component全局注册组件Vue.component(_MessageBox.name, _MessageBox);//将方法添加到Vue的prototype属性中,这样实例就可以继承里面的方法Vue.prototype.$messageBox = {show, hide,info({title, content, type}, callback) {this.show({title, content, type: "primary"}, callback)},success({title, content, type}, callback) {this.show({title, content, type: "success"}, callback)},warn({title, content, type}, callback) {this.show({title, content, type: "warn"}, callback)},danger({title, content, type}, callback) {this.show({title, content, type: "danger"}, callback)}}//显示弹窗function show(props, callback) {//判断这个组件是否存在,如果不存在if (!messageBox) {//生成构造函数、构造器const MessageBox = Vue.extend({/*render该渲染函数接收一个 createElement 方法作为第一个参数用来创建 VNode(节点)。如果组件是一个函数组件,渲染函数还会接收一个额外的 context 参数,为没有实例的函数组件提供上下文信息。*///此处传入的是一个函数组件,所以渲染的函数还可以额外接收一个参数render(h) {//h函数就是vue中的createElement函数,这个函数作用就是创建虚拟dom,追踪dom变化的return h("MessageBox", {//用于接收传递的参数props: {...props}})}});//将动态模板组件实例化messageBox = new MessageBox();//将这个实例手动挂载,挂载后可以通过$el获取这个元素this.vm = messageBox.$mount();//将组件添加到body上,脱离了根节点,不在"id=app中"document.body.appendChild(this.vm.$el)callback && callback();}}//关闭弹窗function hide(callback) {//移出这个组件document.body.removeChild(this.vm.$el);//将这个实例销毁messageBox.$destroy();messageBox = null;this.vm = null;//如果存在才会执行callback && callback();}}
}
3.3、在main.js中引入使用
import Vue from 'vue'
import App from './App.vue'//1、引入
import MessageBox from "@/components/messageBox";
//2、全局注册使用
Vue.use(MessageBox);new Vue({render: h => h(App)
}).$mount('#app')
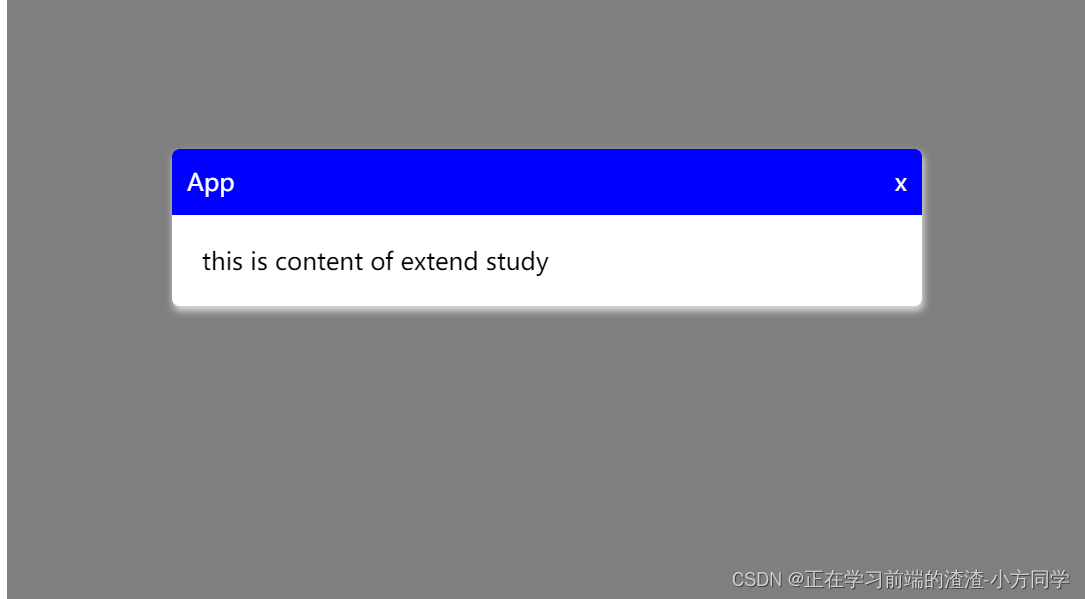
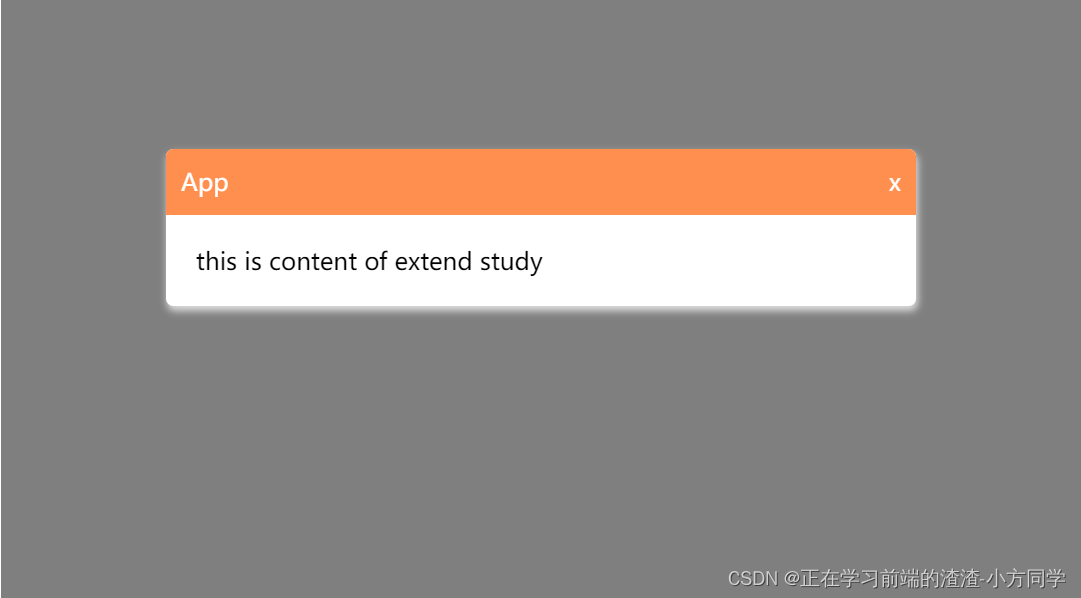
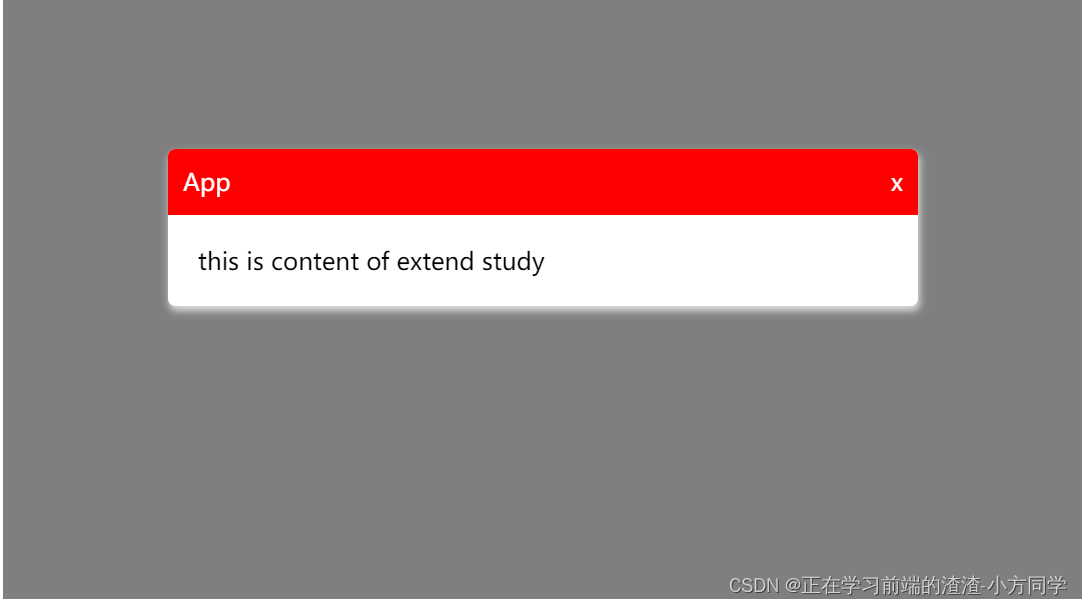
3.4、在需要的地方通过触发事件显示弹窗
<template><div><button @click="showMessageBox">show</button><button @click="showInfoMessageBox">info</button><button @click="showSuccessMessageBox">success</button><button @click="showWarnMessageBox">warn</button><button @click="showDangerMessageBox">danger</button></div>
</template><script>
export default {name: "Extend",methods: {//通过this.$messageBox可以访问到Vue实例的属性和方法showMessageBox() {this.$messageBox.success({title: 'App',content: 'this is content of extend study',type: 'success'}, () => {console.log('show over')})},showInfoMessageBox() {this.$messageBox.info({title: 'App',content: 'this is content of extend study',}, () => {console.log('info over')})},showSuccessMessageBox() {this.$messageBox.success({title: 'App',content: 'this is content of extend study',type: 'success'}, () => {console.log('success over')})},showWarnMessageBox() {this.$messageBox.warn({title: 'App',content: 'this is content of extend study',type: 'warn'}, () => {console.log('warn over')})},showDangerMessageBox() {this.$messageBox.danger({title: 'App',content: 'this is content of extend study',type: 'danger'})}}
}
</script>
3.5、效果图

本文来自互联网用户投稿,文章观点仅代表作者本人,不代表本站立场,不承担相关法律责任。如若转载,请注明出处。 如若内容造成侵权/违法违规/事实不符,请点击【内容举报】进行投诉反馈!