【React】生命周期详解
文章目录
- 一、生命周期钩子函数
- 1.1、旧版钩子函数【淘汰】
- 1.2、新版钩子函数【新增】
- 1.3、常用的钩子函数
- 二、生命周期各阶段
- 2.1、挂载阶段
- render【!】
- constructor【!】
- componentDidMount【!】
- static getDerivedStateFromProps【!】
- 2.2、更新阶段
- componentDidUpdate【!】
- shouldComponentUpdate
- getSnapshotBeforeUpdate
- 2.3、卸载阶段
- componentWillUnmount【!】
- 2.4、错误处理
- componentDidCatch
- static getDerivedStateFromError
一、生命周期钩子函数
- React 的生命周期从广义上分为三个阶段:挂载、渲染、卸载
- 因此可以把 React 的生命周期分为两类:挂载卸载过程和更新过程
1.1、旧版钩子函数【淘汰】
- 了解即可,因为现在一般都是用新版的,但是有些公司以前的项目是用旧版本写的,这时你就需要知道里面一些钩子函数是做什么用的
- 16.3之前的版本生命周期图示:
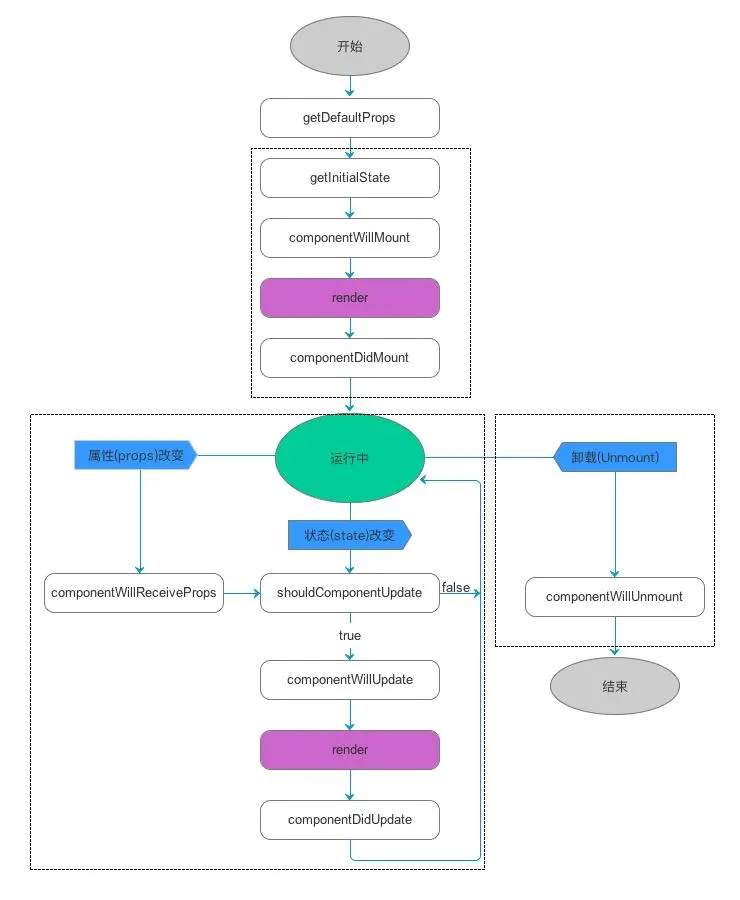
- 旧版本独有的,
17.0版本已经删除了的钩子函数(17.0之前的版本仍可以继续使用): componentWillMount,componentWillReceiveProps,componentWillUpdate- 在使用这几个钩子函数时,前面要加
UNSAFE_
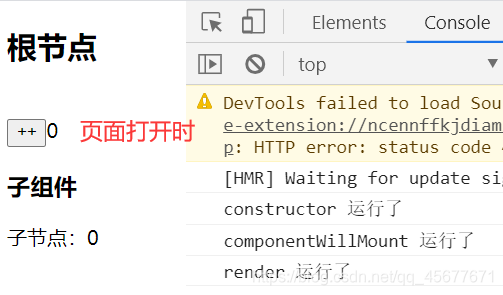
import React ,{Component} from 'react'
import ReactDOM from 'react-dom'
// 子组件
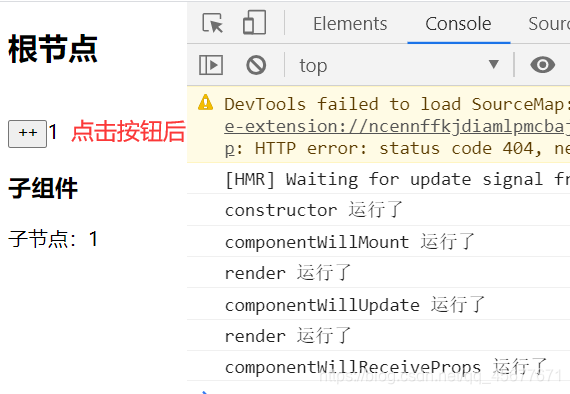
class Child extends Component{// 初始化数据constructor(props){super(props);this.state = {};}// 当组件接收到新的props值会触发,新版已经淘汰UNSAFE_componentWillReceiveProps(){console.log("componentWillReceiveProps 运行了");}render(){return(<div>子节点:{this.props.num}</div>)}}
class App extends Component {constructor(props) {console.log('constructor 运行了');super(props);this.state = {num:0};}// 组件挂载前,新版已经淘汰了UNSAFE_componentWillMount(){console.log('componentWillMount 运行了')}// 箭头函数changeNum = ()=>{this.setState({num:this.state.num+1})}// 渲染数据render() {console.log('render 运行了');return (<div>根节点<br/>{/*
必须加/
*/}<button onClick={this.changeNum}>++</button>{this.state.num}<br/>子组件:<Child num={this.state.num}/></div>);}// 组件更新前,新版已经淘汰了UNSAFE_componentWillUpdate(){console.log('componentWillUpdate 运行了');}
}
ReactDOM.render(<App />,document.getElementById('root')
)
1.2、新版钩子函数【新增】
-
16.3版本生命周期图示:

-
16.4及以上版本生命周期图示:

-
增加了:
static getDerivedStateFromProps()和getSnapshotBeforeUpdate() -
用来替代被弃用的旧版本那三个钩子函数
-
还增加了:
static getDerivedStateFromError()和componentDidCatch() -
用来处理错误
import React ,{Component } from 'react'
import ReactDOM from 'react-dom'
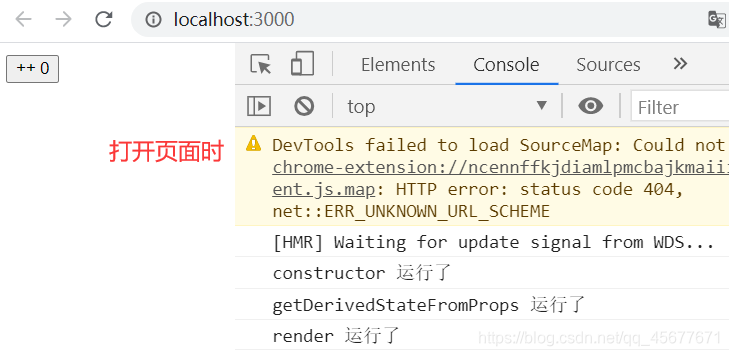
class App extends Component {constructor(props) {console.log('constructor 运行了');super(props);this.state = {count: 0};}// 一般用不到:通过props设置获取到 state的值 // getDerivedStateFromProps前面要加上static保留字,声明为静态方法,不然会被react忽略掉// getDerivedStateFromProps里面的this为undefinedstatic getDerivedStateFromProps(nextProps, prevState) {console.log("getDerivedStateFromProps 运行了");return true;}// 一般用不到:滚动的特殊处理,与componentDidUpdate 配对使用的/* 在react `render()`后的输出被渲染到DOM之前被调用。它使您的组件能够在它们被潜在更改之前捕获当前值(如滚动位置)。这个生命周期返回的任何值都将作为参数传递给componentDidUpdate()*/ getSnapshotBeforeUpdate(prevProps, prevState) {console.log("getSnapshotBeforeUpdate 运行了");return 11;}componentDidUpdate(prevProps, prevState, snapState) {console.log("componentDidUpdate 运行了", snapState);}// 本身或后代有报错会触发componentDidCatch(error, info) {console.log("componentDidCatch 运行了");}// 后代组件抛出错误后会触发static getDerivedStateFromError(nextProps, prevState) {console.log("getDerivedStateFromError 运行了");}// 定义事件changeCount = () => {this.setState({ count: this.state.count + 1 })}// 渲染数据render(){const { count} = this.state;return(<div><button onClick={this.changeCount}>++ {count}</button></div>)}
}
ReactDOM.render(<App />,document.getElementById('root')
)

1.3、常用的钩子函数
- 下面的钩子函数在新老版本都是比较常用的
import React, { Component } from 'react';
class App extends Component {//初始化  ,state  ,props,ref,绑定thisconstructor(props) {super(props);this.state = {}}//渲染  ,父组件 执行了渲染,默认子组件的渲染函数也要执行render() {return (<div>首页</div>);}//是否需要更新  ,不需要 返回 false   ;需要 返回trueshouldComponentUpdate() {return true;}// DOM操作,实例化,数据请求//异步处理,有副作用的处理  ;获取数据、执行 setTimeout  setIntervalcomponentDidMount() {console.log('componentDidMount')}//更新时的钩子函数componentDidUpdate() {console.log('componentDidUpdate')}//卸载 回收操作  定时器  解除绑定componentWillUnmount() {// 类似于vue 的beforeDestoryconsole.log('componentDidUpdate')}
}export default App;
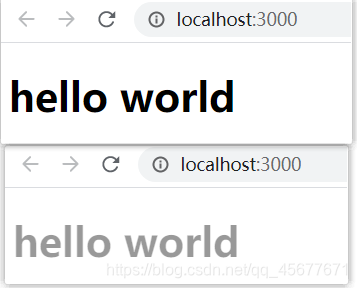
componentDidMount案例:实现文字透明度的渐变效果
import React ,{Component} from 'react'
import ReactDOM  from 'react-dom'
class App extends Component{constructor() {super();this.state = {opacity: 1  // 不透明}}//在这个钩子函数中可以获取数据componentDidMount(){setInterval(()=>{//报错,this指向不对,目前指向了window,可以使用箭头函数let myOpacity = this.state.opacity; myOpacity -= 0.05;//如果透明度到0,重新置1if(myOpacity<=0){myOpacity = 1;}this.setState({opacity:myOpacity})},500);}render() {return (<><h1 style={{"opacity": this.state.opacity}}>hello world</h1></>);}
}
ReactDOM.render(<App />,document.getElementById('root')
)
二、生命周期各阶段
React中组件也有生命周期,也就是说也有很多钩子函数供我们使用, 组件的生命周期,我们会分为四个阶段,初始化(挂载)、运行中(更新)、销毁(卸载)、错误处理(异常)(16.3之后)
常用的生命周期方法就下面几个,为啥?因为好记,好记才会常用。程序员的本性。
其实其他生命周期方法也好用,但是需要特地条件下使用才会觉得方便。所以就不太常用
constructor()render()componentDidMount()componentDidUpdate()componentWillUnmount()getDerivedStateFromProps
2.1、挂载阶段
- 当组件实例被创建并插入 DOM 中时,其生命周期调用顺序如下:
constructorstatic getDerivedStateFromPropsrendercomponentDidMount
render【!】
render()- 调用:在组件挂载之前
- 是 class 组件中唯一必须实现的方法
使用方法
- 当他被调用时,他将计算
this.props和this.state,并返回以下一种类型:
| 返回的类型 | 描述 |
|---|---|
| React元素 | 通常通过 JSX 创建,比如DOM元素或组件 |
| 数组 或 fragments | 使得 render 方法可以返回多个元素。 |
| Portals | 可以渲染子节点到不同的 DOM 子树中 |
| 字符串或数值 | 它们在 DOM 中会被渲染为文本节点 |
| null 或 布尔值 | 什么都不渲染。 |
使用限制
render()方法必须是一个纯函数- 他不能改变
state - 也不能直接和浏览器进行交互
- 应该将事件放在其他生命周期函数中
注意:
- 如果
shouldComponentUpdate()返回false - 则不会调用 render()。
constructor【!】
constructor(props)- 调用:在组件挂载之前
constructor(props) {super(props);this.state = {isLiked: props.isLiked};
}
constructor使用条件
- 在添加其他内容前
- 调用
super(props) - 将父组件传来的
props绑定到这个类中 - 不然
this.props将会无法得到
constructor作用
- 通过给
this.state赋值对象来初始化内部state - 为事件处理函数绑定实例
constructor()在以下条件可以不用:
- 不初始化 state
- 不进行方法绑定
- 组件内全是纯函数写法。
constructor()中不要这样做:
- 调用 setState() 方法
- 引入任何副作用或订阅
componentDidMount【!】
componentDidMount()- 调用:组件挂载到DOM后,只会被调用一次
- 初始化使得DOM节点应该进行到这里。
- 这个方法是用于在服务器渲染上的唯一方法
- 这个方法因为是在渲染之前被调用,也是惟一一个可以直接同步修改state的地方。
- 通常在这里进行ajax请求
- 如果要初始化第三方的dom库,也在这里进行初始化。只有到这里才能获取到真实的dom.
static getDerivedStateFromProps【!】
static getDerivedStateFromProps(nextProps, prevState)- 其周期函数是静态方法,务必加上static关键词;
- 在组件创建时和更新时的render方法之前调用
- 返回一个对象来更新状态,或者返回null来不更新任何内容。
Father.jsx
import React, { Component } from "react";
import Son from "./Son";
class Father extends Component {render() {return (<div><Son val={1423}></Son></div>);}
}export default Father;
Son.jsx
import React, { Component } from "react";class Son extends Component {//  初始化状态state = {num: 0,a: 0};render() {return (<div><div>子组件:当前自身的state是{this.state.num}</div><button onClick={this.ck.bind(this)}>给a+1</button></div>);}// 场景:希望本组件自身的状态与props同步,这个时候就可以使用getDerivedStateFromProps周期static getDerivedStateFromProps(props, state) {console.log('走了xxxxx');// 在这里进行赋值if (props.val === state.num) {// 相等,不需要赋值return null;} else {// 不相等,则需要赋值return {num: props.val,};}}ck() {this.setState((state) => {return {a: state.a + 1,};});}
}export default Son;
- 运行结果

2.2、更新阶段
- 当组件的 props 或 state 发生变化时会触发更新。组件更新的生命周期调用顺序如下:
static getDerivedStateFromPropsshouldComponentUpdaterendergetSnapshotBeforeUpdatecomponentDidUpdate
componentDidUpdate【!】
componentDidUpdate(prevProps, prevState, snapshot)- 调用:在组件更新之后
- 注意:首次渲染不会执行此方法。
componentDidUpdate()用法
- 当组件更新时,可以在此处对 DOM 进行操作。
- 如果你对更新前后的 props 进行了比较,也可以选择在此处进行网络请求
- 例如,如果props没有改变,则可能不需要网络请求
- 可以在里面直接调用 setState()
- 但是 setState() 得在条件语句里使用
- 避免导致额外的重新渲染
与componentDidUpdate()联用
- 如果组件实现
getSnapshotBeforeUpdate()生命周期 - 则它返回的值将作为第三个参数【snapshot】传递给
componentDidUpdate()。 - 否则,这个参数是
undefined。
与shouldComponentUpdate()联用
- 如果 shouldComponentUpdate() 返回值为 false
- 则不会调用 componentDidUpdate()。
shouldComponentUpdate
shouldComponentUpdate(nextProps, nextState)- 根据 shouldComponentUpdate() 的返回值
- 判断组件的输出是否受
state和props的影响。 - 默认行为是 state 每次发生变化组件都会重新渲染。
- 当 props 或 state 发生变化时
shouldComponentUpdate会在渲染执行之前被调用- 返回值默认为 true。
- 首次渲染或使用 forceUpdate() 时不会调用该方法。
shouldComponentUpdate() 返回 false
componentWillUpdate、render和componentDidUpdate不会被调用。
getSnapshotBeforeUpdate
getSnapshotBeforeUpdate(prevProps, prevState)- 在最近一次渲染输出(提交到 DOM 节点)之前调用
- 它使得组件能在发生更改之前从 DOM 中捕获一些信息(例如,滚动位置)
- 这个生命周期返回的任何值都将作为参数传递给componentDidUpdate()。
作用地点:
- 此用法并不常见,但它可能出现在 UI 处理中
- 如需要以特殊方式处理滚动位置的聊天线程等。
class ScrollingList extends React.Component {constructor(props) {super(props);this.listRef = React.createRef();}getSnapshotBeforeUpdate(prevProps, prevState) {// 我们是否在 list 中添加新的 items ?// 捕获滚动位置以便我们稍后调整滚动位置。if (prevProps.list.length < this.props.list.length) {const list = this.listRef.current;return list.scrollHeight - list.scrollTop;}return null;}componentDidUpdate(prevProps, prevState, snapshot) {// 如果我们 snapshot 有值,说明我们刚刚添加了新的 items,// 调整滚动位置使得这些新 items 不会将旧的 items 推出视图。//(这里的 snapshot 是 getSnapshotBeforeUpdate 的返回值)if (snapshot !== null) {const list = this.listRef.current;list.scrollTop = list.scrollHeight - snapshot;}}render() {return (<div ref={this.listRef}>{/* ...contents... */}</div>);}
}
2.3、卸载阶段
- 当组件从 DOM 中移除时会调用如下方法:
componentWillUnmount【!】
componentWillUnmount()- 调用:在组件卸载之前
- 作用:执行一些清理工作
- 例如:
- 清除组件中使用的定时器,
- 取消网络请求或清理在
componentDidMount中创建的任何监听 - 清除
componentDidMount中手动创建的DOM元素
2.4、错误处理
- 当渲染过程,生命周期,或子组件的构造函数中抛出错误时,会调用如下方法:
componentDidCatch
componentDidCatch(error, info)- 此生命周期在后代组件抛出错误后被调用。
- error —— 抛出的错误。
- info —— 带有 componentStack key 的对象
- componentDidCatch() 会在“提交”阶段被调用,因此允许执行副作用。
- 它应该用于记录错误之类的情况
static getDerivedStateFromError
static getDerivedStateFromError(error)- 此生命周期会在后代组件抛出错误后被调用
- 它将抛出的错误作为参数,并返回一个值以更新 state
本文来自互联网用户投稿,文章观点仅代表作者本人,不代表本站立场,不承担相关法律责任。如若转载,请注明出处。 如若内容造成侵权/违法违规/事实不符,请点击【内容举报】进行投诉反馈!