Android之网络请求7————OkHttp源码4:网络操作
Android之网络请求7————OkHttp源码4:网络操作
文章目录
- Android之网络请求7————OkHttp源码4:网络操作
- 一.前言
- 二.名次解释
- 1.URL
- 2.Addresses
- 3.Routes
- 4.Connection
- 5.StreamAllocation
- 6.URL请求的过程
- 三.Address的创建
- 四.StreamAllocation的创建
- 1.connetionpool
- 2.StreamAllocation
- 五.Connection
- 1.ConnectInterceptor
- 2.newStream
- 3.connectionPool
- 六.发送请求和获取响应
- 1.发送请求
- 2.接收响应
- 七.总结
- 八.参考资料
- 九.文章索引
一.前言
关于OkHttp的源码已经写了3篇了,Android之网络请求4————OkHttp源码1:框架这一篇主要分析了,OkHttp的整体框架。在Android之网络请求5————OkHttp源码2:发送请求这一篇中分析了异步和同步请求是如何经过Dispatcher到getResponseWithInterceptorChain()方法的。在 Android之网络请求6————OkHttp源码3:获取响应(拦截器链) 这篇博客中,主要分析了getResponseWithInterceptorChain()方法,经过一系列的拦截器最终获得响应的过程。
这一篇文章主要侧重于整个过程中的网络操作。
二.名次解释
下面的内容主要翻译于官方文档,OkHppt官网
1.URL
URL是HTTP和Interbe的基础。除了作为Web上所有内容的通用,分散的命名方案之外,它们还指定了如何访问Web资源。还可以指定访问时使用Http还是Https。
2.Addresses
Addresses指定网络服务器,和所有的静态必要的配置,已经连接到该服务器:端口号,Https设置,和首选的的网络协议(如Http.2或者SPDY)。
共享相同地址的URL也可以共享相同的基础TCP套接字,共享一个连接有一个很好的性能优点:更低的延迟,更高的吞吐量(由于TCP的慢启动)和省电,OkHttp使用连接池自动再利用HTTP/1.x的连接,复用HTTP/2和SPDY的连接。
在OkHttp中,address的一些字段来自URL(模式、主机名、端口),剩下的部分来自OkHttpClient。
3.Routes
Routes提供一个真的连接到网络服务器的所需的动态信息。这指定了尝试的Ip地址(或者讲过DNS查询得到的地址),使用的代理服务器(如果使用了ProxySelector)和使用哪个版本的TLS进行谈判。(对于HTTPS连接)
对于一个地址,可能有多个路由。举个例子,一个网路服务器托管在多个数据中心,那么在DNS中可能会产生多个IP地址。
4.Connection
Connection:物理连接的封装
ConnectionPool:连接池,实现连接的复用;
5.StreamAllocation
直译就是流分配。流是什么呢?我们知道Connection是一个连接远程服务器的物理Socket连接,而Stream则是基于Connection的逻辑Http请求/响应对。StreamAllocation会通过ConnectPool获取或者新生成一个RealConnection来得到一个连接到Server的Connection连接,同时会生成一个HttpCodec用于下一个CallServerInterceptor,以完成最终的请求;
6.URL请求的过程
当使用OkHttp进行一个URL请求时,下面是他的操作流程:
- 使用URL和配置好的OkHttpClient创建一个address。这个地址指明我们如何连接网络服务器。
- 尝试从连接池中得到该地址的一条连接
- 如果在连接池中没有找到一条连接,那么选择一个route进行尝试。通常这意味着做一个DNS请求得到服务器IP的地址,必要是会选择一个TSL版本和一个代理服务器。
- 如果是一条新的路由,那么建立一条直接的socket连接或者TLS通道或者一个直接的TLS连接。
- 发生Http请求,读取响应
如果连接出现问题,OkHttp会选择另外一条路由进行再次尝试。这使得OkHttp在一个服务器的一些地址不可用时仍然可用。
一旦读取到相应后,连接将会退换到连接池中,方便复用。连接在池中闲置一段时间后将会被释放。
三.Address的创建
Address的创建在RetryAndFollowupInterceptor中的createAddress方法中,代码如下:
private Address createAddress(HttpUrl url) {SSLSocketFactory sslSocketFactory = null;HostnameVerifier hostnameVerifier = null;CertificatePinner certificatePinner = null;//是否是Hpptpsif (url.isHttps()) {sslSocketFactory = client.sslSocketFactory();hostnameVerifier = client.hostnameVerifier();certificatePinner = client.certificatePinner();}//可以看出了Address的信息一部分由URL提供,主要包括主机名和端口;另一部分由OkHttpClient提供,如dns、socketFactory等等。 return new Address(url.host(), url.port(), client.dns(), client.socketFactory(),sslSocketFactory, hostnameVerifier, certificatePinner, client.proxyAuthenticator(),client.proxy(), client.protocols(), client.connectionSpecs(), client.proxySelector());}
查看Address的构造方法,发现在Address的构造方法里,将相关的参数保存起来。
public Address(String uriHost, int uriPort, Dns dns, SocketFactory socketFactory,@Nullable SSLSocketFactory sslSocketFactory, @Nullable HostnameVerifier hostnameVerifier,@Nullable CertificatePinner certificatePinner, Authenticator proxyAuthenticator,@Nullable Proxy proxy, List<Protocol> protocols, List<ConnectionSpec> connectionSpecs,ProxySelector proxySelector) {this.url = new HttpUrl.Builder().scheme(sslSocketFactory != null ? "https" : "http").host(uriHost).port(uriPort).build();if (dns == null) throw new NullPointerException("dns == null");this.dns = dns;if (socketFactory == null) throw new NullPointerException("socketFactory == null");this.socketFactory = socketFactory;if (proxyAuthenticator == null) {throw new NullPointerException("proxyAuthenticator == null");}this.proxyAuthenticator = proxyAuthenticator;if (protocols == null) throw new NullPointerException("protocols == null");this.protocols = Util.immutableList(protocols);if (connectionSpecs == null) throw new NullPointerException("connectionSpecs == null");this.connectionSpecs = Util.immutableList(connectionSpecs);if (proxySelector == null) throw new NullPointerException("proxySelector == null");this.proxySelector = proxySelector;this.proxy = proxy;this.sslSocketFactory = sslSocketFactory;this.hostnameVerifier = hostnameVerifier;this.certificatePinner = certificatePinner;}
四.StreamAllocation的创建
StreamAllocation类负责管理连接,流和请求三者之间的关系,其创建在RetryAndFollowupInterceptor的intercept方法中,使用OkHttpClient的连接池以及上面创建的Address进行初始化,代码如下:
StreamAllocation streamAllocation = new StreamAllocation(client.connectionPool(),createAddress(request.url()), call, eventListener, callStackTrace);this.streamAllocation = streamAllocation;
1.connetionpool
client的connectionPool参数的连接池是在OkHttpClient.Builder中设置的,而其设置在Builder的构造方法中,调用的是ConnectionPool的默认构造方法,代码如下:
public Builder() {...//默认连接池connectionPool = new ConnectionPool();dns = Dns.SYSTEM;followSslRedirects = true;followRedirects = true;retryOnConnectionFailure = true;connectTimeout = 10_000;readTimeout = 10_000;writeTimeout = 10_000;}
查看 ConnectionPool的
public ConnectionPool() {this(5, 5, TimeUnit.MINUTES);}public ConnectionPool(int maxIdleConnections, long keepAliveDuration, TimeUnit timeUnit) {this.maxIdleConnections = maxIdleConnections;this.keepAliveDurationNs = timeUnit.toNanos(keepAliveDuration);// Put a floor on the keep alive duration, otherwise cleanup will spin loop.if (keepAliveDuration <= 0) {throw new IllegalArgumentException("keepAliveDuration <= 0: " + keepAliveDuration);}}
从上面可以看到,默认的连接池的最大空闲连接数为5,最长存活时间为5min。
2.StreamAllocation
继续来看StreamAllocation的构造方法,就是保存了相应的参数
public StreamAllocation(ConnectionPool connectionPool, Address address, Call call,EventListener eventListener, Object callStackTrace) {this.connectionPool = connectionPool;this.address = address;this.call = call;this.eventListener = eventListener;this.routeSelector = new RouteSelector(address, routeDatabase(), call, eventListener);this.callStackTrace = callStackTrace;}
streamAllocation中具体的内容,在调用时进行详细说明
五.Connection
httpCodec:针对不同的版本,OkHttp为我们提供了HttpCodec1(Http1.x)和HttpCodec2(Http2).
Connection:物理连接。
在上一篇博客中, Android之网络请求6————OkHttp源码3:获取响应(拦截器链) ,对于连接拦截器只是简单分析,知道他在其中生成了.httpCodec 和Connection,这里我们来进行更详细的分析
1.ConnectInterceptor
@Override public Response intercept(Chain chain) throws IOException {RealInterceptorChain realChain = (RealInterceptorChain) chain;Request request = realChain.request();StreamAllocation streamAllocation = realChain.streamAllocation();// We need the network to satisfy this request. Possibly for validating a conditional GET.boolean doExtensiveHealthChecks = !request.method().equals("GET");HttpCodec httpCodec = streamAllocation.newStream(client, chain, doExtensiveHealthChecks);RealConnection connection = streamAllocation.connection();return realChain.proceed(request, streamAllocation, httpCodec, connection);}
streamAllocation.newStream方法我们之后再分析,先看connection()方法
public synchronized RealConnection connection() {return connection;}
进去后发现,它就是很简单的返回connection。那么connection是在什么时候赋值的
public void acquire(RealConnection connection, boolean reportedAcquired) {assert (Thread.holdsLock(connectionPool));if (this.connection != null) throw new IllegalStateException();this.connection = connection;this.reportedAcquired = reportedAcquired;connection.allocations.add(new StreamAllocationReference(this, callStackTrace));}
public Socket releaseAndAcquire(RealConnection newConnection) {assert (Thread.holdsLock(connectionPool));if (codec != null || connection.allocations.size() != 1) throw new IllegalStateException();// Release the old connection.Reference<StreamAllocation> onlyAllocation = connection.allocations.get(0);Socket socket = deallocate(true, false, false);// Acquire the new connection.this.connection = newConnection;newConnection.allocations.add(onlyAllocation);return socket;}这两个方法在什么时候调用呢,acquire是在创建新连接和从连接池里获得是,调用的。
2.newStream
我们首先来看HttpCodec的对象的创建是调用streamAllocation.newStream方法,查看streamAllocation.newStream方法是在连接池的deduplicate返回中调用
public HttpCodec newStream(OkHttpClient client, Interceptor.Chain chain, boolean doExtensiveHealthChecks) {//得到连接时长,读取超时已经写超时参数int connectTimeout = chain.connectTimeoutMillis();int readTimeout = chain.readTimeoutMillis();int writeTimeout = chain.writeTimeoutMillis();int pingIntervalMillis = client.pingIntervalMillis();boolean connectionRetryEnabled = client.retryOnConnectionFailure();try {//得到一个健康的连接RealConnection resultConnection = findHealthyConnection(connectTimeout, readTimeout,writeTimeout, pingIntervalMillis, connectionRetryEnabled, doExtensiveHealthChecks);//获得HttpCodecHttpCodec resultCodec = resultConnection.newCodec(client, chain, this);synchronized (connectionPool) {codec = resultCodec;return resultCodec;}} catch (IOException e) {throw new RouteException(e);}}
继续查看findHealthyConnection方法
private RealConnection findHealthyConnection(int connectTimeout, int readTimeout,int writeTimeout, int pingIntervalMillis, boolean connectionRetryEnabled,boolean doExtensiveHealthChecks) throws IOException {//死循环 while (true) {//获得一个健康的连接RealConnection candidate = findConnection(connectTimeout, readTimeout, writeTimeout,pingIntervalMillis, connectionRetryEnabled);// If this is a brand new connection, we can skip the extensive health checks// 如果是一个全新的连接,跳过额外的健康检查synchronized (connectionPool) {if (candidate.successCount == 0) {return candidate;}}// Do a (potentially slow) check to confirm that the pooled connection is still good. If it// isn't, take it out of the pool and start again.//如果候选连接通不过额外的健康检查,那么继续寻找一个新的候选连接if (!candidate.isHealthy(doExtensiveHealthChecks)) {noNewStreams();continue;}return candidate;}}
这个方法用于查找一条健康的连接并返回,如果连接不健康,那么就会重复查找。
上面的代码总结一下就是下面几种情况。
- 候选连接是一个新连接,直接返回
- 候选连接不是一个全新连接,但是是健康的,也直接返回
- 候选连接不上全新连接,并且不健康,那么继续下一轮的循环。
我们继续来看获取连接的方法 findConnection
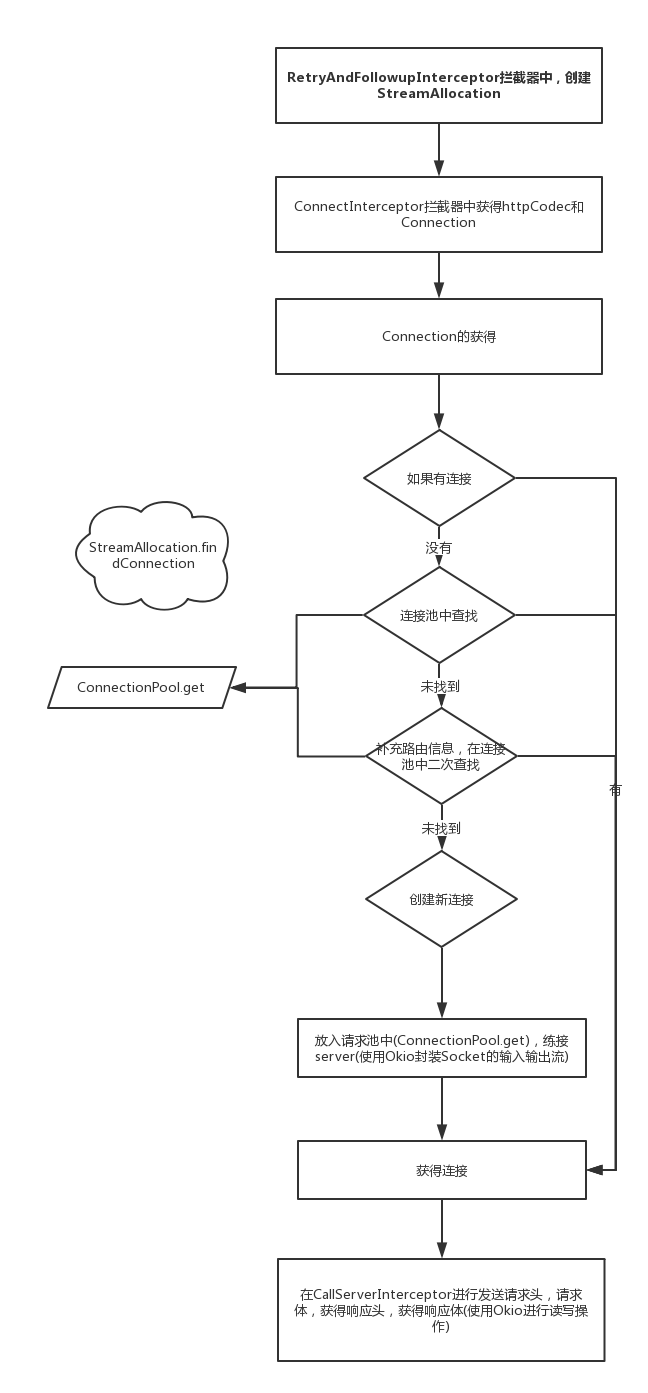
private RealConnection findConnection(int connectTimeout, int readTimeout, int writeTimeout,int pingIntervalMillis, boolean connectionRetryEnabled) throws IOException {boolean foundPooledConnection = false;RealConnection result = null;Route selectedRoute = null;Connection releasedConnection;Socket toClose;//加锁 synchronized (connectionPool) {//处理异常if (released) throw new IllegalStateException("released");if (codec != null) throw new IllegalStateException("codec != null");if (canceled) throw new IOException("Canceled");// Attempt to use an already-allocated connection. We need to be careful here because our// already-allocated connection may have been restricted from creating new streams.releasedConnection = this.connection;toClose = releaseIfNoNewStreams();//存在可使用的已分配连接if (this.connection != null) {// We had an already-allocated connection and it's good.//赋值result = this.connection;releasedConnection = null;}if (!reportedAcquired) {// If the connection was never reported acquired, don't report it as released!releasedConnection = null;}//没有可使用的连接,去连接池(连接池在后面会讲解)中找if (result == null) {// Attempt to get a connection from the pool.//去连接池中查找Internal.instance.get(connectionPool, address, this, null);if (connection != null) {foundPooledConnection = true;result = connection;} else {selectedRoute = route;}}}closeQuietly(toClose);if (releasedConnection != null) {eventListener.connectionReleased(call, releasedConnection);}if (foundPooledConnection) {eventListener.connectionAcquired(call, result);}if (result != null) {// If we found an already-allocated or pooled connection, we're done.//找到了一个已分配或者连接池中的连接,此过程结束,返回return result;}}//否则,我们需要一个路由信息,这是一个阻塞的操作// If we need a route selection, make one. This is a blocking operation.boolean newRouteSelection = false;if (selectedRoute == null && (routeSelection == null || !routeSelection.hasNext())) {newRouteSelection = true;routeSelection = routeSelector.next();}synchronized (connectionPool) {if (canceled) throw new IOException("Canceled");if (newRouteSelection) {// Now that we have a set of IP addresses, make another attempt at getting a connection from// the pool. This could match due to connection coalescing.//提供更加全面的路由信息,再次从连接池中获取连接List<Route> routes = routeSelection.getAll();for (int i = 0, size = routes.size(); i < size; i++) {Route route = routes.get(i);Internal.instance.get(connectionPool, address, this, route);if (connection != null) {foundPooledConnection = true;result = connection;this.route = route;break;}}}//依然没有找到,生成新的连接if (!foundPooledConnection) {if (selectedRoute == null) {selectedRoute = routeSelection.next();}// Create a connection and assign it to this allocation immediately. This makes it possible// for an asynchronous cancel() to interrupt the handshake we're about to do.route = selectedRoute;refusedStreamCount = 0;result = new RealConnection(connectionPool, selectedRoute);//将新连接保存到this.connection中acquire(result, false);}}// If we found a pooled connection on the 2nd time around, we're done.//如果连接是从连接池中找到的,说明是可复用的。不是新生成的,因为新生成的连接,// 需要去连接服务器之后才能可用呀if (foundPooledConnection) {eventListener.connectionAcquired(call, result);return result;}// Do TCP + TLS handshakes. This is a blocking operation.//新连接 练接serverresult.connect(connectTimeout, readTimeout, writeTimeout, pingIntervalMillis,connectionRetryEnabled, call, eventListener);routeDatabase().connected(result.route());Socket socket = null;synchronized (connectionPool) {reportedAcquired = true;// Pool the connection.//将新连接放入请求池中Internal.instance.put(connectionPool, result);// If another multiplexed connection to the same address was created concurrently, then// release this connection and acquire that one.//如果是一个http2连接//确保其多路复用的特性。if (result.isMultiplexed()) {socket = Internal.instance.deduplicate(connectionPool, address, this);result = connection;}}closeQuietly(socket);eventListener.connectionAcquired(call, result);return result;}
这里关于连接的查找:
- 如果有连接,直接用
- 没有可用的连接,第一次去连接池中查找,找到后直接用
- 没有找到,补充路由信息,在连接池中二次查找。
- 依然没有找到,创建新连接,然后连接server,将其放入到连接池中
下面看连接是如何建立连接的,在findConnection方法中,当创建了一个新的Connection后,调用了其connect方法,connect负责将客户端Socket连接到服务端Socket,代码如下:
// Do TCP + TLS handshakes. This is a blocking operation.//新连接 练接serverresult.connect(connectTimeout, readTimeout, writeTimeout, pingIntervalMillis,connectionRetryEnabled, call, eventListener);
//RealConnection类public void connect(int connectTimeout, int readTimeout, int writeTimeout,int pingIntervalMillis, boolean connectionRetryEnabled, Call call,EventListener eventListener) {if (protocol != null) throw new IllegalStateException("already connected");RouteException routeException = null;List<ConnectionSpec> connectionSpecs = route.address().connectionSpecs();ConnectionSpecSelector connectionSpecSelector = new ConnectionSpecSelector(connectionSpecs);//不是HTTPS协议if (route.address().sslSocketFactory() == null) {if (!connectionSpecs.contains(ConnectionSpec.CLEARTEXT)) {throw new RouteException(new UnknownServiceException("CLEARTEXT communication not enabled for client"));}String host = route.address().url().host();if (!Platform.get().isCleartextTrafficPermitted(host)) {throw new RouteException(new UnknownServiceException("CLEARTEXT communication to " + host + " not permitted by network security policy"));}}while (true) {try {if (route.requiresTunnel()) {connectTunnel(connectTimeout, readTimeout, writeTimeout, call, eventListener);if (rawSocket == null) {// We were unable to connect the tunnel but properly closed down our resources.break;}} else {connectSocket(connectTimeout, readTimeout, call, eventListener);//创建Socket以及连接Socke}establishProtocol(connectionSpecSelector, pingIntervalMillis, call, eventListener);eventListener.connectEnd(call, route.socketAddress(), route.proxy(), protocol);break;} catch (IOException e) { //处理异常closeQuietly(socket);//清理各种数据,进入下一次循环closeQuietly(rawSocket);socket = null;rawSocket = null;source = null;sink = null;handshake = null;protocol = null;http2Connection = null;eventListener.connectFailed(call, route.socketAddress(), route.proxy(), null, e);if (routeException == null) {routeException = new RouteException(e);} else {routeException.addConnectException(e);}if (!connectionRetryEnabled || !connectionSpecSelector.connectionFailed(e)) {throw routeException;}}}if (route.requiresTunnel() && rawSocket == null) {ProtocolException exception = new ProtocolException("Too many tunnel connections attempted: "+ MAX_TUNNEL_ATTEMPTS);throw new RouteException(exception);}if (http2Connection != null) {synchronized (connectionPool) {allocationLimit = http2Connection.maxConcurrentStreams();}}}
在这里出现两个很重要的方法, connectSocket和 establishProtocol,我们对两个进行分析
connectSocket为创建Socket以及连接Socket
//RealConnection类/** Does all the work necessary to build a full HTTP or HTTPS connection on a raw socket. */private void connectSocket(int connectTimeout, int readTimeout, Call call,EventListener eventListener) throws IOException {//首先获取代理和地址Proxy proxy = route.proxy();Address address = route.address();//建立socket//代理的类型是使用SocketFactory工厂创建无参的rawSocket//还是使用带代理参数的Socket构造方法,得到了rawSocket对象rawSocket = proxy.type() == Proxy.Type.DIRECT || proxy.type() == Proxy.Type.HTTP? address.socketFactory().createSocket(): new Socket(proxy);eventListener.connectStart(call, route.socketAddress(), proxy);rawSocket.setSoTimeout(readTimeout);try {//连接socket//调用connectSocket进行Socket的连接//Plateform.get()方法返回不同平台的信息Platform.get().connectSocket(rawSocket, route.socketAddress(), connectTimeout);} catch (ConnectException e) {ConnectException ce = new ConnectException("Failed to connect to " + route.socketAddress());ce.initCause(e);throw ce;}// The following try/catch block is a pseudo hacky way to get around a crash on Android 7.0// More details:// https://github.com/square/okhttp/issues/3245// https://android-review.googlesource.com/#/c/271775/try {//使用Okio封装Socket的输入输出流source = Okio.buffer(Okio.source(rawSocket));sink = Okio.buffer(Okio.sink(rawSocket));} catch (NullPointerException npe) {if (NPE_THROW_WITH_NULL.equals(npe.getMessage())) {throw new IOException(npe);}}}Plateform.get()方法返回不同平台的信息,因为OkHttp是可以用于Android和Java平台的,而Java又有多个版本,所以进行了平台判断。get()是一个单例,其初始化在findPlatform方法中,如下:
//Platform private static Platform findPlatform() {Platform android = AndroidPlatform.buildIfSupported();if (android != null) {return android;}if (isConscryptPreferred()) {Platform conscrypt = ConscryptPlatform.buildIfSupported();if (conscrypt != null) {return conscrypt;}}Platform jdk9 = Jdk9Platform.buildIfSupported();if (jdk9 != null) {return jdk9;}Platform jdkWithJettyBoot = JdkWithJettyBootPlatform.buildIfSupported();if (jdkWithJettyBoot != null) {return jdkWithJettyBoot;}// Probably an Oracle JDK like OpenJDK.return new Platform();}可以看到findPlatform分为了android平台、jdk9、有JettyBoot的jdk还有默认的平台几类。这边看默认的Platform就可以了
继续看connectSocket
// Platform类中public void connectSocket(Socket socket, InetSocketAddress address,int connectTimeout) throws IOException {socket.connect(address, connectTimeout);}可以看到就是调用socket的connect方法,至此,本地Socket与后台Socket建立了连接,并得到了输入输出流。
重新回到connect方法中,看 connectSocket方法下的establishProtocol方法
//RealConnection类
private void establishProtocol(ConnectionSpecSelector connectionSpecSelector,int pingIntervalMillis, Call call, EventListener eventListener) throws IOException {//如果不是Hpptsif (route.address().sslSocketFactory() == null) {protocol = Protocol.HTTP_1_1;socket = rawSocket;return;}eventListener.secureConnectStart(call);connectTls(connectionSpecSelector);eventListener.secureConnectEnd(call, handshake);//如过是Http2协议if (protocol == Protocol.HTTP_2) {socket.setSoTimeout(0); // HTTP/2 connection timeouts are set per-stream.http2Connection = new Http2Connection.Builder(true).socket(socket, route.address().url().host(), source, sink).listener(this).pingIntervalMillis(pingIntervalMillis).build();http2Connection.start();}}
上面的代码可以看出OkHttp如果获得一个连接,新连接如果将本地socket和后台socke连接起来。在上面获得新连接时,提到一个连接池,我们接下来继续分析连接池。以及如何在连接池中将连接放入和取出。
3.connectionPool
首先来看下ConnectionPool的实例化过程,一个OkHttpClient只包含一个ConnectionPool,其实例化过程也在OkHttpClient的实例化过程中实现,值得一提的是ConnectionPool各个方法的调用并没有直接对外暴露,而是通过OkHttpClient的Internal接口统一对外暴露:
static {Internal.instance = new Internal() {@Override public void addLenient(Headers.Builder builder, String line) {builder.addLenient(line);}@Override public void addLenient(Headers.Builder builder, String name, String value) {builder.addLenient(name, value);}@Override public void setCache(OkHttpClient.Builder builder, InternalCache internalCache) {builder.setInternalCache(internalCache);}@Override public boolean connectionBecameIdle(ConnectionPool pool, RealConnection connection) {return pool.connectionBecameIdle(connection);}@Override public RealConnection get(ConnectionPool pool, Address address,StreamAllocation streamAllocation, Route route) {return pool.get(address, streamAllocation, route);}@Override public boolean equalsNonHost(Address a, Address b) {return a.equalsNonHost(b);}@Override public Socket deduplicate(ConnectionPool pool, Address address, StreamAllocation streamAllocation) {return pool.deduplicate(address, streamAllocation);}@Override public void put(ConnectionPool pool, RealConnection connection) {pool.put(connection);}@Override public RouteDatabase routeDatabase(ConnectionPool connectionPool) {return connectionPool.routeDatabase;}@Override public int code(Response.Builder responseBuilder) {return responseBuilder.code;}@Overridepublic void apply(ConnectionSpec tlsConfiguration, SSLSocket sslSocket, boolean isFallback) {tlsConfiguration.apply(sslSocket, isFallback);}@Override public HttpUrl getHttpUrlChecked(String url)throws MalformedURLException, UnknownHostException {return HttpUrl.getChecked(url);}@Override public StreamAllocation streamAllocation(Call call) {return ((RealCall) call).streamAllocation();}@Override public Call newWebSocketCall(OkHttpClient client, Request originalRequest) {return RealCall.newRealCall(client, originalRequest, true);}};}
连接池的维护:
ConnectionPool内部通过一个双端队列(dequeue)来维护当前所有连接,主要涉及到的操作包括:
- put:放入新连接
- get:从连接池中获取连接
- evictAll:关闭所有连接
- connectionBecameIdle:连接变空闲后调用清理线程
- deduplicate:清除重复的多路复用线程
我们一个个来看,首先来看Internal.instance的put方法调用了连接池的put方法,下面是ConnectionPool的put方法:
void put(RealConnection connection) {assert (Thread.holdsLock(this));//如果清理线程没有开启,则开启if (!cleanupRunning) {cleanupRunning = true;//cleanupRunnable见下executor.execute(cleanupRunnable);}connections.add(connection);}
当第一个连接被添加就线程池时,开启清除线程,主要清除那些连接池中过期的连接,然后将连接添加就connections对象中。下面看一下cleanupRunnable和connections的定义,其中connections是一个阻塞队列
cleanupRunnable
connections
private final Deque<RealConnection> connections = new ArrayDeque<>();
private final Runnable cleanupRunnable = new Runnable() {@Override public void run() {while (true) {//得到下一次清除的等待市场long waitNanos = cleanup(System.nanoTime());//没有连接,清除任务终结if (waitNanos == -1) return;if (waitNanos > 0) {//等待时间 long waitMillis = waitNanos / 1000000L;waitNanos -= (waitMillis * 1000000L);synchronized (ConnectionPool.this) {try {ConnectionPool.this.wait(waitMillis, (int) waitNanos);} catch (InterruptedException ignored) {}}}}}};
可以看到cleadupRunnbale是一个死循环,调用cleanup方法进行清理工作并返回一个等待时长,如果有等待时长,那么让连接池进行休眠。其中清理工作在cleanup方法中,代码如下:
long cleanup(long now) {int inUseConnectionCount = 0;int idleConnectionCount = 0;RealConnection longestIdleConnection = null;long longestIdleDurationNs = Long.MIN_VALUE;// Find either a connection to evict, or the time that the next eviction is due.synchronized (this) {//检查每个连接for (Iterator<RealConnection> i = connections.iterator(); i.hasNext(); ) {RealConnection connection = i.next();// If the connection is in use, keep searching.//如果连接正在使用,则跳过if (pruneAndGetAllocationCount(connection, now) > 0) {inUseConnectionCount++;continue;}idleConnectionCount++;// If the connection is ready to be evicted, we're done.//找出空闲时间最长的连接long idleDurationNs = now - connection.idleAtNanos;if (idleDurationNs > longestIdleDurationNs) {longestIdleDurationNs = idleDurationNs;longestIdleConnection = connection;}}//如果时间超出规定的空闲时间或者数量达到最大空闲树,那么移除。关闭操作在后面if (longestIdleDurationNs >= this.keepAliveDurationNs|| idleConnectionCount > this.maxIdleConnections) {// We've found a connection to evict. Remove it from the list, then close it below (outside// of the synchronized block).connections.remove(longestIdleConnection);} else if (idleConnectionCount > 0) {//如果时间和数量都没有到达上限,那么得到存活时间// A connection will be ready to evict soon.return keepAliveDurationNs - longestIdleDurationNs;} else if (inUseConnectionCount > 0) {//如果所有连接都在使用中,返回最大存活时间// All connections are in use. It'll be at least the keep alive duration 'til we run again.return keepAliveDurationNs;} else {//没有连接,关闭清除线程// No connections, idle or in use.cleanupRunning = false;return -1;}}从代码中可以看出,对当前连接池中保存的所有连接进行遍历,然后调用pruneAndGetAllocationCount()方法获取连接上可用的StreamAllocation的数量以及删除不可用的StreamAllocation,如果数量大于0,则表示该连接还在使用,那么继续下一次遍历;否则空闲连接数+1,需要查找出所有不可用的连接中最大的空闲时间。遍历做完后,根据不同情况不同的值返回不同的结果,一旦找到了最大的空闲连接,那么在同步块外部调用closeQuietly关闭连接。
pruneAndGetAllocationCount()方法用于删除连接上不可用的StreamAllocation以及可用的StreamAllocation的数量,下面是其具体实现:
private int pruneAndGetAllocationCount(RealConnection connection, long now) {//得到关联在连接上StramAllocation对象列表List<Reference<StreamAllocation>> references = connection.allocations;for (int i = 0; i < references.size(); ) {Reference<StreamAllocation> reference = references.get(i);//可用if (reference.get() != null) {i++;continue;}// We've discovered a leaked allocation. This is an application bug.StreamAllocation.StreamAllocationReference streamAllocRef =(StreamAllocation.StreamAllocationReference) reference;String message = "A connection to " + connection.route().address().url()+ " was leaked. Did you forget to close a response body?";Platform.get().logCloseableLeak(message, streamAllocRef.callStackTrace);references.remove(i);connection.noNewStreams = true;// If this was the last allocation, the connection is eligible for immediate eviction.if (references.isEmpty()) {connection.idleAtNanos = now - keepAliveDurationNs;return 0;}}return references.size();}
到目前为止,我一个连接是如何被添加到线程池中的以及线程池的自动清除线程是如何工作的。我们继续来分析,一个连接如何从连接池中获得的
get方法
// ConnectionPool @Nullable RealConnection get(Address address, StreamAllocation streamAllocation, Route route) {assert (Thread.holdsLock(this));for (RealConnection connection : connections) { //遍历队列if (connection.isEligible(address, route)) { //如果满足条件streamAllocation.acquire(connection, true); //streamAllocation赋给连接return connection;}}return null;}
需要满足的条件
public boolean isEligible(Address address, @Nullable Route route) {// If this connection is not accepting new streams, we're done.//如果这个连接不接受新流if (allocations.size() >= allocationLimit || noNewStreams) return false;// If the non-host fields of the address don't overlap, we're done.//如果主机的地址不同if (!Internal.instance.equalsNonHost(this.route.address(), address)) return false;// If the host exactly matches, we're done: this connection can carry the address.//如果.url().host()相同if (address.url().host().equals(this.route().address().url().host())) {return true; // This connection is a perfect match.}// At this point we don't have a hostname match. But we still be able to carry the request if// our connection coalescing requirements are met. See also:// https://hpbn.co/optimizing-application-delivery/#eliminate-domain-sharding// https://daniel.haxx.se/blog/2016/08/18/http2-connection-coalescing/// 1. This connection must be HTTP/2.//如果是HTTP/2.协议if (http2Connection == null) return false;// 2. The routes must share an IP address. This requires us to have a DNS address for both// hosts, which only happens after route planning. We can't coalesce connections that use a// proxy, since proxies don't tell us the origin server's IP address.// 这些路由必须共享一个IP地址。这要求我们为两个主机都有一个DNS地址,//这只在路由计划之后才会发生。由于代理没有告诉我们源服务器的IP地址,所以我们不能合并使用代理的连接。if (route == null) return false;if (route.proxy().type() != Proxy.Type.DIRECT) return false;if (this.route.proxy().type() != Proxy.Type.DIRECT) return false;if (!this.route.socketAddress().equals(route.socketAddress())) return false;// 3. This connection's server certificate's must cover the new host.//这个连接的服务器证书必须覆盖新主机if (route.address().hostnameVerifier() != OkHostnameVerifier.INSTANCE) return false;if (!supportsUrl(address.url())) return false;// 4. Certificate pinning must match the host.//证书必须与主机匹配。try {address.certificatePinner().check(address.url().host(), handshake().peerCertificates());} catch (SSLPeerUnverifiedException e) {return false;}return true; // The caller's address can be carried by this connection.}
继续来看 streamAllocation.acquire方法
public void acquire(RealConnection connection, boolean reportedAcquired) {assert (Thread.holdsLock(connectionPool));if (this.connection != null) throw new IllegalStateException();this.connection = connection; //将connection赋值给StreamAllocation的connectionthis.reportedAcquired = reportedAcquired;connection.allocations.add(new StreamAllocationReference(this, callStackTrace)); }
到目前为止,我们分析了一个连接如何放入连接池,如何从连接池中取出。同时也分析了连接池如何清除过期的连接。
六.发送请求和获取响应
在连接拦截器中,配置好这次发送请求的连接后,在网络拦截器中,进行具体的连接操作.
1.发送请求
CallServerInterceptor的intercept方法(只截取相关代码,全部代码可以看上一篇博客):
 //发送HTTP首部信息httpStream.writeRequestHeaders(request);//发送请求体BufferedSink bufferedRequestBody = Okio.buffer(requestBodyOut);
equest.body().writeTo(bufferedRequestBody);
写请求和读响应都是通过HttpStream对象,在前面的分析中知道了HttpStream的具体实现是Http1xStream或Http2xStream。我们主要看Http1xStream的各个实现,首先看写头部信息的writeRequestHeaders方法,下面是Http1xStream的具体实现:
//Http1Codec
@Override public void writeRequestHeaders(Request request) throws IOException {String requestLine = RequestLine.get(request, streamAllocation.connection().route().proxy().type());//首先获取HTTP请求行writeRequest(request.headers(), requestLine);//具体的写操作}
查看writeRequest方法
/** Returns bytes of a request header for sending on an HTTP transport. */public void writeRequest(Headers headers, String requestLine) throws IOException {if (state != STATE_IDLE) throw new IllegalStateException("state: " + state); //判断状态sink.writeUtf8(requestLine).writeUtf8("\r\n"); //写入请求行和空行for (int i = 0, size = headers.size(); i < size; i++) {//对头部信息做遍历,逐个写入sink.writeUtf8(headers.name(i)).writeUtf8(": ").writeUtf8(headers.value(i)).writeUtf8("\r\n");}sink.writeUtf8("\r\n");state = STATE_OPEN_REQUEST_BODY; //状态置为STATE_OPEN_REQUEST_BODY}
发送之后会刷新sink
//拦截器中
httpCodec.flushRequest();
@Override public void flushRequest() throws IOException {sink.flush();}
上面是请求体的发送,下面来看请求头的发送。
public abstract void writeTo(BufferedSink sink) throws IOException;
可以看到 writeTo是一个抽象方法,我们具体来看他的实现
首先是FormBody。
@Override public void writeTo(BufferedSink sink) throws IOException {writeOrCountBytes(sink, false);}
继续来看writeOrCountBytes
private long writeOrCountBytes(@Nullable BufferedSink sink, boolean countBytes) {long byteCount = 0L;Buffer buffer;if (countBytes) {buffer = new Buffer();} else {buffer = sink.buffer();}for (int i = 0, size = encodedNames.size(); i < size; i++) { //get方法拼凑后面的参数if (i > 0) buffer.writeByte('&');buffer.writeUtf8(encodedNames.get(i));buffer.writeByte('=');buffer.writeUtf8(encodedValues.get(i));}if (countBytes) {byteCount = buffer.size();buffer.clear();}return byteCount;}
继续看其他的实现:MultipartBody
@Override public void writeTo(BufferedSink sink) throws IOException {writeOrCountBytes(sink, false);}
继续看writeOrCountBytes方法
private long writeOrCountBytes(@Nullable BufferedSink sink, boolean countBytes) throws IOException {long byteCount = 0L;Buffer byteCountBuffer = null;if (countBytes) {sink = byteCountBuffer = new Buffer();}for (int p = 0, partCount = parts.size(); p < partCount; p++) {Part part = parts.get(p);Headers headers = part.headers;RequestBody body = part.body;sink.write(DASHDASH);sink.write(boundary);sink.write(CRLF);if (headers != null) {for (int h = 0, headerCount = headers.size(); h < headerCount; h++) {sink.writeUtf8(headers.name(h)).write(COLONSPACE).writeUtf8(headers.value(h)).write(CRLF);}}//请求体类型MediaType contentType = body.contentType();if (contentType != null) {sink.writeUtf8("Content-Type: ").writeUtf8(contentType.toString()).write(CRLF);}//请求体长度long contentLength = body.contentLength();if (contentLength != -1) {sink.writeUtf8("Content-Length: ").writeDecimalLong(contentLength).write(CRLF);} else if (countBytes) {// We can't measure the body's size without the sizes of its components.byteCountBuffer.clear();return -1L;}sink.write(CRLF);if (countBytes) {byteCount += contentLength;} else {body.writeTo(sink); //发送请求体,body类型: RequestBody}sink.write(CRLF);}sink.write(DASHDASH);sink.write(boundary);sink.write(DASHDASH);sink.write(CRLF);if (countBytes) {byteCount += byteCountBuffer.size();byteCountBuffer.clear();}return byteCount;}
来看最后的实现: RequestBody
@Overridepublic void writeTo(BufferedSink sink) throws IOException {if (progressListener == null) {mRequestBody.writeTo(sink);return;}ProgressOutputStream progressOutputStream = new ProgressOutputStream(sink.outputStream(), progressListener, contentLength());BufferedSink progressSink = Okio.buffer(Okio.sink(progressOutputStream));//发送mRequestBody.writeTo(progressSink); //递归调用progressSink.flush();}
上面分析了请求头和几种不同的请求体的发送,下面我们来看响应的接收
2.接收响应
首先来看接收响应头
responseBuilder = httpCodec.readResponseHeaders(true);
// http1Codec
@Override public Response.Builder readResponseHeaders(boolean expectContinue) throws IOException {if (state != STATE_OPEN_REQUEST_BODY && state != STATE_READ_RESPONSE_HEADERS) { //判断状态throw new IllegalStateException("state: " + state);}try {StatusLine statusLine = StatusLine.parse(readHeaderLine());Response.Builder responseBuilder = new Response.Builder().protocol(statusLine.protocol).code(statusLine.code).message(statusLine.message).headers(readHeaders());//调用readHeaders()进行请求if (expectContinue && statusLine.code == HTTP_CONTINUE) { //返回码为100并且存在00-continue请求头return null;} else if (statusLine.code == HTTP_CONTINUE) { //返回码为100state = STATE_READ_RESPONSE_HEADERS;return responseBuilder;}state = STATE_OPEN_RESPONSE_BODY;return responseBuilder;} catch (EOFException e) {// Provide more context if the server ends the stream before sending a response.IOException exception = new IOException("unexpected end of stream on " + streamAllocation);exception.initCause(e);throw exception;}}
继续来看readHeaders()方法
public Headers readHeaders() throws IOException {Headers.Builder headers = new Headers.Builder();// parse the result headers until the first blank line//可以看到每行遍历直到第一个空行,然后调用Internal.instance的//addLenient方法将这一行的信息解析并添加到头部中for (String line; (line = readHeaderLine()).length() != 0; ) {Internal.instance.addLenient(headers, line);}return headers.build();}继续来看Internal.instance.addLenient
//OkHttpClient.instance.addLenientInternal.instance = new Internal() {@Override public void addLenient(Headers.Builder builder, String line) {builder.addLenient(line);}
Builder addLenient(String line) {int index = line.indexOf(":", 1);//获取:if (index != -1) {return addLenient(line.substring(0, index), line.substring(index + 1)); //添加到列表} else if (line.startsWith(":")) {// Work around empty header names and header names that start with a// colon (created by old broken SPDY versions of the response cache).return addLenient("", line.substring(1)); // Empty header name.} else {return addLenient("", line); // No header name.}
从上面的代码可以看到,首先获取“:”的位置,如果存在“:”,那么调用addLenient将名和值添加进列表中,如果以”:”开宇,则头信息的名称为空,有值;如果都没有,那么没有头部信息名。三种情况都是调用addLenient方法,如下:
Builder addLenient(String name, String value) {namesAndValues.add(name); //字符传列表namesAndValues.add(value.trim());return this;}到上面为此,读取响应的头部信息已经完成,接下来在CallServerInterceptor中做的是调用openResponseBody方法读取响应的主体部分
httpCodec.openResponseBody(response)
来看其具体实现
@Override public ResponseBody openResponseBody(Response response) throws IOException {streamAllocation.eventListener.responseBodyStart(streamAllocation.call);String contentType = response.header("Content-Type");if (!HttpHeaders.hasBody(response)) {Source source = newFixedLengthSource(0);return new RealResponseBody(contentType, 0, Okio.buffer(source)); // 如果响应主体部分不应有内容,那么返回newFixedLengthSource(0) }if ("chunked".equalsIgnoreCase(response.header("Transfer-Encoding"))) {Source source = newChunkedSource(response.request().url());return new RealResponseBody(contentType, -1L, Okio.buffer(source)); // 如果响应头部中Transfer-Encoding为chunked,即分块了,那么返回newChunkedSource }long contentLength = HttpHeaders.contentLength(response);if (contentLength != -1) {Source source = newFixedLengthSource(contentLength);return new RealResponseBody(contentType, contentLength, Okio.buffer(source));// 如果响应中有个具体长度,那么返回newFixedLengthSource,并且指定长度 }return new RealResponseBody(contentType, -1L, Okio.buffer(newUnknownLengthSource()));//以上情况均不满足,返回newUnknownLengthSource }
七.总结
至此,分析完了OKHttp的网络请求部分,总结一下,在重试拦截器中获得Address和StreamAllocation(负责根据请求创建连接),在连接拦截器中获得连接,最后在网络进行发送请求头,请求体,获得响应头,获得响应体。
值得注意的是连接的获得 即:
- 如果有连接,直接用
- 没有可用的连接,第一次去连接池中查找,找到后直接用
- 没有找到,补充路由信息,在连接池中二次查找。
- 依然没有找到,创建新连接,然后连接server,将其放入到连接池中
其次是连接放入连接池,和从连接池中取出的过程。还有新建一个连接后,将其从跟后台socket进行连接(封装成Okio)。
最后是通过OKio发送请求和获得响应。
八.参考资料
深入理解OkHttp源码(三)——网络操作
OkHttp源码(三)
OkHttp 3.7源码分析(五)——连接池
九.文章索引
Android之网络请求1————HTTP协议
Android之网络请求2————OkHttp的基本使用
Android之网络请求3————OkHttp的拦截器和封装
Android之网络请求4————OkHttp源码1:框架
Android之网络请求5————OkHttp源码2:发送请求
Android之网络请求6————OkHttp源码3:拦截器链
Android之网络请求7————OkHttp源码4:网络操作
Android之网络请求8————OkHttp源码5:缓存相关
Android之网络请求9————Retrofit的简单使用
Android之网络请求10————Retrofit的进阶使用
Android之网络请求11————Retrofit的源码分析
本文来自互联网用户投稿,文章观点仅代表作者本人,不代表本站立场,不承担相关法律责任。如若转载,请注明出处。 如若内容造成侵权/违法违规/事实不符,请点击【内容举报】进行投诉反馈!