在Xilinx ZCU102上移植ThreadX SMP
在Xilinx ZCU102上移植ThreadX SMP
- ZCU102移植ThreadX SMP
- 准备工作
- 获取例程
- 安装Xilinx SDK 2018.03
- 移植
- 导入例程
- FSBL引导
- 编译
- 运行
- 验证SMP
- 如何在tx工程中使用xil_printf辅助调试
- 方法如下:
ZCU102移植ThreadX SMP
准备工作
获取例程
ThreadX官方没有直接提供Xilinx ZCU102的移植例程,但是可以发邮件给azure-rtos-support@microsoft.com或者sclarson@microsoft.com,说明你想要移植的板子,就会发给你。
我收到了两个例程:
- zcu102_cortex-a53_smp_full_source.zip
- zcu102_cortex-r5_full_source.zip
百度盘链接
提取码:am85
前者cortex-a53例程支持SMP,cortex-r5例程不支持。
我只运行了cortex-a53例程,若cortex-r5例程有所不同则仅供参考。
安装Xilinx SDK 2018.03
cortex-a53例程是用Xilinx SDK 2018.02完成的,但是当我安装完2018.02版本,导入并编译成功后,运行时没有任何反应。
查到是因为我使用的ZCU102套件(Kit label大于0432055-05)是新版的,不能在2018.02版本使用。参考
我也试过Vitis 2020.02,可能版本差太多,导入失败。
SDK 2019.01可以编译,不过后续没有尝试。
移植
导入例程
1.创建一个存放工程的文件夹。
2.打开SDK 2018.03,选择工程文件夹的路径,点击OK

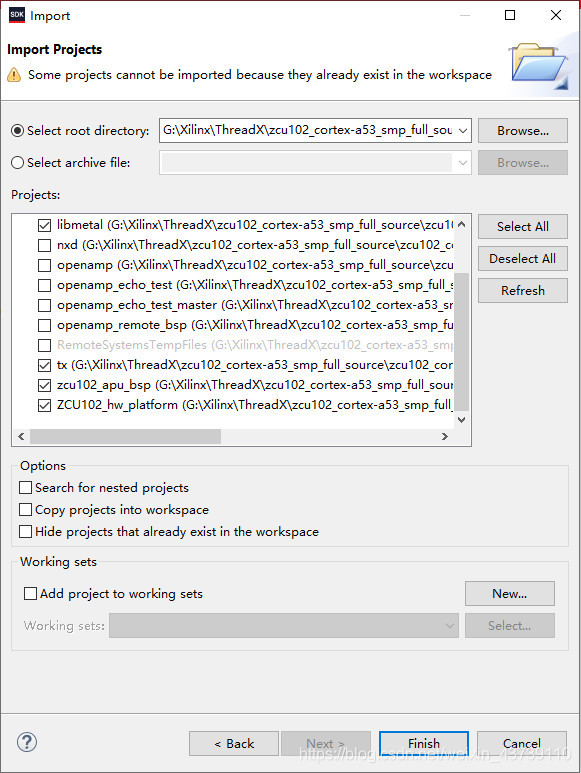
3.左上角菜单栏选择 File->Import ,弹出如下窗口,选择General->Existing Projects into Workspcae,点击Next。

4.点击Select root directory右边的Browse…,选择cortex-a53例程,点击确定。

5.如果不需要网络,那么只需要勾选:
- demo_threadx
- tx
- libmetal
- zcu102_apu_bsp(这个版本有点低,后面没有用到)
- ZCU102_hw_platform
点击Finish。
FSBL引导
导入工程后,还不能直接编译运行,还要创建一个FSBL应用程序作为引导,因为原来的psu_init已经不适用了。参考
1.File->New->Application Project,输入工程名,其他都一样的选择,Next。

2.选择Zynq MP FSBL模版,再点Finish。

编译
1.依次右键编译 Build Project:
- tx
- libmetal
- fsbl
2.右键demo_threadx,Properties->Project References,去掉zcu102_apu_bsp的勾选,再勾选fsbl_bsp。
3.再点C/C++ General->Paths and Symbols,在右侧Includes标签栏中,Edit原来zcu102_apu_bsp的头文件路径,改为fsbl_bsp的头文件。
4.在右侧Library Paths标签栏中,Edit原来zcu102_apu_bsp的库路径,改为fsbl_bsp的库,点OK保存。
5.右键编译demo_threadx。
运行
1.右键 fsbl 工程,Run as->Run Configurations…
2.双击Xilinx C/C++ application(System Debugger)
3.在右侧Target Setup标签栏,去掉Run psu_init的勾选。

4.开启ZCU102,点击Run,串口输出:

5.对demo_threadx工程重复前四个步骤,弹出是否终止已经运行的工程选择是。

验证SMP
tx_thread_smp_core_get() 函数可以返回该线程被哪个核执行,利用它改写demo_threadx.c文件。
大概过程就是:有4个线程不停将运行自身的核心编号存储在一个数组中,还有一个线程则不停打印数组和自身的核心编号。
因为cortex-a53有4个核心,所以设置了5个线程。
修改后的demo_threadx.c:
#include   "tx_api.h"/* XXX prevent xil_types.h from redefining LONG and ULONG types */
#define LONG LONG
#define ULONG ULONG#include   "xil_printf.h"#define     DEMO_STACK_SIZE         1024
#define     DEMO_BYTE_POOL_SIZE     9120
#define     DEMO_BLOCK_POOL_SIZE    100
#define     DEMO_QUEUE_SIZE         100/* Define the ThreadX object control blocks...  */
TX_THREAD               thread_0;
TX_THREAD               thread_1;
TX_THREAD               thread_2;
TX_THREAD               thread_3;
TX_THREAD               thread_4;
TX_QUEUE                queue_0;
TX_SEMAPHORE            semaphore_0;
TX_MUTEX                mutex_0;
TX_EVENT_FLAGS_GROUP    event_flags_0;
TX_BYTE_POOL            byte_pool_0;
TX_BLOCK_POOL           block_pool_0;/* Define the counters used in the demo application...  */
ULONG           thread_0_counter;
ULONG           thread_1_counter;
ULONG           thread_1_messages_sent;
ULONG           thread_2_counter;
ULONG           thread_2_messages_received;
ULONG           thread_3_counter;
ULONG           thread_4_counter;UCHAR           memory_pool[DEMO_BYTE_POOL_SIZE];/* Define thread prototypes.  */
void    thread_0_entry(ULONG thread_input);
void    thread_1_entry(ULONG thread_input);
void    thread_2_entry(ULONG thread_input);
void    thread_3_entry(ULONG thread_input);
void    thread_4_entry(ULONG thread_input);int core_num[4];//暂存核心编号/* Define main entry point.  */
int main()
{/* Enter the ThreadX kernel.  */tx_kernel_enter();
}/* Define what the initial system looks like.  */void    tx_application_define(void *first_unused_memory)
{CHAR    *pointer;/* Create a byte memory pool from which to allocate the thread stacks.  */tx_byte_pool_create(&byte_pool_0, "byte pool 0", memory_pool, DEMO_BYTE_POOL_SIZE);/* Put system definition stuff in here, e.g. thread creates and other assortedcreate information.  *//* Allocate the stack for thread 0.  */tx_byte_allocate(&byte_pool_0, (VOID **) &pointer, DEMO_STACK_SIZE, TX_NO_WAIT);/* Create the main thread.  */tx_thread_create(&thread_0, "thread 0", thread_0_entry, 0,  pointer, DEMO_STACK_SIZE, 1, 1, TX_NO_TIME_SLICE, TX_AUTO_START);/* Allocate the stack for thread 1.  */tx_byte_allocate(&byte_pool_0, (VOID **) &pointer, DEMO_STACK_SIZE, TX_NO_WAIT);tx_thread_create(&thread_1, "thread 1", thread_1_entry, 1,  pointer, DEMO_STACK_SIZE, 16, 16, 4, TX_AUTO_START);/* Allocate the stack for thread 2.  */tx_byte_allocate(&byte_pool_0, (VOID **) &pointer, DEMO_STACK_SIZE, TX_NO_WAIT);tx_thread_create(&thread_2, "thread 2", thread_2_entry, 2,  pointer, DEMO_STACK_SIZE, 16, 16, 4, TX_AUTO_START);/* Allocate the stack for thread 3.  */tx_byte_allocate(&byte_pool_0, (VOID **) &pointer, DEMO_STACK_SIZE, TX_NO_WAIT);tx_thread_create(&thread_3, "thread 3", thread_3_entry, 3,pointer, DEMO_STACK_SIZE,4, 4, TX_NO_TIME_SLICE, TX_AUTO_START);/* Allocate the stack for thread 4.  */tx_byte_allocate(&byte_pool_0, (VOID **) &pointer, DEMO_STACK_SIZE, TX_NO_WAIT);tx_thread_create(&thread_4, "thread 4", thread_4_entry, 4,pointer, DEMO_STACK_SIZE,4, 4, TX_NO_TIME_SLICE, TX_AUTO_START);
}/* Define the test threads.  */
void    thread_0_entry(ULONG thread_input)
{while(1){core_num[0] = tx_thread_smp_core_get();tx_thread_sleep(100);}
}void    thread_1_entry(ULONG thread_input)
{while(1){core_num[1] = tx_thread_smp_core_get();tx_thread_sleep(200);}
}void    thread_2_entry(ULONG thread_input)
{while(1){core_num[2] = tx_thread_smp_core_get();tx_thread_sleep(150);}
}void    thread_3_entry(ULONG thread_input)
{while(1){xil_printf("thread_0 : core %lu\r\n",core_num[0]);xil_printf("thread_1 : core %lu\r\n",core_num[1]);xil_printf("thread_2 : core %lu\r\n",core_num[2]);xil_printf("thread_3 : core %lu\r\n",_tx_thread_smp_core_get());xil_printf("thread_4 : core %lu\r\n",core_num[3]);tx_thread_sleep(100);}
}void    thread_4_entry(ULONG thread_input)
{while(1){core_num[3] = tx_thread_smp_core_get();tx_thread_sleep(200);}
}
结果:

原来一开始是每个线程各打各的信息,结果出来一堆乱序的结果,才改成这样。
现在想来,这其实也是一个多核运行的证据,如果是单核那么即使多线程也不会乱序。
core 0只有一开始引导用到,(猜测)可能是因为core 0需要运行一些隐藏线程,比如定时器线程之类,所以根据平衡分配线程的算法就没有给core 0再分配其他线程。
如何在tx工程中使用xil_printf辅助调试
例程中,是先编译tx工程生成一个libtx.a库文件,然后让demo_threadx工程包含这个库文件。所以tx工程中一开始不能使用xil_printf。
但如果想要探究ThreadX内部的机制,一般来说串口打印信息是必不可少的。
方法如下:
1.右键tx工程,Properties->Project References,勾选fsbl_bsp。
2.再点C/C++ General->Paths and Symbols,在右侧Includes标签栏中,Add头文件fsbl_bsp的路径/fsbl_bsp/psu_cortexa53_0/include。
3.再点C/C++ Build->Settings,在右侧Tool Settings标签栏中,点击ARM v8 gcc compiler->Inferred Options->Software Platform,在Software Platform Inferred Flags中填写-lxil。
4.打开tx/src/tx_port.h文件,在171行左右插入以下代码:
/* XXX prevent xil_types.h from redefining LONG and ULONG types */
#define LONG LONG
#define ULONG ULONG
#include   "xil_printf.h"
这是避免ThreadX和Xilinx SDK之间关于LONG 和ULONG 的重复定义。
再重新编译tx即可。
本文来自互联网用户投稿,文章观点仅代表作者本人,不代表本站立场,不承担相关法律责任。如若转载,请注明出处。 如若内容造成侵权/违法违规/事实不符,请点击【内容举报】进行投诉反馈!