物联网学习之旅:微信小程序控制STM32(四)--微信小程序代码编写
微信小程序代码编写
微信小程序是运行在微信上面的小程序,不需要安装,相比于Android与IOS应用而言,开发难度更简单,并且在两个平台下都可以运行,所以选择使用微信小程序来控制我们的硬件设备在合适不过。因为我更擅长硬件一点,所以小程序的代码只是用别人的例程修改修改,最后实现自己想要的功能。
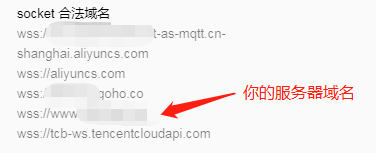
首先 需要引入mqtt.js库,供后续调用,我把业务逻辑代码,放到了app.js里面,主要是由于我有两个页面,这两个页面都需要通过连接mqtt服务端,向主题发布消息,和获取主题的消息。写在app.js里面就不需要在几个页面的逻辑代码里面写几次关于连接服务端的代码了。在这之前还要注意微信公众平台域名信息中已经填好了自己已经备案的域名。
下面是代码:
import mqtt from "utils/mqtt.js" //mqtt.js放在utils目录,引入文件
const host ='wxs://www.domain.com/mqtt';  //填写自己的服务端地址
var client=null;
App({data:{reconnectCounts: 0,live: '../../images/liveoff.png',temperatrue:20,humidity:40,    options: {protocolVersion: 4, //MQTT连接协议版本clientId: 'wechat',clean: true,password: 'public',username: 'admin',reconnectPeriod: 1000, //1000毫秒,两次重新连接之间的间隔connectTimeout: 30 * 1000, //1000毫秒,两次重新连接之间的间隔resubscribe: true, //如果连接断开并重新连接,则会再次自动订阅已订阅的主题(默认true)reconnect: true,}},//连接服务端connectServer: function (that) {    var that=that;//开始连接client = mqtt.connect(host, this.data.options);client.on('connect', function (connack) {client.subscribe('Topic1', function (err, granted) {//订阅主题,用来接收STM32的数据if (!err) {wx.showToast({title: '服务器连接成功'})} else {wx.showToast({title: '服务器连接失败',icon: 'fail',duration: 2000})}})if (client && client.connected) { //连接成功后发送STM32在线询问client.publish('Topic0', '{"src":"wx","des":"stm32","msg":{"type":"ask","which":"stm32","content":"?"}}');} else {wx.showToast({title: '服务器未连接',icon: 'warn',duration: 2000})}}),client.on("reconnect", function () { //客户端重连触发client.subscribe('Topic1', function (err, granted) {if (!err) {wx.showToast({title: '服务器连接成功'})} else {wx.showToast({title: '服务器连接失败',icon: 'fail',duration: 2000})}})        }),client.on("offline",function(){ //客户端脱机时触发,防止客户端连接断开client.reconnect();console.log("reconnect!!!");})},publishMsg:function(cmd){  //发布消息if (client && client.connected) {client.publish('Topic0', cmd);} else {wx.showToast({title: '服务器未连接',icon: 'warn',duration: 2000})}    },//更新页面updata:function(that){  //服务器下发消息的回调client.on("message", function (topic, payload) {var pay = payload.toString();  //将数据转换成字符串if(pay.charAt(0)=='{'){   //如果是JSON数据var msg = JSON.parse(payload);          //解析JSON数据//console.log(msg);if (msg.msg.content == "ok") { //收到STM32在线的消息that.setData({start: 'start',  //点击图片触发的事件live: '../../images/liveon.png', //替换图片为在线})wx.showToast({title: '设备已上线', icon: 'success',duration: 2000})return 1}if (msg.msg.which == "temperature") {that.setData({temperatrue: msg.msg.content  //显示出温度})}if (msg.msg.which == "humidity") {that.setData({humidity: msg.msg.content    //显示出温度})}}})},
})
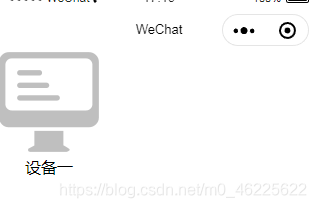
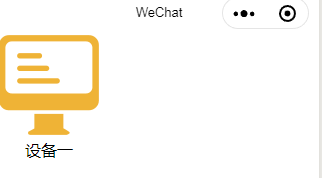
然后 首页的设计,当设备不在线时,设备显示灰色,点击设备会提示设备不在线。设备在线时,图标显示为黄色,点击即跳转到控制页面。
index.js
var initData='关';
var main_view;
var app = getApp();
Page({data: {text: initData,start: 'warn',live: '../../images/liveoff.png',},onLoad: function (options) {app.connectServer(this);app.updata(this);},start:function(e){wx.navigateTo({url: '../console/console',})},warn:function(e){wx.showToast({title: '设备未上线',icon: 'warn',duration: 2000})   },
})
index.wxml
<view><view class="main" bindtap="{{start}}" hover-class="hover"><image src="{{live}}" class="img"></image><text>设备一</text></view>
</view>
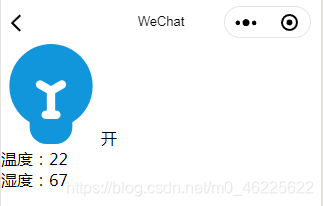
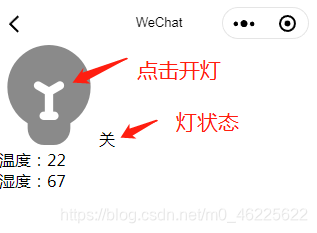
然后 是控制台页面,进入页面获取温湿度数据,然后显示出来,点击图标可以实现对STM32的LED灯的控制。
console.js
const app=getApp();
Page({data: {ledStatu:"off",led: '../../images/dark.png',text:"关",temperatrue:20,humidity:40,},onLoad: function (options) {app.updata(this);app.publishMsg('{"src":"wx","des":"stm32","msg":{"type":"ask","which":"data","content":"?"}}');},onoff:function(){if(this.data.ledStatu=="off"){app.publishMsg('{"src":"wx","des":"stm32","msg":{"type":"ctrl","which":"led0","content":"on"}}');this.setData({led: '../../images/light.png',ledStatu:"on",text: "开",})}else{app.publishMsg('{"src":"wx","des":"stm32","msg":{"type":"ctrl","which":"led0","content":"off"}}');this.setData({led: '../../images/dark.png',ledStatu: "off",text: "关"})      }},})
console.wxml
<view><view><image src="{{led}}" class="img" bindtap="onoff"></image><text>{{text}}</text></view><view>温度:{{temperatrue}}</view><view>湿度:{{humidity}}</view><view> </view>
</view>
最后 这个系统中微信小程序还存在一些问题,比如
第一:与服务端连接存在掉线的问题
第二:在小程序停留在首页时,若ESP8266下线了,不能更新页面中的状态
第三:在首次读取湿度数据时存在与STM32显示不符的情况,但经过自动更新后就恢复正常了。
后续如果有所优化会更新。
参考了这位大佬的代码:
https://blog.csdn.net/xh870189248/article/details/84231666
其中附有源码,我也是在这基础上修改的。
个人能力有限,有什么错误的地方欢迎指正,有问题也可以提,可以一起探讨
本文来自互联网用户投稿,文章观点仅代表作者本人,不代表本站立场,不承担相关法律责任。如若转载,请注明出处。 如若内容造成侵权/违法违规/事实不符,请点击【内容举报】进行投诉反馈!