Centos 7 安装及配置LDAP
基本概念
Required
-
CentOS 7.2 -
OpenSSL 1.0.1e-fips 11 Feb 2013
LDIF ldap信息交换格式,用于ldap数据输入标准格式
准备工作
关闭防火墙
systemctl stop firewalld.service
systemctl disable firewalld.service
firewall-cmd --state
安装LDAP
安装LDAP
yum install openldap openldap-servers openldap-clients -y
启动LDAP
如果启动失败使用journalctl -xe可以看到详细的错误信息,以此来排错
systemctl enable slapd
systemctl start slapd
systemctl status slapd
配置LDAP
拷贝数据库信息
cp /usr/share/openldap-servers/DB_CONFIG.example /var/lib/ldap/DB_CONFIG
chown ldap:ldap /var/lib/ldap/DB_CONFIG
获取加密密码
slappasswd 命令获取加密密码,将加密后的密码填入olcRootPW中,vim rootpwd.ldif
dn: olcDatabase={0}config,cn=config
changetype: modify
add: olcRootPW
olcRootPW: {SSHA}vXhzPBpWs1voey0ijKyI0Uc39fo4xy1O
修改管理员密码
ldapadd -Y EXTERNAL -H ldapi:/// -f rootpwd.ldif
导入LDAP Schema
导入schema目地是为后要使用的Attribute做准备
ls /etc/openldap/schema/*.ldif | while read f; do ldapadd -Y EXTERNAL -H ldapi:/// -f $f; done
设定默认域
使用ldappasswd生成密码,以备后面olcRootPW使用,这块密码需要与第一次配置密码一致,vim defaultDomain.ldif将下面内容写入ldif文件中;
下面内容中的xxx,xx需要替换成真实的域;
执行ldapmodify -Y EXTERNAL -H ldapi:/// -f defaultDomain.ldif文件;
dn: olcDatabase={1}monitor,cn=config
changetype: modify
replace: olcAccess
olcAccess: {0}to * by dn.base="gidNumber=0+uidNumber=0,cn=peercred,cn=external,cn=auth"read by dn.base="cn=Manager,dc=xxx,dc=xx" read by * nonedn: olcDatabase={2}hdb,cn=config
changetype: modify
replace: olcSuffix
olcSuffix: dc=xxx,dc=xxdn: olcDatabase={2}hdb,cn=config
changetype: modify
replace: olcRootDN
olcRootDN: cn=Manager,dc=xxx,dc=xxdn: olcDatabase={2}hdb,cn=config
changetype: modify
add: olcRootPW
olcRootPW: {SSHA}gvWUgKDc395f1uCBStUX3mj78JKTRqrWxxx # 填写上面生成密码dn: olcDatabase={2}hdb,cn=config
changetype: modify
add: olcAccess
olcAccess: {0}to attrs=userPassword,shadowLastChange bydn="cn=Manager,dc=xxx,dc=xx" write by anonymous auth by self write by * none
olcAccess: {1}to dn.base="" by * read
olcAccess: {2}to * by dn="cn=Manager,dc=xxx,dc=xx" write by * read
添加basedomain.ldif文件,文件中的xxx,xx需要使用真实域进行替换,这块内容需要你花点时间读一下objectClass;
ldapadd -x -D cn=Manager,dc=zhidaoauto,dc=com -W -f basedomain.ldif
dn: dc=xxx,dc=xx
objectClass: top
objectClass: dcObject
objectclass: organization
o: xxx xx
dc: xxxdn: cn=Manager,dc=xxx,dc=xx
objectClass: organizationalRole
cn: Manager
description: Directory Managerdn: ou=People,dc=xxx,dc=xx
objectClass: organizationalUnit
ou: Peopledn: ou=Group,dc=xxx,dc=xx
objectClass: organizationalUnit
ou: Group
查询dn
执行命令时需要输入密码,这边的密码为上面你生成的管理员密码
ldapsearch -LLL -W -x -D "cn=Manager,dc=xxx,dc=xx" -H ldap://localhost -b "dc=xxx,dc=xx"
添加用户信息
ldapadd -x -D 'cn=Manager,dc=mucang,dc=cn' -f adduser.ldif -H ldap:/// -W
注意objectClass需要添加加inetOrgPerson这样才能添加用户邮箱电话等信息,你可通过上面查询的结果看到ou信息
dn: uid=xxx,ou=People,dc=mucang,dc=cn
ou: People
uid: xxx
sn: xxx
cn: xxxx
givenName: xxx
displayName: 某人
mail: xxx@mucang.cn
objectClass: person
objectClass: organizationalPerson
objectClass: inetOrgPerson
userpassword: xxx###
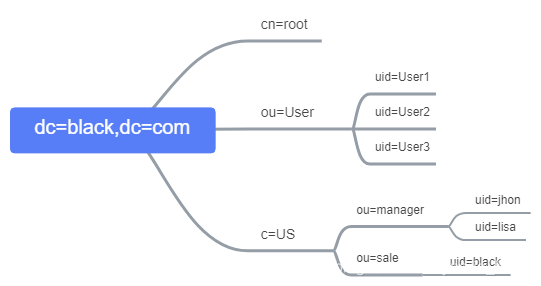
LDAP结构图
问题
执行命令时密码输入正确还提示49信息时,这时你重新安装ldap后就会恢复正常
yum reinstall openldap openldap-servers openldap-clients -y
本文来自互联网用户投稿,文章观点仅代表作者本人,不代表本站立场,不承担相关法律责任。如若转载,请注明出处。 如若内容造成侵权/违法违规/事实不符,请点击【内容举报】进行投诉反馈!