解决fastDFS图裂无法访问图片
原因:图片上传fastDFS成功,但是浏览器使用http://192.168.x.x/fileId无法访问。因为无法单独使用fastDFS进行访问,需要配合nginx + fastDFS搭建图片服务器
搭建Storage服务器:
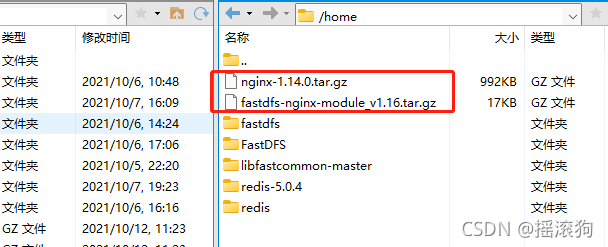
1. 上传 fastdfs-nginx-module_v1.16.tar.gz 和nginx到 /home目录下
2. 解压 fastdfs-nginx-module_v1.16.tar.gz
[root@localhost home]# tar -zxvf fastdfs-nginx-module_v1.16.tar.gz

3. 进入fastdfs-nginx-module,修改配置文件config
cd fastdfs-nginx-module cd src vi config将所有的usr/后面的local去掉
ngx_addon_name=ngx_http_fastdfs_module
HTTP_MODULES="$HTTP_MODULES ngx_http_fastdfs_module"
NGX_ADDON_SRCS="$NGX_ADDON_SRCS $ngx_addon_dir/ngx_http_fastdfs_module.c"
CORE_INCS="$CORE_INCS /usr/include/fastdfs /usr/include/fastcommon/"
CORE_LIBS="$CORE_LIBS -L/usr/lib -lfastcommon -lfdfsclient"
CFLAGS="$CFLAGS -D_FILE_OFFSET_BITS=64 -DFDFS_OUTPUT_CHUNK_SIZE='256*1024' -DFDFS_MOD_CONF_FILENAME='\"/etc/fdfs/mod_fastdfs.conf\"'"
~
4. 将 fastdfs-nginx-module/src下的 mod_fastdfs.conf 拷贝至 /etc/fdfs 下
[root@localhost src]# cp mod_fastdfs.conf /etc/fdfs/
5. 修改 /etc/fdfs/mod_fastdfs.conf
[root@localhost src]# vi /etc/fdfs/mod_fastdfs.conf# 修改base path # the base path to store log files base_path=/home/fastdfs# 修改服务器ip # FastDFS tracker_server can ocur more than once, and tracker_server format is # "host:port", host can be hostname or ip address # valid only when load_fdfs_parameters_from_tracker is true tracker_server=192.168.246.128:22122# 修改url是否包含group name # if the url / uri including the group name # set to false when uri like /M00/00/00/xxx # set to true when uri like ${group_name}/M00/00/00/xxx, such as group1/M00/xxx # default value is false url_have_group_name = true# 修改store_path0 # store_path#, based 0, if store_path0 not exists, it's value is base_path # the paths must be exist # must same as storage.conf store_path0=/home/fastdfs/fdfs_storage #store_path1=/home/yuqing/fastdfs1
6. 将 /usr/lib64下的 libfdfsclient.so 拷贝至 /usr/lib 下
[root@localhost src]# cp /usr/lib64/libfdfsclient.so /usr/lib/
7. 创建nginx/client目录
[root@localhost src]# mkdir -p /var/temp/nginx/client
搭建Tracker服务器:
1. 将上传的nginx-1.14.0.tar.gz解压
[root@localhost home]# tar -zxvf nginx-1.14.0.tar.gz
2. 进入nginx目录,安装依赖包
[root@localhost home]# cd nginx-1.14.0/
[root@localhost nginx-1.14.0]# yum install pcre
[root@localhost nginx-1.14.0]# yum install pcre-devel
[root@localhost nginx-1.14.0]# yum install zlib
[root@localhost nginx-1.14.0]# yum install zlib-devel
[root@localhost nginx-1.14.0]# yum install openssl
[root@localhost nginx-1.14.0]# yum install openssl-devel
注意:安装时将临时文件目录指定为 /var/temp/nginx,需要在 /var 下创建 temp 及 nginx 目录:mkdir/var/temp/nginx(如已创建则忽略)
[root@localhost nginx-1.14.0]# mkdir /var/temp/nginx
3. 开始安装
./configure \
--prefix=/usr/local/nginx \
--pid-path=/var/run/nginx/nginx.pid \
--lock-path=/var/lock/nginx.lock \
--error-log-path=/var/log/nginx/error.log \
--http-log-path=/var/log/nginx/access.log \
--with-http_gzip_static_module \
--http-client-body-temp-path=/var/temp/nginx/client \
--http-proxy-temp-path=/var/temp/nginx/proxy \
--http-fastcgi-temp-path=/var/temp/nginx/fastcgi \
--http-uwsgi-temp-path=/var/temp/nginx/uwsgi \
--http-scgi-temp-path=/var/temp/nginx/scgi \
--add-module=/home/fastdfs-nginx-module/src
4.make编译,然后make install安装
[root@localhost nginx-1.14.0]# make
[root@localhost nginx-1.14.0]# make install
5.拷贝配置文件
[root@localhost nginx-1.14.0]# cd /home/FastDFS/conf/
[root@localhost conf]# cp http.conf mime.types /etc/fdfs/
是否覆盖?yes
6. 修改nginx配置文件
[root@localhost conf]# cd /usr/local/nginx/conf/
[root@localhost conf]# vi nginx.conf
server {listen 80;server_name 192.168.246.128;#charset koi8-r;#access_log logs/host.access.log main;location /group1/M00 {root /home/fastdfs/fdfs_storage/data;ngx_fastdfs_module;}
7. 重启nginx
[root@localhost conf]# pkill -9 nginx
[root@localhost conf]# /usr/local/nginx/sbin/nginx -c /usr/local/nginx/conf/nginx.conf
本文来自互联网用户投稿,文章观点仅代表作者本人,不代表本站立场,不承担相关法律责任。如若转载,请注明出处。 如若内容造成侵权/违法违规/事实不符,请点击【内容举报】进行投诉反馈!