别以为真懂Openstack: 虚拟机创建的50个步骤和100个知识点
转载自:http://blog.itpub.net/18796236/viewspace-1840119/

别以为真懂Openstack!先别着急骂我,我也没有说我真懂Openstack
我其实很想弄懂Openstack,然而从哪里下手呢?作为程序员,第一个想法当然是代码,Code Talks,什么都可以忽悠,代码是实实在在的,何况原来也深入读过Lucene, Hadoop的源代码,总以为从代码下手,背后的原理变了然了。
说干就干,我喜欢读取代码的方式是按照情景阅读,比如在Lucene中跟踪索引的过程,跟踪搜索的过程,比如在Hadoop中,跟踪写入文件的过程,跟踪Map-Reduce的过程,于是在Openstack中决定跟踪虚拟机创建的整个过程
好在很多先贤已经做过这方面的事情,想来也没有那么的困难。
比较推荐一篇 Request Flow for Provisioning Instance in Openstack(http://ilearnstack.com/2013/04/26/request-flow-for-provisioning-instance-in-openstack/),如果被墙挡住了,我转到了[转]Request Flow for Provisioning Instance in Openstack

然而真的开始了这个旅程,却发现Openstack中涉及的知识绝非只有python代码,而必须有大量的外围知识方可理解。
Openstack社区强大,各门各派武林高手竞相亮招,不断的贡献各种各样的插件,模块:
- 模块繁多:除了Iaas平台的基本组件keystone, nova, glance, neutron, cinder之外,很多人都想在Openstack里面创建新的模块,如雨后春笋冒了出来,Telemetry (Ceilometer), Orchestration (Heat), Database Service (Trove), Data processing (Sahara), Bare metal (Ironic), Queue service (Marconi), Key management (Barbican), DNS Services (Designate), Deployment (TripleO),哦,太多了,研究不过来,好吧,先收缩一下雄心壮志,专注IaaS层吧,所以有关这些模块的知识点,本文没有涉及。
- 插件繁多:除了Openstack支持的一些开源插件外,各大厂商都争先恐后的开发自己的插件,似乎害怕被Openstack社区拒之门外。我没有钱去买去试这么多厂家的设备和插件,所以只能使用开源免费默认的KVM,LVM,Openvswitch等,所以有关各种厂商的插件的知识点,本文没有涉及。

好了,我已经退缩到不能再退缩的scope了,下面就进入Openstack的虚拟机创建之旅。
我学习知识采用贪心算法,遇到在哪个步骤先遇到某个知识点就研究,可能这个知识点在其他的模块也有应用,到时候就发现这个知识点已经被遍历过了,当然也没有太过贪心,遇到过于繁复,过于生僻的,也当机立断,进行剪枝。
一、Keystone

步骤1: 任何客户端想要访问任何服务,都需要先从keystone拿到Token
还记得原来那个短短的UUID的Token么?例如"aef56cc3d1c9192b0257fba1a420fc37"
后来变成了一长串不知道是什么的东东:
MIIDsAYJKoZIhvcNAQcCoIIDoTCCA50CAQExCTAHBgUrDgMCGjCCAokGCSqGSIb3DQEHAaCCAnoEggJ2ew0KICAgICJhY2Nlc3MiOiB7DQogICAgICAgICJtZXRhZGF0YSI6IHsNCiAgICAgICAgICAgIC4uLi5tZXRhZGF0YSBnb2VzIGhlcmUuLi4uDQogICAgICAgIH0sDQogICAgICAgICJzZXJ2aWNlQ2F0YWxvZyI6IFsNCiAgICAgICAgICAgIC4uLi5lbmRwb2ludHMgZ29lcyBoZXJlLi4uLg0KICAgICAgICBdLA0KICAgICAgICAidG9rZW4iOiB7DQogICAgICAgICAgICAiZXhwaXJlcyI6ICIyMDEzLTA1LTI2VDA4OjUyOjUzWiIsDQogICAgICAgICAgICAiaWQiOiAicGxhY2Vob2xkZXIiLA0KICAgICAgICAgICAgImlzc3VlZF9hdCI6ICIyMDEzLTA1LTI1VDE4OjU5OjMzLjg0MTgxMSIsDQogICAgICAgICAgICAidGVuYW50Ijogew0KICAgICAgICAgICAgICAgICJkZXNjcmlwdGlvbiI6IG51bGwsDQogICAgICAgICAgICAgICAgImVuYWJsZWQiOiB0cnVlLA0KICAgICAgICAgICAgICAgICJpZCI6ICI5MjVjMjNlYWZlMWI0NzYzOTMzZTA4YTRjNDE0M2YwOCIsDQogICAgICAgICAgICAgICAgIm5hbWUiOiAidXNlciINCiAgICAgICAgICAgIH0NCiAgICAgICAgfSwNCiAgICAgICAgInVzZXIiOiB7DQogICAgICAgICAgICAuLi4udXNlcmRhdGEgZ29lcyBoZXJlLi4uLg0KICAgICAgICB9DQogICAgfQ0KfQ0KMYH/MIH8AgEBMFwwVzELMAkGA1UEBhMCVVMxDjAMBgNVBAgTBVVuc2V0MQ4wDAYDVQQHEwVVbnNldDEOMAwGA1UEChMFVW5zZXQxGDAWBgNVBAMTD3d3dy5leGFtcGxlLmNvbQIBATAHBgUrDgMCGjANBgkqhkiG9w0BAQEFAASBgEh2P5cHMwelQyzB4dZ0FAjtp5ep4Id1RRs7oiD1lYrkahJwfuakBK7OGTwx26C+0IPPAGLEnin9Bx5Vm4cst/0+COTEh6qZfJFCLUDj5b4EF7r0iosFscpnfCuc8jGMobyfApz/dZqJnsk4lt1ahlNTpXQeVFxNK/ydKL+tzEjg
这里面是什么,不可能是一般的乱码吧。
于是看到了这篇文章
Understanding OpenStack Authentication: Keystone PKI (https://www.mirantis.com/blog/understanding-openstack-authentication-keystone-pki/)
[转]Understanding OpenStack Authentication: Keystone PKI
才了解了这个过程
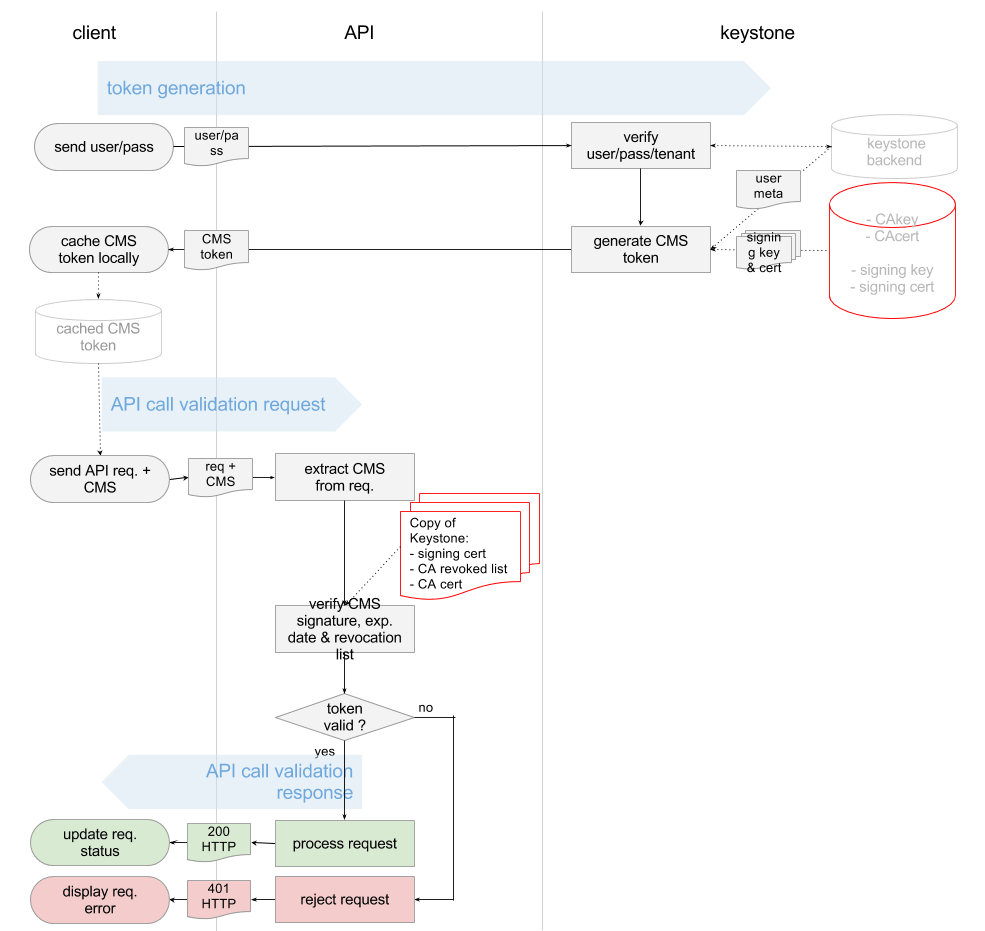
看懂这个图,如果没有点信息安全课程的底子,还真不行。什么各种CA, Certificate, Key,直接就晕了。
于是看了《Principles of Information Security,4ed》的第八章Cryptography,以及《Information Security Principle and Practice》才有所了悟。
下面这篇博客也对相关的概念作了形象的描述
数字证书原理(http://blog.sina.com.cn/s/blog_44ee37cd01016r1h.html)
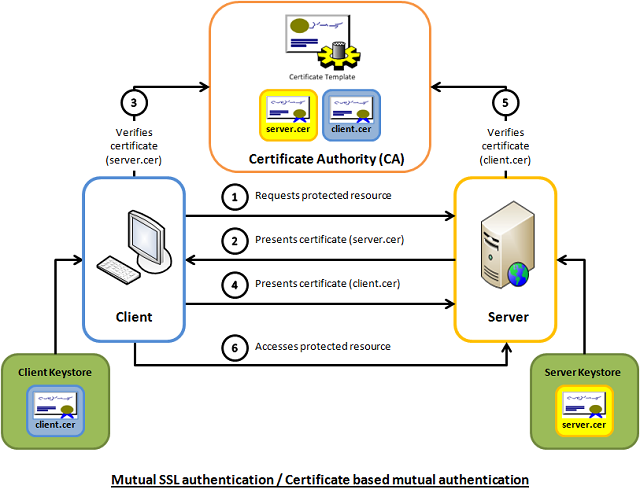
这些概念都是了解SSL和https的必须的,而且我们在部署Openstack的时候,所有的服务最好也部署成HTTPS的。
下面这两篇文章会帮你更好的了解SSL
http://httpd.apache.org/docs/2.2/ssl/ssl_intro.html
http://www.codeproject.com/Articles/326574/An-Introduction-to-Mutual-SSL-Authentication
要使用SSL,两个必备的工具Openssl和certtool,其中Openssl比较常用,而certtool是用于配置libvirt远程连接的官方推荐的工具。
对于Openssl,推荐下面的链接
http://pages.cs.wisc.edu/~zmiller/ca-howto/如果被墙屏蔽了可以访问How To Setup a CA
Openssl的证书操作
对于certtool,推荐libvirt的官方文档,讲的非常的形象具体
http://wiki.libvirt.org/page/TLSSetup
keystone除了authentication的功能,还有authorization。
对于访问控制Access Control,发现有多种http://en.wikipedia.org/wiki/Access_control,而Openstack采用的是Role Based Access Control RBAC。
其中在V2中采用的每个Service下面的policy.json文件,访问控制是每个Service自己决策的。后来在V3中,除了policy.json文件,还可以将Policy在数据库中创建,实现了keystone的统一管理。
推荐下面的文章
Customizing OpenStack RBAC policies
[转] Customizing OpenStack RBAC policies
Mandatory Access Control (MAC)在Openstack中也有应用,就是对Libvirt对Host文件的访问控制AppArmor。当你使用virsh命令进行操作的时候,如果发现自己是root,但是还没有权限,八成就是它的原因了。
推荐http://ubuntuforums.org/showthread.php?t=1008906
[转] Introduction to AppArmor
用户管理也是Keystone的一大工作
在V2中,结构比较简单,用一个三角形就可以明白

Keystone V3中的概念就比较多了,也相对复杂,文档较少,比较推荐下面的文章。
http://www.florentflament.com/blog/setting-keystone-v3-domains.html
[转]Setting Keystone v3 domains
我也画了一幅图,来帮助理解这个过程。
Keystone v3 domains 应用场景

二、nova-api

步骤3:nova-api接收请求
nova-api接收请求,也不是随便怎么来都接收的,而是需要设定rate limits,默认的实现是在ratelimit的middleware里面实现的。
然而有时候,我们希望实现distributed rate-limiting,从而Turnstile是一个不错的选择。
https://github.com/klmitch/turnstile
http://pypi.python.org/pypi/turnstile
步骤4:对Token的验证
步骤5:查看Policy
这两步已经在keystone的时候研究过
步骤6:检查quota
nova, neutron, Cinder各有各的quota,并且可以从命令行进行管理
# nova -h | grep quota
quota-class-show List the quotas for a quota class.
quota-class-update Update the quotas for a quota class.
quota-defaults List the default quotas for a tenant.
quota-delete Delete quota for a tenant/user so their quota will
quota-show List the quotas for a tenant/user.
quota-update Update the quotas for a tenant/user.
# nova quota-show
+-----------------------------+-------+
| Quota | Limit |
+-----------------------------+-------+
| instances | 10 |
| cores | 20 |
| ram | 51200 |
| floating_ips | 10 |
| fixed_ips | -1 |
| metadata_items | 128 |
| injected_files | 5 |
| injected_file_content_bytes | 10240 |
| injected_file_path_bytes | 255 |
| key_pairs | 100 |
| security_groups | 10 |
| security_group_rules | 20 |
+-----------------------------+-------+
# cinder -h | grep quota
quota-class-show List the quotas for a quota class.
quota-class-update Update the quotas for a quota class.
quota-defaults List the default quotas for a tenant.
quota-show List the quotas for a tenant.
quota-update Update the quotas for a tenant.
quota-usage List the quota usage for a tenant.
# cinder quota-show 1779b3bc725b44b98726fb0cbdc617b1
+-----------+-------+
| Property | Value |
+-----------+-------+
| gigabytes | 1000 |
| snapshots | 10 |
| volumes | 10 |
+-----------+-------+
# neutron -h | grep quota
quota-delete Delete defined quotas of a given tenant.
quota-list List quotas of all tenants who have non-default quota values.
quota-show Show quotas of a given tenant
quota-update Define tenant's quotas not to use defaults.
# neutron quota-show 1779b3bc725b44b98726fb0cbdc617b1
+---------------------+-------+
| Field | Value |
+---------------------+-------+
| floatingip | 50 |
| network | 10 |
| port | 50 |
| router | 10 |
| security_group | 10 |
| security_group_rule | 100 |
| subnet | 10 |
+---------------------+-------+
推荐下面的文章
openstack nova 基础知识——Quota(配额管理)
http://www.sebastien-han.fr/blog/2012/09/19/openstack-play-with-quota/
步骤7:在数据库中创建Instance实例
有关nova的database schema参考下面的文章
http://www.prestonlee.com/2012/05/03/openstack-nova-essex-mysql-database-schema-diagram-and-sql/
MySQL是Openstack中最重要的组件之一,所以在生产环境中High Availability是必须的。
MySQL的HA有下面几种方式:
http://dev.mysql.com/doc/mysql-ha-scalability/en/index.html
| Requirement | MySQL Replication | MySQL with DRBD with Corosync and Pacemaker | MySQL Cluster |
| Availability | |||
| Platform Support | All Supported by MySQL Server | Linux | All Supported by MySQL Cluster |
| Automated IP Failover | No | Yes | Depends on Connector and Configuration |
| Automated Database Failover | No | Yes | Yes |
| Automatic Data Resynchronization | No | Yes | Yes |
| Typical Failover Time | User / Script Dependent | Configuration Dependent, 60 seconds and Above | 1 Second and Less |
| Synchronous Replication | No, Asynchronous and Semisynchronous | Yes | Yes |
| Shared Storage | No, Distributed | No, Distributed | No, Distributed |
| Geographic redundancy support | Yes | Yes, via MySQL Replication | Yes, via MySQL Replication |
| Update Schema On-Line | No | No | Yes |
| Scalability | |||
| Number of Nodes | One Master, Multiple Slaves | One Active (primary), one Passive (secondary) Node | 255 |
| Built-in Load Balancing | Reads, via MySQL Replication | Reads, via MySQL Replication | Yes, Reads and Writes |
| Supports Read-Intensive Workloads | Yes | Yes | Yes |
| Supports Write-Intensive Workloads | Yes, via Application-Level Sharding | Yes, via Application-Level Sharding to Multiple Active/Passive Pairs | Yes, via Auto-Sharding |
| Scale On-Line (add nodes, repartition, etc.) | No | No | Yes |
要想系统的学习Mysql replication,推荐下面的这本书
《MySQL High Availability Tools for Building Robust Data Centers》
还有一种方式是Mysql + galera,可以搭建Active + Active的Mysql应用

参考下面的两篇文章
http://www.sebastien-han.fr/blog/2012/04/08/mysql-galera-cluster-with-haproxy/
http://www.sebastien-han.fr/blog/2012/04/01/mysql-multi-master-replication-with-galera/
还有一种常见的HA的技术,就是pacemaker

最底层是通信层corosync/openais
负责cluster中node之间的通信
上一层是Resource Allocation Layer,包含下面的组件:
CRM Cluster Resouce Manager
是总管,对于resource做的任何操作都是通过它。每个机器上都有一个CRM。
CIB Cluster Information Base
CIB由CRM管理,是在内存中的XML数据库,保存了cluster的配置和状态。我们查询出来的configuration都是保存在CIB里面的。nodes, resources, constraints, relationship.
DC Designated Coordinator
每个node都有CRM,会有一个被选为DC,是整个Cluster的大脑,这个DC控制的CIB是master CIB,其他的CIB都是副本。
PE Policy Engine
当DC需要进行一些全局配置的时候,首先由PE根据当前的状态和配置,计算出将来的状态,并生成一系列的action,使得cluster从初始状态变为结果状态。PE仅仅在DC上运行。
LRM Local Resource Manager
本地的resource管理,调用resource agent完成操作,启停resource,将结果返回给CRM
再上一层是Resource Layer
包含多个resource agent。resource agent往往是一些shell script,用来启动,停止,监控resource的状态。
要弄懂Pacemaker,推荐读《SUSE high availability guide》
https://www.suse.com/documentation/sle_ha/singlehtml/book_sleha/book_sleha.html
本人做了一些笔记和实验,请参考
High Availability手册(1): 环境
High Availability手册(2): 架构
High Availability手册(3): 配置
步骤8:创建filter_properties,用于nova scheduler
步骤9:发送RPC给nova-conductor
有关nova-conductor的文章
http://cloudystuffhappens.blogspot.com/2013/04/understanding-nova-conductor-in.html
在Openstack中,RPC的发送是通过RabbitMQ
RabbitMQ可以通过Pacemaker进行HA,当然也可以搭建自己的RabbitMQ Cluster
学习RabbitMQ当然首推《RabbitMQ in Action》
本人也做了一些笔记
RabbitMQ in Action (1): Understanding messaging
RabbitMQ in Action (2): Running and administering Rabbit
RabbitMQ in Action(5): Clustering and dealing with failure
还没完全读完,敬请谅解
当然Openstack中对于RabbitMQ的使用,一篇很好的文章是
NOVA源码分析——NOVA中的RabbitMQ解析
本人也对RPC的调用过程进行了代码分析
Openstack中RabbitMQ RPC代码分析
步骤10:nova-condutor创建request_spec,用于scheduler
步骤11:nova-conductor发送RPC给nova-scheduler
三、nova-scheduler

选择一个物理机来创建虚拟机,我们称为schedule的过程
nova scheduler的一个经典的图如下

就是先Filter再Weighting,其实scheduler的过程在很早就参与了。
步骤13:对Host进行Filtering
Filtering主要通过两个变量进行,request_spec和filter_properties,而这些变量在前面的步骤,都已经准备好了。
而不同的Filter只是利用这些信息,然后再根据从HostManager统计上来的HostState信息,选出匹配的Host。
request_spec中的第一个信息就是image的properties信息,尤其是当你想支持多种Hypervisor的时候,Xen的image, KVM的image, Hyper-V的image各不相同,如何保证image跑在正确的Hypervisor上?在image里面这种hypervisor_type property就很必要。
请阅读下面的文章
http://www.cloudbase.it/filtering-glance-images-for-hyper-v/
image properties还会有min_ram, min_disk,只有内存和硬盘够大才可以。
Flavor里面可以设置extra_specs,这是一系列key-value值,在数据结构中,以instance_type变量实现,可以在里面输入这个Flavor除了资源需求的其他参数,从而在Filter的时候,可以使用。
host aggregates将所有的Host分成多个Group,当然不同的Group可以根据不同的属性Metadata划分,一种是高性能和低性能。
在Openstack文档中,这个例子很好的展示了host aggregates和Flavor extra_specs的配合使用
http://docs.openstack.org/trunk/config-reference/content/section_compute-scheduler.html
Example: Specify compute hosts with SSDs
This example configures the Compute service to enable users to request nodes that have solid-state drives (SSDs). You create a fast-iohost aggregate in the nova availability zone and you add the ssd=true key-value pair to the aggregate. Then, you add the node1, and node2compute nodes to it.
$ nova aggregate-create fast-io nova
+----+---------+-------------------+-------+----------+
| Id | Name    | Availability Zone | Hosts | Metadata |
+----+---------+-------------------+-------+----------+
| 1  | fast-io | nova              |       |          |
+----+---------+-------------------+-------+----------+$ nova aggregate-set-metadata 1 ssd=true
+----+---------+-------------------+-------+-------------------+
| Id | Name    | Availability Zone | Hosts | Metadata          |
+----+---------+-------------------+-------+-------------------+
| 1  | fast-io | nova              | []    | {u'ssd': u'true'} |
+----+---------+-------------------+-------+-------------------+$ nova aggregate-add-host 1 node1
+----+---------+-------------------+-----------+-------------------+
| Id | Name    | Availability Zone | Hosts      | Metadata          |
+----+---------+-------------------+------------+-------------------+
| 1  | fast-io | nova              | [u'node1'] | {u'ssd': u'true'} |
+----+---------+-------------------+------------+-------------------+$ nova aggregate-add-host 1 node2
+----+---------+-------------------+---------------------+-------------------+
| Id | Name    | Availability Zone | Hosts                | Metadata          |
+----+---------+-------------------+----------------------+-------------------+
| 1  | fast-io | nova              | [u'node1', u'node2'] | {u'ssd': u'true'} |
+----+---------+-------------------+----------------------+-------------------+
Use the nova flavor-create command to create the ssd.large flavor called with an ID of 6, 8 GB of RAM, 80 GB root disk, and four vCPUs.
$ nova flavor-create ssd.large 6 8192 80 4 +----+-----------+-----------+------+-----------+------+-------+-------------+-----------+-------------+
| ID | Name      | Memory_MB | Disk | Ephemeral | Swap | VCPUs | RXTX_Factor | Is_Public | extra_specs |
+----+-----------+-----------+------+-----------+------+-------+-------------+-----------+-------------+
| 6  | ssd.large | 8192      | 80   | 0         |      | 4     | 1           | True      | {}          |
+----+-----------+-----------+------+-----------+------+-------+-------------+-----------+-------------+
Once the flavor is created, specify one or more key-value pairs that match the key-value pairs on the host aggregates. In this case, that is the ssd=true key-value pair. Setting a key-value pair on a flavor is done using the nova flavor-key command.
$ nova flavor-key ssd.large set ssd=true
Once it is set, you should see the extra_specs property of the ssd.large flavor populated with a key of ssd and a corresponding value of true.
$ nova flavor-show ssd.large
+----------------------------+-------------------+
| Property                   | Value             |
+----------------------------+-------------------+
| OS-FLV-DISABLED:disabled   | False             |
| OS-FLV-EXT-DATA:ephemeral  | 0                 |
| disk                       | 80                |
| extra_specs                | {u'ssd': u'true'} |
| id                         | 6                 |
| name                       | ssd.large         |
| os-flavor-access:is_public | True              |
| ram                        | 8192              |
| rxtx_factor                | 1.0               |
| swap                       |                   |
| vcpus                      | 4                 |
+----------------------------+-------------------+
Now, when a user requests an instance with the ssd.large flavor, the scheduler only considers hosts with the ssd=true key-value pair. In this example, these are node1 and node2.
另一个作用是Xen和KVM的POOL分开,有利于XEN进行Live Migration
另一个作用是Windows和Linux的POOL分开,因为Windows是需要收费的,而Linux大多不需要,Windows的收费是按照物理机,而非虚拟机来收费的,所有需要尽量的将windows的虚拟机放到一个物理机上。
Filter_properties的里面scheduler_hints是一个json,里面可以设置任何值,用于Filter的时候使用。
例如JsonFilter
The JsonFilter allows a user to construct a custom filter by passing a scheduler hint in JSON format. The following operators are supported:
- =
- <
- >
- in
- <=
- >=
- not
- or
- and
The filter supports the following variables:
- $free_ram_mb
- $free_disk_mb
- $total_usable_ram_mb
- $vcpus_total
- $vcpus_used
Using the nova command-line tool, use the --hint flag:
$ nova boot --image 827d564a-e636-4fc4-a376-d36f7ebe1747 --flavor 1 --hint query='[">=","$free_ram_mb",1024]' server1
With the API, use the os:scheduler_hints key:
![]()
{
"server": {
"name": "server-1",
"imageRef": "cedef40a-ed67-4d10-800e-17455edce175",
"flavorRef": "1"
},
"os:scheduler_hints": {
"query": "[>=,$free_ram_mb,1024]"
}
}
我们可以指定某个物理机,用下面的命令--availability-zone
步骤14:对合适的Hosts进行weighting并且排序
选出了Hosts,接下来就是进行Weighting的操作
Weighting可以根据很多变量来,一般来说Memory和disk是最先需要满足的,CPU和network io则需要次要考虑,一般来说,对于付钱较少的Flavor,能满足memory和disk就可以了,对于付钱较多的Flavor,则需要保证其CPU和network io.
步骤15:nova-scheduler想选出的Host发送RPC
四、Nova-compute

步骤17:nova-compute接收到请求后,通过Resource Tracker将创建虚拟机所需要的资源声明占用
步骤18:调用Neutron API配置Network,虚拟机处于Networking的状态
需要注意的是,这一步虽然是配置Network,但是主要是数据结构的准备,真正的设备并没有创建。
由于在创建虚拟机的时候,我们指定了将虚拟机放到哪个private network里面,因而在创建真正的设备之前,所有的信息都需要准备好。
这里的知识点设计Network的创建,然而这一步其实在虚拟机创建之前就应该做好。
一个最简单的场景是通过下面的脚本创建网络
#!/bin/bash
TENANT_NAME="openstack"
TENANT_NETWORK_NAME="openstack-net"
TENANT_SUBNET_NAME="${TENANT_NETWORK_NAME}-subnet"
TENANT_ROUTER_NAME="openstack-router"
FIXED_RANGE="192.168.0.0/24"
NETWORK_GATEWAY="192.168.0.1"
PUBLIC_GATEWAY="172.24.1.1"
PUBLIC_RANGE="172.24.1.0/24"
PUBLIC_START="172.24.1.100"
PUBLIC_END="172.24.1.200"
TENANT_ID=$(keystone tenant-list | grep " $TENANT_NAME " | awk '{print $2}')
(1) TENANT_NET_ID=$(neutron net-create --tenant_id $TENANT_ID $TENANT_NETWORK_NAME --provider:network_type gre --provider:segmentation_id 1 | grep " id " | awk '{print $4}')
(2) TENANT_SUBNET_ID=$(neutron subnet-create --tenant_id $TENANT_ID --ip_version 4 --name $TENANT_SUBNET_NAME $TENANT_NET_ID $FIXED_RANGE --gateway $NETWORK_GATEWAY --dns_nameservers list=true 8.8.8.8 | grep " id " | awk '{print $4}')
(3) ROUTER_ID=$(neutron router-create --tenant_id $TENANT_ID $TENANT_ROUTER_NAME | grep " id " | awk '{print $4}')
(4) neutron router-interface-add $ROUTER_ID $TENANT_SUBNET_ID
(5) neutron net-create public --router:external=True
(6) neutron subnet-create --ip_version 4 --gateway $PUBLIC_GATEWAY public $PUBLIC_RANGE --allocation-pool start=$PUBLIC_START,end=$PUBLIC_END --disable-dhcp --name public-subnet
(7) neutron router-gateway-set ${TENANT_ROUTER_NAME} public

- 为这个Tenant创建一个private network,不同的private network是需要通过VLAN tagging进行隔离的,互相之间broadcast不能到达,这里我们用的是GRE模式,也需要一个类似VLAN ID的东西,称为Segment ID
- 创建一个private network的subnet,subnet才是真正配置IP网段的地方,对于私网,我们常常用192.168.0.0/24这个网段
- 为这个Tenant创建一个Router,才能够访问外网
- 将private network连接到Router上
- 创建一个External Network
- 创建一个Exernal Network的Subnet,这个外网逻辑上代表了我们数据中心的物理网络,通过这个物理网络,我们可以访问外网。因而PUBLIC_GATEWAY应该设为数据中心里面的Gateway, PUBLIC_RANGE也应该和数据中心的物理网络的CIDR一致,否则连不通,而之所以设置PUBLIC_START和PUBLIC_END,是因为在数据中心中,不可能所有的IP地址都给Openstack使用,另外可能搭建了VMware Vcenter,可能有物理机器,仅仅分配一个区间给Openstack来用。
- 将Router连接到External Network
经过这个流程,从虚拟网络,到物理网络就逻辑上联通了。
然而真正的创建底层的设备,却是通过具体的命令来的,本人总结了一下:
neutron创建network执行的那些命令
当然还有更复杂的场景,参考这篇文章
多个router和多个network
步骤19:生成MAC Address
步骤20: 获取DHCP Server的配置
步骤21:获取Network的信息
步骤22:获取Security Group的信息
步骤23:拿着所有的信息,创建Port对象,是一个Tap device,当然真正的设备还没有创建
步骤24:调用Libvirt Driver创建虚拟机
五、Image

在创建Instance之前,当然需要Image,Image后来发现是一个大学问。
在Openstack里面,对于KVM,应用到的Image格式主要是两种RAW和qcow2,
raw格式简单,容易转换为其他的格式。需要文件系统的支持才能支持sparse file,性能相对较高。
qcow2是动态的,相对于raw来说,有下列的好处:
- 即便文件系统不支持sparse file,文件大小也很小
- Copy on write
- Snapshot
- 压缩
- 加密
具体的格式和特点,参考下面的文章
QEMU KVM libvirt手册(4) – images
[转] The QCOW2 Image Format
创建一个image,有多种方法
一种方法是通过virt-install,讲hard disk设为一个image文件, 从CDROM启动一个虚拟机,按照正常的安装流程来,最后操作系统安装好,image再经过qemu-img进行处理,压缩,最终形成image。
参考文章
QEMU KVM libvirt 手册(1)
当然现在有了更先进的方法,就是libguestfs,它可以轻松基于已有版本的image创建一个你想要的image,就是virt-builder
参考文章
libguestfs手册(3): virt命令
当然一个可以在Openstack里面使用的image,绝不是仅仅安装一个操作系统那么简单。
在OpenStack Virtual Machine Image Guide中详细写了一个Linux Image的各种需求
- Disk partitions and resize root partition on boot (cloud-init)
- No hard-coded MAC address information
- Ensure ssh server runs
- Disable firewall
- Access instance by using ssh public key (cloud-init)
- Use cloud-init to fetch the public key
- Process user data and other metadata (cloud-init)
- Ensure image writes boot log to console
另外加几条:
- 包含MBR和bootloader,可以自启动
- 支持virtio的disk和network driver
- 使用DHCP分配IP
当一个Linux的Image安装完毕后,总要测试一下:
- 能通过key ssh上去吗
- 能够文件注入吗
- cloud-init是否运行了
- 文件系统被resize为flavor大小了吗
- hostname设为文件名吗
- timezone设的对吗
- /etc/fstab干净正确吗
- 虚拟机的log被正确输出了吗
- /tmp路径下干净吗
- 能打snapshot吗
- block storage添加后能正常看到和使用吗
对于windows image,却要复杂的多,windows真的不是对cloud友好的。
- 首先必须用virt-install将windows系统安装好。
- windows要想使用virtio,就必须将windows版本的virtio安装好。即便安装好,还要在device manager里面update driver才好。
- Remote Access要打开,要不怎么远程桌面啊。
- 安装一个SSH Server吧,有时候需要创建虚拟机后,自动执行脚本安装东西,不能通过远程桌面来。
- 安装windows版本的cloud-init cloudbase-init
- 别忘了运行windows update来更新windows,否则会有很多安全漏洞。
- 在device manager里面添加一个serial console的device
- windows的硬盘占用通常很大,运行一下disk cleanup tool可以清空一些硬盘。
- 微软有一个SDelete工具,可以讲未分配的空间设为0,从而可以压缩硬盘。
- 别忘了License问题。
- 有时候windows配置网络的时候,会弹出对话框,这是家庭网络,工作网络,还是公共网络?这会使得网络配置死在哪里,在注册表里干掉他。
- 运行sysprep
对于cloud-init,参考下面的文章
http://cloudinit.readthedocs.org/en/latest/index.html
http://www.scalehorizontally.com/2013/02/24/introduction-to-cloud-init/
在ubuntu中,cloud-init主要包括
配置文件在/etc/cloud下面,默认的cloud.cfg如下
root@dfasdfsdafasdf:/etc/cloud# cat cloud.cfg
# The top level settings are used as module
# and system configuration.
# A set of users which may be applied and/or used by various modules
# when a 'default' entry is found it will reference the 'default_user'
# from the distro configuration specified below
users:
- default
# If this is set, 'root' will not be able to ssh in and they
# will get a message to login instead as the above $user (ubuntu)
disable_root: true
# This will cause the set+update hostname module to not operate (if true)
preserve_hostname: false
# Example datasource config
# datasource:
# Ec2:
# metadata_urls: [ 'blah.com' ]
# timeout: 5 # (defaults to 50 seconds)
# max_wait: 10 # (defaults to 120 seconds)
# The modules that run in the 'init' stage
cloud_init_modules:
- migrator
- seed_random
- bootcmd
- write-files
- growpart
- resizefs
- set_hostname
- update_hostname
- update_etc_hosts
- ca-certs
- rsyslog
- users-groups
- ssh
# The modules that run in the 'config' stage
cloud_config_modules:
# Emit the cloud config ready event
# this can be used by upstart jobs for 'start on cloud-config'.
- emit_upstart
- disk_setup
- mounts
- ssh-import-id
- locale
- set-passwords
- grub-dpkg
- apt-pipelining
- apt-configure
- package-update-upgrade-install
- landscape
- timezone
- puppet
- chef
- salt-minion
- mcollective
- disable-ec2-metadata
- runcmd
- byobu
# The modules that run in the 'final' stage
cloud_final_modules:
- rightscale_userdata
- scripts-vendor
- scripts-per-once
- scripts-per-boot
- scripts-per-instance
- scripts-user
- ssh-authkey-fingerprints
- keys-to-console
- phone-home
- final-message
- power-state-change
# System and/or distro specific settings
# (not accessible to handlers/transforms)
system_info:
# This will affect which distro class gets used
distro: ubuntu
# Default user name + that default users groups (if added/used)
default_user:
name: ubuntu
lock_passwd: True
gecos: Ubuntu
groups: [adm, audio, cdrom, dialout, dip, floppy, netdev, plugdev, sudo, video]
sudo: ["ALL=(ALL) NOPASSWD:ALL"]
shell: /bin/bash
# Other config here will be given to the distro class and/or path classes
paths:
cloud_dir: /var/lib/cloud/
templates_dir: /etc/cloud/templates/
upstart_dir: /etc/init/
package_mirrors:
- arches: [i386, amd64]
failsafe:
primary: http://archive.ubuntu.com/ubuntu
security: http://security.ubuntu.com/ubuntu
search:
primary:
- http://%(ec2_region)s.ec2.archive.ubuntu.com/ubuntu/
- http://%(availability_zone)s.clouds.archive.ubuntu.com/ubuntu/
security: []
- arches: [armhf, armel, default]
failsafe:
primary: http://ports.ubuntu.com/ubuntu-ports
security: http://ports.ubuntu.com/ubuntu-ports
ssh_svcname: ssh
工作文件夹在/var/lib/cloud
root@dfasdfsdafasdf:/var/lib/cloud/instance# ls
boot-finished datasource obj.pkl sem user-data.txt.i vendor-data.txt.i
cloud-config.txt handlers scripts user-data.txt vendor-data.txt
另外就是cloud-init的命令
/usr/bin/cloud-init
如果我们打开它,发现他是python文件,如果运行/usr/bin/cloud-init init,则会运行cloud_init_modules:下面的模块,我们以resizefs为例子
/usr/bin/cloud-init 中会调用main_init,里面会调用run_module_section
这就调用到python代码里面去了,所以cloud-init另一个部分就是python代码部分
/usr/lib/python2.7/dist-packages/cloudinit
我们发现里面有这个文件/usr/lib/python2.7/dist-packages/cloudinit/config/cc_resizefs.py
里面是
def _resize_btrfs(mount_point, devpth): # pylint: disable=W0613
return ('btrfs', 'filesystem', 'resize', 'max', mount_point)
def _resize_ext(mount_point, devpth): # pylint: disable=W0613
return ('resize2fs', devpth)
def _resize_xfs(mount_point, devpth): # pylint: disable=W0613
return ('xfs_growfs', devpth)
def _resize_ufs(mount_point, devpth): # pylint: disable=W0613
return ('growfs', devpth)
哈哈,终于找到resize的根源了。
说完了创建image,还需要了解修改image,我们的文件注入,就是对image的修改。
有三种方式:通过mount一个loop device,通过qemu的network block device,或者最先进的,通过libguestfs
总结成了一篇文章
如何修改image文件
对于qemu-nbd,有文章
QEMU KVM Libvirt手册(6) – Network Block Device
对于libguestfs,我也写了一些笔记
libguestfs手册(1): 架构
libguestfs手册(2):guestfish command
libguestfs手册(3): virt命令
对于文件注入,有文章
nova file injection
对于如何打snapshot,分多种,有文章
QEMU KVM Libvirt手册(5) – snapshots
Snapshot Types
External Snapshot management
[转] External(and Live) snapshots with libvirt
[转] Snapshotting with libvirt for qcow2 images
步骤26:从Glance下载Image,作为base
步骤27:基于base image,创建qcow2的image
步骤28:resize image的大小,和filesystem的大小无关
步骤29:配置configuration drive
步骤30:配置文件注入
六、Libvirt

对于Libvirt,在启动虚拟机之前,首先需要define虚拟机,是一个XML格式的文件
列出所有的Instance
# virsh list
Id Name State
----------------------------------------------------
10 instance-00000006 running
# virsh dumpxml instance-00000006
本文来自互联网用户投稿,文章观点仅代表作者本人,不代表本站立场,不承担相关法律责任。如若转载,请注明出处。 如若内容造成侵权/违法违规/事实不符,请点击【内容举报】进行投诉反馈!