【精品】pinia 基于插件pinia-plugin-persist的 持久化
准备工作
第一步:安装pinia
npm install pinia --save
第二步:新建store目录,创建index.ts
import { createPinia } from "pinia"
const store = createPinia()
export default store
第三步:main.ts中使用store
import { createApp } from 'vue'
import store from '@/store'const app = createApp(App)
app.use(store)
app.mount('#app')
第四步:新建user.ts
import { defineStore } from "pinia"export const useUserStore = defineStore({id:'user',state() {return {name: '',age: 0}}
})
第五步:在vue页面中使用
<template>User:{{ name }} == {{ age }}<br><button @click="fun">修改值button>
template><script setup lang="ts">
import {useUserStore} from "@/store/module/user"
import {storeToRefs} from "pinia"const userStore = useUserStore()
const {name, age} = storeToRefs(userStore)const fun = () => {userStore.name = "zhangsan"userStore.age = 18
}
script>
结果
打开页面,单击页面按钮,显示的用户信息发生变化,刷新页面又恢复到原来的样子。
利用插件pinia-plugin-persist持久化
第一步:安装插件pinia-plugin-persist
npm install pinia-plugin-persist --save
第二步:修改store文件夹下的index.ts
import { createPinia } from "pinia"
import piniaPluginPersist from 'pinia-plugin-persist'const store = createPinia()
store.use(piniaPluginPersist)export default store
第三步:修改user.ts,为其添加persist
import {defineStore} from "pinia"export const useUserStore = defineStore({id: "user",state: () => {return {name: '',age: 0}},persist: {enabled: true,strategies: [{key: 'wego_user',storage: localStorage}]}})
注:在strategies中可以指定对哪些数据进行缓存,比如:
strategies: [{ storage: localStorage, paths: ['token','name'] }
]
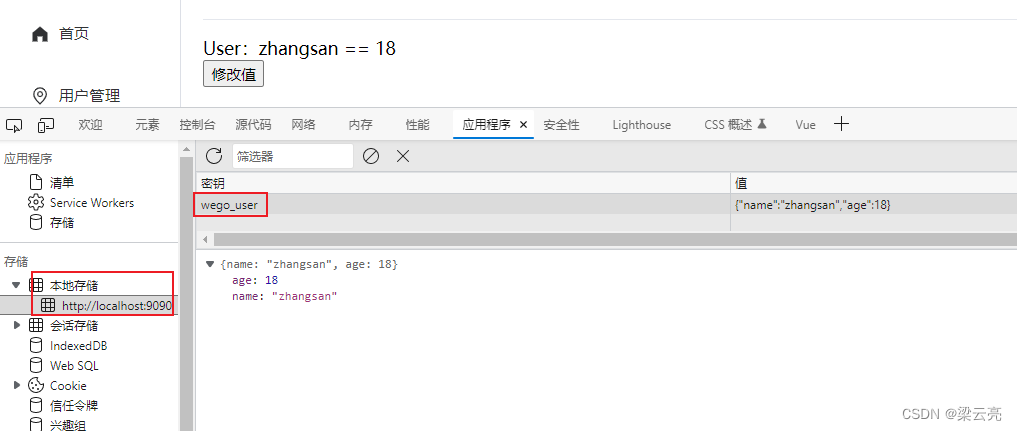
测试
运行程序,打开页面单击按钮,数据发生变化,关闭页面再次打开,页面显示的仍然是变化后的数据,此时F12,会看到:
本文来自互联网用户投稿,文章观点仅代表作者本人,不代表本站立场,不承担相关法律责任。如若转载,请注明出处。 如若内容造成侵权/违法违规/事实不符,请点击【内容举报】进行投诉反馈!