Android设计模式详解之装饰模式
前言
装饰模式也称为包装模式,结构型设计模式之一;
定义:动态地给一个对象添加一些额外的职责。就增加功能来说,装饰模式生成子类更为灵活;
使用场景:需要透明且动态地扩展类的功能时;
UML类图:
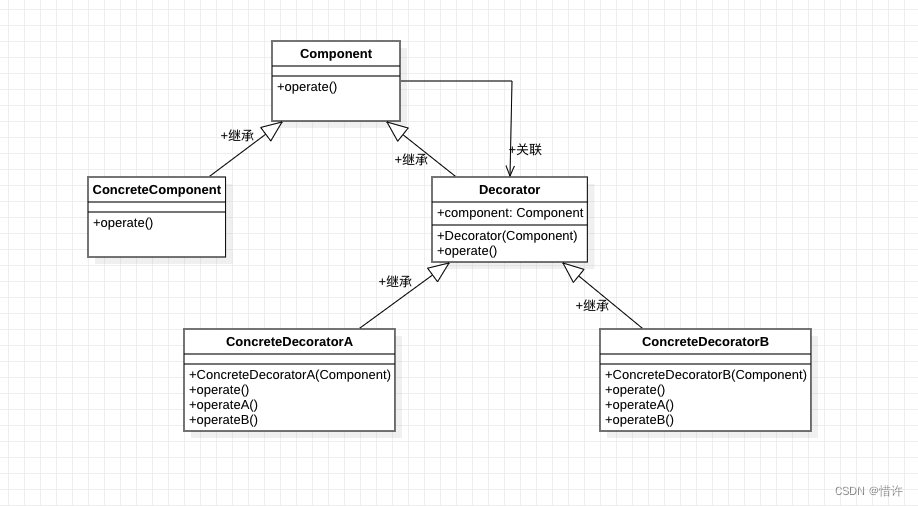
Component:抽象组件,可以是一个接口或抽象类,充当的就是被装饰的原始对象;
ConcreteComponent:组件具体实现类;该类是Component类的基本实现,也是我们装饰的具体对象;
Decorator:抽象装饰者,为了装饰我们的组件对象,内部持有一个指向组件对象的引用,该类为抽象类,需要根据不同的装饰逻辑实现不同的具体子类;
ConcreteDecoratorA、ConcreteDecoratorB:装饰者具体实现类,对抽象装饰者的具体实现;
模板代码
- 定义抽象组件,
Component
/*** 抽象组件*/
abstract class Component {abstract fun operate()
}
- 定义具体被装饰类,
ConcreteComponent
/*** 具体被装饰类*/
class ConcreteComponent : Component() {override fun operate() {}
}
- 定义抽象装饰类,
Decorator
/*** 抽象装饰类*/
abstract class Decorator(private val component: Component) : Component() {override fun operate() {component.operate()}}
- 定义具体装饰类,
ConcreteDecorator
/*** 具体装饰类*/
class ConcreteDecorator(component: Component) : Decorator(component) {override fun operate() {operateA()super.operate()//方法装饰,增强operateB()}/*** 自定义装饰方法A*/private fun operateA() {}/*** 自定义装饰方法B*/private fun operateB() {}
}
- 代码调用示例
//构造被装饰的对象
val component = ConcreteComponent()
//具体装饰类
val concreteDecorator = ConcreteDecorator(component)
concreteDecorator.operate()
示例代码
这里我们以员工进行举例,以员工为抽象组件,抽象行为为工作,具体被装饰的对象假如为互联网员工,然后根据职位不同进行装饰,如普通程序员可以一边工作一边摸鱼,而部门主管不仅一边工作一边摸鱼,还一边监视其他员工;下面我们使用装饰模式来实现:
- 定义抽象组件,员工类
Staff
abstract class Staff {abstract fun work()
}
- 定义具体被装饰类,公司员工
ConcreteStaff
/*** 具体被装饰类,公司员工*/
class ConcreteStaff : Staff() {override fun work() {println("努力上班中...")}
}
- 定义抽象装饰类,程序员装饰类
EngineerDecorator
/*** 抽象装饰类,程序员装饰类*/
abstract class EngineerDecorator(private val staff: Staff) : Staff() {override fun work() {staff.work()}}
- 定义具体装饰类,普通程序员
CommonEngineerStaff
/*** 普通程序员*/
class CommonEngineerStaff(staff: Staff) : EngineerDecorator(staff) {override fun work() {super.work()rest()}private fun rest() {println("休息一会,偷偷摸摸鱼...")}
}
- 定义具体装饰类,部门主管
GroupEngineerStaff
/*** 部门主管*/
class GroupEngineerStaff(staff: Staff) : EngineerDecorator(staff) {override fun work() {super.work()rest()checkOthers()}private fun rest() {println("休息一会,喝个咖啡~~")}private fun checkOthers() {println("看一下,哪个龟儿子在偷懒...")}
}
- 编写测试代码验证
object Test {@JvmStaticfun main(args: Array<String>) {//构造被装饰的对象val staff = ConcreteStaff()//普通代码狗val commonEngineerStaff = CommonEngineerStaff(staff)commonEngineerStaff.work()println("------------------------------")println("------------------------------")//部门主管val groupEngineerStaff = GroupEngineerStaff(staff)groupEngineerStaff.work()}
}
结果输出:
努力上班中...
休息一会,偷偷摸摸鱼...
------------------------------
------------------------------
努力上班中...
休息一会,喝个咖啡~~
看一下,哪个龟儿子在偷懒...
Android源码中的装修模式
Context、ContextImpl、ContextWrapper,我们简单分析下源码:
首先看下Context类
public abstract class Context {public abstract void startActivity(@RequiresPermission Intent intent);public abstract void sendBroadcast(@RequiresPermission Intent intent);public abstract ComponentName startService(Intent service);...
}
可以看到Context是一个抽象类,定义了很多关键的抽象方法,如启动Activity、发送广播、开启服务等,
我们知道它的具体实现类为ContextImpl
class ContextImpl extends Context {@Overridepublic void startActivity(Intent intent, Bundle options) {warnIfCallingFromSystemProcess();...mMainThread.getInstrumentation().execStartActivity(getOuterContext(), mMainThread.getApplicationThread(), null,(Activity) null, intent, -1, options);}
}@Overridepublic ComponentName startService(Intent service) {warnIfCallingFromSystemProcess();return startServiceCommon(service, false, mUser);}@Overridepublic void sendBroadcast(Intent intent) {warnIfCallingFromSystemProcess();String resolvedType = intent.resolveTypeIfNeeded(getContentResolver());try {intent.prepareToLeaveProcess(this);ActivityManager.getService().broadcastIntentWithFeature(mMainThread.getApplicationThread(), getAttributionTag(), intent, resolvedType,null, Activity.RESULT_OK, null, null, null, AppOpsManager.OP_NONE, null, false,false, getUserId());} catch (RemoteException e) {throw e.rethrowFromSystemServer();}}可以看到它实现了Context中的所有抽象方法,我们在看下ContextWrapper这个类;
public class ContextWrapper extends Context {Context mBase;public ContextWrapper(Context base) {mBase = base;}protected void attachBaseContext(Context base) {if (mBase != null) {throw new IllegalStateException("Base context already set");}mBase = base;}public Context getBaseContext() {return mBase;}@Overridepublic void startActivity(Intent intent) {mBase.startActivity(intent);}/** @hide */@Overridepublic void startActivityAsUser(Intent intent, UserHandle user) {mBase.startActivityAsUser(intent, user);}@Overridepublic void sendBroadcast(Intent intent) {mBase.sendBroadcast(intent);}@Overridepublic void sendBroadcast(Intent intent, String receiverPermission) {mBase.sendBroadcast(intent, receiverPermission);}
}
可以看到,ContextWrapper持有Context对象,并重写了一系列的抽象方法,很明显,这是典型的装饰模式的运用,ContextWrapper充当具体的装饰者角色,对ContextImpl进行功能增强;
总结
装饰模式在Android中运用的十分广泛,但容易和代理模式混淆,代理模式中代理类也是持有被代理类的对象,但两者又有很大的区别:装饰模式是对所要装饰的对象的功能增强,而代理模式只是对代理的对象进行调用,不会对对象本身的功能有所增强;
结语
如果以上文章对您有一点点帮助,希望您不要吝啬的点个赞加个关注,您每一次小小的举动都是我坚持写作的不懈动力!ღ( ´・ᴗ・` )
本文来自互联网用户投稿,文章观点仅代表作者本人,不代表本站立场,不承担相关法律责任。如若转载,请注明出处。 如若内容造成侵权/违法违规/事实不符,请点击【内容举报】进行投诉反馈!