【OpenCV】 全景拼接——两张图像拼接
上回文章写道opencv_contrib安装,为什么安装呢?为了使用SIFT函数。为什么使用SIFT函数?为了进行特征点检测。为什么进行特征点检测?为了图像拼接。所以呢,这段时间我在学习全景拼接。
全景拼接可以分为两张图像拼接和多张图像拼接(大于两张)。因为每幅图像是相机在不同角度下拍摄得到的,它们并不在同一个投影平面上,如果对重叠部分直接进行拼接,则会破坏实际场景的视觉一致性。所以对于多张图像我们需要在拼接之前,对图像进行投影变换,即对图像进行扭曲变形。
两张图像拼接:可以采用单应性矩阵(cv:: findHomography)。例如以左图为基础将右图进行单应性变换,与左图拼接,这样一来右图就会因为单应性变换分辨率降低变得模糊(详见:运行结果(由于图像上传大小限制,效果不明显))。多张图并不是不可以使用单应性,而是图像越多,拼接扭曲越厉害,惨不忍睹啊。
多张图像拼接:【OpenCV】 全景拼接——多张图像拼接(stitching_detailed)
【开发环境】:
软件版本:OpenCV-4.1.1、opencv_contrib-4.1.1、Visual Studio 2015
操作系统:Win10
【源代码】:
#include
#include
#include
#include
using namespace cv;
using namespace std;int main()
{Mat img1, img2, img_gray1, img_gray2;Mat  L_Rmatcher;Mat left_view, result;img1 = imread("C:\\Users\\Administrator\\Desktop\\p2.jpg", 1);  //右图img2 = imread("C:\\Users\\Administrator\\Desktop\\p1.jpg", 1);  //左图vector pic{ img1,img2 };//灰度图cvtColor(img1, img_gray1, COLOR_BGR2GRAY);cvtColor(img2, img_gray2, COLOR_BGR2GRAY);//SIFT特征检测器,计算关键点Ptr sift = xfeatures2d::SIFT::create();//检测关键点vector keypoints1, keypoints2;sift->detect(img_gray1, keypoints1);sift->detect(img_gray2, keypoints2);//计算描述子Mat descriptors1, descriptors2;sift->compute(img_gray1, keypoints1, descriptors1);sift->compute(img_gray2, keypoints2, descriptors2);//快速近似最邻近 匹配方法寻找匹配点FlannBasedMatcher matcher;vector > matchePoints;vector GoodMatchePoints;vector train_desc(1, descriptors1);matcher.add(train_desc); //添加训练描述符matcher.knnMatch(descriptors2, matchePoints, 2);cout << "total match points: " << matchePoints.size() << endl;// Lowe's algorithm,获取优秀匹配点for (int i = 0; i < matchePoints.size(); i++){if (matchePoints[i][0].distance < 0.4 * matchePoints[i][1].distance)   //atio=0. 4:对于准确度要求高的匹配; ratio = 0. 6:对于匹配点数目要求比较多的匹配;   ratio = 0. 5:一般情况下。{GoodMatchePoints.push_back(matchePoints[i][0]);}}//显示关键点drawKeypoints(img1, keypoints1, descriptors1, cv::Scalar::all(-1));drawKeypoints(img2, keypoints2, descriptors2, cv::Scalar::all(-1));//关键点匹配drawMatches(img2, keypoints2, img1, keypoints1, GoodMatchePoints, L_Rmatcher, cv::Scalar::all(-1), cv::Scalar(0, 0, 255));vectorkp1, kp2;for (int i = 0; i < GoodMatchePoints.size(); i++){kp2.push_back(keypoints2[GoodMatchePoints[i].queryIdx].pt);kp1.push_back(keypoints1[GoodMatchePoints[i].trainIdx].pt);}Mat homography = findHomography(kp1, kp2, cv::noArray(), RANSAC);cout << "变换矩阵为:\n" << homography << endl << endl;//歪曲右图到左图// 右边的图像经过矩阵H转换到stitchedImage中对应的位置warpPerspective(img1, result, homography, Size(img2.cols + img1.cols, img2.rows));//warpPerspective(输入图像,输出图像,3*3矩阵,最终图像尺寸,)imshow("左图视角的有图", result);//赋值右图到整幅图像的前半部分//把左边的图像放进来Mat half(result, Rect(0, 0, img2.cols, img2.rows));//复制图2到图1的ROI区域img2.copyTo(half);imshow("左图-img2", descriptors2);imshow("右图-img1", descriptors1);imshow("匹配线", L_Rmatcher);imshow("Result", result);cv::imwrite("Result.jpg", result);waitKey(0);return 0;
}
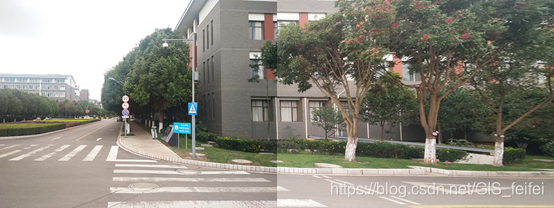
【运行结果】


You believe in fate?
你相信命运吗?
本文来自互联网用户投稿,文章观点仅代表作者本人,不代表本站立场,不承担相关法律责任。如若转载,请注明出处。 如若内容造成侵权/违法违规/事实不符,请点击【内容举报】进行投诉反馈!