Weston中Panel渲染
Weston中panel设置
Panel设置流程
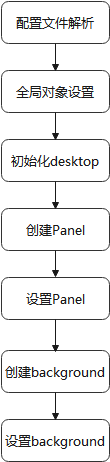
流程分析:
parse_panel_position从配置文件中解析出panel-position,注意这里的want_panel,如果为0,则代表桌面不需要任务栏,那么weston启动之后就只有背景layer,没有panel layer
static void parse_panel_position(struct desktop *desktop, struct weston_config_section *s){char *position;desktop->want_panel = 1;weston_config_section_get_string(s, "panel-position", &position, "top");if (strcmp(position, "top") == 0) {desktop->panel_position = WESTON_DESKTOP_SHELL_PANEL_POSITION_TOP;} else if (strcmp(position, "bottom") == 0) {desktop->panel_position = WESTON_DESKTOP_SHELL_PANEL_POSITION_BOTTOM;} else if (strcmp(position, "left") == 0) {desktop->panel_position = WESTON_DESKTOP_SHELL_PANEL_POSITION_LEFT;} else if (strcmp(position, "right") == 0) {desktop->panel_position = WESTON_DESKTOP_SHELL_PANEL_POSITION_RIGHT;} else {/* 'none' is valid here */if (strcmp(position, "none") != 0)fprintf(stderr, "Wrong panel position: %s\n", position);desktop->want_panel = 0;}free(position);
}
display_set_global_handler(desktop.display, global_handler)设置全局对象的handler。其中将绑定client端shell的interface,这个interface定义于server端,用于client端与server操作。第二步设置的listener用于监听server端的操作,server完成即可回调client端
//client
static void global_handler(struct display *display, uint32_t id,const char *interface, uint32_t version, void *data)
{struct desktop *desktop = data;if (!strcmp(interface, "weston_desktop_shell")) {desktop->shell = display_bind(desktop->display,id,&weston_desktop_shell_interface,1);weston_desktop_shell_add_listener(desktop->shell,&listener,desktop);} else if (!strcmp(interface, "wl_output")) {create_output(desktop, id);}
}
//server
static const struct weston_desktop_shell_interface desktop_shell_implementation = {desktop_shell_set_background,desktop_shell_set_panel,desktop_shell_set_lock_surface,desktop_shell_unlock,desktop_shell_set_grab_surface,desktop_shell_desktop_ready,desktop_shell_set_panel_position
};
//client
static const struct weston_desktop_shell_listener listener = {desktop_shell_configure,desktop_shell_prepare_lock_surface,desktop_shell_grab_cursor
};
handler配置完,然后在main函数里初始化desktop的界面
创建panel并传给output,设置panel
创建background并传给output,设置background
output_init(output, &desktop);
static voidoutput_init(struct output *output, struct desktop *desktop)
{struct wl_surface *surface;if (desktop->want_panel) {output->panel = panel_create(desktop, output);surface = window_get_wl_surface(output->panel->window);weston_desktop_shell_set_panel(desktop->shell,output->output, surface);}output->background = background_create(desktop, output);surface = window_get_wl_surface(output->background->window);weston_desktop_shell_set_background(desktop->shell,output->output, surface);
}
Panel(background)创建流程
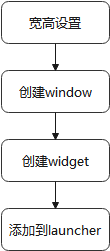
流程解释:
panel_configure:这个函数就是用来设置不同位置panel的width/height参数,如果是TOP/BOTTOM,则默认的panel 的高度为32个像素值
调用compositor创建一个panel->window->surface
surface = surface_create(window)-->wl_compositor_create_surface(display->compositor)window_add_widget(panel->window, panel):创建完panel->window->surface,会创建一个widget并添加进刚才的window。
panel_redraw_handler是widget重绘的处理函数,使用的是cairo。panel_resize_handler是widget在resize时的处理函数。可以理解为panel是底部,在上面添加了一个surface,在surface里添加了widget组件,这个widget组件可以是应用程序launcher的入口
panel_add_launchers(panel, desktop):读取config中配置的launcher入口,包括图标和bin文件位置
panel_add_launcher-->panel_launcher_enter_handler-->panel_launcher_leave_handler-->panel_launcher_button_handler-->panel_launcher_touch_down_handler-->panel_launcher_touch_up_handler-->panel_launcher_redraw_handler-->panel_launcher_motion_handler按下launcher图标并释放会触发panel_launcher_activate函数,fork一个pid然后启动launcher。
panel_launcher_redraw_handler使用cairo重绘launcher
Weston中panel的渲染过程
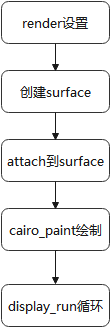
panel渲染流程
使用EGL 绘图的基本步骤
Display(EGLDisplay) 是对实际显示设备的抽象。
Surface(EGLSurface)是对用来存储图像的内存区域
FrameBuffer 的抽象,包括 Color Buffer, Stencil Buffer ,Depth Buffer。Context (EGLContext) 存储 OpenGL ES绘图的一些状态信息。
使用EGL的绘图的一般步骤:
获取EGL Display 对象:eglGetDisplay()
初始化与EGLDisplay 之间的连接:eglInitialize()
获取EGLConfig 对象:eglChooseConfig()
创建EGLContext 实例:eglCreateContext()
创建EGLSurface 实例:eglCreateWindowSurface()
连接EGLContext 和 EGLSurface:eglMakeCurrent()
使用OpenGL ES API 绘制图形:gl_*()
切换front buffer 和 back buffer 送显:eglSwapBuffer()
断开并释放与EGLSurface 关联的 EGLContext 对象:eglRelease()
删除EGLSurface 对象
删除EGLContext 对象
终止与EGLDisplay 之间的连接
流程分析:
compositor的render设置(gl-render):在drm后端初始化时,会根据config选择使用pixman渲染还是opengl渲染,一般来说默认是使用opengl。gl渲染器的初始化流程如下,会设置egl的环境,读取shader,然后绑定一系列gl的操作函数等等
drm_backend_create->init_egl->drm_backend_create_gl_renderer(设置GBM参数)->gl_renderer->display_create//gl-render.c ->gl_renderer_display_create(egl环境创建,shader初始化)->设置read_pixels,repaint_output,flush_damage,attach,surface_set_color,surface_get_content_size,surface_copy_content,import_dmabuf等函数wl_display_add_shm_format(ec->wl_display, WL_SHM_FORMAT_RGB565);wl_display_add_shm_format(ec->wl_display, WL_SHM_FORMAT_YUV420);wl_display_add_shm_format(ec->wl_display, WL_SHM_FORMAT_NV12);wl_display_add_shm_format(ec->wl_display, WL_SHM_FORMAT_YUYV);wl_display_add_shm_format(ec->wl_display, WL_SHM_FORMAT_XYUV8888); surface创建流程:
panel_create->window_create_custom->window_create_internal->surface_create(window)->wl_compositor_create_surface->compositor_create_surface(libweston/compositor.c)->wl_resource_set_implementation(设置attach/damage/frame/commit接口实现函数)->wl_signal_emit(&ec->create_surface_signal, surface);//给compositor发送创建surface的信号 ->weston_surface_create->weston_surface_state_initsurface的创建最终调用到了compositor,weston_surface_create负责创建surface。主要实现逻辑如下:
weston_surface_state_init(&surface->pending)//设置当前surface为pending状态
pixman_region32_init(&surface->damage)
pixman_region32_init(&surface->opaque)region_init_infinite(&surface->input)
//主要是client请求在server端创建一个surface buffer
attach到surface:刚才surface已经创建好了,然后我们需要绘制这个surface,往里面填显示数据。panel_create中在创建surface之后绑定了panel_redraw_handler。cairo_paint是渲染并合成输出的关键函数。
static void panel_redraw_handler(struct widget *widget, void *data)
{cairo_surface_t *surface;cairo_t *cr;struct panel *panel = data;//创建一个cairo画布 cr = widget_cairo_create(panel->widget);cairo_set_operator(cr, CAIRO_OPERATOR_SOURCE);set_hex_color(cr, panel->color);//拿到cairo surface后进行绘渲染合成输出 cairo_paint(cr);cairo_destroy(cr);//获取surface然后销毁 surface = window_get_surface(panel->window);cairo_surface_destroy(surface);panel->painted = 1;check_desktop_ready(panel->window);
}
widget_cairo_create调用逻辑:
widget_cairo_create->widget_get_cairo_surface->window_create_main_surface->surface_create_surface(两种surface创建方式,EGL/SHM)->egl_window_surface_create->//这里panel创建不会用到 ->surface->toysurface=shm_surface_create//共享内存的方式进行创建,主要是设置了shm一些功能函数prepare,swap,acquire,release ->surface->toysurface->prepare->display_create_shm_surface//创建共享内存 ->shm_pool_create//os_create_anonymous_file && mmap&&wl_shm_create_pool ->display_create_shm_surface_from_pool//最重要的填充数据 ->shm_pool_allocate//从池中分配空间 ->cairo_image_surface_create_for_data->wl_shm_pool_create_buffer->surface_create_surfacecairo_paint绘制:
cairo_paint会调用backend中的paint()接口
cairo_paint(cr)->cr->backend->paint (cr)->_cairo_default_context_paint->_cairo_gstate_paint->_cairo_surface_paint->_cairo_gl_surface_paint(opengl作为后端)->_cairo_compositor_paint
->_cairo_spans_compositor_paint() // Spans合成器情况下对应的paint接口
->clip_and_composite_boxes() // 将要绘制的窗口转换成一个box的集合,然后绘制所有的->composite_boxes() //绘制boxes
->emit_aligned_boxes()
->_cairo_gl_composite_emit_rect()
->_cairo_gl_composite_flush() //触发flush操作,将缓冲区中的数据绘制到窗口上。这里很关键,后面再详述
->_cairo_gl_composite_draw_triangles_with_clip_region() 或 _cairo_gl_composite_draw_tristrip() //绘制一个个矩形区域或者tristrip区域->_cairo_gl_composite_draw_triangles // 绘制矩形
->glDrawArrays() // 调用OpenGL接口,执行实际的绘制操作。
display_run:在display_create的时候,设置了display_run时的事件处理函数handle_display_data,创建鼠标和窗口主题。添加registry_listener监听,插入redraw任务并运行。
panel_configure->window_schedule_resize->window_schedule_redraw->window_schedule_redraw_task->window->redraw_task.run = idle_redraw->display_defer(window->display, &window->redraw_task)//将idle_redraw写入task.run
display_run->task->run//循环一次运行一次task
idle_redraw会不断重绘界面。其中最重要的是帧回调,这一步会继续插入一个新的redraw任务,使得redraw一直持续下去。redraw的本质就是不断调client端定义的redraw_handler。每redraw一次,就需要attach->dmage->commit一次,将数据提交给合成器。
idle_redraw->surface_redraw->surface->frame_cb = wl_surface_frame(surface->surface)//帧回调继续插入redraw任务 ->widget_redraw->panel_redraw_handler//回调进client ->cairo_paint(cr)//画图 //画完flush ->window_flush->surface_flush->shm_surface_swap->wl_surface_attach//设置buffer->wl_surface_damage->wl_surface_commit本文来自互联网用户投稿,文章观点仅代表作者本人,不代表本站立场,不承担相关法律责任。如若转载,请注明出处。 如若内容造成侵权/违法违规/事实不符,请点击【内容举报】进行投诉反馈!