[数据结构] 链表(图文超详解讲解)
文章目录
- 一、链表是什么?
- 二、链表
- 1.链表的结构
- 2.链表方法的代码实现
- 总结
一、链表是什么?
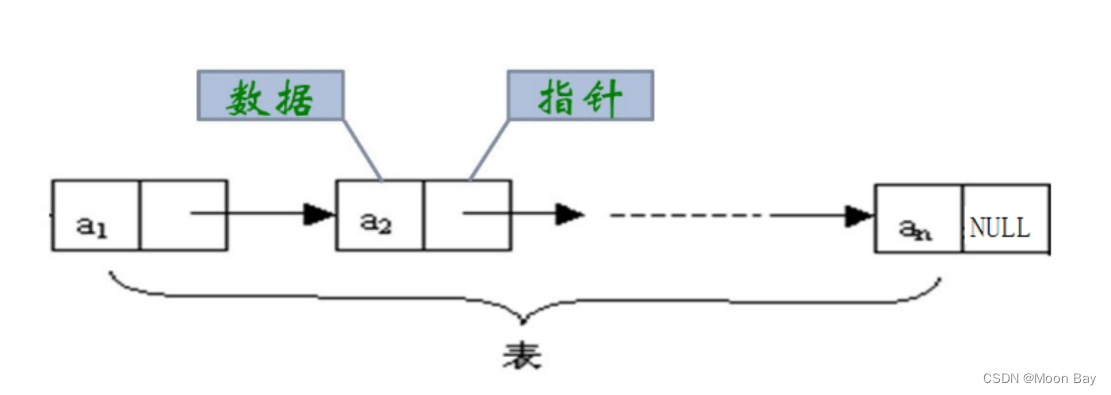
链表是一种物理存储结构上非连续存储结构,数据元素的逻辑顺序是通过链表中的引用链接次序实现的 。
二、链表
1.链表的结构
链表的结构如图:
链表有8种结构:
1.单向带头循环 2.单向带头非循环. 3.单向不带头循环. 4.单向不带头非循环.
5.双向带头循环. 6.双向带头非循环. 7.双向不带头循环. 8.双向不带头非循环.
接下来介绍链表种主要的一些结构
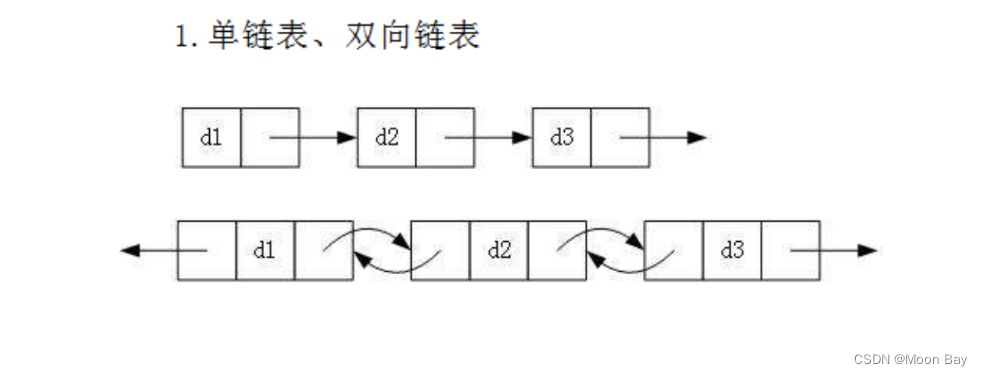
1.单链表和双链表的结构如下:
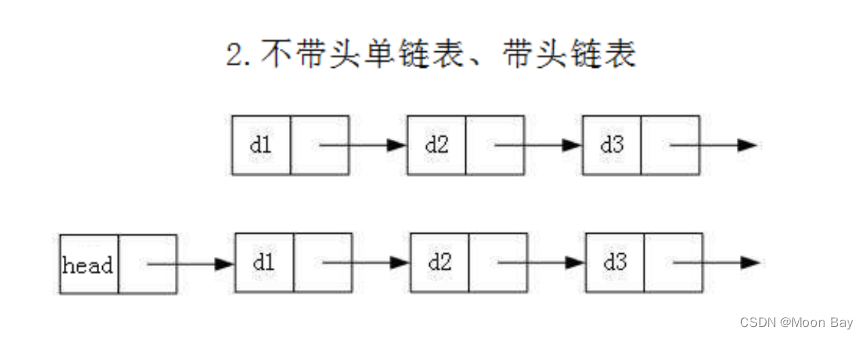
2.不带头单链表丶带头单链表结构:
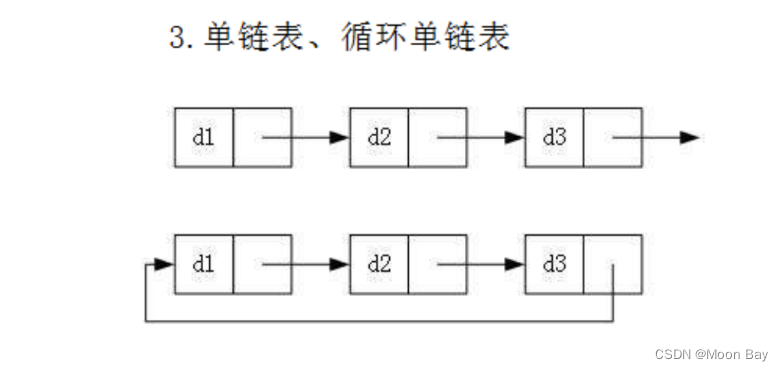
3.单链表丶循环单链表结构:
4. 无头双向链表:在Java的集合框架库中LinkedList底层实现就是无头双向循环链表。

2.链表的方法代码实现
1.单链表实现方法:
1.我们先创建链表的val值和next
import java.util.Scanner;/*** Created with InteliJ IDEA.* /Description:* User:PANJIAPENG* Date:2022-08-11* Time:9:20*/
//节点
class ListNode{public int val;public ListNode next;public ListNode (int val){this.val = val;}
}
2.我们可以用最简单方法创建出一链表但是比较low,不建议使用,我们可以使用下面的头插法和尾插法来实现出链表
public class MylLnkedList {public ListNode head;//创建链表 lowpublic void Mff(){ListNode listNode1 = new ListNode(11);ListNode listNode2 = new ListNode(12);ListNode listNode3 = new ListNode(13);ListNode listNode4 = new ListNode(14);ListNode listNode5 = new ListNode(15);listNode1.next = listNode2;listNode2.next = listNode3;listNode3.next = listNode4;listNode4.next = listNode5;this.head = listNode1;}3.打印链表:
//打印链表public void display() {ListNode cur = this.head;while (cur != null) {System.out.print(cur.val+" ");cur = cur.next;}System.out.println();}4.求链表的长度:
//求单链表长度public int size(){int count = 0;ListNode cur = this.head;while(cur != null){count++;cur = cur.next;}return count;}5.头插法:
//头插法public void addFirst(int data){ListNode node = new ListNode(data);if(this.head == null){this.head = node;}else{node.next = this.head;this.head = node;}}
6.尾插法:
//尾插法public void addLast(int data){ListNode node = new ListNode(data);ListNode cur = this.head;if(this.head==null){this.head = node;}else{while (cur.next != null){cur = cur.next;}cur.next = node;}}7.找到链表中是否有val值:
//找链表中是否有这个数public boolean contains(int key){ListNode cur = this.head;while(cur != null){if(key == cur.val){return true;}cur = cur.next;}return false;}8.删除第一次出在链表出现的key的关节点:
//找删除的前驱public ListNode searchPery(int key){ListNode cur = this.head;while(cur.next != null) {if (cur.next.val == key) {return cur;}cur = cur.next;}return null;}//删除第一次出现的关键字为key的节点public void remove(int key){if (this.head == null){System.out.println("单链表为空,不能删除");return;}if(key == this.head.val){this.head = this.head.next;return;}ListNode cur = searchPery(key);if(cur == null){System.out.println("没有你要删除的节点");return ;}ListNode del = cur.next;cur.next = del.next;}9.删除所有出在链表出现的key的关节点:
//删除出现所以是key的节点public ListNode removeAllkey(int key){if(this.head == null){return null;}ListNode cur = this.head.next;ListNode pver = this.head;while (cur != null){if(cur.val == key){pver.next = cur.next;cur = cur.next;}else {pver = cur;cur = cur.next;}return this.head;}if(this.head.val == key){this.head = this.head.next;}return this.head;}10.清空链表:
//清空链表public void clear(){//粗暴做法 this.head = null;ListNode curNext = this.head.next;while(this.head != null){this.head.next = null;this.head = curNext;}}public boolean chkPalindrome(){if(this.head == null){return true;}ListNode last = this.head;ListNode slow = this.head;while (last != null && last.next != null){last = last.next.next;slow = slow.next;}ListNode cur = slow.next;ListNode curNext = cur.next;2.双向链表的方法实现代码:在已经了解单链表的结构后我们就会发现单链表和双链表的实现是大同小异的
class ListNode {public int val;public ListNode next;public ListNode prev;public ListNode(int val) {this.val = val;}
}
public class MyLinjedlist {public ListNode head;public ListNode last;//打印链表public void display() {ListNode cur = this.head;while (cur != null) {System.out.print(cur.val+" ");cur = cur.next;}System.out.println();}//得到链表的长度public int size() {int count = 0;ListNode cur = this.head;while (cur != null) {count++;cur = cur.next;}return count;}//查找是否包含关键字key是否在链表中public boolean contains(int key) {if (this.head == null) {return false;}ListNode cur = this.head;while (cur != null) {if (cur.val != key) {cur = cur.next;} else {return true;}}return false;}//头插法public void addFirst(int data){ListNode node = new ListNode(data);if(this.head == null){this.head = node;this.last = node;}else {node.next = this.head;this.head.prev = node;this.head = node;}}//尾插法public void addLast(int data){ListNode node = new ListNode(data);if(this.head == null){this.head = node;this.last = node;}else {this.last.next = node;node.prev = this.last;this.last = node;}}
//删除第一次出现关键字为key的节点public void remove(int key){ListNode cur = this.head;if(this.head == null){System.out.println("此链表为空,没有要删除的key值");return;}while(cur != null){if(cur.val == key){if(cur == head){this.head = this.head.next;if(head != null) {head.prev = null;}else {last = null;}}else {cur.prev.next = cur.next;if (cur.next != null) {//中间位置cur.next.prev = cur.prev;} else {last = last.prev;}}return;}cur = cur.next;}}//删除所以key的节点public void removeAll(int key){ListNode cur = this.head;if(this.head == null){System.out.println("此链表为空,没有要删除的key值");return;}while(cur != null){if(cur.val == key){if(cur == head){this.head = this.head.next;if(head != null) {head.prev = null;}else {last = null;}}else {cur.prev.next = cur.next;if (cur.next != null) {//中间位置cur.next.prev = cur.prev;} else {last = last.prev;}}}cur = cur.next;}}//任意位置插入,第一个数据节点默认为0下标public void addIndex(int index,int data){ListNode node = new ListNode(data);if(index == 0){addFirst(data);return;}if (index == size()-1){addLast(data);return;}ListNode cur = this.head;while (index != 0){index--;cur = cur.next;}node.next = cur;node.prev= cur.prev;cur.prev.next = node;cur.prev = node;}//清理链表public  void clear(){while (head != null){ListNode curNext = this.head.next;head.next = null;head.prev = null;head = curNext;}last = null;}
}
总结
根据读完本文后大家会对链表有更深的理解,并且能够掌握对方法的深层理解,相信大家在过后时间能够保持求学的态度,我们一起加油!offer拿到手软!对博主感兴趣可以关注博主,我会继续更新博客,努力完善我的文章内容不会辜负大家的期待!
本文来自互联网用户投稿,文章观点仅代表作者本人,不代表本站立场,不承担相关法律责任。如若转载,请注明出处。 如若内容造成侵权/违法违规/事实不符,请点击【内容举报】进行投诉反馈!