在vue中上传图片
大纲:
🌵 1、avue中如何上传图片
Avue官网 : Avue
在Avue官网中找到 Upload附件上传。本案例为了满足项目需求,我只用了上传后的方法
:upload-after="uploadAfter"
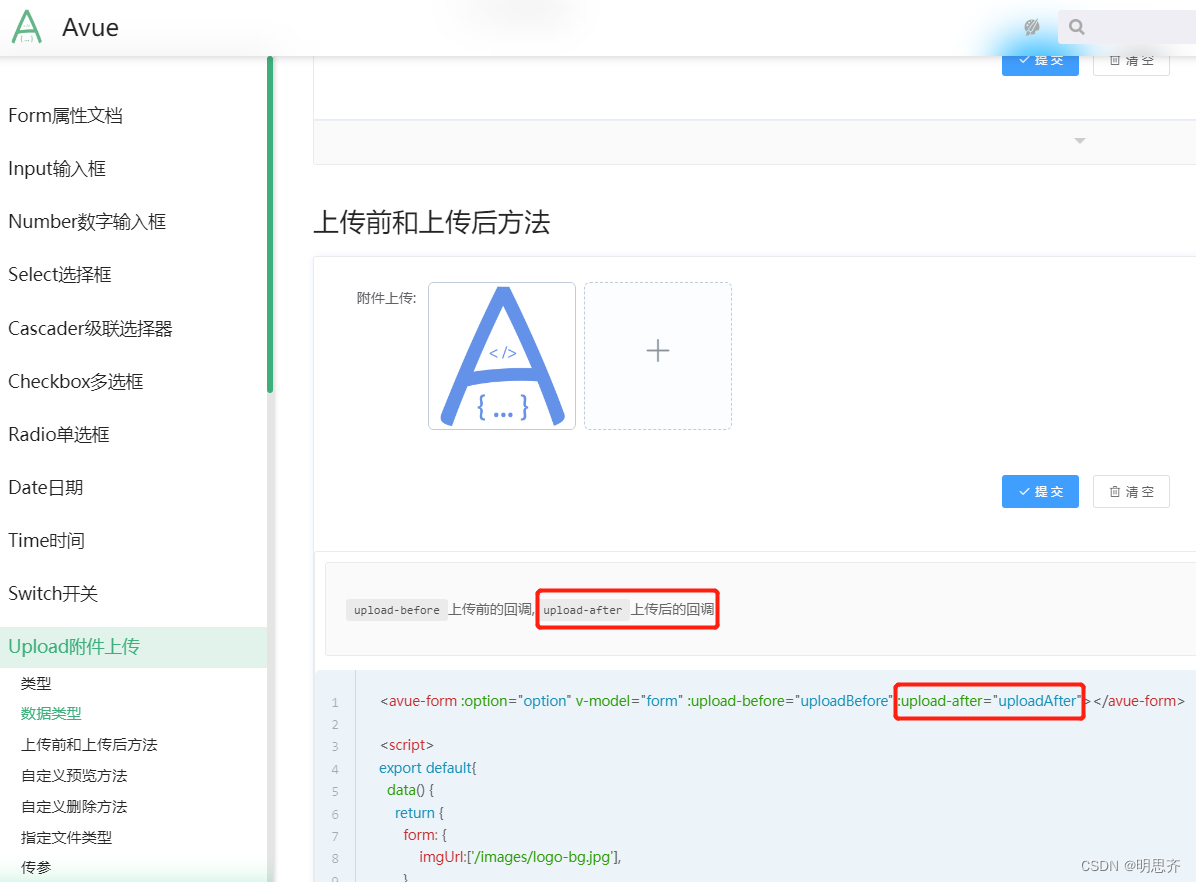
🍆 Avue上传图片案例代码
export default {data() {return {/* data:[]后端获取到的数据列表。option表格配置项.form 表单*/data: [],form: {},option: {column: [{label: '图片路径', //表头prop: 'imagePath', //键值listType: 'picture-card',type: 'upload',span: 24,action: '/api/admin/upload/images/2',},{label: '菜种', //表头prop: 'name', //键值},]},}},mounted() {},methods: {//上传图片uploadAfter(e){//this.form.imagePath = '服务器地址:端口8084/image-api/' + ''this.form.imagePath = 'http://127.0.0.1:8084/image-api/' + e.data}}}🌵 2、 elementUI上传图片

🍆 ElementUI上传图片案例代码
![]()
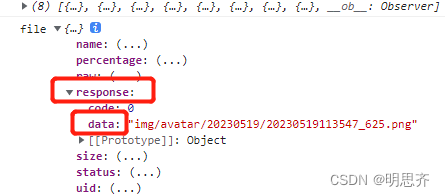
export default {data() {return {data: [],form: {},img: '',picture:'http://192.168.5.40:8082/image-api/',};},mounted() {},methods: {//图片上传handleAvatarSuccess(res, file) {console.log('file',file)//获取到file下面的响应数据this.form.img= file.response.dataconsole.log('图片路径:',this.form.menuIcon)},//判断用户上传的图片格式和大小beforeAvatarUpload(file) {const isJPG = file.type === 'image/jpeg';const isLt2M = file.size / 1024 / 1024 < 2;if (!isJPG) {this.$message.error('上传头像图片只能是 JPG 格式!');}if (!isLt2M) {this.$message.error('上传头像图片大小不能超过 2MB!');}return isLt2M;return isJPG && isLt2M;}}};picture:'http://192.168.5.40:8082/image-api/', //显示图片路径
🌸 因为ip有可能会变,所以我就把它定义成变量了,如果ip变了,修改的时候也只需要改一个地方就行了。
🌸 所以存数据把 img/avatar/20230511/20230511140802_460.png存到数据库就可以了
注意:
1、当不需要存入全路径时,则 this.form.img = file.response.data
详解:file是指上传文件相关的信息对象,response 则是指上传文件后返回的响应数据对象。其中,response.data 代表响应数据中的 data 字段的值,即文件上传后的 URL 地址或其他相关数据。
2、若图片显示不出来就:查看后端Nginx是否启动、IP地址是否正确

效果展示


本文来自互联网用户投稿,文章观点仅代表作者本人,不代表本站立场,不承担相关法律责任。如若转载,请注明出处。 如若内容造成侵权/违法违规/事实不符,请点击【内容举报】进行投诉反馈!