透明皮肤控件设计系列(三):皮肤窗口进阶篇
前文的窗口如果最大化,你会发现它把任务栏也覆盖了,原因是我们窗口的 BorderStyle 设置成了 bsNone,所以要处理一下WM_GETMINMAXINFO消息:
procedure TForm1.WMGETMINMAXINFO(var Message: TMessage);
varRect: TRect;
beginSystemParametersInfo(SPI_GETWORKAREA, 0, @Rect, 0);with PMINMAXINFO(Message.LParam)^ dobegin// ptReserved: TPoint;//保留不用ptMaxSize.X := Rect.Right; // 最大范围ptMaxSize.Y := Rect.Bottom;ptMaxPosition.X := 0; // 最大的放置点ptMaxPosition.Y := 0;ptMinTrackSize.X := 200; // 最小拖动范围ptMinTrackSize.Y := xTitleHeight;// ptMaxTrackSize: TPoint;//最大拖动范围end;
end;
……
if PtInRect(Rect(0, 0, xHitTestWidth, xHitTestWidth), P) and (WindowState <> wsMaximized) then Message.Result := HTTOPLEFT //左上角
else if PtInRect(Rect(xHitTestWidth, 0, Width – xHitTestWidth, xHitTestWidth), P) and (WindowState <> wsMaximized) then Message.Result := HTTOP //上边
else if PtInRect(Rect(Width – xHitTestWidth, 0, xHitTestWidth, xHitTestWidth), P) and (WindowState <> wsMaximized) then Message.Result := HTTOPRIGHT //右上角
else if PtInRect(Rect(Width – xHitTestWidth, xHitTestWidth, Width, Height – xHitTestWidth), P) and (WindowState <> wsMaximized) then Message.Result := HTRIGHT //右边
else if PtInRect(Rect(Width – xHitTestWidth, Height – xHitTestWidth, Width, Height), P)and (WindowState <> wsMaximized) then Message.Result := HTBOTTOMRIGHT //右下角
else if PtInRect(Rect(xHitTestWidth, Height – xHitTestWidth, Width – xHitTestWidth, Height), P)and (WindowState <> wsMaximized) then Message.Result := HTBOTTOM //下边
else if PtInRect(Rect(0, Height – xHitTestWidth, xHitTestWidth, Height), P)and (WindowState <> wsMaximized) then Message.Result := HTBOTTOMLEFT //左下角
else if PtInRect(Rect(0, xHitTestWidth, xHitTestWidth, Height – xHitTestWidth), P)and (WindowState <> wsMaximized) then Message.Result := HTLEFT //左边
else if PtInRect(Rect(0, 0, Width, xTitleHeight), P) then Message.Result := HTCAPTION //标题栏
else inherited;
……
下面开始将绘制颜色改成图片。
图片的绘制方法有很多,比如说:按照原始尺寸显示;平铺显示;拉伸显示。如果图片小于窗口尺寸,就不能按照原始尺寸显示了,因为空白的地方会很难看;如果用平铺,那么图像会严重比例失真,我们这里使用一种暂称为过度颜色处理法。
此方法的原理是,将图片等分成四个区域,假如要将图片往右下角扩展,那么除了左上角第一个区域保留不变,另外三个区域使用图片的平均颜色过渡处理,图片画到窗口后,非图片区全部用平均颜色填充,这样一来图片就比较整体平滑。
图1:左边是原图,右边只贴左上角:
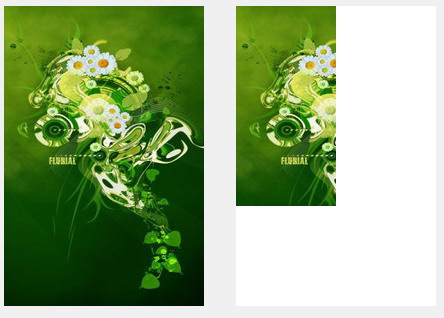
图2:将剩余三个区域用平均颜色过渡处理:
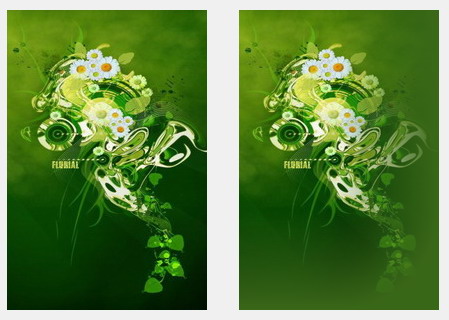
图3:剩余区域全部用平均颜色贴上,最后效果图:

下面的代码是网上一个朋友写的,原来的语言是C,我将其转换成了Delphi的,另外对取平均颜色的函数进行了优化,原来的是基于像素颜色点循环取的,改用ScanLine后,速度快了50倍:
========================================================
unit u_BmpUnit;interface
usesWindows, SysUtils, Classes, Graphics;
procedure MakeBmp(BmpIn: Graphics.TBitmap; var AverageColor: TColorRef);implementationprocedure FillSolidRect(m_hDC: HDC; lpRect: PRect; clr: COLORREF); overload;
beginWindows.SetBkColor(m_hDC, clr);Windows.ExtTextOut(m_hDC, 0, 0, ETO_OPAQUE, lpRect, nil, 0, nil);
end;procedure FillSolidRect(m_hDC: HDC; x, y, cx, cy: Integer;clr: COLORREF); overload;
varr: TRect;
beginWindows.SetBkColor(m_hDC, clr);r := Rect(x, y, x + cx, y + cy);Windows.ExtTextOut(m_hDC, 0, 0, ETO_OPAQUE, @r, nil, 0, nil);
end;constm_nOverRegio: Integer = 100; // 过度的大小procedure DrawBKImageCross(dc, dcTemp: HDC; nWidth, nHeight: Integer;clrCustomBK: TColorRef);
varblend: TBlendFunction;nStartX, nStartY: Integer;i, j: Integer;dRadiusTemp2: Double;
beginFillChar(blend, sizeof(blend), 0);blend.BlendOp := AC_SRC_OVER;blend.SourceConstantAlpha := 255;nStartX := nWidth - m_nOverRegio;nStartY := nHeight - m_nOverRegio;FillSolidRect(dc, nStartX, nStartY, m_nOverRegio, m_nOverRegio, clrCustomBK);for i := 0 to m_nOverRegio - 1 dobeginfor j := 0 to m_nOverRegio - 1 dobegindRadiusTemp2 := sqrt((i * i + j * j));if (dRadiusTemp2 > 99) thenbegindRadiusTemp2 := 99;end;blend.SourceConstantAlpha :=255 - Round(2.55 * ((dRadiusTemp2 / m_nOverRegio) * 100));Windows.AlphaBlend(dc, nStartX + i, nStartY + j, 1, 1, dcTemp,nStartX + i, nStartY + j, 1, 1, blend);end;end;
end;function DrawVerticalTransition(dcDes, dcSrc: HDC; const rc: TRect;nBeginTransparent: Integer = 0; nEndTransparent: Integer = 100): Integer;
varbIsDownTransition: Boolean;nTemp: Integer;blend: TBlendFunction;nStartPosition, nWidth, nHeight, nMinTransition, nMaxTransition: Integer;dTransition: Double;i: Integer;
beginbIsDownTransition := True;if (nEndTransparent <= nBeginTransparent) thenbeginbIsDownTransition := FALSE;nTemp := nBeginTransparent;nBeginTransparent := nEndTransparent;nEndTransparent := nTemp;end;FillChar(blend, sizeof(blend), 0);blend.BlendOp := AC_SRC_OVER;blend.SourceConstantAlpha := 255;nStartPosition := rc.top;nWidth := rc.right - rc.left;nHeight := rc.bottom - rc.top;nMinTransition := 255 - 255 * nBeginTransparent div 100;nMaxTransition := 255 * (100 - nEndTransparent) div 100;dTransition := (nMinTransition - nMaxTransition) / nHeight;if (bIsDownTransition) thenbeginfor i := 0 to nHeight - 1 dobeginblend.SourceConstantAlpha := nMinTransition - Round(dTransition * i);Windows.AlphaBlend(dcDes, rc.left, nStartPosition + i, nWidth, 1, dcSrc,rc.left, nStartPosition + i, nWidth, 1, blend);end;endelsebeginfor i := 0 to nHeight - 1 dobeginblend.SourceConstantAlpha := nMaxTransition + Round(dTransition * i);Windows.AlphaBlend(dcDes, rc.left, nStartPosition + i, nWidth, 1, dcSrc,rc.left, nStartPosition + i, nWidth, 1, blend);end;end;Result := blend.SourceConstantAlpha;
end;procedure BlendBmp(BmpFrom, BmpTo: TBitmap; var Bmp: TBitmap; BlendValue: Byte);
vari, j: Integer;P, PFrom, PTo: PByteArray;
beginBmpFrom.PixelFormat := pf24bit;BmpTo.PixelFormat := pf24bit;Bmp.PixelFormat := pf24bit;for j := 0 to Bmp.Height - 1 dobeginP := Bmp.ScanLine[j];PFrom := BmpFrom.ScanLine[j];PTo := BmpTo.ScanLine[j];for i := 0 to Bmp.Width * 3 - 1 doP[i] := PFrom[i] * (255 - BlendValue) div 255 + PTo[i] *BlendValue div 255;end;
end;procedure MakeBmp(BmpIn: Graphics.TBitmap; var AverageColor: TColorRef);
varBmpOut: Graphics.TBitmap;x, y: Integer;P: PRGBTriple;r, g, b: Integer;n: Integer;nStartPosition: Integer;i: Integer;blend: TBlendFunction;rcTemp: TRect;
beginBmpIn.PixelFormat := pf24bit;BmpOut := TBitmap.Create;// 计算平均颜色r := 0;g := 0;b := 0;with BmpIn dobeginfor y := 0 to Height - 1 dobeginP := BmpIn.ScanLine[y];for x := 0 to Width - 1 dobeginr := r + P^.rgbtRed;g := g + P^.rgbtGreen;b := b + P^.rgbtBlue;Inc(P); // 指向下一个像素end;end;end;n := BmpIn.Width * BmpIn.Height;AverageColor := RGB(r div n, g div n, b div n);BmpOut.Width := BmpIn.Width;BmpOut.Height := BmpIn.Height;// 左上nStartPosition := BmpIn.Width - m_nOverRegio;BitBlt(BmpOut.Canvas.Handle, 0, 0, nStartPosition,BmpIn.Height - m_nOverRegio, BmpIn.Canvas.Handle, 0, 0, SRCCOPY);// 上中FillSolidRect(BmpOut.Canvas.Handle, nStartPosition, 0, m_nOverRegio,BmpIn.Height - m_nOverRegio, AverageColor);// 下中nStartPosition := BmpIn.Height - m_nOverRegio;FillSolidRect(BmpOut.Canvas.Handle, 0, nStartPosition,BmpIn.Width - m_nOverRegio, m_nOverRegio, AverageColor);// 中间DrawBKImageCross(BmpOut.Canvas.Handle, BmpIn.Canvas.Handle, BmpIn.Width,BmpIn.Height, AverageColor);FillChar(blend, sizeof(blend), 0);blend.BlendOp := AC_SRC_OVER;blend.SourceConstantAlpha := 255; // 透明度// 上中nStartPosition := BmpIn.Width - m_nOverRegio;for i := 0 to m_nOverRegio - 1 dobeginblend.SourceConstantAlpha := 255 - Round(2.55 * i);Windows.AlphaBlend(BmpOut.Canvas.Handle, nStartPosition + i, 0, 1,BmpIn.Height - m_nOverRegio, BmpIn.Canvas.Handle, nStartPosition + i, 0,1, BmpIn.Height - m_nOverRegio, blend);end;// 下中rcTemp := Rect(0, BmpIn.Height - m_nOverRegio, BmpIn.Width - m_nOverRegio,BmpIn.Height);DrawVerticalTransition(BmpOut.Canvas.Handle, BmpIn.Canvas.Handle, rcTemp);BmpIn.Assign(BmpOut);BmpOut.Free;
end;end.
========================================================
后来我写控件的时候,再次重写了此单元,代码精简到现在的1/6,效率也提高了更多,但原理是不变的。
现在我们只需要修改DrawTitle和DrawClient函数即可:
procedure TForm1.FormCreate(Sender: TObject);
beginBorderStyle := bsNone;// BorderIcons := [];m_BackBMP := TBitmap.Create;m_BackBMP.LoadFromFile(ExtractFilePath(Application.ExeName) + ‘ Back.bmp ’);u_BmpUnit.MakeBmp(m_BackBMP, m_BackColor);
end;procedure TForm1.DrawTitle;
varDC: HDC;C: TCanvas;
beginDC := GetWindowDC(Handle);C := TControlCanvas.Create;C.Handle := DC;try(*C.Brush.Color := clRed;C.FillRect(Rect(0, 0, Width, xTitleHeight)); //标题区域C.Brush.Color := clBlue;C.FillRect(Rect(0, xTitleHeight, xFramWidth, Height – xFramWidth)); //左边框C.Brush.Color := clGreen;C.FillRect(Rect(Width – xFramWidth, xTitleHeight, Width, Height – xFramWidth)); //右边框C.Brush.Color := clYellow;C.FillRect(Rect(0, Height – xFramWidth, Width, Height)); //下边框*)if Assigned(m_BackBMP) thenbeginC.Brush.Color := m_BackColor;C.FillRect(Rect(0, 0, Width, xTitleHeight)); // 标题区域BitBlt(DC, 0, 0, Width, xTitleHeight, m_BackBMP.Canvas.Handle, 0,0, SRCCOPY);C.FillRect(Rect(0, xTitleHeight, xFramWidth, Height – xFramWidth)); // 左边框BitBlt(DC, 0, xTitleHeight, xFramWidth, Height – xFramWidth,m_BackBMP.Canvas.Handle, 0, xTitleHeight, SRCCOPY);C.FillRect(Rect(Width – xFramWidth, xTitleHeight, Width,Height – xFramWidth)); // 右边框BitBlt(DC, Width – xFramWidth, xTitleHeight, Width, Height – xFramWidth,m_BackBMP.Canvas.Handle, Width – xFramWidth, xTitleHeight, SRCCOPY);C.FillRect(Rect(0, Height – xFramWidth, Width, Height)); // 下边框BitBlt(DC, 0, Height – xFramWidth, Width, Height, m_BackBMP.Canvas.Handle,0, Height – xFramWidth, SRCCOPY);end;finallyC.Handle := 0;C.Free;ReleaseDC(Handle, DC);end;
end;procedure TForm1.DrawClient(DC: HDC);
varC: TCanvas;
beginC := TControlCanvas.Create;C.Handle := DC;try(*C.Brush.Color := clDkGray;C.FillRect(ClientRect);*)if Assigned(m_BackBMP) thenbeginC.Brush.Color := m_BackColor;C.FillRect(ClientRect);BitBlt(C.Handle, 0, 0, ClientWidth, ClientHeight, m_BackBMP.Canvas.Handle,xFramWidth, xTitleHeight, SRCCOPY);end;finallyC.Handle := 0;C.Free;end;
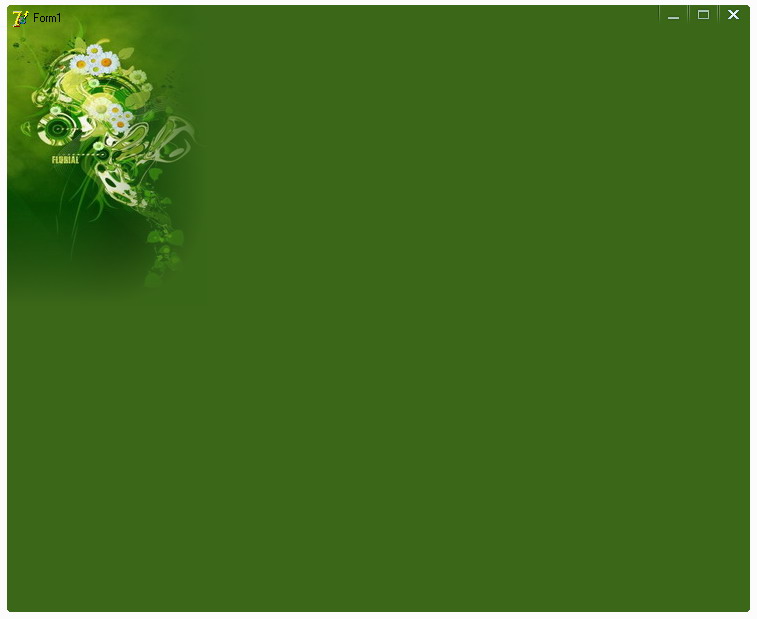
end;程序运行效果图:

最后我们画按钮。
按钮我们使用PNG格式的图片,所以程序必须添加pngimage单元。按钮一共有三个,其中最大化按钮在窗口最大化的时候,显示的是恢复按钮,所以是四类图片,又因为每个按钮都有三种状态:普通、热点(鼠标移动到上面时触发)、按下,所以实际上一共是12张PNG。
为了更新按钮的状态,我们需要处理以下消息:
1、WM_NCMOUSEMOVE:判读鼠标是否位于三个按钮上面,如果是,则重画标题,同时启动一个定时器判断鼠标是否已经离开按钮。
2、WM_NCLBUTTONDOWN、WM_NCLBUTTONUP、WM_LBUTTONUP:判断用户是否点击/松开了三个按钮的其中之一。
画按钮是在DrawTitle函数。前面我们都是直接操作画板DC,但是因为这次我们要画的内容比较多,所以先创建一个临时的BMP对象,把内容画到上面,最后才贴到DC,这样可以避免窗口闪烁,也是所谓的双缓冲区:
procedure TForm1.DrawTitle;
varTitleBmp: TBitmap;DC: HDC;C: TCanvas;
varR: TRect;Style: DWORD;
beginTitleBmp := TBitmap.Create;TitleBmp.Width := Width;TitleBmp.Height := xTitleHeight;TitleBmp.Canvas.Brush.Color := m_BackColor;TitleBmp.Canvas.FillRect(Rect(0, 0, Width, xTitleHeight)); // 先用平均颜色填充整个标题区DC := GetWindowDC(Handle);C := TControlCanvas.Create;C.Handle := DC;try(*C.Brush.Color := clRed;C.FillRect(Rect(0, 0, Width, xTitleHeight)); //标题区域C.Brush.Color := clBlue;C.FillRect(Rect(0, xTitleHeight, xFramWidth, Height – xFramWidth)); //左边框C.Brush.Color := clGreen;C.FillRect(Rect(Width – xFramWidth, xTitleHeight, Width, Height – xFramWidth)); //右边框C.Brush.Color := clYellow;C.FillRect(Rect(0, Height – xFramWidth, Width, Height)); //下边框*)if Assigned(m_BackBMP) thenbeginC.Brush.Color := m_BackColor;BitBlt(TitleBmp.Canvas.Handle, 0, 0, Width, xTitleHeight,m_BackBMP.Canvas.Handle, 0, 0, SRCCOPY);DrawIconEx(TitleBmp.Canvas.Handle, 6, 6, Application.Icon.Handle, 16, 16,0, 0, DI_NORMAL);TitleBmp.Canvas.Font.Assign(Font);TitleBmp.Canvas.Brush.Style := bsClear;ExtTextOut(TitleBmp.Canvas.Handle, 26, 6, TitleBmp.Canvas.TextFlags, nil,PChar(Caption), Length(Caption), nil);R := GetRectMiniButton;if m_MiniButtonDown thenbeginTitleBmp.Canvas.Draw(R.Left, R.Top, btn_min_down)endelse if m_MiniButtonHover thenbeginTitleBmp.Canvas.Draw(R.Left, R.Top – 1, btn_min_highlight);endelseTitleBmp.Canvas.Draw(R.Left, R.Top, btn_min_normal);R := GetRectMaxButton;Style := GetWindowLong(Handle, GWL_STYLE);if Style and WS_MAXIMIZE > 0 thenbeginif m_MaxButtonDown thenbeginTitleBmp.Canvas.Draw(R.Left, R.Top, btn_Restore_down)endelse if m_MaxButtonHover thenbeginTitleBmp.Canvas.Draw(R.Left, R.Top – 1, btn_Restore_highlight);endelseTitleBmp.Canvas.Draw(R.Left, R.Top, btn_Restore_normal);endelsebeginif m_MaxButtonDown thenbeginTitleBmp.Canvas.Draw(R.Left, R.Top, btn_max_down)endelse if m_MaxButtonHover thenbeginTitleBmp.Canvas.Draw(R.Left, R.Top – 1, btn_max_highlight);endelseTitleBmp.Canvas.Draw(R.Left, R.Top, btn_max_normal);end;R := GetRectCloseButton;if m_CloseButtonDown thenbeginTitleBmp.Canvas.Draw(R.Left, R.Top, btn_close_down);endelse if m_CloseButtonHover thenbeginTitleBmp.Canvas.Draw(R.Left, R.Top – 1, btn_close_highlight);endelseTitleBmp.Canvas.Draw(R.Left, R.Top, btn_close_normal);// C.FillRect(Rect(0, 0, Width, xTitleHeight)); //标题区域BitBlt(DC, 0, 0, Width, xTitleHeight, TitleBmp.Canvas.Handle, 0,0, SRCCOPY);C.FillRect(Rect(0, xTitleHeight, xFramWidth, Height – xFramWidth)); // 左边框BitBlt(DC, 0, xTitleHeight, xFramWidth, Height – xFramWidth,m_BackBMP.Canvas.Handle, 0, xTitleHeight, SRCCOPY);C.FillRect(Rect(Width – xFramWidth, xTitleHeight, Width,Height – xFramWidth)); // 右边框BitBlt(DC, Width – xFramWidth, xTitleHeight, Width, Height – xFramWidth,m_BackBMP.Canvas.Handle, Width – xFramWidth, xTitleHeight, SRCCOPY);C.FillRect(Rect(0, Height – xFramWidth, Width, Height)); // 下边框BitBlt(DC, 0, Height – xFramWidth, Width, Height, m_BackBMP.Canvas.Handle,0, Height – xFramWidth, SRCCOPY);end;finallyC.Handle := 0;C.Free;ReleaseDC(Handle, DC);TitleBmp.Free;end;
end;另外 , 默认程序是正方形的 , 我们可以修改为圆角窗口 :procedure TForm1.WMSize(var Message: TWMSize);varRgn: HRGN;begininherited;DrawTitle;Rgn := CreateRoundRectRgn(0, 0, Width, Height, 5, 5);SetWindowRgn(Handle, Rgn, True);DeleteObject(Rgn);
end;
程序运行效果图如下:
点击打开链接
本文来自互联网用户投稿,文章观点仅代表作者本人,不代表本站立场,不承担相关法律责任。如若转载,请注明出处。 如若内容造成侵权/违法违规/事实不符,请点击【内容举报】进行投诉反馈!